Figurine based on papier-mâché
The fake man made from paper is designed for early adolescence (11-12 years). But preschoolers and primary schoolchildren are recommended to work together with adults.
To create the product you will need:
- leatherette or wire at least 0.5 meters long;
- pliers;
- liquid paper glue (preferably PVA);
- toilet paper or paper napkins of any color;
- paints for painting, brush, container with water.
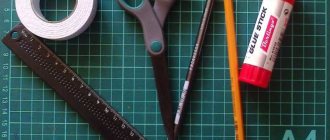
Paper crafts
Little paper crafts are also adorable, colored paper is a great material for applique. All you need is:
- Ruler;
- Pencil;
- Eraser;
- Scissors;
- Glue gun;
- Thick colored cardboard or paper.
You can do whatever you want: train. binoculars, pistol, dragon, crocodile, bear or bunny
Preparing the base of the product
The most difficult part of the work is forming a solid frame. Use pliers to shape the wire into the shape of a human skeleton. To prevent the fake from being fragile, all limbs should consist of two parts of wire. This will happen as a result of its bending in the area of the feet, palms, and head.
Create the little man in the pose in which you plan to see him as a result of your work.
Work details
If desired, you can fashion a hat, elements of a coat, glasses, an umbrella and other accessories. Separately, you can prepare a chair, bench or pet.
It is easier to form additional objects, because only part of the production will need to be molded. Papier-mâché covers the seat of a chair/bench, individual parts of an umbrella and an animal.
Photos of the man's crafts can be seen on the website.
Add color
It is not recommended to use watercolor - the product turns out pale and loses color faster. When using gouache, the color will turn out bright, matte, and lightens as it dries.
However, there is a high probability of unwanted mixing during subsequent application. Acrylic adds shine to the product, as its structure is similar to oil paints. It dries quickly, which reduces the possibility of mixing shades, but darkens as it dries.
We recommend reading:
- Craft bullfinch: detailed description of how to make a bird with your own hands (115 photos)
- Crafts from vegetables: 100 photos of the best crafts for children and a review of recipes for adults
- Craft ship: 120 photos, templates, drawings and step-by-step instructions on how to make a boat
To apply the palette, it is recommended to have a medium to fine brush. This will help convey the details of the character's image.
Sculpting the body
Choose a piece of plasticine of your favorite color and roll it in your hands so that an oval is formed. We make a cut along the oblong part (1/3 of the total size of the workpiece). From the resulting two halves we sculpt the legs. The future limbs need to be moved apart a little and given a roundness.
To make the arms, we fashion 2 cylinders that will decrease at one end. Then we press the workpieces to the body so that they are firmly secured.
New Year's crafts from all sorts of things - all the fun!
Well, friends, are you ready to go into the world of magic? Then quickly turn on your imagination and ingenuity, let's take unnecessary things and make masterpieces out of them. If you still don’t know how to do something like this, then these master classes and a bunch of ideas will help you. Go for it!
For the first craft we will need :
- glue gun
- tinsel
- paper
- wire
- CD disks - 12 pcs.
Stages:
1. Cut a pentagon from a sheet of paper with sides of 6.5 cm. Attach it to the disk, and where the vertices are, place points on the surface of the disk.
3. Now use a drill to drill according to the marks to make holes. Take the wire and fix all the pieces so that the ball eventually comes out.
4. This should be such a cute little thing, it already shines and shimmers.
5. Now all that remains is to do some magic, glue multi-colored tinsel along the contour of each circle.
Use a heat gun, just be careful not to burn your fingers.
6. In the end, the most wonderful charm awaits you, which is even a pity to give), and if you hang it on a chandelier or decorate a street Christmas tree with it, it will be absolutely wonderful.
By secret. You can take it with you to school or kindergarten and take first place at the exhibition. Good luck!
The next craft option for the New Year, or winter in general, so to speak, is a fairy-tale house. Wow, you say, I see how your eyes have already lit up. Do you want to create the same snow composition? Then contact me for templates, I will send them to everyone absolutely free.
These works are made in the style of vytynankas, but many people really like them. In addition, you can then decorate such products with tinsel or beads and sequins to create a festive atmosphere.
You will be given one template for the Christmas tree, but you will need to cut out two blanks from it, and then either coat them in the center with glue or sew them together. This is necessary for the volume effect.
If you don’t want that Christmas tree model, then take this newspaper beauty. In general, you know, I recently had a post on my blog, and there I gave so many amazing ideas on how to make a Christmas tree that wow, you will obviously be delighted. Therefore, if you want, you can follow this link right now. Well, if not, then do it this way:
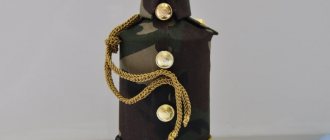
The next cool option and you can even say a souvenir in the form of a deer. Moreover, it is made from an ordinary bottle of champagne or beer. You can take any fruit drink, depending on who you want to give it to later, or put it on the table on a festive night?
Next, the next point, you probably know that not a single winter is complete without snowflakes. So why not take advantage of this and make a whole mountain of them. They can be cut out using either a stencil or the accordion technique. This method allows you to make the product voluminous. Watch the instructions now. But in this post, you will find a lot more cool options.
So, the snowflake has been created, now what? The craft is of course ready. Or you can make 7-8 of these fluffs, of different sizes, and put them on a stick with a stand. Do you see what I'm getting at? Yeah, and make another New Year's masterpiece. Look, how do you like this miracle?
Charming and beautiful, see the next work, which is made of satin ribbons (can be replaced with paper strips). You need to fold each strip into a loop and glue it to a paper cone.
For preschool children, I suggest the work is approximately the same, but instead of needles there will be ordinary green balls.
Advice from the blog author. By the way, you can replace the paper circles with plasticine balls.
Then you can also create a stunning composition from dry twigs. Doesn't she look quite interesting and unusually beautiful? Express your opinion below.
If you want to amaze everyone with your ingenuity, then make toys from eggshells, and you can do this completely safely. Pierce two holes with a diameter of 5 mm and 2 mm in the egg on both sides, and then start pouring polyurethane foam into the largest hole.
That's the whole trick, from a small hole, then you will see foam as it appears, so stop filling the testicle.
Thus, such a “ball” will be strong and stable, and then decorate it with decoupage, as if you don’t know how to do this, you can read here, or wait for my next article on New Year’s toys. In a nutshell, you have to take a regular napkin with a pattern and separate all the layers, then leave only the last one, dip it in PVA and stick it on the egg, let it dry.
And now pay attention, another new product this year is a New Year’s craft made from salt dough. Wow, you fluff. This phrase stuck to me from a cartoon about the Barboskins. Well, glue a cone-shaped figure from cardboard; the inside of the almost finished product is already shown.
Do you know how to make dough? If not, then here is the recipe for you, written in the picture.
Using your hands, apply the dough onto the cone and smooth it out, making sure the layer is 1.5 cm thick.
Then use scissors to scratch the dough and it will look like needles and branches, like the crown of a tree.
Place a star on the top using a toothpick.
Well, after voila, into a preheated oven at 180 degrees.
Then let the product cool, take a brush and gouache and paint.
You can decorate with beads or large beads; glue them to the workpiece.
For creative individuals, I suggest making magnets in this theme. To do this, take a cardboard and cut out a New Year's symbol from it.
Then tie it in a spiral with a thick thread and secure all ends with glue. Glue a magnet to one of the sides.
Now the most interesting thing remains, this is the design, I propose to do it this way in the form of coffee beans.
Or you can build a toy in the shape of a snowflake, use ice cream sticks as a base and glue them at the base.
And then glue colorful buttons.
Perhaps you will be blown away by another beauty from whom you will not take your eyes off))). Take a look.
Use your imagination further, how do you like this story with Santa Claus and a snowman? Cool.
By the way, they often make a little penguin in winter, just like from the Tororo cartoon, using plastic bottles.
Well, since the bull will be the symbol in the coming year, I propose to make it just that. And do you know what? Yes, from ordinary socks. See all the work steps in these pictures.
Or take approximately the same scheme for the work of snowmen.
A ball will be an excellent gift, as well as a craft. Which you can paint with acrylic paints and draw absolutely any design.
Or do decoupage with your own hands. Remember how to do this? If you find it difficult, go here, this is how we decorated eggs for Easter. In short, you need to take a napkin and separate all the layers, leaving only the last one with the picture. Dip it in glue and apply it to the workpiece, let it dry.
Or go the other way; transparent balls can be filled with anything, for example, rubber bands. Looks nice, huh?
Here are a couple more ideas.
A ball with a photo inside looks magical and beautiful.
You can glue any bows you like.
And look what I found - an asterisk. Which will fit perfectly on a forest beauty, or will act as a keychain on a bag.
Crazy little hands even made something out of walnuts.
You can create any pattern or snowflake using PVA glue, then let it dry and remove it from the parchment. You can add more colors and color the sketch.
I also offer a version of paper fluff, and it will be voluminous and with fringe. First, learn how to fold the sheet correctly, since this craft is made based on origami. If you have any questions, write, or read more in detail here.
Now another toy, in the form of a snowman made of pompoms. The idea itself is quite simple, and the souvenir turns out lovely.
And by the way, you can use all the options discussed in the article for Christmas. For example, here is another masterpiece made from threads and glue, watch MK in this video and reel it in for yourself.
If you are interested in artistic activities, you can easily paint ordinary light bulbs and put knitted hats on them.
Additional items
There are many master classes on making figurines, but if you understand how to make a person, fakes are easy. Departing from the subtleties of the instructions, the figure can be diversified with glasses, a scarf, a vest, a dog on a leash or a parrot on the shoulder.
You can make a scarf from a long flat plasticine “canvas”. It is twisted 2-3 times and wrapped around the neck. To make the figure stand firmly, they make boots. To do this, just make 2 ovals and flatten them a little.
Craft "Fire Truck"
These fire safety crafts can be done in kindergarten.
Required parts:
- White sheets of paper
- Red, black and white paint colors
How to do it: invite your child to draw a fire truck on a white sheet of paper using paints. parents can help if necessary.
What are the benefits of this craft:
- Teach your child to draw different shapes and make a basic fire truck.
- This activity will help your child learn and revise shapes. Parents can also introduce him to the concept of a fire truck.
- The child can also practice fine motor skills by trying to color between the lines.
Alternative option
In addition to the invented character, the child will be delighted with the crafts of Spider-Man, the Little Mermaid, Shrek and even a doll. Thus, completing the task will provide not only the student’s self-development and silence for the parent, but also high motivation to complete it.
Spider-Man is made according to the above procedure, but the bottom part should be blue and the top red. It is not necessary to make a nose and mouth; instead, the emphasis is on the large white eyes.
If a student is interested in history, primitive people will arouse a lot of interest. Crafts of a historical nature require accuracy and diligence.
The basis will be plasticine, from which leather is made (white, pink, brown). The body is made according to the above procedure, but the area where the arms are attached must be greased so that it is not visible. To do this, the attachment point is smoothed in the direction from the arm to the body.
The palms do not come off the hand; to form them, it is enough to press the end of the hand until a plane is formed. The legs and feet are done at the same time. You need to make the limb longer, bend it and flatten it at the end to form a foot.
Features of the body proportions of primitive man are shortened legs and long arms, as well as an elongated jaw. In order for changes in the usual shape of the head to be successful, one part of the oval must be made larger than the other, and then extended on one side. This will give you a massive chin.
"Master - class on making crafts"
"Master - class on making crafts"
Author: Natalya Vladimirovna Kashina, primary school teacher at Municipal Budgetary Educational Institution Secondary School No. 7 in Zelenodolsk.
DIY application. Master class on the eve of Maslenitsa.
"Merry pancake."
Work for children 5.7 years old.
Description of work:
The master class will be of interest to primary school teachers, kindergarten teachers and even parents.
is used in the production of this work . Goal:
making a panel “Cheerful Pancake” using applique.
Objectives:
to develop students’ creative abilities, aesthetic taste and accuracy in work;
— teach children to create and imagine. — to cultivate an aesthetic attitude towards making one’s own work, to develop a sense of love for Russian traditions. Purpose:
the “Funny Pancake” applique can be a holiday gift, an element for decorating postcards for the spring holiday, or an idea for other applications. The completed work can be a gift to loved ones on Maslenitsa Day, March 8th.
Progress of the lesson.
1. organizational moment.
2. Introductory conversation
Look out the window. What season? (spring)
How did you determine? (autumn month, the snow is melting, the sun has become brighter and warmer..)
What holidays are there in spring? (March 8, Maslenitsa, Easter, Victory Day)
We will remember the Maslenitsa holiday. What do you know about this holiday?….
Guess the riddle:
And with caviar, and with sour cream - they are all delicious! Nostrils and blush - Our suns -... (pancakes)
Today we will make a fun pancake.
Instructions are provided for the child’s workplace; about safe work with glue and scissors; about saving the material used.
The teacher discusses a crafted panel with the children:
What parts does it consist of? how to make parts; what colored paper can be used. Required material:
Colored paper, scissors, compass, glue stick, ruler or templates for kids.
Step-by-step production
.
- Using a compass on orange paper, draw a circle with a radius of 8 cm (for kids, you can prepare a circle template with a diameter of 16 cm)
- Cut it out.
- We draw the blanks for the pancake legs and cut them out.
4.Glue it on.
5.Using a compass, draw circles with a radius of 2 cm on white paper (or prepare templates with a diameter of 4 cm) and cut out 2 pieces.
6. Cut out circles with a radius of 1 cm from black paper (or trace templates with a diameter of 2 cm)
7.cut the “hairs” and use scissors to twist the ends.
8. We start gluing and painting everything.
9. This is what the guys did.
10. This idea can be used in...
Photo diy man
0