Options
Many novice craftsmen are interested in the question of what this type of decoration can be made from. For these purposes, multi-layer napkins are useful. Choose those products that depict interesting, colorful designs.
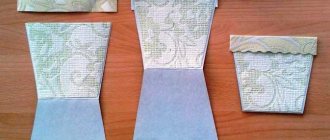
At first glance, the process may seem complicated to you, but it is not. An alternative is decoupage cards. As you can see in the photo of decoupage cans, this is paper prepared in a special way, on which interesting patterns are applied.
Often this kind of card is used to decorate sets and boxes. They are used to complement gift wraps that will surely make you stand out from the rest.
To enhance the effect, gilding or blackening is often used when decoupaging a glass jar. A technique of artificial “aging” that is quite popular today.
Note! The use of the technique of decoupaging jars with your own hands is gaining more and more popularity. Using this method of decorating objects allows you to create unusual, truly original things, unlike other things.
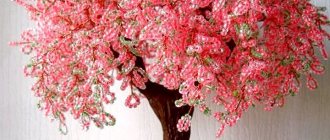
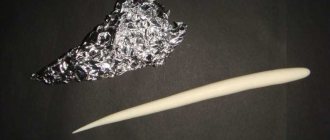
It is not necessary to use exclusively images that can be transferred to another surface. After all, there are other equally acceptable solutions. This is the use of volumetric decoupage technique. For these purposes, special modeling masses are used. The use of eggshells is relevant.
Decoupage of plastic jars
You can always find empty plastic cans and bottles in any home. You can also keep your child and yourself busy with useful creative activities. Let's play with objects together and create a beautiful thing.
We will prepare the following tools and materials:
- clean plastic jar or bottle;
- scissors;
- acrylic primer;
- paints or varnishes;
- three-layer napkin or decoupage card;
- accessories for decoration;
- decoupage glue or PVA glue;
- fixing varnish.
Stages of work:
- We clean the surface from grease and dust using alcohol or an alcohol-containing liquid.
- Cover the entire surface with primer.
- Apply two layers of white paint.
- We place a fragment of a napkin or decoupage card on the surface of the jar and carefully apply PVA glue. Try to do everything slowly so that the surface becomes smooth and free of bubbles. Let the layer dry.
- Apply a second layer of paint to match the napkin.
- You can draw an outline of individual elements that complement the central design.
- We decorate the jar with sparkles, shells, and lace. This is your field of creativity.
- We cover all this splendor with decoupage or any other varnish that you have at home.
We rejoice together with the children in beautiful interior items!
Application
To use the coffee can decoupage technique, you will need ordinary available parts. The duration of the process will pleasantly surprise you, because in a short period of time you can achieve amazing results.
Stylists most often use techniques when decorating rooms made in different styles. For example, it could be Victorian style, Provence, or other styles.
It is difficult to decorate furniture in this way, because in this case experience and a certain level of skill are required.
Important! As a gift to friends, or, for example, for a housewarming, you can bring a bottle decorated using this technique into your home.
Decoupage tin can
Don’t rush to throw away baby food containers. It has wonderful airtight plastic lids. Tin can decoupage, a master class of which we will now look at, will undoubtedly decorate your kitchen.
Materials and tools
To work we will need:
- alcohol or alcohol wipe;
- acrylic primer and paint;
- PVA glue;
- beautiful napkin;
- decoupage varnish;
- brushes, sponge or piece of foam rubber;
- and, most importantly, a good mood!
Master Class
Operating procedure:
- Degrease the surface of the jar with alcohol or an alcohol wipe.
- Apply acrylic primer in a thin layer. Let's dry it.
- Use a sponge to cover the surface of the container with white acrylic paint.
- Let's cut out a fragment of the picture, for example, a bouquet of roses. Separate the 2 bottom layers of the napkin from the colored one.
- Carefully place the drawing and cover the surface of the napkin with PVA glue (from the center to the edges). Try to smooth out all bubbles and wrinkles. Let the layer dry.
- Let's paint the product with a second layer of acrylic paint. You can take pink, gray or beige. It's better to work with a sponge. Around the drawing we make the color deeper and more intense. This will add depth and volume to the bouquet. Let the paint dry.
- Cover the entire jar with 2-3 layers of varnish.
- You can glue thin lace along the top edge.
Voila! Your beauty is ready. You can put hairpins, small items for a sewing machine, combs and even candies there.
conclusions
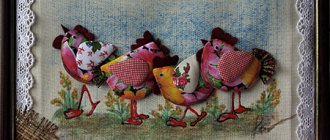
There are a lot of interesting options. They are united by attractive appearance, originality, and unusualness.
This DIY jar will definitely find application and fit into any stylistic direction.
We decorate jars for tea and coffee using the reverse decoupage technique
I want to show off my set to you! Jars for tea and coffee! They took a long time to do, every step was thought out carefully and only then brought to life! I’m happy with the result, which is extremely rare; I’m very self-critical of myself.
I decided to make a master class with an emphasis on reverse decoupage, because about a year ago I made a bottle and even though I watched a bunch of master classes, I still made a lot of mistakes, and I had to correct them along the way, in the end the bottle turned out more less normal, but not at all the way I intended it to be.
I thought for a long time about what pattern to choose for reverse decoupage... And then I thought this: two jars for tea and coffee are already a set, and something should unite the set, and since everyone usually drinks tea and coffee with sweets, it was decided It was necessary to place candy-lambs.
So, for work we will need:
- glass containers (in our case, coffee jars); - dye; - gouache; - PVA glue; - acrylic varnish; - napkins; - brushes.
So let's get started! Reverse decoupage is performed in the same way as direct decoupage, only in reverse order and with small nuances! That's what I want to tell you about. These nuances are especially important when the face of the jar is made using the decoupage technique.
And if the top of the jar is decorated with paper, putty or tights, then in this version, only the first few points are needed!
First, degrease the jar and glue the napkin “face” to the glass. We glue in any way convenient for you.
Here is the motif already glued.
I would like to draw your attention to the fact that through the window you will be able to see not only what is opposite it, but also the side walls of the jar, so it will look better if the motif is on the sides. And if you are gluing a whole napkin, then ideally it should be almost right up to the window.
And one more important point: when doing reverse decoupage, the motif must be cut strictly along the contour, otherwise these indents will be visible!
Don’t forget that you need to focus on where you will have the window and glue it opposite it! Therefore, after gluing, you should look at the face, and if everything suits you, we continue our work! If not, we correct what we didn’t like. It's easy to do at this stage!
When the glued motifs have dried, we coat them with varnish, only the motifs, no need to smear them on the glass.
We do this so that when painting the jar later, the paint does not bleed through the napkin!
This is the first important nuance! Without a varnish coating, the paint can be absorbed into the napkin and appear on the other side, accordingly, ruining the whole job!
This step is also important!
After everything has dried, do not forget to wipe the jar with any means to remove glue stains. In this photo you can clearly see the stains from the PVA glue. If you do not erase the marks, the work will look muddy and stained in places!
In these photos you can see the difference between “before” wiping and “after”.
The next stage is also very important! This was my mistake in my last job!
I need to paint the jar. But! Don't forget that the transition from your motif to the paint will be visible through the window, so white is not always suitable. I made this mistake in my first work with reverse decoupage. This photo shows that the transition is very sharp and looks ugly. This bottle should have been painted to match the color of the lions a little darker or lighter, otherwise they hang in the air, and it really hurts the eyes!
Remembering my mistake, I chose this light beige color for my reasons! With it, the candies don’t look so lost, and the transition isn’t so abrupt if I painted them white!
At this stage, although you can paint it black, our motif is protected by a layer of varnish!
I paint the jars using the “smacking method” with foam rubber, so the paint applies evenly and there are no streaks from the brush. Don't forget to leave a window! Since I have decor on the window, I painted it by eye.
If you need smooth contours, then at this stage you need to seal the window itself with masking tape, which you will remove after all the paint and varnish work.
If you decorate the jar with putty, papier-mâché, or something else, you can safely proceed! I have an idea to decorate the top of the jar with decoupage too, so...
Further actions are the same as for ordinary direct decoupage!
And for this we need to paint the jar with white paint! But. Again, a small thing, but if the color of this base suits you for further work, then you can glue it without first painting it white. In my case, one jar had to be painted greenish, for these reasons I painted it white!
As you can see in this photo, the “relief” of my motif “appears”, in order to hide it, smooth it out, you need to sand it, but not very hard, sand it lightly, mainly along the motif itself and along its edges!
After sanding, our base showed through, so I coated the jar with white paint again! If necessary, you can sand it again.
The first jar is for tea, since the jar itself has an uncomfortable textured surface, with a lot of corners and bevels, it is very problematic to completely glue the napkin, again I glue it with motifs, so I prepared the base for the motifs in advance. I paint the tea jar with light green paint!
Under coffee - beige!
I paint with foam rubber. I painted it in two layers because the foam I used was too porous and it left marks in the form of bubbles!
Next we glue our motifs at your convenience! And we get such beauty!
We coat the jars with varnish, sand and varnish again. And so on until you are satisfied with the result!
After that, we start decorating the windows. I glued coffee beans to a coffee jar around the perimeter of the window!
We decorate the tea room with green tea (you can also use black tea, it’s just that green tea suited my jar better, it’s not so dark).
This is how beautiful the end result is!
I hope my master class will be useful to beginning craftsmen! If you have any questions, I will be happy to answer!