Tips for decoupaging a tray
Why is tray decor so popular? Because you can buy a cheap option and perfectly refine it without spending a lot of resources.
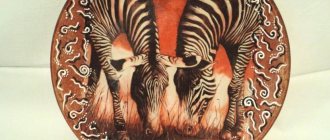
- To update the tray, it is better to choose pictures on “food” themes with images of fruits, buns or kitchen utensils. Sometimes natural and floral motifs will look good.
- Napkins work well because of their light structure. In hobby stores you can find entire stands with a variety of napkins that you can buy individually.
- The tray using the brushing technique looks original. Relevant for decorating only wooden trays. Soft fibers are washed out using a stiff brush. The effect of aged wood is obtained.
- The crack effect is created by the craquelure method. After application, you need to fill the cracks with oil paints or apply two contrasting layers of paint at once, and between them a special varnish that dries and thereby creates cracks in the paint.
Stages of work.
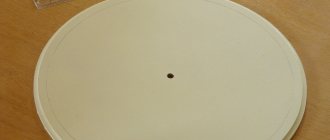
1. Take a tray, think over the composition, choose a picture.
2. We inspect the tray very carefully for chips and defects, which we must cover with putty .
Apply a drop of putty to the defect, then carefully remove all excess putty with the flat side of a palette knife.
This is what happens. Now we won't have to sand off the excess putty.
3. Carefully sand the tray , especially the places where it is poorly sanded and the fibers stand on end.
4. We try on the A4 sheet for the tray, find out what size of the printout we need and how much painting we have to do. Glue the tracing paper to an office sheet and print out the drawing .
5. Our tray has already been primed and sanded again, and under the picture it is primed a second time. Leave 1 layer of soil on the sides and bottom.
6. Soak the tracing paper in water, then take it out, place it face down on the file, blot off excess water, and apply decoupage glue.
7. We put it together with the file on our tray, remove all the bubbles with our hands, remove the file, coat it with glue on top and at the same time go over the printout with our finger again - we remove all the bubbles completely. The finger must be very wet or in glue, otherwise you will erase the toner from the picture!! !
8. It was not possible to do without folds at all - printouts do not always stretch evenly. Therefore, we are not afraid and leave the folds - then we will remove them.
9. Dry the tray, sand the folds until smooth, cover with 3-4 layers of varnish. Why 3-4??? Because behind 4 layers of varnish, the torn edges of the print are hidden very well, and all we have to do is sand the varnish a little, and we will paint on a flat surface - then the paint will apply more evenly, and less finishing varnishing will be required.
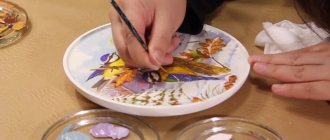
10. Let's start painting. The very first thing is to mix the colors that we need for painting . Moreover, you need to mix a lot of paint - for painting, sides and bottom. First I mix peach with yellow, and I’ll make other shades of this color scheme as I go.
11. This is where I couldn’t resist and recorded this half-hour video . If you are still on the “you” side of drawing in decoupage , then look carefully, pay attention to the movements of the brush, the colors of the paints (unfortunately, the camera does not convey all the colors correctly, but I think the meaning will be clear), the sequence of actions. And listen carefully to the comments! Using this technique, you can paint any picture with a complex artistic background (remember the classification)! Eh, if only someone had shown me all this at the very beginning)))
You can download the video to your computer from Yandex disk (follow the link): https://yadi.sk/d/IgriQvh1GiVXz
Or watch on YouTube (I recommend full-screen mode and high video quality - to do this, click on the gear at the bottom right and select 720p if you have good internet, or at least 480p).
12. Have you painted everything? Great! Let's get to the fun part - decorating the sides and bottom. There are still some colors left, a lot of colors need to be mixed! Let's watch a 15-minute video about a simple but very effective painting technique! I don’t suggest downloading - detailed resolution is not necessary, the main thing is to catch the essence.
13. Varnish the entire tray: apply 8-10 layers of matte varnish, and then about 4-5 layers of tsapon varnish on the picture . That's it, now you can put even hot food on the tray!
We admire it! Click on the picture to enlarge it.
As you can see, this is a fairly simple but effective technique that looks wonderful with decoupage on a wooden tray . The main thing is the correct painting of the background in decoupage, and the correct mixing of colors !
Did you like the article? Share it!
You may also be interested in:
Simple decoupage of a wooden tray
Master Class:
- Before work, it should be cleaned and made smooth using sandpaper.
- First prime the surface, then sand it to ensure smoothness throughout.
- Transfer the printed drawing to tracing paper in advance (or use a napkin, having previously cut out the drawing from it), then place the front side on a transparent file and spread glue. After this, attach the sheet to the surface, remove the file and coat the pattern with glue again. It is necessary to remove all trapped air by hand, after dipping your fingers in the glue.
- Dry completely.
- Apply varnish 4 times.
- Paint the sides of the tray.
- Apply varnish about 10 times to protect the design from high temperatures.
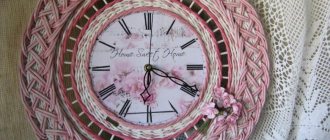
Decorating a tray using decoupage technique using varnish prints
Decorating the “Tea Break” tray.
For work we need: - a wooden tray blank - printout of a drawing on photo paper according to the size of the tray - acrylic artistic primer - glossy acrylic varnish - decoupage glue - acrylic paint - sandpaper - foam sponge - stamp or stencil with a small design - brushes
A master class on decorating a tray will be of interest, first of all, to beginners in the decoupage technique and those who have never worked with prints on photographic paper, the so-called varnish prints. We discussed the first method of gluing a varnish print in the workshop for making the “East” bracelet - by separating the top varnish layer.
In this master class we will look at another way to use varnish prints - “face into varnish”. As we said in the workshop for making the “East” bracelet, the main advantage of prints is that we can always choose exactly the design and the size that we need for our work.
So, we have prepared all the necessary materials and are starting...
Step 1: Preparing the Print
We print the drawing on a color printer on photo paper according to the dimensions of the tray. I decided to make a design on the bottom, inner and outer sides of the tray.
After some time, when the paint has fixed on the paper, we varnish the entire surface of the front part of the print with an even layer.
Step 2. Preparing the tray While the print is drying, prepare the tray for decoration. 1. Like any wooden product, we sand the tray to remove any unevenness, and, if necessary, fill cracks and holes. 2. The tray is now ready for priming. To do this, use a flat synthetic brush to take acrylic art primer and pass over the entire surface of the tray. Dry and lightly sand again to create a smooth surface.
The decorating tray is ready and we get to work with the prints. 3. We cut out all printouts along the contour and try them on the surface of the product. We start gluing the printouts from the bottom of the tray. We coat the bottom of the product with glossy varnish and immediately coat the paper. If the bottom of the tray has dried out, coat it again. We apply the front part of the varnished design to the varnished bottom of the tray - “face to face” or “face to varnish”. Iron it well so that there are no bubbles left inside.
4. Similarly, glue the printout to the sides of the tray. Leave to dry for at least 4 hours. I usually do this at night. 5. Now the fun part is removing the paper layer. To do this, use a brush with water to blot the surface of the paper and gently roll the wet paper with your fingers. When you see that the surface is dry again, saturate it with water and remove the paper layer again until our design appears. If after some time, when the surface has dried, the drawing suddenly turns white, it means that not the entire paper layer has been removed and the procedure will have to be repeated again. Rub the paper with your fingers carefully so as not to damage the design.
In the same way, we “reveal” the pattern on the sides of the tray. This is what we should get - an even and well-adhered varnish layer on the surface of the product. If the pattern “comes out” on the sides, sand it down.
Step 3. Decorating the tray Now we create beauty on our tray. First, we paint the empty primed areas of the tray – handles, bottom, etc. – with acrylic paint to match the print background (I have ivory).
I assumed that the purpose of the tray would be to store bread, sweets and other goodies. Therefore, I decided to decorate the outer edges using the technique of imitation lace fabric with folds (the author’s “Egorov cambric” technique by Liliya Egorova). 1. To do this, you need to measure the width of the workpiece using a ruler and transfer the resulting size to a sheet of cardboard. Draw the desired folds on the cardboard and cut along the lower border of the folds. Attach the lower part of the stencil to the workpiece using masking tape and apply paint to the upper (open) part of the workpiece using a sponge (remove excess paint from the sponge). We dry the work very well. Do not varnish!
2. We draw with a pencil (do not press too hard) directly on the paint the bends of our folds (i.e. we transfer the bends of the folds drawn on the stencil onto the paint). We apply a rectangle of cardboard to the inner border of the fold (we repeat the slope of the fold from the lower stencil) and use a sponge with paint to seal the inner vertical part of the fold.
3. Take a cotton swab and slightly moisten it with water (the swab should be damp, but not wet). We first wipe (outline the dimensions) with a stick the scallops along the bottom of the napkin, then turn on our imagination and use a cotton swab to “cut out” holes of different shapes. Please note that we do not rub holes in tight folds! Dries very well! Cover with 2 layers of varnish.
4. Take the outline of the glass (white) and first draw scallops along the bottom of the napkin.
We outline all our holes and draw in the missing parts of the embroidery on the folds. Add various dots across the entire surface of the napkin. Dries very well! Cover with 3 layers of varnish.
5. To prevent the lace from appearing lonely glued to the outer parts of the tray, I decided to tint the bottom and inner sides of the product with white acrylic paint - simulating that the fabric lies on the entire tray. The inside also imitated folds.
6. To make the handles on the tray look more interesting, take a stamp or stencil and apply a design to the outer part of the undecorated side of the product. If desired, the design can be applied to the bottom of the tray.
Step 4. Varnishing
Our tray is almost ready. All that remains is to seal the entire surface with a layer of varnish. To do this, take a little varnish on a brush and apply it to the entire surface of the tray. Work the brush in one direction. When the varnish is dry, apply several more layers, leaving them to dry thoroughly each time.
I hope everything worked out for you and you have a desire to learn all the secrets of decoupage.
I will be glad if you liked my master class.
Decoupage metal tray
A distinctive feature of processing metal from wood as a material for a tray is the final result and the need to process the plane exclusively in all cases.
Use alcohol to treat it.
Master Class:
- You must first thoroughly sand and treat the tray with alcohol.
- Prime the surface with a foam sponge.
- Cut out the piece from the napkin and place it on the selected location.
- Glue it with special glue.
- Cover the rest of the area with paints using a sponge.
- Apply varnish several times, drying each layer.
Decoupage of a wooden tray: master class
The main stages of the master class on decoupage of a wooden tray are the following steps:
- The choice of idea involves not only the formation of a project for future work, but also the choice of a decoration object, the necessary tools and materials.
- Preparing the base for further work is an important stage, which involves sanding the wooden tray, applying a primer or a base tone of acrylic paint.
- Preparing the pattern involves separating the top layer of the patterned napkin. The selected motif is carefully cut out using special scissors.
- Gluing the napkin motif to the surface to be decorated using a flat brush. This stage requires careful work. As the napkin is soaked in glue, the paper motif can easily stretch and deform
. - Drawing with paints is necessary to create spectacular color schemes and bring the drawing to perfection.
- Varnishing (at least 2 layers) will protect the finished work from mechanical damage and the negative effects of moisture.
You can decorate a metal tray
. However, an important feature of working with metal is the need to thoroughly degrease the base. The use of a primer is the key to high-quality gluing of drawings and securing them with varnish.
Decoupage styles
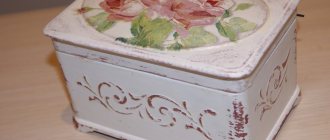
Decorating a tray in shabby chic style
Shabby chic refers to “folk”, but is distinguished by sharper colors. A “wooden” background with an artificial aging effect is often used. In this case, you can also use a contrasting pattern on the napkin. Pictures with baskets containing flowers and greenery will look especially good.
To achieve a specific aging effect, you can use two-component craquelure.
Master Class:
- Prepare the surface, that is, treat it with sandpaper and primer.
- Attach an image from a napkin.
- The next step is to use decoupage glue.
- Decorate the composition with varnish and dry.
- Only after the final layer of varnish, apply craquelure to the image, which will begin to form the expected cracks.
- Fill the gaps with polar oil paints.
- Rub the candle over the areas that will remain dark in color after covering the entire tray with paint.
- It is better to touch the corners and sides with the candle.
Decorating a tray in Provence style
This style creates associations with the Cote d'Azur, the foothills of the Alps and lavender landscapes.
Provence is a French style that combines notes of folklore and cultural elegance. A typical design for this style is a basket of fruits or wildflowers. The drawing should not conflict with the background.
A special palette of colors has been created for this direction: gray, turquoise, white, lilac, pistachio, green.
Master Class:
- Prepare the surface.
- Apply 3 coats of white paint, allowing each coat to dry.
- Rub the painted tray along the borders. This creates the effect of peeling paint.
- Apply a napkin with a pattern and cover it with decoupage glue.
- Apply varnish to the entire product about 6 times.
- Sand the tray with fine sandpaper.
Use the craquelure method for a peeling paint effect.
Decorating a tray in kitsch style
Kitsch is a bright trend with opposite shades. Here any elements are suitable for design, including ordinary geometric shapes.
The background can be colorful and asymmetrical. The master reaches the highest standard if he places a small reproduction of a great Renaissance painting in the center of the composition.
Decoupage tray in Chinese style
The background of a tray in a similar design is most often chosen to be black or something else rich and deep.
In the middle of the decorative tray, traditional Chinese drawings of animals, birds, mythical creatures, an image of a running river and rich grass, blossoming tree branches are distributed.
Updating trays using one of the listed techniques is limited only by the imagination of the author himself, so you can find many original and unique works.
Characteristic and basic aspects of the technology are:
- meticulous surface preparation
- constant multi-layer varnishing of the finished product to avoid damage to the design.
The result can range from a cute craft or a kind gift for a friend to a piece of art that belongs in a museum rather than in the kitchen.
Decoupage tray: from the history of napkin painting
At first glance, unique gifts, accessories and interior elements are difficult to make without special skills and knowledge
. In fact, everything is much simpler than it seems! The decoupage technique is a classic appliqué that, thanks to varnish coating, gives the product a stunning look. Creating elegant and unusual products with your own hands is very interesting and exciting.
The French term "decoupage" means "to cut out". the secret of this amazing technique lies.
decoration. Decoupage of a tray and other products involves the design of various blanks and objects using paper motifs, which are carefully cut out beforehand.
The pioneers of the art of decoration are considered to be Chinese peasants, who, back in the 12th century, were able to produce surprisingly thin and at the same time colorful paper. With its help, they began to design various items. The fashion for the “East” and everything connected with it reached Europe in the 17th-13th centuries. An interesting method of decoration has become widespread, as has elegant lacquer furniture from China.
Demand exceeding supply was the main impetus that contributed to the development of counterfeits. That is why decoupage won the hearts of lovers and connoisseurs of original jewelry with oriental flavor
. The popular trend was quickly able to compete with the original Chinese technology. Even great artists such as Matisse and Piscasso used decoupage painting in their works.
Today, the most popular material for decoupage of trays and other kitchen utensils are three-layer napkins
with original and unusual designs. Their use in the work process has led to an alternative name for the technique, which is often called the napkin technique.