DIY felt pincushion: master class with patterns
Have you ever had the feeling that the needles and pins for your needlework are somehow stored incorrectly? Sometimes they get lost, and then find themselves on the carpet or in another completely inappropriate place. Or they are not at hand when they are needed, they break or even disappear without a trace. If this has happened to you, it's time to think about a DIY felt pincushion. Maybe this handy little thing won’t save you from all troubles, but it will definitely keep your favorite needles safe and sound. How to make a beautiful and comfortable needle bed with your own hands, read the article.
Flower in a pot
To make such a spring pincushion, we will need the following things:
- a cream jar or any other small jar;
- multi-colored felt;
- synthetic fluff or other filler;
- thread and needle.
Patterns of a flower and leaves for a pincushion:
Using the patterns, we cut out exactly the same parts from our material.
Next, we take measurements of the base of our needle bed and, based on the data obtained, we will cut out an additional rectangle, which will be the sidewall.
Additionally, we cut out two felt ribbons one and a half centimeters wide and long, which is equal to the circumference of the jar.
Sew the ribbons to the main base that will close the jar.
The edges are stitched.
The center of the flower is filled with synthetic fluff.
Sew a soft pad to the flower.
The lower part of the petals is attached with threads to the upper part.
The leaves are sewn to the flower and the finished flower is sewn to the felt piece that will close our jar.
The resulting form is put on the base.
The lower part is swept away with threads.
Our pincushion is ready. All that remains is to add decorative elements.
Original cactus
Nowadays, cactus pincushions are very popular, so our master class could not do without such a model.
The first thing we need to do is prepare all the necessary parts for our cactus. The pattern we will use to cut out our parts:
When cutting out parts according to the pattern, do not forget to leave a small indent for stitching. Once you've finished cutting out the pieces, you can move on to sewing. Place the pieces with the insides facing out and sew tightly along the edge. Next, turn the product inside out and straighten the seams.
Now we need to fill the empty pockets of the parts with some soft filler. Synthetic fluff, padding polyester, cotton wool and even unnecessary felt scraps work well as fillers. The main thing is to stuff the parts tightly and elastically.
When we have similar parts, we can proceed directly to assembly. And to do this, we stitch each part from the bottom so as not to lose the filler, and then we sew the parts together into the composition that you yourself come up with.
You can decorate our cactus with decorative buttons, ribbons or other suitable elements. But even without all this it will look great.
Book for needles
Another beautiful and practical pincushion, which you can also take with you on any trip.
For work we will need:
- multi-colored felt;
- scissors;
- thick threads;
- decorative decorations for the pincushion.
From plain paper we cut out templates for future parts of the product.
Additionally, you can select the location of the actual parts on them.
Let's get to work. We attach the template to the felt folded in half.
Outline the template with a pencil.
Having removed the template, we secure this place with pins so that the final part is even.
Cut out the part according to the markings.
Using the same principle, we cut out all other parts from the material.
From felt of a brighter color we make rectangles of the same shape as the main part, but a little smaller.
Take a small piece of tape.
Fold it in half with a loop and insert it between two main sheets of felt and stitch it.
We sew our base with a simple “forward needle” seam.
Now we unfold the sheets like a book and put the smaller part inside.
We measure the center in the book using a ruler or measuring tape.
We draw a dotted line in the middle with soap or chalk.
Carefully sew along the dotted lines. It is advisable to use a sewing machine for this.
We mask the seam on the other side with tape and stitch it again.
Don't forget to use pins. Then your tape will not go to the side.
We go along the edge with a zigzag seam. You can use an overlocker to finish the edge.
Now we sew the decorative felt parts onto the book. The knot should be placed behind the felt piece.
The leaf will look good at the bottom.
We cut the petals of the flower.
Sew a leaf to it.
We make stitches in the form of stems.
We attach the button.
And place the center of the flower on the glue.
We add a buttonhole and decorative rhinestones, and our pincushion is ready.
Video on the topic of the article
For even more interesting things, watch the video:
Similar articles:
knittochka.ru
Master class 'Flower Pincushion'
Let's create a spring mood for ourselves! I present to your attention a flower pincushion!
We will need: 1. Patchwork fabric; 2 A piece of decorative green felt for the foliage; 3. Synthetic filler; 4. Flower template (see Fig. 1) A4 format; 5. Scissors; 6. Needles for pinning and sewing; 7. Floss threads to match the color of the petals and the color of the leaves;
rice. 1
1. Cut out the template. The larger circle is the center, and the smaller ones are the petals. And a pattern of incomprehensible shape remains - this is foliage. )
2. Select fabrics for the flower. We will have 7 petals. I like to select fabric so that it is the same in color, but different in tone and pattern. Fantasize. For example, you decide to make a flower red, choose white fabric with red polka dots, red with a white flower, just light red, you can even add burgundy. And make the center, for example, orange, or choose several colors for the center and try on which one suits the petals best.
Popular articles Bonsai topiary tree master class New Year artichoke assemblage kinusaiga interior Christmas tree made of satin ribbons ribbons foam plastic soutache braid cord fabric
3. Cut out the flower details according to the templates (see Fig. 2).
rice. 2
4. Next, we begin to make the petals and center. For this we need floss threads, a needle, scissors and synthetic filler. I like to sew with floss threads; they don’t get tangled and are easy to handle. Moreover, many needlewomen have floss threads left after embroidery.
I sew in two threads, as in embroidery, only with a knot at the end.
We collect the petal in a circle with threads (see Fig. 3).
rice. 3
We fill it tightly with synthetic down, while simultaneously tightening the thread so that the filler does not fall out, but is located inside (see Fig. 4, 5 and 6). We do the same with the rest of the circles.
rice. 4
rice. 5
rice. 6
5. Flower details are ready. We lay them out in the required sequence (see Fig. 7).
rice. 7
6. Now we begin to sew together all parts of the needle bed. Our thread with a knot at the end will go as follows:
- will enter the hole of the petal and come out obliquely (see Fig. 8, 9 and 10);
rice. 8
rice. 9
rice. 10
- will enter the central part of the flower almost at the base and exit at a distance of 1 cm along the arrangement of the petals (see Fig. 11);
rice. eleven
- then the thread will again enter the same petal (see Fig. 12 and 13);
rice. 12
rice. 13
- we take the second petal and sew it on almost in the same way as the first, only our thread continues its tangle not from the hole, but from the side and again goes to the center and so on with all the petals (see Fig. 14 and 15);
rice. 14
rice. 15
- to strengthen our structure, you can once again walk in a circle simply through the petals (see Fig. 16);
rice. 16
— we fix the thread at the base of any petal so that our knot is not visible (see Fig. 17).
rice. 17
7. Cut out foliage from felt (see Fig. 18). We embroider the veins on the foliage so that there is an excellent view on both sides (see Fig. 19 and 20).
rice. 18
rice. 19
rice. 20
We make cuts with scissors to make them look more similar) (see Fig. 21 and 22).
rice. 21
rice. 22
8. Attach the foliage to the flower and carefully sew these two parts together (see Fig. 23). Sew so that the bases of the petals are hidden by the foliage (see Fig. 24 and 25).
rice. 23
rice. 24
rice. 25
9. Woo a la!!! The flower pincushion is ready!
Create for your health!!!
DIY felt pincushion in the form of a book for the lazy
Felt crafts are very beautiful, functional and easy to make.
A hand-made felt pincushion in the shape of a book can be used not only at home, but also on the road. It won’t be difficult for an appetizing soft apple to find a place in a lady’s handbag. With it you can show off your thoughtfulness at work or at a party. Girls, please note that this is a wonderful gift for your mother or grandmother on March 8, New Year or other holiday. It takes very little time and no sewing skills are needed.
- Materials and tools
- Master class on sewing a needle bed
Materials and tools
To sew a beautiful felt pincushion according to our master class, prepare:
- red felt 3 mm thick;
- pink felt 1 mm thick;
- green felt 3 mm thick;
- green or red satin ribbon 5 mm wide and 30 cm long;
- sewing needle;
- sewing threads in red, pink and brown colors;
- padding polyester;
- a sheet of thin cardboard;
- a simple pencil;
- scissors.
See all master classes on felt crafts in this section. These are jewelry, toys, home decor, hair accessories. Select in advance to calculate the amount of material.
Master class on sewing a needle bed
First make a pattern. On a sheet of cardboard, using any round object, draw a circle of the size you want for the pincushion. This circle will become the basis for drawing an apple.
Use a pencil to draw the outline of an apple.
Fold a piece of cardboard in half, slightly overlapping one side of the apple. Use scissors to cut out the template.
Using the pattern, trace the outline of the pincushion onto the thick red felt.
Reduce the dimensions of the template by 5-7 mm, cut the drawn strip.
Fold the thin pink felt in half and draw the contours of the apple using the new, smaller template.
Using scissors, cut out one red pincushion piece and two pink felt pieces.
To prevent the seams from standing out on the product, first sew a red piece and one pink piece in the center, using red thread.
Then, using matching thread, sew on the second piece from a thin pink sheet.
The result was a blank for pincushions - books with a red cover and four sheets of felt. Using a regular straight stitch, sew together the first and second sheets, and then the third and fourth. To ensure a neat seam on both sides, do not stitch all at once. Pierce the material with a needle as perpendicularly as possible.
Without sewing the sheets together completely, fill the middle with a small amount of padding polyester. Then sew the apple all the way up.
Cut the green ribbon in half and heat the cuts to prevent the threads from fraying. Using matching thread, sew both stripes to the inside of the sides of the red apple. These strips will become the clasp of the book.
Cut two small leaves from thick green material and sew them onto the red apples with brown thread.
For the final decoration of the felt pincushion, embroider brown seeds on pink sheets on both sides.
The book pincushion is ready! Needles are stored more safely in this design than in an open one. But remember to keep it out of the reach of children. Always leave long threads in the needles to increase safety and quickly find a dangerous object in the event of a fall.
A master class on sewing a needle case with your own hands in the form of a book was prepared specifically for the online magazine “Women’s Hobbies”. Do you like to make pincushions? Master the biscornu technique - this is a very exciting craft.
We are waiting for you in the catalog of master classes and be sure to take our test to find a new hobby!
zhenskie-uvlecheniya.ru
An example of a felt pincushion made by yourself
Is a felt pincushion even necessary? Is it worth doing it yourself, because it’s very nice. I suggest you look at the examples and be inspired by them. And then try to make your own pincushion. Or don't. What do you think?
Fairytale houses and felt mushrooms
Very creatively done, the hand of the master is immediately visible.
Bunnies and birds
There are also examples of hares and birds made of felt, but here the level is slightly lower than that of houses and mushrooms. However, they are still very creative and funny. What do you think?
Elephants
Felt elephants look amazing.
Hearts
And of course, romantic felt hearts.
Animals
Almost like real forest animals made of felt.
Share your opinion: is it necessary to make a felt pincushion with your own hands?
minigift.ru
Crafts from disks
Almost every person has a couple of unnecessary CDs, DWDs, CDs that are simply scratched, stale and no longer needed.
Don’t rush to throw them away because you can use them to make useful crafts for the home, such as: a napkin holder, a photo frame, a candlestick, a hot stand, a pincushion, and even children’s crafts like fish and smeshariki.
In this article we will look at how to make crafts for the home from old CDs, DWDs, CDs with your own hands.
Master Class
- Take two disks, cut off 25% of each disk in a straight line.
- Take a whole disk that will serve as the base of the napkin holder.
- Glue the cut disks on both sides to the base so that they act as holders.
- Wait until completely dry.
- Decorate to your taste.
I recommend watching the video master class!
Decoupage is a method of decorating objects.
You will need: a disk, a napkin with a pattern, scissors, PVA glue, varnish, a sheet of flexi (so that the stand does not slide on the table).
Smeshariki from disks
You will need: disks, colored cardboard, PVA glue or double-sided tape, a simple pencil, scissors, felt-tip pens.
Popular articles DIY amphibious boat. homemade hovercraft
We turn a jar into a pincushion using felt – Crafts Fair
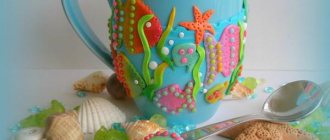
The idea of using a jar as a base for a pincushion is, of course, not mine. I don’t know who the author is, I apologize. And the fact that felt can be given any shape has also been known since time immemorial. I’ll just tell you how I do it.
We will need:
- A sheet of A4 felt of medium thickness (I got an inexpensive one from a set for children's creativity).
- Jar.
- padding polyester or any other filler
- Cardboard.
- Glue Moment-crystal.
- Threads and needles.
- Decor (I have a piece of satin ribbon, a macrame flower and a bead).
- Scissors.
- Tennis ball.
- Terry towel.
- Scrunchy.
We empty the jar of its contents, remove the labels and wash well. Cut out a cardboard circle to fit the lid. I selected a lid of a suitable color, but if you don’t have one, it’s better to paint it in the color of your felt with acrylic paint.
Take a tennis ball. We wrap it with a towel in several layers (in my case it turned out to be three layers), put an elastic band on the free edge of the towel and evenly straighten the resulting folds. The diameter of the resulting ball should be approximately equal to the diameter of the cap.
We take felt, wet it with warm water and lightly soap it. We wash off the excess soap and squeeze out a little without twisting. After this treatment, the felt begins to stretch well. We apply it to our towel ball and gently sip it into a ball shape.
We dry it on a blank. I speeded up this process with a hairdryer. Carefully cut and remove from the ball. It turns out this “hat”:
From a flat piece of felt, cut out a circle equal to our cardboard blank.
We sew the cap to the mug, slightly gathering the convex part. When about half of the circle is sewn, insert a cardboard circle and continue sewing until about a quarter remains unstitched. We stuff the workpiece tightly with padding polyester and sew it to the end.
Generously coat the top of the lid with glue and glue the felt blank.
We take the lace and carefully sew it to the felt. Make sure that the bottom edge of the lace lies exactly along the edge of the lid.
We turn away the free edge of the lace and coat the side of the lid with glue.
Glue the lace. We cover the joint with decor. We admire and praise ourselves.
Thank you for attention.
www.livemaster.ru
Cute felt pincushions - Do it yourself
home
The more time I spent in front of the sewing machine last year, the more my husband's frustration grew when he found needles and pins on the floor (he loves to go barefoot). And then I decided it was time to stop and make a pincushion.
I just needed to have a place where I could keep my needles and pins instead of just putting them in a pile on the table.
Instructions for making needle beds:
barrel
There are a huge variety of pincushion ideas out there that can inspire you to create one unique to you.
I chose the barrel shape of the pincushion because it is easy to sew without a pattern, using only a few simple templates. And the applications you come up with will give the pincushion its individuality.
tools
To work, you will need a 45 mm circular knife with a comfortable handle, a cutting mat measuring 60 x 90 cm, a special cutting ruler, and felt of different colors. Start by cutting out a 6 x 30cm rectangle from blue wool felt. To cut out the circle pattern, I used a 9cm diameter template - one circle for the top and another for the bottom of the pincushion.
I also used templates to make wool felt appliqués for the pincushion. Wool felt is a suitable material for making such products, as it holds its shape very well and is durable in use. In addition, the edges of the patterns do not need to be processed - it does not crumble.
To start, I sewed appliqués onto the base of the pincushion - I secured them using decorative hand stitches. I used a blanket stitch to assemble the pincushion. Before sewing on the bottom circle, I attached a heart applique to the side seam. If you don't do this, you'll have to use a blind stitch, which isn't very convenient. When finished sewing, leave a small hole to fill the pincushion with the stuffing of your choice.
I filled my pincushion with crushed walnut shells. This method was recommended to me by a lady at a local fabric and textile store, but you can use a different filler - it's up to you. The shell is supposed to help sharpen needles and pins. In addition, the shell gives the pincushion a pleasant feeling of weight.
After filling the piece, I finished the overlock stitch along the filling hole.
To create a cover for a book-shaped pincushion (hereinafter referred to as a pincushion). I cut a rectangle measuring 17 x 9 cm from blue wool felt. For the inside pages I made 17cm x 7cm rectangles from cream colored felt. I used the tree shape template for the appliques, similar to what I did with the previous pincushion.
To assemble the pincushion, I centered the cream colored felt pages on the cover and hand stitched them down the middle. To sew the first page to the cover, I used a blanket stitch (making sure to keep the stitches going through the back of the cover at all times) to hide the seam on the front of the cover. Finally, I trimmed the edges of each page using scalloping scissors.
And now my whole family can walk around the house barefoot!
Author MK: Fiskars
Translated especially for the site by Ivanets Oksana
sami-s-rukami.ru
How to sew a felt pincushion with your own hands
Seamstresses and handicraft lovers often use needle beds. The simplest pincushion is a cushion into which needles and pins are stuck. If you value originality, we suggest you sew a felt pincushion in the shape of a stump with fly agaric mushrooms.
Materials and tools for sewing a needle bar:
- brown felt 25×15 cm
- beige felt 9×9 cm
- red felt 8×5 cm
- beige felt 8×9 cm
- white (ivory) felt 10×7 cm
- dark green felt 6.5×5.5 cm
- light green felt 6×5 cm
- threads of suitable colors, as well as black ones for embroidering eyes and mouth
- thick brown and light brown threads
- 2 black beads with a diameter of about 4 mm
- padding material
- needle, pins, scissors
- hot glue gun
- printer for printing the template (shown below)
Note: the project used felt with a thickness of 1-1.5 mm
How to sew a felt pincushion with your own hands
Print the diagram with templates on a printer.
Pin the hemp bark template to the brown felt and cut out a rectangle according to the template.
Use a large round template to make the top and bottom parts of the hemp. These pieces are cut from brown and beige felt.
On the bark, using thick brown threads, embroider many stripes to imitate cracks. The distance between the seams is approximately 1 cm.
Sew the edges of the rectangular piece, making a centimeter overlap.
Using black thread, sew on beads that will become the eyes of your stump. Using the same threads, embroider the mouth.
Make the cheeks from red felt. Sew them to the bark with suitable threads.
Using thick light brown threads, embroider several annual rings on the top of the stump. The distance between the rings is about a centimeter. Place the beige circle on the top of the bark and sew the two pieces together.
Fill the stump 3/4 full with stuffing material. Sew the bottom circle, leaving a small hole through which you can add more stuffing. Don't get too carried away with the stuffing or your stump will turn into a ball. Sew up the hole.
Cut a circle of dark green felt and punch the edges to create grass. Do the same with light green felt. Sew two green pieces to the top of the stump.
Fly agarics are of different sizes, but they are sewn using the same technology.
Sew a leg from beige felt. The hat is sewn from two round pieces, red and white. The parts are filled with stuffing material, and then small circles of white felt are glued onto the hat.
Cut out two bushes of grass from green and lettuce felt and sew them to the stump.
Glue fly agarics to the top of the stump. If you don’t have a heat gun, you can sew on mushrooms.
The original felt pincushion is ready.
Source: diy.ru
tehnologi.su
Envelope model
This type of needle cases for needlework is also made of felt. To work, you will need two felt flaps of different colors (it is better to take bright contrasting shades that will be visible from afar). In addition, thin metal needles are clearly visible against such a background.
Instructions on how to sew an interesting pincushion with your own hands:
- Using a pre-prepared template, cut out a square piece from felt of the same color.
- Unfold the flap into a diamond shape.
- Place filler on the bottom tier.
- Fold the bottom and side corners of the diamond to the center point (like an envelope), and sew with hand stitches.
- The top corner remains open. For it, a small triangle is cut out of felt of a different shade, repeating the contours of the corner of the envelope, but having a smaller diameter.
The corner is hemmed along the contour of the larger sample, imitating the inner surface of a traditional envelope. The peculiarity of such a pincushion is the ability to pin needles and pins in a vertical position, as if dropping them into an open envelope.