The best gift for a coffee lover
Products made from coffee beans are distinguished by the fact that they retain the pleasant natural aroma of coffee for a long time. It is for this incomparable smell that lovers value this strong, invigorating drink.
An unusual gift, made with your own hands, and even functional, will not leave the recipient indifferent. The fact that you showed attention to a person’s passion, spent not only money on a gift, but also your own strength and time to create something unique, inimitable, will not leave the recipient indifferent.
The Internet is full of photos of coffee crafts in the form of tabletop, hanging figures and panels. It is characteristic that their execution requires a very small amount of effort, and the craft itself is very budget-friendly. Coffee beans can be purchased in any grocery section of the grocery store.
DIY coffee owl: how to make, detailed master class
You may have noticed, while flipping through pages on the Internet, how often a funny bird began to catch your eye. This owl personifies us in the morning, so sleep-deprived and lethargic. Her image may appear not only in demotivators, but also on youth clothing. Toys and keychains with a bird are very popular. The designers cleverly moved its image into the kitchen, turning the owl into part of the decor.
If you want to learn how to create crafts and decorative items in the shape of a wise bird, then this article will be useful to you.
DIY coffee owl: how to make, detailed master class
Suspension
The easiest way to create a talisman or handbag decoration for yourself is a craft. To do this, you need to take a sheet of paper and a piece of thick fabric, get a sewing machine, needles and threads. This is in any home, but you may have to buy it: a cord and a ring for a pendant, coffee and tea, hot glue, acrylic paints and brushes. In addition, place a black gel pen or felt-tip pen in front of you, plus a glass of warm water. This coffee owl is made in a few minutes and looks very impressive.
DIY coffee owl: how to make, detailed master class-2
How to create:
- You need to draw an image on paper. If you do it well yourself, go for it, others download a picture from the Internet, redraw it or cut it out from a magazine.
- The black rod was useful for sketching the eyes, claws and feathers.
- We place the finished template on the material and copy the outline of the bird exactly.
- You need to cut out two pieces and make a dart in the area of the shoulder blades. Now you need to put the resulting parts inside and stitch the edges. Do this manually or using a machine, the main thing is not to touch the bottom of the craft.
- Don't forget about the dart, you need to stitch it too. Now it’s time to turn the owl outward with the drawn elements. Your eyes will see an almost finished pendant; all that remains is to fill the void with cotton wool and sew the remaining hole. We will have a ring for the lace attached to our head.
- Let's start drawing. To achieve the desired color, brew tea and pour a spoonful of coffee into the solution. Our coffee owl should smell delicious, which means we’ll add a pinch of vanillin to the liquid. When the mixture has cooled, it can be applied to the surface of the toy. Do this carefully, without “bathing” the owl. When the craft is dry, add the contours of the eyes, wings, claws, and beak.
- Color the bird as you please. The only thing is to place two coffee beans in the center of the yellow eyes. This way your composition will look more impressive and mysterious.
You can supplement the wings with pile, threads, and fur. We use the same materials to complement the tassels on the ears, tail and eyebrows.
DIY coffee owl: how to make, detailed master class-3
Painting
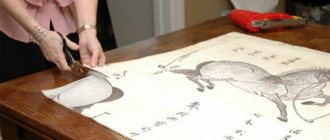
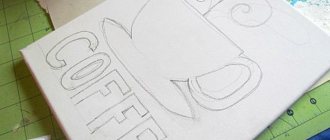
Simple, fast and beautiful. This is how we can briefly describe the master class where we will create a painting. You need to take thick white cardboard and draw the silhouette of an owl on it. We do this in the manner described above. It is important to pay attention to your eyes. They should be as large as possible. Glue yellow circles like saucers, paint the eyes with paints, here you come up with the surroundings yourself. Cover the entire drawing with a layer of glue. Pour in coffee beans and see how securely they are attached to the paper. As soon as the craft has dried, we open the surface with varnish, give it more time to soak, and then put the picture in a beautiful frame. You can give it to friends for a holiday or decorate the walls in your room.
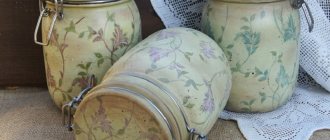
It turns out that creating beauty with your own hands is not difficult. The main thing is to have a little patience and a free minute for creativity. If you liked the Coffee Owl and want to make new crafts, watch master classes with interesting ideas on the Internet. There are options for making jars for cereals, sewing backpacks and soft toys.
Materials
Crafts made from coffee beans are made from a minimal set of materials.
Basic
All you need is coffee and glue to hold the work together.
The main requirements for the material so that the grains are:
- whole;
- as identical in color and shape as possible.
Not all coffee beans are alike. They vary in variety and degree of roasting. For crafts, the color and shape of coffee seeds play a big role. They are oval and almost round.
- The Arabica variety has an oval shape.
- Round - for the Robusta variety.
Note!
DIY military crafts step by step: 150 photos of the best craft ideas for children for school or kindergarten
- DIY crafts for May 9 step by step: 150 photos of the best crafts for Victory Day
DIY crafts for February 23rd step by step: master class with photos and descriptions of how to make crafts for Defender of the Fatherland Day
Robusta belongs to a cheaper price category, so it is more often used in decoration. But a pack of coffee is enough for more than one craft. So, in the end, working with coffee is a very low-cost activity.
The second required component is glue. It is most convenient to use a hot glue gun. Sometimes thick PVA glue is used. But it takes longer to dry and doesn't hold as tightly.
Related
For coffee crafts, you will also need other materials that are harmonious in color and texture. As a rule, they use natural, natural origin.
The important part of coffee crafts is the base. They take foam or plastic balls as a basis, roll up cylinders and cones from thick paper or cardboard, sometimes real candles or plasticine are needed.
Often used in crafts:
- cardboard;
- burlap, linen fabric, felt;
- jute rope;
- decorative ribbons;
- wood beads;
- cones, acorns, nuts;
- paint - golden, silver, white;
- photo frames;
- matching paints and ground coffee for priming the work surface;
- wire;
- a simple pencil;
- alabaster;
- cinnamon sticks, star anise, dried citrus slices, etc.
Watch
Watches decorated with grains diversify the decoration of the kitchen space. Even the most simple pattern will be the “highlight” of the kitchen decoration.
To create chimes, you need to lay out a pattern of material on a cardboard of any shape, with the convex side up, and place it in the center of the arrow. The dial can be distinguished by using Arabica beans of a different color palette and adding Swarovski stones.
Magnetic figurines, Christmas tree decorations or photo frames are made in the same way. A series of mini-pictures with silhouettes of vegetables, randomly located on the wall in the dining room, will also look unusual.
Crafts from glue: 150 best ways to use glue to create crafts + simple diagrams and photos of finished works- DIY crafts from matches: step-by-step master classes and DIY craft ideas + simple and quick photo diagrams
Crafts from tubes - unusual ideas, step-by-step master classes for beginners + photo reviews of ready-made DIY crafts
With a good imagination, you can make beautiful crafts from almost anything - true connoisseurs of the drink can use a similar technique to decorate a teapot and bowls for drinking it, which will exude a rich amber when the dishes are heated. Cups with a waterfall of grains are also in great demand.
Any little thing created on your own will not only decorate the space of your home, but also warm your soul, because you put a part of yourself into its creation.
Panel – master class
An easy-to-follow master class on coffee crafts - making panels. Despite the simplicity of the work, unique compositions are obtained for any subject - from the plots of children's fairy tales and cartoons to paintings by famous artists.
- On a base made of cardboard, hardboard, plywood, or canvas, draw the outline of the selected design with a simple pencil.
- Paint over the design with paint to match the coffee color or apply a thin layer of glue and sprinkle with ground coffee. After the glue has dried, shake off the excess powder. This is necessary so that the background does not show through the craft and there is better adhesion of the glue to the surface.
- Glue the grains. For the first experiment, it is easier to glue on the flat side. This way the coffee will hold up better.
- We arrange the craft in a suitable frame. The frame can also be decorated in a coffee style.
- It’s more convenient to use tweezers, the craft will turn out neat, and you won’t get your fingers dirty with glue.
Floating mug
We will need:
- mini service consisting of a mug and saucer
- composition base (you can use solid wire or a bent aluminum fork)
- glue gun
Preparation method:
- Wash the dishes thoroughly and dry them.
- Squeeze a large amount of glue onto the saucer and install the base. Give it a slight slope. Hold the base until the glue hardens completely.
- Cover the glue “puddle” on the plate and the base itself with grains. Please note that the base should be covered with grains in several layers so that it does not look too “thin”.
- Glue the cup onto the base. To do this, apply glue to the inside of the cup, attach it to a fork (or wire), and then wait until it hardens completely.
- Cover with grains all parts of the composition where glue or base is visible. For additional decoration, you can glue a few grains onto the saucer itself.
And here is a short video to make it even more clear.
Candle
A decorated candle is a simple New Year's craft made from coffee beans.
Choose a candle with straight sides, apply glue, and glue the coffee. Decorate to your liking. When the wax is heated, the coffee beans will release aroma. If you want to enhance it, throw a few grains into the melted wax on the surface - you will get a real scented candle.
It is important to use glue with the least harmful composition. When super glue heats and melts the candle material, it will release toxins and have an unpleasant odor. For candles that you plan to use for their intended purpose, choose decoupage glue.
Candle with coffee beans
For this craft you will need: paraffin, wick, grains, candle mold.
Melt the paraffin and add coffee beans to it. Hold the wick by the tip and place it in the middle of the candle mold. Pour paraffin into it. Hold the wick in a vertical position until the paraffin hardens.
If desired, remove the paraffin blank from the mold or leave it inside.
Coffee magnet
A variety of quick coffee crafts for the New Year can be created literally in one evening. For a refrigerator magnet, cut out a heart, snowflake, snowman, cracker, Christmas ball, etc. from thick cardboard. The base is covered with canvas or jeans.
Coffee is glued to one side and a small magnet to the other. Decorate with ribbons, beads, sparkles. If you cover both sides with grains and attach a loop, you will get a stylish Christmas tree decoration.
Topiary made from coffee beans
The most labor-intensive craft is a coffee tree or topiary. To make it you will need a plastic ball for the crown, a stick, a tube or wire for the trunk, plaster and a small flower pot for the mounting base. The manufacturing technology is similar to those described above.
It is better to stick coffee beans on the crown in two layers, this will make it look richer. With effort and patience, you can glue the grains onto the edge - the wood will come out very textured.
If instead of a ball you take a cone and wrap it with jute twine, and glue coffee on top, you will get a Christmas tree in the style of Tilda toys.
floating cup
The design in the form of a coffee cup floating in the air from which a coffee drink pours is amazing. The design is so unusual that the question is: how is this possible? - you will hear more than once.
In fact, everything is very simple. A frame in the shape of a waterfall is formed from wire and thickly mixed plaster/alabaster. After drying, paint and mask with coffee beans. A coffee cup is glued to the top edge with reliable glue, and a saucer is glued to the bottom, which will serve as the base of the composition.
Coffee as a tonic drink was discovered before our era. He is loved and popular all over the world. This means that the coffee theme in crafts will always be relevant.