Did you know that coins can be used to make amazing crafts? They often lie idle and wait in the wings, so use unnecessary coins to make interesting crafts from coins that will be an excellent decoration for any interior.
Various coasters, money trees, panels and many other things can be made from the most common coins.
Benefits of coin crafts
Coins are often associated with wealth and prosperity, which is why crafts made from them are so popular. The main advantages of such decorative products include the following qualities:
- Availability
- Working with metal is quite easy
- Coin souvenirs are strong and durable
- Variety of designs
- Regular round shape that looks aesthetically pleasing
In order to make crafts from coins with your own hands, you can use both old coins from the times of the USSR and modern money, which are small or simply unnecessary change. If necessary, the decorative item can be disassembled and the coins can be used for their intended purpose - for payments.
Crafts from coins photo
Women's jewelry has long been made from coins.
Even stars wear them. For example, we noticed Selena Gomez wearing this.
Another wall in the interior and it looks dazzling. Do you want one? Buy your piggy bank today.
A floor made of coins is painstaking work, but the result is worth it.
Floor made of coins
Table of coins
Floor made of coins
Table of coins
Table of coins
Floor made of coins
Floor made of coins
Onet furniture
Floor made of coins
Another piece of coin jewelry, this time a bracelet.
Vest made of coins. Heavy, but dazzlingly brilliant.
Coin bracelet
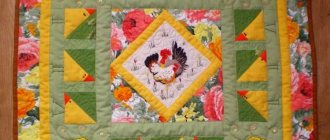
Panel of coins
Panel of coins
Crafts from coins video
Craft ideas
You can make various accessories and decorative items from coins; the choice of crafts is extremely wide.
- Photo frame;
- Souvenirs with a monetary message;
- Floating cup;
- Panels and flower pots;
- Hot pads;
- Topinary;
This is just a small part of what can be made from the most ordinary coins. Various photos of crafts made from coins will help you choose the right option and start making it.
Frame of coins
To make the interior more unusual and interesting, you can make a beautiful frame for photographs or mirrors from coins. It is necessary to prepare the following materials:
- Base (frame).
- Glue gun.
- Coins.
Coins are glued to the base, which must be strong. You can stack them one on top of the other so that there are no gaps. Once the glue has dried, you can use gold or silver spray paint to paint the frame.
Master class from coins
At first glance, it is difficult to make beautiful crafts from small money, but in fact, nothing is easier if your hands know how to bring the plan to life.
To confirm the veracity of our words, let's take a step-by-step look at how to make a gorgeous apple.
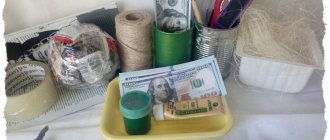
You need to prepare the following materials in advance:
- a base (a plastic orange or apple, a rubber ball, a foam ball, a Christmas tree toy will do);
- glue gun;
- threads;
- scissors;
- coins;
- decorative leaves.
Progress:
- Wrap the base with knitting or regular threads to better adhere the coins to the surface.
- Clean the prepared coins with vinegar solution.
- Using a heat gun, cover the entire ball with coins, starting from the bottom, leaving a small gap for the leaves at the top.
Tip1.You need to glue the coins so that the edge of one coin is on the edge of another, like in fish scales.
Tip 2.
When finishing finishing the base, make sure that the upper part, where the leaves will be, looks neat: dock the coins, arranging them correctly and beautifully.
- Insert wire pieces from decorative leaves into the prepared hole at the top of the product and close the gaps with a few more coins.
Tip 3.
Leaves can be used from ordinary textiles by painting them with shiny paint.
- We glue a beautiful rhinestone between the leaves.
- Place the apple on a shiny plate and decorate with accessories. Here you can spray paint coins bronze.
- You can prepare a separate plate for it, pasting it with a large colored napkin, open it with varnish, and then glue an apple to it and decorate it with beads, berries, etc.
Making a vase
This craft will be a great way to decorate a cracked or damaged vase. Making such a craft is extremely simple; all you need to prepare is an old vase, coins and glue. The vase is simply covered with coins; it is important to remember that the color of the vase should be a single color; for gold and silver coins it is best to use a black background.
You can decorate a bottle in the same way; the finished product can also be painted gold or silver with spray paint.
The vase is extremely simple to make; you can take a vase of any size, as well as bottles or glasses. This idea will tell you how to make a coin craft as simply and quickly as possible.
Making a keychain from a 10 ruble coin
Different people perceive keychains differently.
For some it is jewelry, for others it is a device for storing keys, for others it is a beautiful souvenir that can be added to your own collection or given to friends and relatives. In this material we will look at a method for making a keychain from a 10 ruble coin. We present to your attention a video on making a keychain
What we need: - 10 ruble coin; - mini drill; - paper; - pen; - water; — bearing; - double sided tape; - hammer; - file; - soldering iron; - soldering acid.
Since our keychain will consist of two parts, the inner one of which will rotate, we need to drill a through hole. And to do this you need to measure two points strictly in the center. On the sides of the coin there are two stars, which are located exactly in the center. You can drill these stars, but since they are located along the axis, the keychain will not look so beautiful, however, these same stars can help you find the center and mark it on the coin. To do this, we need to put a coin on paper and make a simple template. We trace the coin with a pen.
We find the stars and make marks on the paper.
Next, we place the coin straight and draw these marks on the coin.
After that, take a mini drill and make holes. You should be extremely careful that the hole runs strictly in the center and is straight. The author also advises using water during the drilling process, which will help do the job faster and better.
It is also important to turn the coin over from time to time during the drilling process to avoid possible unevenness and crooked lines.
When the hole is drilled, check whether it is level. If everything is fine, you can proceed to the second stage.
If desired, you can immediately polish the coin with GOI paste.
Now we need to knock out the core. To do this, take something larger in core diameter. This could be some kind of cap or a piece of thin pipe.
We will knock it out with a bearing. We glue thick double-sided tape with one side to the bearing, and the other side to the coin. Here you also need to be careful that the bearing is glued strictly in the middle.
Next, take a regular hammer and hit the bearing with one sharp blow. As a result, the core of the coin is easily separated from the frame.
Now we need to remove all the irregularities and sharpen the edges of the core so that it rotates freely in the frame. This can be done with a file.
The frame also needs to be processed.
For the next step we will need a soldering iron, soldering acid and a stiff wire around the diameter of the hole on the coin. First we treat the hole with acid. You can use a needle for this.
Now we take the wire, heat the surface of the coin and insert the wire into the hole.
Then we pass the free end of the wire or axle through the hole in the frame.
Another wire needs to be placed at the bottom of the coin.
Cut off all excess.
We make a ring on the top.
Become the author of the site, publish your own articles, descriptions of homemade products and pay for the text. Read more here.
Coin jewelry
Jewelry from coins began to be made many centuries ago. These were all kinds of bracelets and necklaces that could always be exchanged for the necessary things. You can make a lot of stylish jewelry out of coins, but to do this you need to drill holes in them.
From coins you can make a stylish set of earrings, necklace and bracelet, which are strung on wire, chain or leather laces. To make a bracelet, you need to drill two holes in the coin from different sides, into which metal rings are threaded. The clasp is attached separately to the rings.
Panel of coins
This craft is extremely simple and quick to make. Thick cardboard or plywood is used as a base, which must be covered with coins. When the canvas is ready, it must be inserted into a frame. This craft option is suitable for those who collect coins and bring them from different countries.
When a panel is assembled from different coins, it looks more impressive, and the treasured coins will not be lost. Various money crafts made from coins are also relevant for handicraft lovers.
What crafts can you make?
If you have never made crafts from penny coins or any other coins before, then you can start your creativity with light products.
Pyramid of coins
One of the most basic crafts. To make it, glue together 4 rows, each of which will have 6 coins, to form the base of the future figure; similarly, make the sides for the pyramid in the form of triangles from any coins.
DIY box
This product is also easy to make. The only drawback is this: it will take a lot of time. Take the prepared coins, glue them carefully in the form of columns, giving them the shape you like. The lid for the box can be flat or convex. If desired, for a three-dimensional look and decor, you can use any material that happens to be at home.
A vase for flowers
To make a vase with your own hands, take any unnecessary container. Cover it with coins. The craft will fit into the interior of any home.
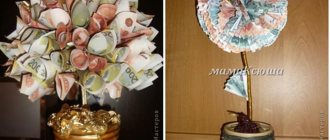
Coin tree
The craft is rightfully considered one of the most popular today. Most craftsmen try to replicate it at home, since wood attracts success and wealth to any home.
What materials will you need:
- Coins (The more there are, the better);
- Textile;
- Scissors;
- Good quality glue;
- Photo frame;
- Napkins;
- Paints with a brush;
- Sponge.
Sequencing
- Take burlap and cover a cardboard photo frame. This will become the basis of the craft.
- Cut and twist two small strips of 2 cm each from napkins. This way you can depict the trunk of the future tree.
- Based on the pre-selected layout, start making the tree. Take rolled napkins and carefully glue them to the base.
During work, use only high-quality glue.
- When all the necessary elements are glued to the burlap, wait until the glue dries and only then continue working. Next, glue the coins. They will look like leaves on a money tree.
Important Tips:
- Try to make the crown full enough so that it looks beautiful.
- If drops of glue remain on the craft while working, you can easily get rid of them using any brush you happen to have at home.
- It is advisable to cover the finished craft with acrylic paint or bronze paint, then insert it into a photo frame.
Interesting tips
- Artificially aged coins that are made using various acids look very interesting.
- To make coins shine, they must be varnished.
- To make a coin table, it is best to use epoxy resin.
The strength and correct shape of the coins, combined with the author’s imagination, will help you create a real work of art. From coins you can create both designer and household items that will serve for a long time.