Before you start
Before you begin to master handicraft techniques and materials that are new to you, you should first stock up on a sufficient amount of materials:
- copper and aluminum wire of different thicknesses;
- colored threads, paper, foil, shreds;
- multi-colored beads, beads, sequins;
- plasticine of different colors;
- dry twigs and roots of interesting shapes;
- chenille (fluffy) wire of different colors.
Of course, making wire crafts without tools is, if not a pointless undertaking, then certainly unpromising: once you pick up this material, you will soon realize that you can’t do much with just your fingers. What tool do you need?
- First of all, wire cutters for biting off wire, pliers and round nose pliers for bending material.
- Soldering iron - many crafts, especially large ones made of thick copper wire, require soldering at least at key points: you will need known skills in handling a soldering iron, which are easy to acquire by practicing on unnecessary scraps, soldering them using rosin and tin. To work with a soldering iron, you will need tweezers (medical or special), since you will not be able to hold the heated wire in your hands. And for completely novice handicraftsmen, let us remind you that only copper wire is soldered; for aluminum there are other connection methods.
- Small Hammer and Anvil - As you will see, some crafts have flattened parts. A suitable massive metal object with a flat surface is most often used as an anvil.
- Fine-grained flat file, a piece of sandpaper.
- Scissors - cut out the necessary elements from paper and scraps.
- Scotch tape or electrical tape - for temporarily connecting individual parts.
These are just the most necessary tools, which in any case will be useful when creating most crafts. As creativity progresses, the need may arise for other, special tools.
Read also DIY crafts from plastic bottles for the garden and at home
Flowers on a fork or ruler
You can decorate clothes, bags, scarves with these flowers, use them to create various decorations and accessories, handmade albums, decorative wreaths, and even just put them in a transparent wide vase. It looks very gentle and beautiful.
Here is a slightly different technique: first we wind the yarn on a ruler and sew the bunches at the base.
A similar option, only we wind it on a fork.
See you soon, friends, take a look at some interesting DIY yarn crafts: the coolest ideas. I would be grateful if you click on the social network button and share the master class with your friends.
Crafts made from copper wire
Copper wire is considered the recognized leader among all materials for “wire” needlework. Wire of different thicknesses is used, which depends on the element of the composition being created. For example, it is advisable to make the frame parts from thicker wire, while the connections and windings are made from thinner material.
We used “copper wire” in the name, but aluminum wire also has all the advantages of this material, the work with which is identical to working with copper, with the exception, perhaps, of the impossibility of soldering connections. Aluminum wire has a brilliant gray tint, which outwardly makes it similar to noble silver: because of this similarity, many DIY wire jewelry people prefer to make from aluminum wire; this is worth taking into account in your creativity.
If you have never made crafts from wire before, we recommend starting with copper material, since, firstly, it is soft and pliable even for children’s and women’s hands, and, secondly, unlike aluminum wire, it can be bent many times. different sides without breaking after two or three bends like aluminum, which gives more room for correcting mistakes.
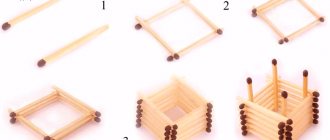
Contour (flat) crafts
Contour crafts made from copper wire are available even for children’s creativity: children like to tinker with such a favorite “wire”, while their imagination and spatial thinking develop very well, as well as fine motor skills, which, among other things, perfectly develops intelligence and strengthens mental health. And how much joy there is from the first successes!
When starting to assemble a flat craft, they adhere to a simple algorithm: starting from the outline, move on to the internal parts, which are manufactured separately, and then carefully screwed to the outline and to each other with thin wire; in the right places they make (if necessary) a tight winding, filling the space.
Typically, children strive to complicate the design of their crafts, and there is no need to interfere with this by artificially restraining the creative impulse. Having felt the creative powers within himself, the child, looking at pictures with examples of crafts, wants to do something more complex, and often these are three-dimensional figures.
Volumetric crafts
Three-dimensional structures are called three-dimensional, which usually have a more complex structure. In addition to purely decorative ones, there are many examples of crafts for applied purposes such as baskets, lanterns, various stands, etc. Often the objects of attention are figures of people, animals, cars, and flowers.
When composing complex compositions, you most likely cannot do without a soldering iron. In principle, any will do - a regular 25-watt one will suffice. The main thing is to first clean the soldering areas from the insulating varnish coating (if any), clean them and carefully tin them using tin and rosin: the areas prepared in this way are then easily and reliably soldered, creating a strong connection.
Read also DIY snowman craft: instructions, photos
Copper wire jewelry. Master Class.
DIY copper wire jewelry. Pendant made of copper wire and natural stone using the wire wrap technique. Step-by-step master class. I wouldn’t dare say that this is a master class for beginners. You should already have some skills in working with wire.
In order to make a pendant we need a small set of hand tools , which can be purchased at a hardware store. These are not all the tools we need. Later in the text I will talk about other tools.
To work with wire you need the “correct” wire cutters. On the outside there should not be a chamfer on the cutting edges, as on ordinary electricians' pliers. I bought the correct small wire cutters for working with wire using the wire wrap technique in China - here . I bought the correct large wire cutters – here
I recommend using pliers with nylon tips for working with wire. You can tighten the braid and bend the wire without fear of damaging it. I bought pliers with red handles - HERE.
Copper wire jewelry. What kind of wire do we need?
The main requirement is that there should be NO varnish on the surface of the wire. Today, to make a pendant we will need wire 1mm and 0.4mm thick. If you have wire of the required thickness in coils, great! If not, you can buy it in online stores.
Believe it or not, I still buy 1mm and 0.4mm thick copper wire at the electrical supply store. Where they sell electrical wires.
I go to the store with a caliper so as not to make a mistake in the thickness of the wire. In the store they will tell you not the thickness but the cross-section of the wire - this is not the same thing. Already at home, I carefully remove the braid from the wire with a knife.
For this pendant we need to make an additional element from wire. You need to flatten the copper wire in special rollers and twist it using a hand drill (clamp the other end in a vice) into a nice spiral.
No rollers!? No problem! Replace with another element. For example, simply wrap a thick wire with a thin one as shown in the video tutorial below. Another option (photo under the video) is to tightly twist two wires with a thickness of 0.5 - 0.8 mm together with a drill (select according to thickness).
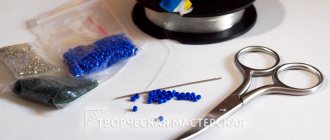
Copper wire jewelry. Stones for jewelry.
It’s not for nothing that I wrote stones in the title. As a rule, I use beads and cabochons made from natural stones. As a last resort - from glass. In the process of work, we use solutions for patination, grind and polish the wire. Using beads and cabochons made of soft materials, we can easily damage and ruin them.
Before we start working, watch the video tutorial on how to braid three wires. That is, you can replace the element with a piece of wire of the same thickness and braid it in any way.
In this master class I use a flat stone pendant (bead) with a hole. We have already made a pendant with such a flat bead in the last master class.
You will be required to be precise and careful in your work.
How to make a ball at the end of a copper wire? We will need a gas burner and a gas cylinder. Now they are sold on “every corner”. Hold the wire vertically with pliers or tweezers. Place the tip of the wire near the tip of the blue flame. Hold until a ball of the desired size is formed. Cool in water and polish.
To work, use the nylon jaw pliers that I described above. Next - everything is as in the photo.
I sometimes use affiliate links in my articles. In some cases, when you click on these links and purchase something, I receive a small commission from the seller. This does not cause any harm or damage to you personally. Sometimes it even brings additional bonuses for you. Thanks in advance everyone!
Copper wire jewelry. Patination (aging) and polishing of copper.
To give the product an old, vintage look, artificial aging of copper is used, followed by polishing. Ammonia can be used to patina copper. which is sold in pharmacies. Pour ammonia into a glass jar with a lid. We hang the product OVER THE AMMONIA SOLUTION!!! After some time the copper will darken. We take out the decoration, wash it and dry it.
Also for patination, special universal solutions are used, which can be purchased in online stores. After patination, copper must be polished.
For polishing you will need: a grinding machine (you can use a screwdriver, electric drill), polishing felt circles with polishing pastes. For fastening the circles, a threaded rod (not with a bolt as in the photo) is more convenient. You can quickly change felt tips. You can buy it, for example, HERE . Polishing pastes can also be purchased in our online stores. Look at the name in the photo and enter it into the search.
Over time, copper darkens and becomes covered with a new patina. If you do not want to constantly update the jewelry (polish the copper), you can coat the entire product with Tsapon varnish. Varnish can be purchased at hardware stores. I usually varnish one product 2-3 times. Be sure to read the instructions.
Our decoration made of copper wire and natural stone is READY!!! Can be worn, given or sold. Read how to properly sell your handmade products on the Internet on my new website “Make Money with Handicrafts”.
Save the Pin below as a bookmark to your Pinterest board!!!
Did you like the master class!? DON'T BE LAZY, share with your friends on social media. networks!!! I will be grateful.
Share link:
Crafts made from wire and beads
This is perhaps the most common technique today and is extremely popular. Of course: multi-colored beads placed on a wire frame allow you to create incredible crafts for a wide variety of purposes and levels of complexity.
As a rule, people begin to get acquainted with this technique with simple (by the way, not always) flat crafts - bracelets, pendants, pendants, earrings, various butterflies and flowers. Even at this level, a huge number of crafts have been created, repeating which is the best practice for independent creativity in the future. And if, repeating someone’s model, you use beads of other colors, you can get a completely unique thing!
Volumetric wire-beaded crafts are, for the most part, prefabricated models from pre-assembled elements that are attached to each other either by twisting or soldering.
Very often, completely foreign objects are used as an additional element, for example, dry twigs of an interesting shape: you can often find “bonsai” made of wire and beads, where a piece of a branch directly with the bark, stuck into a flower pot, is used as the trunk of a miniature tree. To prevent the branch from standing out against the background of shiny beaded parts, it is advised to first open it with varnish, which will give it a certain shine and keep the bark from peeling when it dries out.
The undoubted advantages of crafts made from wire in combination with beads and beads include their colorfulness, attractiveness and the ability to quickly build something worthwhile: this will primarily interest children who, due to their personal characteristics of perception, may not appreciate abstract crafts from ordinary wire.
Crafts made from wire and thread
In our opinion, interesting crafts are made when using ordinary copper or aluminum wire and colored floss. The most common are all kinds of flowers and funny little animals made using this technique.
Most of these crafts are voluminous: as can be seen in the photos presented, the threads play the role of winding on a wire frame of the desired shape. For example, a flower petal is made from wire twisted into a spring on a rod of a suitable diameter (from a fountain pen, a long nail, a knitting needle, an even piece of solid steel wire, etc.), then a thread of the desired color is pulled between the wire coils, laid in a dense layer .
The body of the animal, its legs and tail, as well as the head are formed from multi-layered thread wound around the frame. Eyes, nose - made of beads or suitable beads, small buttons; whiskers (for a cat) - from pieces of fishing line or thin elastic wire.
Read also Decorating the entrance for the New Year: tips, ideas, photos
Crafts made from wire and colored paper, scraps
In essence, there is nothing unusual in this type of “wire” crafts. The main task of paper and flaps is to fill the frame space, the outer lining of the frame, and additional elements such as sails, flags, and leaves. For example, soft green paper is used to cover the stem of a wire flower. There are many uses for colored paper tape.
Crafts made from chenille (fluffy) wire
So we have come to perhaps the most modern subspecies of wire crafts - chenille wire, which has received the common name “fluffy”. Which is not surprising considering her appearance.
This type of wire is a flexible twisted wire, wrapped in a special way with fluffy pile of a certain color and is produced specifically for creativity. However, as often happens, it was invented for purposes very far from children's handicrafts: chenille wire was originally developed for cleaning smoking pipes and mouthpieces. One day, someone had the idea to roll it into something like an animal, and an idea for a business was born: the pile began to be made in different colors, and the wire itself was longer. It is not difficult to buy chenille wire in specialized online and regular stores of creative materials.
In the presented pictures it is noticeable that crafts made from fluffy wire are largely freed from the need to use threads and scraps of fabric, since the material itself provides the figurine with “filling” or, in other words, “body”.
Making fluffy wire figures is not at all difficult, you can learn it very quickly, the main thing is to practice a lot. There are also flat and three-dimensional models, and the manufacturing process is not particularly different from ordinary copper (aluminum) wire.
Good models are obtained by combining chenille wire with ordinary copper wire, as well as with the technique of thread winding and beads. Decorative adhesive eyes have become widespread.
From the presented examples of ready-made crafts, it is easy to understand their structure. The main method of connecting parts is mutual twisting, but some craftsmen use hot-melt adhesive, which is applied in an inconspicuous place and thus the parts are connected. There is an ambiguous attitude towards the glue method of joining in wire crafts, but whether to use glue or not is only your choice, the main thing is that everything is neat.
Next, we offer you to look at several examples of works of different levels of complexity, made using different techniques from different types of wire and decor.
Wire crafts - ideas for home and garden. 100 photos of creation options
You can make interesting crafts from wire (flowers, trees, bracelets, brooches, beads, etc.), which will serve as an excellent decoration for the interior. Even a preschool child can make simple wire products.
For home handicrafts and crafts with children, copper wire is used, which is very soft and flexible. Candlesticks, vases, brooches, etc. can also be made from this type of wire.
Handicrafts help develop children's attention and fine motor skills, as well as distract and calm the nervous system. The child receives a lot of positive emotions in the process of creative activity.
- Craft wire can be purchased at a craft store or online.
Tools
To make wire products you will need the following tools:
- tongs that have round ends;
- wire cutters;
- copper wire;
- materials for decorative finishing (beads, all kinds of stones for decoration).
It is very popular to make crafts from fluffy wire, which is a flexible wire wrapped in lint. You can make a lot of different crafts from it. The products turn out beautiful.
- You can purchase this type of wire online or in any bookstore. Products made from fluffy wire can be of two types:
- flat products;
- volumetric products.
- Chenille (fluffy) wire was invented for cleaning smoking pipes.
Christmas tree
To make a Christmas tree you need to take a shaggy green wire and twist it into a cone, in the direction of the spiral. It is necessary to gradually reduce the size of the circle.
- Using a similar pattern (in the form of a spiral), you can also make a caterpillar, snake, snail and other animals.
- This is an excellent option, for example, for crafts for kindergarten, since it does not require special skills and time for busy mothers.