Benefits of plastic cups
Cups are good because they allow you to create three-dimensional shapes. This advantage has a beneficial effect on the development of the child, making him:
- smart;
- attentive;
- diligent;
- able to see beauty in ordinary objects.
By making simple things, children acquire skills in working with glue, scissors, learn to model, and learn the properties of various materials. The experience gained will make learning in kindergarten and school easier.
So, what do we need and where to start?
Materials
Select appropriate materials. Both ordinary plastic cups and colored ones can be used. You can combine different volumes, which will allow you to create a variety of unique shapes.
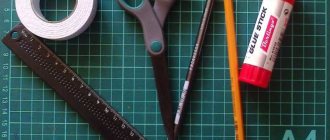
What you will need:
- Scissors,
- Cray moment or second,
- Scotch,
- Needle with thread,
- Marker,
The work table on which the child will craft can be covered with polyethylene or newspapers to make cleaning more convenient. Cling film can work well for this purpose. If you don’t have such funds, you can take a garbage or regular bag, cut it, and build a covering for the craft.
Important: Be sure to advise your child on the safety of working with materials or work with him. The main thing is that a small child is not left unattended.
So, the table is ready, there is a set of materials, what else:
- Acrylic or any other thick or gel based paints?
- Sequins,
- Rhinestones,
- Beads,
- Beads.
As you can see, additional materials can be anything you like.
What can be done?
The following are interesting master classes for handicrafts with children from the authors of dnevnikmastera.ru.
Bunny
Having made several animals in the same likeness, you can play theater and perform interesting scenes. The following will be useful for work:
- A white plastic cup, if you only have a transparent one on hand, then paint it with snow-white gouache;
- A small piece of felt, white and pink;
- Black marker;
- Doll flat eyes, sold in departments with goods for creativity;
- Cocktail tube.
The master class on creating a bunny includes the following steps:
- Cut two identical elongated parts from white felt;
- Cut out slightly smaller elements from pink felt and glue them onto the white parts;
- The result was a pair of bunny ears;
- Place the glass upside down, open side down;
- Glue the ears vertically with PVA glue, leaning them just below the bottom;
- Make a muzzle, glue on the eyes;
- Cut the cocktail tube in half, cross the halves and stick it on the face, depicting a mustache;
- Using a marker, draw a smile and eyebrows in a “house”.
In the same way they create a bear, a wolf, a frog and other animals. Plastic cups can be easily painted with acrylic paint in any color.
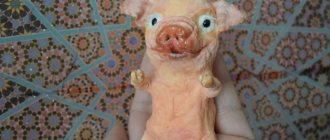
Dog made from yogurt cups
Looking through photos on Internet resources dedicated to the development of children, you can see that you can create original crafts and even decorative items from scrap materials. A striking example is a dog made from three yogurt cups. Production takes literally half an hour, but the child receives an unusual toy, to the creation of which he also had a hand.
Master Class:
- Cut off the top of one cup and insert it into another, you get a part (head) closed on both sides;
- Yogurt cups have a characteristic flap; you need to cut off the excess, leaving only round elements that resemble ears;
- You need to glue purchased eyes to the resulting head or draw them with a marker;
- Draw a round nose and attach a felt tongue;
- For the third glass, on the side where the drinking part is, you need to cut off the excess material, depicting four legs;
- Glue the head to the body with PVA glue.
To assemble parts, you can use the hinge method. This will allow the dog to move its head. Hinges are sold in creative departments and are inexpensive.
Features of crafts made from disposable cups
The availability and low price of the starting material make crafts from disposable cups an activity suitable for children of any age. Paper cups are easy to cut with scissors, connect to each other, or glue additional elements to them, creating anything that comes to mind. Successful products, especially those covered with fabric or thick paper, can be stored or used for a long time, and you don’t mind throwing away unsuccessful copies.
Composing various crafts based on the same simple form develops the child’s imagination and creative thinking.
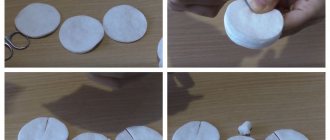
Examples of ready-made crafts
You can come up with an endless number of options for what can be made from a cardboard cup: toys, accessories, lamps, packaging for gifts or storing small items, and much more - it all depends only on your imagination and the amount of paper containers.
Animals and people. You can use purchased eyes for toys or make your own from colored paper.
Crown made from a finished bezel.
Various little animals.
A variety of noses that can be used for play or to teach your child about animal species.
Different types of birds.
New Year's event calendar.
Halloween Crafts.
Volumetric applications using cocktail tubes.
Summer “glass” cafe. How to make an umbrella is shown here.
Glowing angels.
Garland of flowers.
Lampshade for a chandelier.
When creating luminous crafts, be sure to follow fire safety measures, ensure that the light bulbs do not touch close to the walls of the cups, and do not leave paper lamps unattended.
New Year's bell toy
The bell is considered a simple craft. It can puzzle children aged 3-4 years. An adult's help consists only of making a hole in the bottom and inserting a ribbon folded in half into it and making a knot on the inside. A glass with a loop resembles a bell and is easier for a child to decorate.
The most affordable way to decorate is with a brush and paint. By coloring a glass, the child acquires the skills to work with a non-standard surface. After all, to depict a simple leaf, you need to get creative. Basically, children draw repeating dots and strokes with colored paints.
The resulting bells are good as independent souvenirs that the child proudly gives to his grandparents. While waiting for the New Year, you can stick paper snowflakes and tinsel on the bells and decorate the Christmas tree with them.
Making origami and appliques
As we already wrote above, the most common homemade products made from cups are appliqués and origami. If the essence of the application is to apply images in various ways, then origami is to cut a glass and connect or fold the resulting ribbons in a certain way.
So, for example, if you want to create crafts from plastic cups in the shape of flowers, you will need 3 copies of this dish. Also, have a stapler and scissors ready. It is best to use cups of different colors - the flower will look as festive as possible.
When the material is selected, you need to leave one cup at its original length, the second one will have to be shortened a little, and the third one will have to be cut even shorter. After the cups are prepared, you need to cut each of them to the bottom and twist it by running a scissor blade along these strips. In this way, as many “flowers” are made as necessary to create an artificial bouquet.
Snowman
A snowman made from plastic cups makes a real splash at any event. His height is comparable to that of a human, and a light source is hidden inside, which turns the snowman into a real masterpiece of creative craftsmanship.
Basic materials needed for work:
- several dozen transparent cups;
- hot glue and a gun.
The manufacturing instructions look like this:
The first layer (base) is formed by 20 containers glued together on their sides;
- In the next row, the number of cups increases after one;
- In the next one - in two;
- And so on until the volume of the ball, which was conceived in theory, is reached;
- Then the number of containers in each row must be systematically reduced.
Using an identical method, make two more balls of smaller diameter. Build the parts on top of each other, placing the smallest one on top. You can form a snowman from two balls.
When the figure is ready, you need to make a carrot nose from scrap materials. It should not be heavy so as not to outweigh the light snowman. You can use a plastic bottle, in which you first cut off the bottom part and paint it orange. A scarf knitted with large knitting needles will add to the snowman the image of a kind and long-awaited guest who came in from the street for the holiday.
The inside of the snowman is hollow and you can fit a small lamp inside it. When working, you must follow safety regulations.
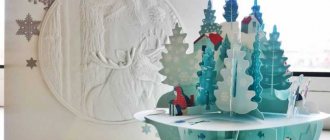
Christmas tree made from cups
A Christmas tree can be made from any materials, but it looks especially attractive when made from cups. Both cavities are involved at the same time - the Christmas tree stretches upward, and at the same time leads the eye in a horizontal direction.
To create a Christmas tree you will need:
- opaque plastic or paper cups;
- green tinsel;
- small Christmas balls, the size should fit inside the cup;
- hot glue.
When working with hot glue, be careful not to get burned.
Step-by-step manufacturing plan:
- Place five containers next to each other and glue them together on their sides;
- Place four cups in the next row, and in each subsequent row decrease their number until only one remains on top;
- Place a little tinsel on the bottom of each container;
- Attach a Christmas ball to the rims of the cups.
The tree is simple, but looks incredibly beautiful. It can be used to decorate the interiors of offices, departments in shopping centers, apartments, and placed in school classrooms and groups in kindergartens. A festive mood is guaranteed to everyone who visits these places.
Plastic cups as an ornamental material perform well in creative work. They are actively used in preschool institutions to develop motor skills, perseverance, and the ability to finish a job. For every holiday, you can make a funny souvenir from simple cups.
https://youtu.be/wsqmtQF84cshttps://youtu.be/gwufPTJwpuc
_
New Year decoration
How to make a New Year's craft from cups step by step with a detailed description? You can find the answer to such questions on any art server.
We will introduce you to the most common variations of New Year's plastic products.
One of the simplest is the so-called New Year's “ball”. We think we've all come across glass pants with snow flying inside on their own. So it’s easy to do it with a glass.
It is enough to come up with what you want to see inside and create it. Buy silver sparkles. Next, place the pre-made composition along with glitter under the transparent base and glue it to the bottom. That's it, so fast and so cheap!