Isothread - non-traditional embroidery, basic techniques, patterns with numbers
There are many types of handicrafts - sewing, knitting, creating jewelry, floristry, decoupage and much more.
Everyone can choose a hobby to their liking. I was interested in non-traditional embroidery - isothread. What is isothread embroidery, how did it appear and what are the basic techniques of thread printing - we will look into it today.
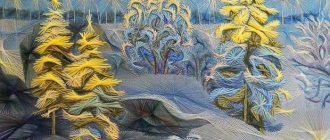
Thread graphics, isographics, thread design, isothread - all these are names for the technique of creating paintings from threads on a solid base (cardboard, velvet paper, leather, etc.). With its help, very impressive works are created, and besides, in order to engage in thread printing you do not need any special costs or materials.
England is considered the birthplace of isothread. According to one version, Mary Everest Boole, a famous English explorer and mathematician, invented the technique of filling various shapes with thread to help children learn geometry.
According to another, isothread was invented by English weavers, who created tapestries in a special way by intertwining cords on a wooden base with nails driven into it. Today, this technique has been simplified by eliminating boards and nails and replacing them with more affordable materials.
Materials and tools for isothread embroidery.
— Base — cardboard, artificial suede, velor, leather, sandpaper or velvet paper. The base must hold its shape and at the same time be such that it can be pierced.
- Threads, cords - it is not recommended to choose thin silk or woolen threads. Everything else is up to your taste. The most popular threads for isothread are floss and iris; they have a rich range of colors.
- Glue (or tape) - any will do: stationery, "Moment", PVA, wallpaper - needed to secure knots and ends of threads on the back side of the product.
— Paper—an ordinary piece of checkered paper—for working drawings.
- An awl or safety pin - for making holes in the base.
- A needle with a large eye - for embroidery.
— Ruler (compass) — for measuring the distance between points and creating a neat drawing.
- Pencil.
- Substrate - polystyrene foam, an unnecessary book, cardboard - so that it is convenient to make holes in the base.
Isothread - the main embroidery techniques.
At first glance, it seems that weaving patterns using the isothread technique requires varied and complex patterns.
In fact, in this technique there are three main techniques for filling a pattern: filling a corner, an arc and a circle. The remaining elements are built on their basis.
Filling a corner when embroidering using isothread technique.
On the wrong side of the cardboard you need to draw an angle. Divide its sides into an equal number of segments. Use a pencil to mark each point, giving it a number. The numbering of points on the left side is from edge to top. On the right side - from the top of the corner to the edge. Punch holes in the cardboard at the points. Fill in the corner according to the diagram.
or so
Angles can be obtuse, acute, with sides of different lengths.
They may change depending on the design of the pattern or be partially stitched.
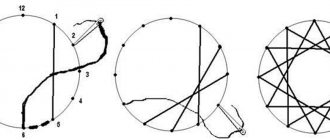
Filling a circle when embroidering using the isothread technique.
Draw a circle on the back of the cardboard.
Divide it into equal parts.
Punch a hole according to the markings - it is important that the number of punctures is even.
Use an arrow to indicate the direction of stitching.
Fill the circle according to the diagram.
The longer the stitch, the more filled the circle appears.
Circles can be changed depending on the pattern into ovals, various irregular shapes. They will be needed when embroidering flowers, birds, and animals with isothread.
Making an arc and spiral when embroidering using the isothread technique.
Arcs, spirals, curls are sewn according to the same rules as circles.
To stitch, you need to draw an arc on the wrong side of the cardboard and divide it into segments. The length of the segments can be different, depending on the purpose of the elements, but most often the recommendations advise making the length of the segments the same. These elements are used to depict bird tails, snowdrifts, waves, clouds, leaves, and decorative elements in various compositions.
Isothread is perhaps one of the most unusual types of embroidery available to people of any age. Nitography is good for developing imagination and artistic taste, and helps train memory and fine motor skills in both old age and childhood.
And after training on simple elements, you can not only embroider patterns of varying complexity, but also come up with your own compositions.
Isothread schemes with numbering for beginners.
Pattern for embroidering a mouse.
You should start flashing it from the body, moving to the ears. The ears are filled in like one of the main figures in isothread – an oval. The tail, according to the pattern, is embroidered with crosses. The lower arc of the body contour is embroidered with a stitch, the length of which is indicated on the sketch by a line between points 1 and 2. The arc located at the top is stitched in four stages with stitches of different lengths. These designations are marked on the diagrams in the form of numbers I, II, III, IV. For mouse embroidery using isothread technique, grey, black and brown thread colors are suitable. The nose and eyes are cut out of paper and glued in the right places.
Chamomile embroidery pattern.
To make a chamomile flower using the iso-thread technique you need to: embroider several petals; in the middle of each of the resulting flowers, sew a bead; using the diagram to work out the buds; Embroider the leaves and stems last.
Cornflower embroidery pattern.
To create a cornflower you need to - embroider the core of the flower - a circle (steps one to ten); carefully sew a bead along the contour; depict the petals of a plant; embroider leaves (steps one to eight); embroider the stems (steps one to three); finalize the remaining elements.
Dandelion embroidery pattern.
The flower and dandelion bud are embroidered with yellow thread using the method of filling the arc with triangles. The stem is created with stitches of green thread. The leaves are made by filling the corner with green threads.
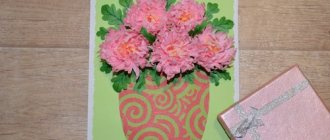
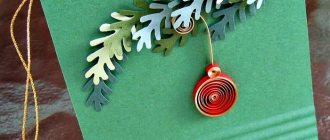
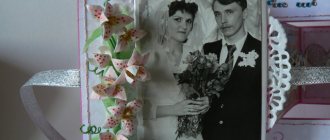
Thanks to the Internet, you can find a lot of embroidery patterns using the isothread technique, from very simple to very complex. With their help, you can decorate a postcard, gift bag, notebook, or embroider a picture of tonal isothread to decorate the interior. In any case, the isothread technique is a wonderful type of needlework suitable for any age and very exciting.
Embroidery patterns using isothread technique.
Templates and examples for children
Isothread is used in technology lessons for children; simple patterns are suitable for elementary school students (grades 1, 2, 3, 4). Older children and adults can create more complex and fancy patterns by combining several needlework techniques.
to contents ^
Chick
This chicken is made using a template and a simple diagram.
A detailed master class is presented in the video.
to contents ^
Butterfly
to contents ^
Fish
How to make a simple fish is shown in a step-by-step master class. For the base, use a template or draw an image of a fish with dots yourself.
Other schemes:
to contents ^
Christmas tree
There are many options for how to make a Christmas tree.
to contents ^
Snowman
to contents ^Snowflake
to contents ^