Beach robe
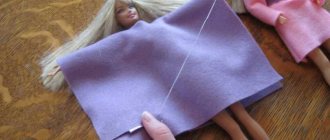
To make a robe with a hood for swimming, you will need to cut out a rectangle with sides 16 x 29 cm. On this rectangle you need to make cuts for the armholes. To do this, put a length of 18 cm up. Divide this line into three parts - 5 cm (right shelf), 6 cm (back), 5 cm (left shelf). On a segment of the back line at the beginning and end, set aside 3 cm upward and make cuts.
Bend the edges of the shelves by 0.5 -0.7 cm and iron them.
Fold the robe blank in half.
Make the top seam. This is the formation of the hood.
The bathrobe with a hood is ready.
The belt for the robe can be cut from the edging of the T-shirt neck.
We try on a robe with a hood and tie the belt.
Paper dolls and accessories
Paper dolls can be a good component of exciting play. Here everything is limited either by your imagination, or on the Internet you can find a large number of samples of dolls of various shapes, hair and eye colors.
Clothes for paper dolls are very easy to make. A variety of ideas can be found on the Internet, magazines or books. Rectangular grips are used for fastening to clothing.
To work you need paper, scissors, glue, colored pencils, markers or pens. The paper doll needs to be placed on a sheet and traced along the outline. It is important to outline the shoulders, waist, hips, as well as those parts on which the outfit will be “put on”.
Rompers
If the T-shirt had a print, then you can cut out a beautiful summer jumpsuit for Barbie. To do this, cut out a rectangle with sides 16 cm (width) x 12 cm (length).
Make folds on the wrong side and iron them.
Fold our rectangle in half with the front side. Make a seam, not reaching 3 cm from the top.
The blank for the overalls is ready.
It is necessary to mark the cuts for the armholes.
Make cuts of 3-3.5 cm for the armholes on the sides of the workpiece as shown in the photo.
Turn the workpiece for the overalls inside out. Mark a 1cm long seam line down the middle to form the shorts.
Mark shoulder seams. To do this, divide the top line of the overalls into approximately 3 equal segments.
Make shoulder seams and a line for the shorts.
Turn the overalls right side out and iron. Summer jumpsuit for Barbie is ready.
Rear view of the jumpsuit.
Trying on a jumpsuit with a print.
Hair washing, detangling Barbie's hair
Many collectors have success using regular shampoo (baby shampoo is best) and conditioner to wash Barbie's hair. You can also successfully wash your doll's hair with mild regular soap and then use conditioner to soften and detangle the hair.
However, some soaps may discolor the hair of some Skipper and Twist and Turn dolls. In any case, if you use conditioner, make sure it doesn't damage the hair, dilute it and try it on the doll's hair at the bottom where it is not visible.
Summer long jumpsuit
Cut a rectangle measuring 18 cm (width) x 23 cm (length).
Fold a rectangle of knitwear as shown in the photo.
Fold the part again.
Cut a 1 cm wide strip at a height of 12 cm from the bottom line, forming (rounding) the seat line.
Make cuts for the armholes 4 cm long from the top of the piece.
Lay out the part.
Turn the piece right side out and make internal seams on the legs. Make shoulder seams 2 cm long and a seam on the back, not reaching the top of the overalls 3 cm.
Try on a printed jumpsuit on a doll.
Replacing doll earrings
Do you like the look of Barbie's little pearl earrings, but don't want to risk a green ear problem in the future? You can get the exact same earring look using small white pearls from craft stores!
Pearls can be attached to plastic monofilaments (fishing line will do) rather than metal, so there is no risk of a green ear. Lubricate the thread with glue and glue the bead to the thread (fishing line), leaving an end that will be inserted into the doll's pierced ear.
Or you can simply glue pearl halves to your ears (they are sold in the rhinestones for decoration section). The same (gluing) can be done with porcelain dolls.
Monofilament pearl earring.
Side view.
Summer dress
Cut two rectangles measuring 11x15 cm from knitted fabric
Place two rectangles next to each other and make armholes at a height of 4-5 cm from the top (cut off the triangle on both sides).
Make a 6 cm long cut on one of the pieces. Sew the side seams.
Iron the dress and press the seams.
Prepare the tie.
Place the tie under the seam allowance and sew the seam allowance to the dress.
Gather the detail at the tie.
Attach seam allowances to the back of the dress. Gather the details of the dress at the tie.
Try the dress on the doll.
You can tighten the tie on the top of the dress more tightly.
Decorating ideas
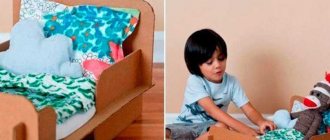
Like an ordinary house, a dollhouse can be decorated endlessly - adding new details, updating dishes or textiles, moving furniture. Moreover, accessories are easy to create from scrap materials:
- Pillows are stuffed with padding polyester, just like upholstered furniture.
- Buttons are useful not only for the handles of chests of drawers or bedside tables, but also for decorating pillowcases, blankets, and other textiles.
- Plastic corks can be used to make ottomans, and wine corks can be used under tables and armchairs.
- Straws and toothpicks are suitable for slats - both frame and external, and they also make a good base for floor lamps.
- Fabrics add the most comfort. You can change bedding, update curtains for the season, or even recreate different styles, from country to classic.
- Wallpaper can also be made from scraps of fabric or pasted over the walls with decorative tape (the size of the pattern on it is more suitable in proportion to a doll's house).
- Foil will make a mirror in a dressing table or closet.
- You can even use chocolate egg containers or shoe covers - they make great pans and pots.
When choosing decor material, you need to take into account the age of the child. For example, beads, like any other small parts, should only be used with children over 5 years old. Paints must be safe, as well as varnish.
Despite the huge range of products for dolls, hand-made items still remain unrivaled. Accessories and furniture made of cardboard, plywood or plain paper help develop a child’s imagination; they have more warmth than factory-made ones. In addition, it is not necessary to settle on complex models - assembling a chest of drawers from matchboxes will take no more than half an hour (including drying), and an ottoman made from cork, despite its simplicity, will look better than a factory one.
Types of children's furniture sets, reasons for popularity
However, if you wish, you can take advantage of master classes for professionals - they tell in detail how to make furniture for Barbie that looks like it came out of a designer’s workshop. Everything goes into use, from used plastic containers to specialized tools. A little effort - and the decor of the house will be the envy of any furniture department of designer toys. Such items will be completely exclusive, which will also delight children.
DIY Barbie doll
Created in 1959, the Barbie doll is still very popular. And not only for children. For example, for collectors it is also a coveted object. Barbie is every girl's cherished dream. And parents, if possible, try to purchase this doll for their children. But what if your little one’s collection already includes a Barbie rider, a ballerina, an athlete, a nurse or little mermaids? The conclusion suggests itself - make a doll with your own hands!
“Do-it-yourself Barbie doll” master class
Making a new, original version of Barbie is not difficult. You don't have to be a talented designer or artist to do this. Of course, if you set yourself the task of making the most accurate copy of Barbie, you will have to spend a lot of time and money, and put in a lot of effort. But there are much simpler ideas. This could be a polymer clay doll or a rag doll. In principle, children don’t care what it’s made of. The main thing is that your child likes the result. Homemade dolls are practical (if they are made conscientiously!), cozy and, unlike people, do not age, so more than one generation will play with them. In stores you will find special materials for making dolls, and even individual auxiliary parts (wigs, eyes, shoes, clothes). No, if you don’t bother too much, you can do everything yourself!
In order for your DIY Barbie doll to last longer and be playable with, you should choose a simpler and more durable material for it. Products are usually made from plastic or cold porcelain for decorative purposes, which collect dust on shelves and are not practical in children's games because they can break if handled improperly. For a doll, for example, salt dough is perfect. It is made from water, flour and salt in proportions of 0.25:1:1 (measured in glasses). The dough is a simple and cheap option; and even if the toy breaks, you can always quickly find a replacement. Or clay will serve as an alternative. If you really want to work with a material similar to porcelain, then it can be replaced with a mixture of glycerin, PVA glue, starch, cream and water.
The doll is sculpted and formed from the selected material in the form in which the author sees it. She can be tall or short, plump or thin. For a doll, you can sculpt all the parts separately, and then combine them into one; or immediately sculpt as a single whole. After which the finished product is dried in a warm room or in the oven. And then the workpiece can be painted with acrylic, gouache, artistic varnish and other types of paints. You can mix all kinds of dyes into the dough in advance and immediately get parts of the desired shape and color, so that you don’t have to cover the doll first with paint to match the color of the skin, and then adding detailing. In such cases, it is convenient to make a mulatto Barbie or a Barbie in a diving suit. The base will be ready, all that remains is to apply your face and makeup.
Sewing Barbie dolls is also a great option. To sew a doll you will need fabric, cotton wool or padding polyester for stuffing and yarn for hair. Patterns are made on paper: a large circle is drawn for the head, the body is made in the form of a rectangle with rounded corners; arms and legs are drawn immediately along with hands and feet. According to the patterns, cutting is done on flesh-colored fabric. The head part is “baited” along the edge with a thread, a cotton ball is placed in the middle and the thread is pulled together, securing the part with several stitches. The result is a ball of the desired size. Beady eyes are sewn onto it, hair is made from yarn, and the mouth and nose are drawn with felt-tip pens. Barbie's head is ready.
The pieces for the arms and legs are cut out in pairs, folded right sides inward and sewn together. Then the blanks are turned inside out and stuffed with padding polyester. The torso is also stuffed; but a frame should be inserted into it so that it can support the weight of the head, and in general the doll has a stable appearance. The head is connected to the body; legs and arms are sewn in. Beautiful clothes are made from colorful scraps. The rag doll is complete.
One more question: how to make hair for a doll? After all, each material requires its own approach. The easiest way is to buy a ready-made wig or material from which it is easy to make neat strands. Or you can take ordinary knitting threads and make a fancy hairstyle out of them. If, say, you are making a DIY Barbie Doll cake , then it is better to put the hair in a ponytail or secure it with a net, or mold the hair from the same material as the doll itself (in this case, imitation of a short haircut or a bob is most suitable).