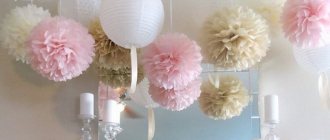
Instructions for making New Year's balls from cotton wool, disks and sticks.
With the New Year holidays approaching, people are eager to decorate their homes and make it more comfortable. One of the most basic attributes of the New Year is the Christmas tree. It is decorated with garlands, tinsel, and Christmas tree decorations. Of course, you can buy everything you need at the supermarket, or get a little creative and make your own Christmas decorations. To do this, you can use affordable and cheap materials.
Second life of CDs
Almost every family keeps a large number of them - recordings of favorite performers, feature films, necessary programs.
You can view captured matinees in preschool institutions and graduation parties at school, collected interesting graphics and a lot of different information.
However, the time of parting comes, and the hand does not rise to throw away such iridescent and sparkling things with many colorful highlights.
What can be done from old disks
The proposed instructions and master classes will allow you to bring your planned objects to life. There are plenty of options, it's your choice.
Show time beautifully
An important home attribute is a watch, which is easy to buy. But how much more pleasant it is to look at a handmade creation - a watch made from disks.
You will need very little:
- CD/DVD;
- glue gun, screwdriver;
- dial numbers - what they will be like, your imagination will tell you;
- clockwork.
You can begin to manufacture a unique mechanism. It only takes five steps:
- remove the clock mechanism (if there is no new one), remove the hands, remembering the sequence of their location on the clock roller;
- glue the clock device to the back side of the disk, return the arrows to their place and insert the battery;
- prepare the dial-disk using a protractor (maybe 12 parts or 4);
- glue the selected numbers onto the disk and allow time to dry completely;
- We adapt a means for installing the clock (a loop, if you need to hang it on the wall, or a support stand).
Disco clocks can be used for their intended purpose. As an option, you can decorate the dial with various decoration techniques, rhinestones, and decals.
The most spectacular holiday with a fabulous atmosphere is the New Year. Wonderful New Year's crafts made from CDs will delight kids and adults.
Such colorful decorations are suitable for decorating a child’s room, as well as a Christmas tree decoration.
How to make New Year's balls from cotton swabs: step-by-step instructions, description, photos
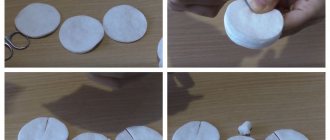
If you like to be creative, you can make Christmas tree decorations using cotton swabs. To do this, you will need capsules from Kinder surprises, an awl and the sticks themselves.
Instructions:
- Use an awl to make holes in the Kinder Surprise capsule. Insert cotton swabs cut in half into these holes. Please note that in order to give the product a spherical shape, you will have to adjust the depth of immersion of the sticks into the Kinder surprise capsules.
- You will get something very interesting, similar to a snowflake or a hedgehog. You can decorate such products with glitter, as well as regular watercolor or acrylic paints. If you want the ball to look quite organic, before making holes in the Kinder Surprise capsule, paint them using acrylic paints.
- You can also use regular watercolor paints mixed with soap. This way, the dye will not spread over the smooth surface of the plastic. Only after this proceed to immerse the cotton swabs in the prepared bases.
New Year's balls from cotton swabs New Year's balls from cotton swabs New Year's balls from cotton swabs New Year's balls from cotton swabs
Getting ready for the celebration
Prepare glue, colored parchment, and braid for the items you made. Place figurines of snowmen, Christmas trees, amazing snowflakes, and confetti of firecrackers on sparkling disks.
Create snowmen from round cotton swabs (adjust the circles to the required sizes), complement the appearance with bright elements (scarf, hat, buttons).
Cut it out of green velvet paper and apply some nail glitter. Create a multi-colored scattering of firecrackers with a hole punch.
All decorative elements are easily glued to the disc. We attach a looped braid at the back, and New Year's decorations from the disks can be hung on windows, walls, and branches of the forest beauty.
To make the holiday feel right when you enter the house, we will decorate the hallway.
Christmas tree toy “Winter sun”
Kulikov Arthur, 4 years old, Khabarovsk, kindergarten No. 104. The work “Winter Sun” was made (with the help of his mother) from waste material and is intended for decorating a street New Year tree.
The base is a cardboard circle, lined with padding polyester on both sides and covered with fabric (organza).
The finishing is done with acrylic paints, contours, glitter; tinsel, beads. The rays of the “sun” - “handles from a plastic can” are decorated with ribbons; decorative boots, mittens and a hat made of fabric (organza).
Pig "Sunny"
A large and light Christmas tree decoration can be made from waste and improvised materials - newspapers and colored tape. How - watch the master class.
“Christmas tree toy “Squirrel” . Kulikov Kirill, 7 years old, Khabarovsk, secondary school No. 41. The decoration for the street New Year tree “Squirrel” is made of waste material: the base is nylon tights and synthetic padding, the finishing is cut and glued foam rubber petals, covered with acrylic paints, contours, and glitter.
"Christmas tree decoration". Svintsov Vadim Denisovich. The Christmas tree toy is made of a foam ball covered with pine cones. The cones are painted in places with white gouache to imitate snow cover. Decorated with shiny silver snowflakes and red satin ribbon bows with white beads arranged in a chaotic manner. A Christmas angel is made from twine to decorate the Christmas tree ball. Using a loop, the New Year's ball can be hung on the tree.
"New Year's ball!" Abramova Varvara. The ball is made of fiberboard, large in diameter, for an outdoor Christmas tree. For painting, we took regular gouache, after drying, we painted snowflakes and decorated it with rain, having previously cut it finely. Then it was varnished.
"Snowflake". Olga Zakharova. The basis of the snowflake is a plywood mold. Painted on both sides with acrylic paint. Rhinestones are glued using Moment glue.
Another option for crafts for the city Christmas tree is “Russian Cockerel” using the papier-mâché technique:
Bell from a plastic bottle:
"Winter-winter." Trushina Lydia. Toy for the yard Christmas tree. Made from a large bottle, corrugated paper, cotton wool and tinsel.
Another interesting option is a bottle house:
Another option is to make a bird feeder out of a bottle - both elegant and useful!
What other Christmas tree decorations can be made from plastic bottles , see here and here.
Alena Ilyina’s version - Christmas tree decorations made from small skates:
Amazing hero of the occasion
An alternative to the forest beauty would be a wonderful Christmas tree made from unnecessary CDs. Lay out the Christmas tree from the disks on a paper base.
Start from the bottom: two disks - the trunk of the tree, then the first row - the largest amount of the main component. With each row, decrease it one piece from each edge until you reach the top (last disc).
Glue the discs right away. After drying, cut along the contour and attach to the wall. Decorate as you wish (beads, snowflakes, small balls, Christmas tree garland).
Large toys for the street Christmas tree
Bells
The first version of this toy is made of wire decorated with twine. Decorations include plastic multi-colored balls and bright bows.
And this bell is made from... a figured flower pot! The white plastic base needs to be covered with pieces from computer disks. Tinsel is glued along the edge, and a loop is placed on top.
Balloons
Just look at the beauty that came out of simple disposable plastic cups glued to a regular rubber ball. Cups can be used either transparent or made from multi-colored plastic. Tinsel is used as decoration.
"Magic Ball". Yuryeva Violetta. Made from disposable plastic cups.
Materials for work: disposable plastic cups - 180 pcs., aluminum foil, tinsel glitter, rope, stapler and staples.
Connect plastic cups together in the form of two hemispheres, line the inside with foil and secure with tape. In one hemisphere, stretch a rope between the cups, tie a knot inside the sphere and secure it with tape to the foil so that the knot is on top of the foil. Connect two hemispheres together using a stapler. Finely chop the tinsel. Grease the cups with glue, quickly spreading the prepared tinsel over the entire surface of the ball. Spray the top of the ball with hairspray. The ball is ready.
And this ball is made of papier-mâché. An ordinary balloon, inflated with air, is covered with pieces of newspaper dipped in PVA glue. After drying, the craft becomes durable and strong. It can be decorated with paints, decorated with sparkles or multi-colored snowflakes.
Candy
This is a classic of the genre. It is based on a cylinder twisted from thick cardboard. It needs to be wrapped in shiny wrapping paper and tails made on the sides. The decor around the perimeter is satin or plastic ribbon.
Snowflakes
Two options from different materials. A large white snowflake is cut out of a piece of thin foam using a stationery knife.
The second craft is glued together from newspaper strips. To do this, sheets of newspaper are cut along the long side into 2 or 3 equal parts, each folded several times to form a dense strip. The middle is rolled up from strips of equal width, and the rays are glued to it. The top of the snowflake is painted with golden spray paint and varnished for durability.
Dog
The frame of the animal is cut out of hardboard or thick cardboard. The surface is covered with yellow oil paint; the craft can be decorated with silver tinsel. This is a craft for 2021, for 2021 you can make a symbol in the same way - a pig.
Asterisks
The first option is made from thick twigs fastened with wire in the shape of a five-pointed star. The frame is wrapped in tinsel and decorated with small multi-colored balls.
The basis for this star is cardboard covered with shiny fabric and blue tinsel.
The third star is made entirely of natural material. The frame is made of twigs, as in the first version, only twine was used as decoration. In the center of the craft there is a composition of spruce branches, cones and ribbons.
boot
The toy is made of burlap, filled with padding polyester and decorated with white openwork braid. Additional decor includes sequins, snowflakes, pine cones, and gifts. Eco-style toys are very popular now.
Caterpillar
Her entire body is formed from balls made from threads. The balls are coated with transparent varnish on top so that the craft does not become soggy under wet snow. The decor (eyes, beads, etc.) is made of fabric.
However, you can just make balls from thick cord:
Snowmen
This is another option for using used disposable tableware. The cups are connected with a stapler, resulting in balls of different sizes. All that remains is to glue the cap, carrots, eyes and put on the scarf.
This snowman is made of white and blue fleece, its interior space is filled with padding polyester. In his hands he has a broom made of twigs. This is how a neat little snowman turned out.
All these toys can appear on your New Year's beauty if you work a little before the holidays.
The description of the crafts was prepared by Tatyana Yablonskaya.
Christmas tree toy made from CDs:
Another option is a pencil made from napkins.
Toys for the street Christmas tree “Funny snowmen“:
Snowman using papier-mâché technique - master class
Tinsel balls and other Christmas balls:
City Christmas tree toy made from plastic bottles “Santa Claus’s Workshop” (more details here).
Chic candlesticks
New Year's decor is not complete without candles. An attractive creation made from disks for the New Year - a candlestick - is very easy to make. Take several discs that shimmer on both sides.
One is a stand, the rest are attached with Moment glue to the base with an edge with a slight outer slope. A candle is inserted inside. The beautiful decoration of the romantic setting is complete.
Is there a carnival or competition coming up at school? You will definitely become a winner if you prepare a unique outfit - a costume made from DVDs.
It's not as difficult as it might seem at first glance. We offer two options: we decorate a festive dress with discs, or create a specific disc vestment.
How to make New Year's balls from cotton wool: step-by-step instructions, description, photos
You can make New Year's toys using ordinary cotton wool. You have two options: you can use foam balls as a base, which can be purchased at a hardware store, or you can make balls entirely from cotton wool.
Instructions:
- Buy ordinary cotton wool and roll it into a ball. Next, you need to add strength to your product. To do this, use a thick, thick brush with soft bristles to apply PVA glue to the entire surface of the ball.
- Apply a thick layer, then with wet hands try to roll the ball between your palms again. This way you will make it the correct shape. Leave the ball to dry for 12 hours. Please note that the glue takes a long time to dry. After the ball has dried, you need to take a thin wire and soak it in glue.
- Stick the wire as deep as possible into the ball. Let it dry and you will attach the thread or ribbon to this loop. Start decorating your balloon. To do this, use sparkles and lace. The decoupage technique is also used as decoration.
- You can use multi-layer napkins with an image printed on them. Nowadays there are quite a large number of similar napkins with New Year's themes in supermarkets. They can have Santa Claus, sleighs, deer and New Year's balls painted on them.
New Year's balls made of cotton wool New Year's balls made of cotton wool New Year's balls made of cotton wool
How to prepare a unique copy
Main! Here it is important to choose the right tape, thread, braid that binds the components together.
Let's start production:
- Having measured the radius of the disk, we cut the selected thread four times larger.
- We pass the tape through the hole, fix it, and thread it into the eye of the next part.
- We make the vertical lines of the dress.
- We repeat the process, only in a horizontal position - we create a canvas.
- The style depends on your imagination and elegant ribbon.
Let's make our kids happy
Children are extremely fond of various fun things; it is not difficult to buy them in the store. Prepare a surprise for your child - give homemade toys made from disks. For example, a goldfish.
Step-by-step master class
For this product, we will take CDs (two pieces), cardboard and papyrus of different colors, glue, beads (you can buy false eyes at a craft store).
Let's start by cutting out the tail, fins and lips of the fish (they can be the same tone, but it is better to choose a different color). We place the parts on the disk and glue them. If this item will be hung, attach a loop to the disk. We cover everything with a second disk, having previously applied an adhesive composition to it.
This way you get a more voluminous thing. We attach the eyes on both sides. We fold colored paper to match the cardboard like an accordion and carefully push it into the gap of the disks. This fish will really want to make a wish.
Carriage of CDs
You will need the following materials:
- standard wheels (2 pcs.)
- smaller CDs (4 pcs.)
- a small round box, and if you don’t have one, you can make it yourself
- decorative tape, the width of which should be less than the height of the box
- colored cardboard or felt, stickers for decoration.
Coach
So let's get started:
- The box that is needed for the base of the carriage should be made of colored cardboard, round in shape, the size of a CD. The box must be covered on both sides with discs; they will serve as the sides of the future carriage.
- Wrap the part of the box between the CDs in a circle with decorative ribbon and tie it in a big beautiful bow.
- The sides of the CD carriage are decorated at your discretion either with stickers or felt.
- When the base of the carriage is ready, you can start attaching the wheels, which we will make from small CDs.
- We decorate the wheels around the edges. You can cut it out from colored cardboard or felt, or just take colored ribbons and glue them on.
There are a lot of ideas for CD crafts. Almost everything can be done with children. And involving children in such a creative process will bring them great joy and pleasure, and they will be able to spend more time with you doing something with their own hands. And maybe in the future they will become famous artists who will create unusual sculptures from CDs. Let these little crafts invigorate your imagination and help you come up with a new, unique idea. So good luck to you in your endeavors!
Funny Smeshariki from disks
Children are delighted with the cheerful, bright characters of the cartoon of the same name, who carry positive emotions, talk about good and evil, and help children in difficult situations.
Invite your fidgets to help create crafts from CDs - wonderful cartoon friends. Discuss what characters you will create and get to work.
Select sketches of the characters (on the Internet, coloring books, illustrated magazines for children). Decide on the size, print and cut out the shapes.
Cut the stencil and trace each detail individually on a color base that matches the purpose of the design. We take a similar step if the template is in black and white.
Most likely, these creations will be suspended in nature. Before gluing the image, drill a hole at the edge of the disk with a hot nail and thread an elegant ribbon loop.
With such bright works you can decorate a playground for a holiday, a child’s room, or give a gift to a friend.
Disposing of such unique, interesting, charming material is a huge mistake.
Crafts made from CDs with your own hands will help you change your interior, make a stylish, original gift for loved ones and friends, and have a great time spending your free time with your kids.
How to make a disco ball from discs
At discos, there are always disco balls under the ceilings, which shimmer under the bright multi-colored beams of spotlights and cast glare on the dancing youth on the dance floor. If friends often gather at your house and you like to dance, then a disco ball is an irreplaceable thing for you. Buying such a ball is very unprofitable, but it is easy to make it yourself.
In this video you can see the process of creating such a ball, and below read its detailed description.
To work we need to prepare:
- old CDs; - scissors; - glue gun; - scotch; - flask; - newspaper.
In order to make a disco ball, we take any unnecessary newspaper and begin to crumple it, forming a ball. You can make a ball of any size, it all depends on your personal desire. Just keep in mind that for a large ball you will need a lot more newspapers and CDs. The ball must be as dense as possible, so spare no effort and newspapers in order to prepare a high-quality base.
The resulting ball of newspaper must be wrapped with tape so that it holds its shape and does not unravel. In addition, this is necessary in order to take the next steps to create a disco ball.
As a result, you should make a hard and strong ball. It doesn’t matter if it is slightly not very smooth, it will be noticeable after all the actions that we do with it.
Wrap the resulting ball in foil. Carefully smoothing it onto the ball with your hands so that no large pieces remain too noticeable. We put our ball preparation aside and take the CD.
Cut the disk into narrow strips. Then we cut these strips into squares and rectangles. It doesn’t matter if they are of different shapes, it’s only to our advantage.
After the required number of various shapes from the disk have been cut, it’s time to begin the most intricate and painstaking work - gluing the pieces onto the ball.
Using a glue gun or regular instant glue, we begin gluing our pieces step by step. Apply glue to each piece separately on the non-shiny side. Place the pieces on the ball, trying to arrange them as close to each other as possible.
After pasting the entire surface of the ball, you can evaluate the result of your work by holding the disco ball in the sun. It will shimmer with multi-colored shades and at the same time scatter glare throughout the room.
Become the author of the site, publish your own articles, descriptions of homemade products and pay for the text. Read more here.
Crafts from disks: photo ideas for beautiful copies
Please repost
0