Needlework
07/30/2018 Anastasia Prozheva
To create a festive atmosphere at home, you can use small Christmas trees made of cardboard cones, made using various techniques and materials. Whatever method of decoration you choose for the forest beauty, you will need a base. You can read about how to make a cardboard cone for a Christmas tree in this article, everything is written step by step.
Tools and materials for making a cone
A paper cone can become the basis for all sorts of crafts: from stargazer hats to an amazing New Year tree. To make this item yourself, you will need the following tools:
- a sheet of printing paper or whatman paper;
- compass;
- pencil or ballpoint pen;
- ruler;
- tape, glue or stapler;
- paper clips;
- scissors.
If there is no compass in the house, then a string or thick thread with a pencil can replace it. We measure the required radius of the rope. You can tie a pencil to it, or you can simply press it with your finger. With the finger of your other hand, press down the free end of the thread, using it as the center of the circle. Then, with the help of these simple devices, a circle of the required diameter is drawn.
Lesson #2
If you don't have a printer at hand, you can use another method.
- Draw an even circle on a piece of paper or cardboard (remember that its radius will determine the height of the cone).
- Cut out the circle
- Divide the circle into 4 parts with two perpendicular lines intersecting in the center of the figure. Then cut out one quarter, bring the adjacent sections together and overlap them.
And once again, in as much detail and clearly as possible in the video:
Sheets of paper allow you to create a wide variety of objects. These can be complex crafts, like a high-quality notebook or a model of a ship, or they can be very simple. For example, some people are interested in how to make a paper cone with their own hands. Such a simple figure can be used for various purposes, including to create a Christmas tree decoration.
First, you need to understand the basics of creating cones. Then, with the help of various additional elements, it will be possible to construct original decorative elements from them, even in the form of animal faces. The most common craft made from a paper cone is a small Christmas tree.
How to make a cone from a circle
Making a cone out of paper is quite simple. You just need to do everything correctly and carefully, foreshadowing a unique positive result. The step-by-step instructions are as follows:
- Determine why you are making a paper cone. Its size, paper density, color scheme, as well as the presence of any decorative elements will depend on this.
- Take paper of the required size and lay it out on a horizontal surface. A kitchen table, nightstand or coffee table is suitable for this. How convenient for anyone.
- Using a ruler, mark a point in the middle of the sheet.
- The tip of the compass is placed at this point and the contours of the circle are first outlined with a dotted line. At the same time, it is noted whether the stylus does not extend beyond the sheet of paper. If everything is in order, a clear line is drawn.
- A circle is cut out clearly along the line with scissors.
- Next, you need to connect the center of the circle with any point on the circle with a ruler and draw a line with a pencil.
- Using scissors, carefully cut the circle along this line exactly to class=”aligncenter” width=”1356″ height=”763″[/img]
- The cut circle is rolled into a cone to the size you need. The edges are trimmed and secured with a paper clip.
- Glue is applied to the edges of the cut edges on the inside and outside, and the walls are tightly fixed.
- Let's start making the base of the cone. To do this, take another sheet of paper and lay it out on the table.
- The manufactured cone is placed on a ruler. This is how its diameter is determined. 2 millimeters are subtracted from this result and the indicator is divided in half. This is the estimated radius of the cone.
- A circle is drawn with a pencil on a blank sheet of the established radius. It is considered internal.
- Then from the same center we draw a new circle, the diameter of which is 2-3 centimeters larger than the previous one.
- Cut out a circle along the outer contour.
- We connect the gap between the inner and outer circles with notches, which are made using scissors. It is advisable to do this procedure carefully so as not to go beyond the inner circle. The distance between the notches should be about a centimeter.
- The made notches are wrapped in one direction. There should be a slight overlap.
- We cover the outer part of the notches with glue and carefully insert them inside the cone itself.
- We leave the finished product on the table and allow it to dry thoroughly.
Step-by-step manufacturing instructions
To make a three-dimensional conical geometric figure out of paper or cardboard with your own hands, you will need 2 sheets of A4 paper (cardboard) or whatman paper. You will also need a pair of paper clips, scissors, a pencil, a ruler, a compass and a compound for gluing paper.
Step-by-step instructions “How to make a cone out of paper” or “How to make a cone out of cardboard with your own hands” consist of two parts and look like this.
Lateral surface of the cone:
- On an A4 sheet of paper (cardboard), you first need to find and place a point, which is the geometric point of intersection of the diagonals. To do this, placing a ruler on the opposite vertices of a sheet of A4 paper, draw the diagonals of the rectangle with a pencil and mark the point of their intersection.
- Using a compass, draw a diagram of a cone on paper or cardboard in the form of a circle with the center at the point of intersection of the diagonals. The size of the future product will depend on the size of the radius of the circle.
- Using scissors, a circle is cut along the marked line of the circle.
- From its center to the edge, draw a radius using a ruler and pencil.
- Taking the scissors in your hands, you need to make a cut along the drawn straight line, which represents the radius.
- After these steps, the cut paper circle needs to be rolled into a pointed shape, and if necessary, the edges should be trimmed and secured at the junction with paper clips.
- Next, carefully apply a thin layer of glue where the paper overlaps and press down to connect the glued parts.
The side surface of the cone template is ready and left for some time for the glue to dry.
How to make a cone from a semicircle
- Take a sheet of paper and place it on a flat horizontal surface. Place a compass in the middle of the edge of either side of the sheet and draw a semicircle over the entire sheet.
- Using scissors, cut out the resulting semicircle from paper.
- Next you need to connect the two corners of the resulting semicircle. To do this, coat the smooth side of the semicircle with glue from the center to the corner. Then the corner not smeared with glue will need to be moved slightly behind the other so that the cone “closes” and its side will need to be glued to the smeared side.
How to make a cone from a triangle
The method of making a cone from a circle is simple, but excess paper is used, which significantly compacts part of the finished product, and this is not always good. But you can create a cone from a triangle. The tools you will need are exactly the same as in the previous version. We take the following steps:
- Using a ruler, draw an isosceles triangle on a sheet of paper laid horizontally. In this case, two of its sides must have the same dimensions, and the third side must exceed the parameters. It is worth keeping in mind that the larger the sides of the triangle, the larger the cone you will get. The main thing is that all dimensions of the geometric figure are correct. Inaccurate parameters can lead to a one-sided cone or one so miniature that it is not possible to glue it together. If you are not confident that you are able to construct the desired figure yourself, you should resort to using a ruler in the form of an isosceles triangle. But you need to check that its two sides are the same, and the third is larger than the previous ones.
- Take one corner and fold it towards the center so that this edge coincides with the center of the triangle. Using the second hand, the second corner is wrapped around the first. Result: the triangle turned into a cone. If you have difficulty folding the corners, this means that the triangle you made is not wide enough.
- The cone needs to be leveled. This is achieved by slightly moving the paper or by turning the corners more tightly. If the result is skewed and the cone looks unnatural, then you should try turning the corners again. If there is excess paper peeking out from the bottom of the cone, this means that the triangle you made was defective. You can carefully trim the excess edges with scissors.
- Excess pieces of paper are wrapped inside the cone so that irregularities are not visible. Moreover, the fold of the cone must be perfectly even, otherwise the product will look sloppy.
- It is best to seal the joint line with tape. This should be done from the inside. The tape is applied along the joint line and carefully smoothed out. This will add strength to the finished product. Scotch tape can also be applied to the rim of the cone, both on the outside and on the inside.
Crafts from paper cones
From an ordinary paper cone you can make such a beautiful Christmas tree that will decorate your home, room or even office. You can also give it to a friend or loved one.
Using the above instructions, you will make a cone, and then learn how to decorate it.
1.
Cover the cone with tape or wrap it in cling film.
2.
Prepare thick threads and dip them in PVA glue. You can mix half a glass of glue with half a glass of water.
3.
Wind the threads around the cone and leave them to dry.
4.
Pull out your paper cone with film through the bottom, leaving only the threads that have frozen in the shape of a cone.
5.
Decorate the Christmas tree to your liking. You can use bows, beads, glitter and even small decorative fruits.
From an ordinary cone you can make beautiful gift wrapping and decorate it with cookies and candies. This will be a great gift for any child.
- glue or double tape
1.
Cut out a circle for the cone and cut a quarter from it (as shown in the picture).
2.
Add double tape or glue to the edges of the cut quarter.
3.
Cut a long piece of crepe paper and glue it to your future cone (to the quarter that you cut from the circle). While you are gluing, make small folds for beauty (see picture).
4.
Fold the crepe paper back and glue the entire quarter together to form a cone. You can use double tape or a stapler instead of glue.
5.
Straighten the crepe paper, place the sweets inside the cone and tie the paper with ribbon.
* You can decorate the outside of your cone - use stickers, for example.
But you will get such beautiful animals if you add antennae, ears, and faces to your paper pets.
How to make a Christmas tree from a cone with your own hands
A wonderful addition to the New Year's holiday is a homemade Christmas tree. To do this, you need to make a cardboard cone using any of the above methods. The main thing is that it is durable and of the correct shape. Then you should start decorating it.
Next steps are as follows:
- The cone is completely covered with tape. You can use cling film for wrapping.
- The thickest (possibly multi-colored) threads are selected and dipped in PVA glue. The glue can be pre-diluted with clean water at a ratio of 1:1.
- The threads are wound around the cone.
- The product is left to dry completely.
- The paper cone with the film is carefully pulled out through the bottom. The frozen threads in the shape of a cone remain unharmed.
- The resulting Christmas tree can be decorated at will with bows, ribbons, beads, sparkles, decorative fruits, and home-made Christmas tree decorations.
Such different Christmas trees
Beautiful handmade Christmas trees are an excellent solution for decorating your home for the holidays, as well as for a small gift for a loved one. It’s so important to share the festive mood with other people. There are a lot of options for such Christmas trees. Children can make a Christmas tree from a cardboard cone. They will enjoy this activity and will help them realize their creative potential.
Adult craftswomen make magnificent crafts from various papers, decorative elements, threads, tinsel, candies and even feathers.
Inspired? Now look carefully at the photos of all these beautiful crafts. What do they have in common? Of course, this is a cone-shaped base. Moreover, each Christmas tree has its own. If the Christmas tree is intended as a floor or tabletop composition, then the bottom can be omitted. But there are also crafts in which the bottom of the cone must be closed. Read below to learn how to make cardboard cones for the base of these Christmas trees.
How to make a candy bag
To build such beauty, you need to have:
- a large paper cone (to fit a lot of sweets and cookies);
- corrugated paper;
- ribbons;
- scissors;
- double tape or PVA glue;
- all sorts of goodies.
Step-by-step instruction.
- Draw a circle of large diameter on thick paper and cut off ¼ of it.
- Next we work only with the cut off corner. Apply either glue to the edge of the paper or use double tape.
- We take corrugated paper, cut off a large piece from it and apply it to the cut corner in the part that is treated with glue or where the tape is located. Corrugated paper can be folded for added appeal.
- The corrugated paper is folded back and the paper corner is glued to form a cone. Glue can be replaced with double tape or a stapler.
- The corrugated paper is straightened and all sorts of sweets are placed into the cone. The top of the paper is tied with a beautiful ribbon.
- The cone itself can be decorated by making an applique in the form of flowers, animals, and cartoon characters.
Cones without bottom
The best material for making the base for Christmas trees is cardboard.
Since decor sometimes weighs quite a lot, it is better not to use paper for the base. It is only suitable for making children's crafts or Christmas trees decorated with paper decor.
To make a conical base you will need:
- Cardboard;
- Scissors;
- Glue or tape;
- A compass or round object that can be traced along the contour (plate, bowl);
- Pencil;
- Ruler.
The thickness of the cardboard should be selected depending on the weight of the selected decor. If the decor is quite heavy and the cardboard is thin, the base may not be able to support it and the tree will turn out to be unstable and will fall on its side.
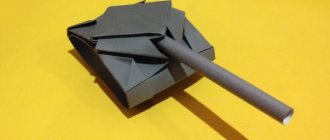
You can make a paper cone using several methods. To implement the first one, you need to fold the cardboard into a little bag, as in the figure:
Next, the excess cardboard from the bottom side is cut off with scissors. This must be done exactly as in the diagram, otherwise the product will collapse. Glue the side edge of the cone with tape or glue. This method is convenient because you can independently and without calculations adjust the height and width of the cone.
DIY Santa Claus made from a paper cone
It is worth noting that many different crafts can be made using a paper cone. They are more attractive, individual, extraordinary, always delight and lift your spirits. This will not only help make the New Year’s atmosphere fabulous, but will also give many indelible impressions to little children.
To start work you need to have the following devices available:
- white and red paper;
- PVA glue or good quality stationery glue;
- cotton wool;
- pencils;
- compass;
- scissors;
- ruler.
The stages of creating Santa Claus are as follows:
- Take red paper and draw a circle on it with a diameter of 20 centimeters.
- Cut out a circle and fold it in half.
- Cut along the fold.
- From the resulting semicircle we form a cone.
- Carefully glue the edges.
- Take white paper and draw a circle on it with a diameter of 4 centimeters.
- A small circle is cut out and glued to the main cone just below the point. He will serve as the face of Santa Claus. Eyes, nose and mouth are drawn on it.
- From red paper we cut out details for the hands of Santa Claus. They are glued to the sides of a large cone.
- Attach a piece of cotton wool to the tip of the cone - this will be a pompom on the hat. You can do the hair from under the hat in the same way.
- On a small circle of cotton wool (you can also use just paper) draw a mustache and beard.
Video lesson
To create a festive atmosphere at home, you can use small Christmas trees made of cardboard cones, made using various techniques and materials. Whatever method of decoration you choose for the forest beauty, you will need a base. You can read about how to make a cardboard cone for a Christmas tree in this article, everything is written step by step.
Paper cockerel from a cone
This wonderful creation made from colored paper will delight not only kids, but also adults. Even the smallest craftsmen can participate in the making of such crafts; they need a little guidance and help. Making a cockerel is quite simple. To do this you need to have in the house:
| 1 | colored paper |
| 2 | cardboard |
| 3 | pencil |
| 4 | compass |
| 5 | glue |
| 6 | ruler |
| 7 | felt-tip pens |
| 8 | scissors |
A fairy tale cockerel is made in this way:
- Cardboard is taken, laid on a horizontal surface, a circle is drawn on it with a compass, which is subsequently cut out with scissors.
- The workpiece is folded exactly in half and cut.
- The resulting semicircle is folded into a cone.
- The seam is glued and dried well.
- A small piece is cut out of colored paper and a beak is made from it.
- The beak is glued to the base of the figure.
- A cut out thin strip is glued to the top of the workpiece.
- If you glue the same strip in several places, you will get an interesting comb.
- Cut out figures in the form of droplets from colored paper and glue them to the base of the cone below the beak. This will be the cockerel's beard.
- Cut strips of different colors in the amount of 5 pieces.
- Just like the scallop, glue them to the sides of the cone. You will get bird wings.
- Make a ponytail from the same strips, which can be slightly twisted using scissors.
The fairy tale cockerel is ready!
In the same way, you can create other fairy-tale animals, such as a donkey, a cow, a rabbit, a dog, a hippopotamus and many other fairy-tale characters, as long as your imagination and perseverance are sufficient.
Cone base
To find out the radius of the base of the conical frame, use a ruler to measure the diameter of the lower part of the workpiece, which is a paper (cardboard) side surface.
- For greater accuracy, apply a ruler to the edges of the workpiece and measure the distance in two perpendicular directions. Calculate the average diameter and divide in half. As a result, the radius of the base of the paper cone is obtained.
- Using a compass, draw a circle on the prepared second sheet of paper, the radius of which is equal to half the diameter of the base of the cone. At this stage of production, you need to try on the base of the already made side surface to the drawn circle. And, if everything matches, then proceed to the next step.
- Having placed the leg of the compass in the center of the drawn circle, increase the expansion of the compass, making an allowance of 1.5 centimeters, and draw another circle.
- A circle is cut out along the line of the outer circle with scissors and cuts are made along the entire perimeter from the edge of the cut out circle to the line of the inner circle.
- The notches are bent to one side at an angle of 90 degrees. The result is the bottom of a cone with curved edges to connect to the side surface.
- All that remains is to coat the lower inner part of the sidewall with glue to a depth of 1.5 cm and carefully insert the manufactured bottom with notches inside the cone.
The finished product is left to dry for 10-15 minutes and can then be used for its intended purpose.
You can gradually build a ready-made development of any size for a conical product using a computer in a graphic editor . After drawing the drawing in a computer program, you need to print it on a printer, and then all that remains is to separate the excess with scissors and glue the finished figure. This option is especially convenient if you need to make a toy in the form of a truncated cone.