Shibori is a Japanese method of dyeing fabric by tying, rolling and compressing. This method of dyeing fabric began to be used in the 8th century in Japan and over time it became more and more popular.
Already by the 14th century, these fabrics were worn not only by commoners, but also by the entire high society; they slightly transformed the fabric with complex ornate patterns using bamboo shoots, and hand-painted some parts of the fabric.
The base of the Shibori ribbon contains silk satin fabric, cut on the bias, which is then dyed and pleated.
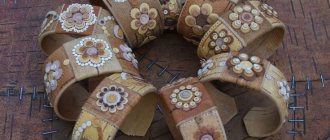
Shibori ribbon jewelry has become very popular among jewelry makers. Such jewelry turns out to be very beautiful, original and unusual. They always look very elegant, they can be worn to a party or with everyday clothes, the main thing is that the colors of the decoration match the elements of the colors of the clothes.
DIY Shibori jewelry
The use of Shibori ribbons is a new direction in Hand Made; with their help, you can make a voluminous decoration while using a minimum of beads and additional voluminous elements.
In order to make the decoration you will need 15 cm of shibori tape , a cardboard stencil that you can cut out at your discretion (the parts can be the same shape or different shapes) . The shibori ribbon will need to be sewn onto a felt base; the felt not thick but dense enough.
Lay out your stencils on felt, outline them and cut them out. Next you will need all kinds of different beads , they can be of different diameters, different shapes, and the color will depend on what kind of decoration you want to achieve.
You are making either a contrasting decoration or a harmonious one, taking into account the colors of the ribbon itself, you will also need beads (you can take beads of several colors) the main color of the beads matches the color of the ribbon. You will also need a fishing line of approximately size 0.
18 mm, (the main thing is that it is neither thick nor thin, but strong enough and comfortable for work), leather (can be leatherette, felt, or any thick fabric that you have at home), you will also need a ribbon for ties (it’s better to use rapeseed; it’s denser; it holds better and ties more tightly).
Next you need to sew the shibori ribbon to the cut out felt stencil, laying the ribbon the way you like, and sew along the edges using a needle and fishing line.
After you have stitched the ribbon, you should attach the largest beads, and then sew the outline of the ribbon with smaller beads. If you have any gaps in the felt, fill them with beads.
After you have decorated the element from the wrong side, attach a piece of leather cut out from a stencil and sew it to the felt using a needle and fishing line, and in order to hide irregularities and seams, make each stitch with beads.
Below is a video where you can see visually how to make a necklace using the shibori technique with your own hands.
- Shibori ribbons can be used to make stunning earrings that will match any outfit.
- DIY earrings using Shibori technique - master class
Source: https://ukrassebya.ru/svoimi-rukami/838.html
Uniqueness is an advantage
Undoubtedly, each type of needlework allows you to create unique products. But some types of creativity make it possible to copy, for example, knitting or embroidery, while others do not. And it is precisely the latter that includes the creation of jewelry using the shibori technique. The shibori ribbon itself is unique - the source material for this type of creativity. There are no two identical pieces of tape, painted not only by hand, but even with the help of technology. If you look at the work of experienced shiborists who create jewelry, and not the silk fabrics themselves, then paired products will differ from each other, for example, earrings - they will be similar, but will never be completely identical. After all, this type of creativity does not tolerate copying; it is simply impossible a priori.
Jewelry made using the Shibori technique allows each owner to feel its unique charm - the unique coloring of the ribbon and high-quality decorative elements make each product a real masterpiece.
Shibori jewelry: master class on creating jewelry for beginners (95 photos and videos)
Shibori style jewelry is made from satin ribbons, beads and beads of different diameters. The technology for making products is suitable for both experienced and novice needlewomen.
Today, creating exclusive crafts with your own hands is quite simple. Specialized handicraft departments offer a large selection of consumables that come in a variety of designs. Thanks to them, you can create a unique accessory that will complement both everyday and evening looks.
What is shibori?
Many beginning needlewomen often ask the question: “What is shibori?” This technique dates back to the mid-18th century. The products are based on special satin ribbons, painted in the form of a tint gradient. In simple terms, a rainbow color is applied to a fabric base, which gradually changes its saturation.
What is shibori?
Shibori, or shibori, is an ancient Japanese art of fabric dyeing that dates back to the 7th century. The term "shibori" comes from the Japanese verb 絞る (shiboru), which means "squeeze", "squeeze", "squeeze", "fold". Traditionally, Japanese shibori was made from cotton fabric by dyeing it a beautiful indigo color. The transformed product is twisted, compressed, folded or fixed in the desired position with threads, rubber bands, paper clips, etc., and then painted with paint. At the same time, those areas that have been twisted are protected from paint getting on them, and as a result, due to the contrast and difference in colors, an unusual pattern remains on the fabric.
The art of Shibori is divided into many different techniques in which the piece can be folded, twisted, pressed and stitched to create different patterns. However, although each type of shibori is designed to produce a specific type of pattern, it depends not only on what kind of processing the product needs to be subjected to in order to achieve the desired result, but also on the type of fabric used and its properties. The most interesting thing is that the same coloring technique, repeated over and over again, will give completely different results each time.
Known types of shibori include kanoko, miura, kumo, nui, itachjime and arashi shibori. However, we decided to dedicate this shibori master class to one of the most popular techniques - arashi shibori, with which unusual corrugated silk ribbons are made. And then they can be used to create amazing shibori jewelry.
DIY shibori ribbon???? at home
The shibori felting technique allows you to create original fabric products. Shibori fabric strips are dyed using the batik technique. The painting scheme is quite simple. Even an inexperienced needlewoman can easily master the batik technique. Products made from shibori strips are very popular; creative and leisure centers often host workshops on felting and dyeing long pieces of fabric, from which colored shibori strips are then made.
Fabric products dyed by experienced craftsmen using the batik technique are unique: each shibori ribbon has its own unique color. This is due to the fact that before dyeing the fabric using the batik technique, craftsmen tie and twist the material in a variety of ways. As a result, the color of the fabric is heterogeneous and quite variegated.
DIY shibori ribbons: where to start
Corrugated pieces of fabric dyed using the batik technique can be purchased at specialized craft stores. But you can also make them yourself from ordinary silk ribbons.
The batik technique is well suited for dyeing fabric at home..
An experienced craftsman can easily cope with the work, and before making it, novice needlewomen are recommended to hone the technique of dyeing fabric on small scraps of those that lie idle in a craft box.
In order to better understand the basic principle, methods and techniques of making shibori ribbons from silk pieces of fabric of various lengths, beginning craftswomen are recommended to attend a master class on working with fabric. Experienced craftsmen will be happy to share their secrets. If you cannot attend the master class in person, you can watch the training video.
In order to make shibori jewelry yourself from scrap materials, a novice craftsman will need:
- Wooden or plastic stick.
- Threads.
- Silk fabric stripes.
- Large basin.
- Ordinary tap water.
- Wide brushes for painting fabric, a sponge is also suitable.
- Iron for ironing fabric.
- Newspaper or oilcloth to protect against paint stains.
- Abstract of a training master class or video recording of a master class from the Internet.
Having prepared everything necessary, the master can begin to work. Experienced needlewomen can immediately begin coloring pre-prepared strips. Masters who are still comfortable with batik should first practice on simple scraps.
Gallery: ribbons using the shibori technique (25 photos)
DIY shibori master class: general description of the process
First of all, you need to take a pre-prepared piece of corrugated silk fabric and lightly wet it.
After this, the piece of fabric to be dyed is folded into a screw or spiral and then wound around a wide stick made of plastic or wood.
Attention: it is strictly forbidden to use a metal stick to dye fabric , because metal, interacting with water and dye, oxidizes. The desired color will not come out and the work will be ruined.
The shibori ribbon itself is already colored, so the needlewoman’s task is to make sure that only the edge of its fold is colored .
In this case, the original color of the ribbon and the desired color must be in harmony with each other, only in this case the finished product will look beautiful.
To ensure that only the edges on the folds are painted, and the color of the tape itself remains unchanged, it is recommended to use a sponge or a wide paint brush.
After the colored piece of corrugated silk has been dyed to the end, it remains hanging on the stick. In order not to splatter the paint while the tape is still wet, the stick can be left above the basin in which the painting took place. Attention: there should be no direct sunlight or electric heaters near the painted tapes that are drying .
When the piece of fabric is completely dry, you need to iron it along the fold lines. Then, using old newspaper, the tape is rolled into a tight roll and sealed in plastic wrap.
To finally fix the paint, the finished roll is sent to a water bath for an hour and a half. The final stage is to iron the tape along the folds one last time .
Now you can make original crafts from these ribbons.
Shibori master class: practical recommendations
In order for shibori ribbons made by yourself to last a long time, and for crafts made from them to please the eyes of others, you must follow the following practical recommendations :
- To prevent the edges of the finished tape from fraying, before using the tape you need to scorch its edges over a fire using a lighter.
- The more you twist the tape before painting, the more colorful and original the coloring will be.
- In order for shibori ribbons to please the eye for a long time, they must be stored in airtight packaging. After the silk ribbon craft is ready, the remaining material must be packed again and stored in a dark place. If you store them without packaging, the ribbons will quickly fade and lose their beautiful appearance.
- If a novice craftswoman does not know the batik technique, or if for some reason it is impossible to properly organize the dyeing process at home, it is better to use ready-made shibori ribbons to make crafts. They are freely sold in art and craft stores.
- Dyeing ribbons is not the best option for children's creativity, because working with dyes can provoke allergic reactions.
Products made from shibori ribbons have recently become very popular. From variegated, originally colored ribbons, you can make original flowers, earrings, and decorative panels.
Making shibori ribbons with your own hands is very simple, the main thing is patience and desire. Products made from these silk ribbons will serve as an original gift. Dyeing corrugated silk ribbons at home will help develop artistic taste and creativity.
This is a beautiful and relatively simple type of needlework.
Other types of needlework
(1
Source: https://1igolka.com/rukodelie/master-klass-izgotovlenie-lent-po-tehnike-shibori-svoimi-rukami
Making a tape
Of course, you can buy such a tape in a store, it’s not expensive, but you won’t find it that easily unless you order it on the Internet, but why wait and pay for a finished product if you can realize the idea from your head with your own hands?
So, we will need materials, namely a silk piece of fabric as the future base of the ribbon, a cylindrical object made of plastic or wood, woven paints - you can take different colors, not just one, threads, a wide and deep cup, brushes or sponges, as well as water.
Note! Beautiful jewelry made of genuine leather - how to make a beautiful and stylish jewelry with your own hands (110 photos and video master class)
Small work - high-quality results
The entire process of creating jewelry using the shibori technique comes down to several main stages:
- creating a sketch;
- placement and fastening based on shibori tape, cabochons, and basic decorative elements;
- filling the field of the product with soutache, beads and beads;
- ribbon decor (if necessary);
- backing and fastening device;
- decoration edge design.
Any master class on making shibori jewelry will include these stages of work. Each of them requires care, because shibori ribbon and cabochons are expensive materials that are attached to the base either with glue or thread. But silk is a thin fabric, the puncture site on it will be noticeable if the thread is removed. And semi-precious cabochons should be glued in place, even if settings are used to attach them. What can we say about working with beads or soutache, when small stitches are the basis of high-quality work. So the whole shibori technique is a very delicate and painstaking work.
