Which material to choose
Various materials can be used to make shoes:
- leather or leatherette;
- textile;
- crocheted or knitted;
- made using bead weaving;
- can be made from paper using the papier-mâché technique.
Shoes for dolls
Shoes can also be made from various plastic materials: clay, plasticine or similar.
Tools
To complete the work, you need to prepare the following tools and materials:
- scissors;
- threads and needles of various sizes;
- centimeter;
- paper and pencil;
- glue;
- laces;
- transparent glue “Moment”;
- soap or chalk needed to outline the doll’s legs;
- material for making doll shoes.
Depending on the manufacture of a particular type of shoe, additional tools and materials may be required: fittings, knitting needles, beads, pliers, etc.
A little about accessories for dolls
The fashionable toy industry showcases a large number of dolls. These are different products, comparable in proportions to their owners, depicting girls from 2 to 7 years old. All such products require different shoes: children's shoes with bows, boots, traditional pumps with heels or boots. In any version, each doll can be made into a wonderful pair of shoes for each of her outfits.
The feet of the toys can be dressed in handmade shoes . They can be of various types. Shoes for toys are made of fabric, leather, fur or cardboard. It can be sewn or glued, and can also be knitted or crocheted. Many people wonder how to make boots for a doll or shoes. In creating such shoes, the main thing is the right material and sewing skills.
Shoes for Barbie pose a serious challenge. She has a rather thin and small leg with a very large instep. You will need high-heeled shoes, but making them is difficult.
Taking measurements and creating a pattern
In order to make beautiful doll shoes, you need to take the doll’s measurements correctly. This can be done in two ways depending on its size.
In the first case, you need to take the following dimensions:
- calf circumference (for boots);
- shape and size of the foot;
- shoe height.
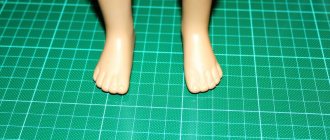
For small dolls, they usually limit themselves to outlining the foot with a pencil. In this case, you need to pay special attention to the accuracy of the depiction. To do this, it is important to hold the pencil vertically while taking measurements. The shoes are then adjusted to fit during the manufacturing process.
Step-by-step instruction
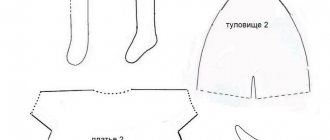
When making boots for a doll, the pattern looks like this.
You may be interested in this Guide for using the sewing machine Chaika 143 A
Pattern
Making shoes for dolls is not difficult. However, the work must be done carefully and accurately. For a centipede doll, the sole is cut out of rubber, cardboard, leather or other similar material. The dimensions for this are obtained by accurately tracing the doll’s leg with a pencil.
When all the dimensions are determined, in order to make shoes for a doll with your own hands, patterns are drawn on cardboard, then they are carefully transferred to the skin.
Top part
To make the upper part, fabric, leather or leatherette is often used. To do this, you need to prepare two parts for each leg. In this case, the front part will be used to make the toe, and the back part will be used to wrap the heel. The first of them is shaped like a triangle. The second is for a wide stripe.
First install the front part. It is wrapped around the insole in such a way that it is folded underneath it a few millimeters and glued to it. After this, the rear part is placed in the same way. In this case, it will also be necessary to tuck a narrow strip of material under the insole and glue it.
Insole processing
Insole
The pattern of boots for a leather doll includes an insole.
It is usually made from cardboard, which is cut to fit the shape of the sole. In this case, two strips approximately one and a half centimeters wide are cut out of the skin for each leg. Their length should be such that one of them covers the back of the insole, and the second - the front. Each strip is bent so that one part of it is at the bottom of the insole, and part is at the top. Together they completely cover the edge of the insole. They are glued along the entire length on both sides of the insole.
Installing the upper part of the boots
Connection of top and bottom
In previous manufacturing stages, the upper of the shoe was attached to the insole. At the same time, at the bottom it was slightly bent and glued. The sole is cut from rubber. A leather strip is glued to the bottom middle of the insole.
Before gluing the sole
It is necessary to glue the upper part to the sole. Now the main part of the shoe making work is completed.
Master class “How I make shoes for my dolls..”
Good afternoon). I will describe the process of creating shoes for dolls. I know...that finished patterns need to be adjusted to fit the leg, so I’ll show you the process from scratch). We need: leather or thick cardboard for the sole, double leather or thick fabric for the insole and sealing the pattern pieces, transparent glue, suede or leather, laces, lace, oil paints or pastels, scissors, thread, needle. Be careful there are a lot of photos)
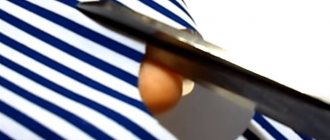
I take a piece of foil and crush it on the leg. You can use masking tape...also convenient.
remove the “foil” boot).
On the “boot” we draw with a felt-tip pen a model of future shoes: boots, slippers, sandals, boots, etc. In my example: a shoe.
Carefully cut out what you have outlined.
We trace the patterns on paper..
Now we have ready-made patterns specifically for “your” leg..
The shoes will have heels..we outline them on the pattern..
We trace the pattern details on the selected materials. My leather is thick from the sole belt - 4 pieces. plus 2 pieces - heel (also made of leather belt).
We cut out “backdrops” from suede - 4 pieces. You can immediately sew decorative stitching on the sides and top to suit your taste.
We cut out the “front” from suede..here I decided to make the front part rounded..and already painted it on the suede..There is no need to cut out the darts..just stitch it. There should be 2 such parts - suede, 2 pieces - dublerin or thick fabric (linen, thick cotton).
My insole is cut from dublerin. These are the details that should be ready at this stage.
We glue the dublerin with an iron and sew the darts. Take the threads to match the material of the shoe...my suede will be tinted with oil...so the color of the threads does not matter)..
The two “fronts” of the boots are ready..
We glue the insoles with dublerin and glue the “front” to the sole. Apply glue along the edge of the sole...I have Moment crystal (transparent). We wait a couple of minutes and glue the “front” part of the boot.
We glue the “backs” in the same way).
We have already used two leather belt soles, now we glue the remaining two. Be careful...do not confuse the right and left parts).
We cut out heels from thick leather and glue them to the sole.
Almost finished stompers))...but I need to bring them to mind)
I glue lace along the edge of the shoe... you can glue a cord or a ribbon... or not glue anything)) it all depends on the idea... and the image.
I squeeze out some oil paints...two shades of brown...on a napkin or piece of paper. I wait 10-15 minutes... until the oil is absorbed. I use a flat brush to go over those places that in real life have abrasions and marks)
Using a thick needle, awl or knitting needle heated over a fire, I make holes for the lace ties. You can use eyelets and a punch... but here they are superfluous)). I made the laces from floss threads, which I kept in water diluted with PVA glue and dried.
The boots are ready. You can see how they look on a doll here.
Thank you for your attention).
Decoration
After the doll's shoes have been sewn, you need to make holes for the laces. It is convenient to use an awl for this. You need to thread the laces through the holes and tie them nicely.
You might be interested in how a beginner can sew dresses for dolls with his own hands
Ready-made shoes
Note! You can use appliques, beads, embroidery or other decorations as decorations.
The shoe can be made differently. One possible option involves using felt for the sole and attaching the parts without using glue - using a needle and thread. You must first make holes with an awl into which they will be threaded. In this case, you can use, for example, a sneaker pattern for a doll.
Other types of shoes
Here we talk about various ways of making doll shoes.
For miniature dolls
The manufacturing method described here is convenient to use for relatively large dolls. If they are miniature, then you can use, for example, the following option.
Making the sole
In this case, the pattern of shoes for a doll is based on the correct determination of the shape of the sole.
You can use a paper clip of a suitable size as a base for the sole. It needs to be bent so that it exactly fits the doll's foot. It is covered with sole material on both sides.
Fitting
After this, tape it to the leg. This is especially convenient if you need to make high-heeled shoes for the doll with appropriately curved soles.
Taping the insole
The tied shoe base is used to glue the remaining parts to it: the long heel and the front of the shoe. In this case, a pattern for hand-made doll shoes is only needed to make the soles.
Attaching to the leg
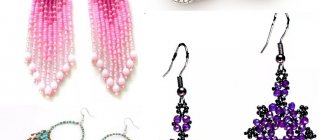
From beads
The top of the shoes can be made entirely of beads or seed beads. To do this, you need to tie a thread around the doll’s foot, and then string glass balls onto it.
Preparing bead threads
The result will be beautiful, high-end shoes that can be compared to Cinderella's glass slippers.
Beaded shoes
Using clay
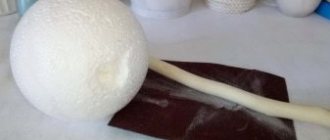
You can make shoes using polymer clay. In this case, a small rectangular block is made for each leg with an indentation for the leg. Then two strips are made from this material - for the front and for the heel. They are placed on the doll's foot, then the shoes are given the required shape, corresponding to the shoe pattern for the doll.
Getting started on clay slippers
After the shoes are made, they need to be baked. In what temperature conditions it should be done is indicated in the instructions for use for polymer clay. After baking, the master must carry out a final polishing of the shoes.
You might be interested in: Options for hemming trousers manually and using a machine
Clay shoe finishing
Note! You can paint it for decoration. Using glue you can glue various decorations: bows, beads, sequins or others.
You can make moccasins for your doll from clay.
Polymer clay
Once all the necessary components and materials have been purchased, you can begin the manufacturing process. In this case, a rather unusual but well-suited material will be taken - polymer clay.
Many mini-master classes show how to make stiletto heels for a doll using polymer clay. This is one of the easiest ways to make doll shoes among those that have been invented so far. The crafter has the opportunity to reuse the polymer and make more than one pair of shoes before disposing of the product.
You can recreate a pair of Barbie shoes that are hot pink. They can also be depicted in the sketch as black using acrylic paint. Later, you can add sealant to the patterns - this will prevent the paint from slipping when using the shoes in the future. You must remember to attach several straps to the finished product. This way the products will look more realistic.
In addition to shoes for Barbie, you can create several plaster objects for Moster High dolls. First you should start creating the sole blank. For this you can use a small wooden block from which part of the sole is cut out. Now it should be sanded and painted in the color that the shoes will eventually acquire. After this, the base of the shoe is modeled on top of the sole. When the process of creating the silhouette of the shoes is completed, you need to leave the product for a while. This will give it the opportunity to fix the shape in which it will remain for a long time.
In addition to polymer clay, latex molds may also be needed. In this case, in addition to the painstaking manufacture of the main sole, you will need to spend some time modeling the silhouette of the shoes from latex parts.
The simplest option would be to form the back of the heel at a right angle. The hole for the heel is made where it touches the heel of the object.
Then the resulting product should be carefully treated with paint. This must be done in several layers. Such measures are necessary to ensure that the product is of high quality and serves the master and his children for a long time. It is also worth leaving it to dry for a while after processing. This will prevent the main layers from cracking or slipping at the most inopportune moment. Do not forget about coating the main product with varnish or a varnishing component.