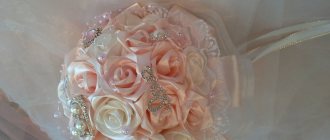
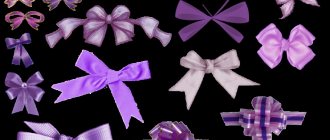
Delicate lace headband with flower and ribbon decor
Do not rush to throw away your old headband if it has become worn out or the decorations have fallen off. You can always give things a second life using a little imagination and the materials you have on hand. Let's see this for ourselves by making an elegant and delicate headband with flowers with our own hands.
Take the old headband and clean it of any remaining jewelry and fabric.
In addition, we will need:
- small beads or finished decoration;
- glue (necessarily transparent so that yellow smudges are not visible);
- lace 1 cm wide, 1.5 m long;
- guipure ribbon 0.5 cm wide, 4 m long;
- stationery clip (for ease of use);
- scissors and needle and thread.
You need to jump ahead a little and think about how to make the ends of the headband look neat. The answer suggests itself. Glue small pieces of lace to the ends. Don't despair if the base of the rim turns out to be black. It can be very advantageously played up using lace. You will get an interesting contrasting pattern.
Secure the end of the lace ribbon with a clip and wrap the lace around the headband in a circle.
We cut off the ends, leaving about a centimeter on both sides, and glue them on the inside.
A bright accent in this hairband will be the ribbon, from which you need to weave a patterned strip - a braid.
To do this, fold a 3-meter long ribbon in half and tie a small bow.
Pressing the knot tightly, pull the right end of the ribbon, thus unraveling one side of the bow. This will give us the initial loop we need.
We make a loop from the right half of the ribbon and insert it into the initial loop, tightening the end that we hold in our hand.
Next, we proceed in the same way, using the tape on the left side, tightening the loop into which we thread it.
Thus, we weave a braid equal in length to our headband.
A more detailed master class on weaving braids from ribbon can be viewed here.
We will also need the same smaller braid, woven from the remaining meter of ribbon. We want to make a headband with flowers, so we’ll assemble a flower from this small braid.
Gather the braid along one edge and tighten the thread.
The result will be a flower. Trim the protruding ends of the ribbon and decorate the flower with a bead.
If desired, you can make completely different flowers from satin ribbons and decorate the headband with them.
SEVERAL MASTER CLASSES ON THE TOPIC
Next, glue the ribbon braid over the lace base of the headband.
For reliability, you can secure it with clamps and wait a few minutes until the glue sets well.
Let's continue decorating the floral headband with our own hands by adding a thread of beads. Glue it exactly in the center of the rim.
If you have beads separately, you must first put them on monofilament or fishing line. But it is much more convenient to work with ready-made beads, the so-called pearl thread.
The final touch is to sew or firmly glue the previously made flower from ribbons to the lace.
This is how you can easily repurpose an old item and end up with a beautiful and fashionable piece of jewelry!
Check out a few more Krestik master classes on decorating hairbands:
And another pleasant surprise! The video tutorial on how to create a flower headband uses ready-made (purchased) artificial flowers:
How to make an original kanzashi headband with your own hands in autumn colors
A stylish headband decorated with ribbons will instantly transform your look and decorate your hair.
A bright and at the same time unobtrusive kanzashi headband in autumn colors will suit both blondes and brunettes! To make such beauty with your own hands, you will need a little time and some skills in working with ribbons, which you will acquire in this master class. Step-by-step photos are an indispensable help for beginners, so feel free to start creating, even if you have never worked in the proposed technique.
- Decorative elements and tools for work
- Master class with step-by-step photos
Decorative elements and tools for work
To make such an autumn headband with flowers from ribbons, you must have in stock:
- 7 colors of satin ribbon with a smooth transition from one shade to another - from yellow to brick red or burgundy (13 pieces of 2.5 cm by 6 cm for making a twig and 6 of the same pieces for modeling a flower);
- thin plastic bezel;
- glue and thread with a needle for attaching the petals;
- fluffy golden fringe or ribbon (13 or more pieces measuring 4 cm by 1.5 cm);
- red sugar viburnum berries for decoration;
- yellow felt base in the form of a rectangle 12 cm by 2 cm;
- metal sun hug and stone 0.8 cm.
If you decide to try your hand at the kanzashi technique for the first time, take a look at the article about this hobby.
Master class with step-by-step photos
Cut 2.5 cm strips from the satin ribbon to make twig and flower petals. The following will be used in the work:
- 3 bright yellow,
- 2 yellow,
- 2 orange,
- 2 dark orange,
- 2 fiery,
- 2 red,
- 6 burgundy stripes.
The length of all blanks is 6 cm.
To decorate the kanzashi with a floral arrangement, prepare a headband, the width of which is approximately 0.5 cm. To make a fringe from a gold ribbon, fluff the pieces. Also prepare decorative berries and a half bead with a stone.
To make petals from strips of ribbon, place the blanks vertically. Create a fold, forming a 90 degree angle.
Turn the side of the corner down so that the 2 ends of the tape line up. One side of the petal will be smooth - this is the front side, the second - with a pocket.
Next, you need to make a zigzag bend at the base of the petal, forming an internal fold. Press the satin gather with your fingers, scorch it with a candle flame and squeeze it with tweezers.
Prepare pairs of petals of different colors to form a long branch like a spikelet. The first color will be bright yellow, so you need to prepare 3 of these parts. Glue all the parts in pairs, then draw a spikelet.
The darkest petals, intended for the kanzashi flower decorating the rim, can be collected on a thread or glued together, helping with tweezers. Glue the rock into the center of the sun hugger.
Cut a 2cm x 12cm rectangle out of yellow felt and start gluing the flower arrangement on one side. Glue on the first lightest yellow petal. Go around the first piece with two pieces of gold fringe and glue two berries.
Next, continue the branch with a pair of yellow petals of the same shade. The next detail is a piece of fringe.
Continue gluing the prepared pairs, arranging them by color (from lightest to darkest). Place gold between layers.
Create an elegant composition from satin ribbons.
Glue the remaining fringe to the back of the flower around the circumference. Decorate the center of the kanzashi rim with a hugger with a bead.
Add 2-3 berries to the back of the felt after adding a drop of glue.
Cover the top end of the wire with gold, then a small piece of felt.
A bright stripe with flowers to decorate the headband is ready.
Glue the decorative kanzashi blank onto the hoop, slightly moving it from the middle to the right or left.
Add a dark flower to the side to complete the decor.
An elegant and exclusive autumn headband using the kanzashi technique is ready. If you can convey all the colors of the brightest time of year in your product, then the owner of such an accessory will not go unnoticed in any season!
To watch other master classes on making headbands and other jewelry using the kanzashi technique, take a look at this section of the website “Women’s Hobbies”. If you are interested in instructions for making headbands using different techniques, go to another section.
To stay updated on new interesting and useful publications, join our groups on social networks! Until new creative meetings!
Types of headbands
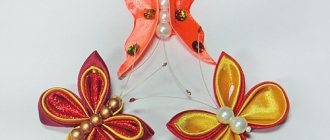
Most often, hairbands are very feminine and delicate. But for a bright and unusual look, you can make an accessory with multi-colored feathers, beads and ribbons of the boldest shades. The most common ideas for designing hair accessories:
- Kanzashi headbands and hairpins. A master class on this technique can be found below.
- DIY headbands made of satin ribbons.
- Handmade products decorated with beads, bows, rhinestones.
Using a Headband Base
Satin ribbon has become one of the most popular and easily accessible materials.
Thanks to its wide range of colors and many sizes, it can be used in different areas of creativity. For example, to create DIY ribbon headbands, where you will need a satin ribbon and a base for the headband. The rim turns out neat and the color we need. It’s easy to decorate such a base and create a full-fledged, luxurious decoration.
My rims with similar winding
Now you know how to wrap a headband with a satin ribbon. This neat base can be easily decorated with any beads, crystals, seed beads, twigs, flowers, in general, anything you like.
I suggest you look at my jewelry, which is based on a headband made of satin ribbons. Get inspired and create.
View other master classes:
Surely you will want to know other secrets of my creativity. Therefore, subscribe to the BroshkaShop channel or follow my detailed master classes on the website.
Japanese motifs - kanzashi style
The kanzashi style originated in Japan more than 400 years ago, and kanzashi products are still traditional Japanese jewelry along with kimonos. Each season and month corresponds to a certain style of kanzashi products that should be worn at that particular time.
To make this decoration yourself, you will need:
- Wide satin ribbon (from 5 centimeters wide) - 40 centimeters per 1 flower.
- Two narrow satin ribbons (0.5 - 1 cm wide) for braiding the headband. The length of the ribbons is approximately 130 - 150 cm.
- Rhinestones or beads for the flower core.
- Base: headband or large hairpin.
- Scissors, tweezers, pencil, file for processing the surface of the rim, lighter, superglue, ruler.
- Scissors and needle.
DIY kanzashi decorations
Making a “kanzashi” headband using a master class is not at all as difficult as it seems at first glance. The first step is to prepare the base. You need to braid it with satin ribbons so that it blends harmoniously with the flower decorating it.
There are quite a few ways to braid a headband with ribbons. One of them is the “pigtail”.
To do this, use both narrow tapes. Burn the edges with a lighter to prevent them from fraying, and make a small loop at the beginning of both ribbons. Secure with glue. Now thread one loop through the other (the green ribbon is threaded through the yellow). On the yellow one, make a loop again (no need to secure it with glue this time) and thread it into a loose loop of a different color. Tighten them and continue threading loops, alternating colors.
Simpler techniques
If the kanzashi technique seemed a little complicated to you, simpler options for weaving and decorating headbands with your own hands are suitable for you. For example, cross braiding. To transform the headband you will need:
- Narrow or medium width satin ribbons.
- Lighter or candle, scissors.
- Glue or double-sided tape.
- The basis.
As in the previous case, you first need to prepare the materials.
If necessary, sand the surface of the rim, remove the teeth, heat the ends of the ribbons and secure them to one of the ends of the base with glue or tape so as to close the edges. Now let's start braiding . We place and glue both ribbons “crosswise” on the inside. Leave a small tail (a couple of centimeters) on one of them to hide the attachment point. Next, you need to repeat several steps: take tape No. 1 to the top, wrap the rim with tape No. 2, and pass it under tape No. 1. Then do the same thing, swapping them. Continuing to braid the base, alternating ribbons, we will get such a beautiful pattern.
All that remains is to cut and process the ends of the tapes and secure them with glue.
Just like that, with the help of satin ribbons and the master class “How to make a headband with flowers with your own hands,” you can transform your image and create a unique decoration.
DIY satin ribbon headband
Any representative of the fair half of humanity loves to dress up beautifully. And to complete the look you need not only a beautiful outfit, but also stylish accessories. This is especially true for hair decorations. The easiest way to decorate your hair is with an unusual headband. We are talking about an item decorated with satin ribbons. The beauty of this accessory is that you can build it yourself and in several versions. Even a novice craftswoman can cope with this task. For the process you will need to spend a little free time and be creative. By making this decoration in different colors and techniques, you can create any image: a romantic young princess, or a strict business look of a business woman. To make sure of this, let's figure out how to wrap a headband with a satin ribbon in more detail.
Features of creating a headband from satin ribbons
There are several ways to beautifully decorate a simple headband using bright stripes:
- Braid. This is the simplest method. Often it is used in conjunction with others. It involves obtaining, using various weaving options, a beautiful patterned surface: rhombuses, triangles, stripes, and so on;
- Products created using the kanzashi technique are most often used as decoration. This option came to us from Japan. It consists of creating beautiful plant elements from specially folded satin pieces;
- The next way to wrap with satin is to decorate it using various braids. For example, as in the example.
To obtain this weaving, you need to perform the following steps:
- Connect the ends of the strips;
- Using the diagram shown in the figure, make a braid;
- Secure the ends;
- Cover the base with matching tape;
- Using glue, fix the braid onto the prepared base.
Reference! Braids look most attractive when using material in contrasting colors.
Decoration with one ribbon
The easiest way is to use one tape. You need to prepare:
- Headband.
- Ribbon of the required length.
- A lighter.
- Glue.
The beginning of the tape is attached to the edge of the rim using glue. Then the ribbon must be wound in a spiral along its entire length. This needs to be done obliquely. After this, the edge of the ribbon needs to be cut, lightly burned with a lighter so that it does not unravel, and fixed with glue on the inside of the rim.
You need to wind it tightly and carefully. Some turns can be additionally fixed with glue.
How to make a headband from satin ribbons with your own hands
To begin with, we suggest looking at creating a headband in a simple way. Even despite all its simplicity, or perhaps precisely because of it, this accessory looks very beautiful and extraordinary.
To implement you will need:
- satin stripe 5cm wide;
- several half beads;
- needle and thread in color;
- The basis;
- Narrow white ribbon;
- Glue gun;
- Ruler and pencil.
Completing of the work:
- Prepare all the necessary materials and tools, placing them in a convenient order on the work surface;
- Place the main strip face down;
- On the wrong side, make marks every two cm from the edge;
- Then draw triangles as shown in the picture;
- Using thread and needle, connect the vertices of each triangle, starting from the top, then the central one and ending with the bottom corner;
- The result should be a blank as in the photo;
- Next, we cover the base with white narrow tape;
- Next, we fix the satin blank onto the base with glue;
- Carefully wrap the ends of the workpiece around the edges of the base;
- After this, we glue the half-beads into the recesses of the improvised braid;
- A beautiful and unusual decoration for your hairstyle is ready.
Reference! You can also use rhinestones as decoration. They will give the product a more sophisticated look.
Delicate floral headband in kanzashi style - master class for beginners
In this master class you will find a charming kanzashi headband for hair. You will definitely get an amazingly beautiful accessory if you strictly follow the instructions.
This delicate and amazingly beautiful headband in the kanzashi style is suitable for decorating the hairstyle of a little fashionista or young girl. If the proposed color scheme does not suit you, choose your favorite shades of ribbons. For those who are starting to create flowers from satin ribbons for the first time, we recommend starting with general material, which describes in detail all the nuances and technology. If you are already familiar with the secrets of ribbon needlework, you can immediately begin to follow the steps of the master class.
- Materials and tools for decoration
- Step by step procedure
Materials and tools for decoration
To make a headband using the kanzashi technique you will need the following materials:
- light purple ribbon 4 cm wide;
- purple ribbon 5 cm wide;
- green ribbon 5 cm wide (you can take 4 cm);
- small stamens on a string - two different colors - 18 pcs. one tone (purple), 16 pcs. other (dairy);
- twigs with stamens on a wire – 3 pcs.;
- hair band.
Tools for work:
- lighter or candle, scissors;
- pencil;
- glue (Moment-Crystal or glue gun);
- ruler;
- soldering iron
Step by step procedure
To make a headband with flowers using the kanzashi technique, as in the photo, strictly follow the step-by-step instructions.
Cut the ribbon into squares 5*5 and 4*4 cm. For each flower from the purple ribbon you need 7 squares, for light flowers – 5.
Fold the square diagonally, then bring the ends together once again and again.
Cut off the end of the tape and use a lighter to burnish the edge. You can use a soldering iron; it glues together all the layers of the petal well.
Turn the workpiece inside out. This turns out to be a petal like this.
This needs to be repeated six more times. For one light color you need 5 petals and 6 stamens of purple color (for contrast).
Using a glue gun, glue the petals one by one, in a circle. It turns out a flower blank of 5 petals. Do not connect them to each other yet.
Apply glue to the middle of the formed flower, attach the stamens there all together, in a bunch. Next, you can apply glue to the edge of the petal and connect the flower together. On the reverse side, cut off the stems of the stamens with scissors. Repeat this with other flowers. In total, make three flowers from a light ribbon of five petals, and two flowers from a dark ribbon, using milky stamens.
For green leaves, take green ribbon. The width can be any. Cut strips 10 cm long. You only need six such strips.
Fold the strip with the right side of the tape inward, applying a ruler, measure where you need to cut off the corner to form a leaf. Then you can cut off this corner with scissors and burn the edge with a lighter to connect the edges of the tape together. You can use a soldering iron. Then you need to take an iron ruler and a flat glass surface, on which to cut off the required part of the tape with a soldering iron. If you use a soldering iron, then the sheet will already be glued along the desired edge. So cut both sides of the folded workpiece, searing the edges together.
Unfold the leaf blank, cut off a little of its base, and scorch the edge with a lighter. From one piece of ribbon 10 cm long you will get 2 leaves. You can use a 4 cm wide ribbon. This will not affect the size of the leaves. Make 12 green leaves in total.
From a 4 cm wide ribbon, cut out a blank for the base of the flower composition. You can use felt or thick fabric for this.
Using a glue gun, place and glue onto the piece.
Next, glue the twigs with stamens and flowers.
Applying glue to the rim, glue the composition with flowers to the base. On the inside of the rim you need to glue the same piece of tape. This will secure the composition to the hoop.
This is what a finished headband made of satin kanzashi flowers looks like.
And this is how a kanzashi style headband looks on a princess’s head.
If you like the kanzashi technique, try making other crafts according to the master classes on our website. For example, hair bands, a headband, a simple headband, a box. Even more master classes await you in the Handicraft section. You can also get new ideas from our group on Odnoklassniki.
We are waiting for you every day! Check back often so you don't miss any updates to our collection of ideas.
How to decorate a headband with satin ribbons
The best way to decorate a base covered with this material is to use decor made using the kanzashi technique. These can be a variety of flowers or twigs, as well as snowflakes. Let's look at how to do this in detail.
To implement you will need:
- Two ribbons of contrasting colors;
- Clothespins. You can also use hairpins;
- The basis;
- Glue;
- Scissors;
- Source of open fire: candle or lighter;
- Tweezers;
- Decorative element for the core of a flower.
The working process:
- Braid the base with contrasting ribbons according to the example shown in the photo;
- For the inner circle of the flower, make six double petals from a contrasting material;
- Using the same method, make eight larger white petals for the outer circle;
- Form a flower with glue;
- Glue the decor into the middle of the flower;
- Fix the flower on the prepared base.
Reference! You can use an old brooch or a piece of broken jewelry as a decorative detail.
We hope that you have seen how easy it is to create an attractive and original decoration for your hairstyle. This accessory will make you stand out from the crowd and will undoubtedly attract the attention of the opposite sex. It will also show others that you are a creative person and not only love beauty, but are also capable of creating wonderful things yourself.
How to braid a headband
Each needlewoman strives to make her product flawless and it often happens that when making a decoration for a headband, its color does not match the product. However, there is a way out, and more than one. Today we will devote our master class to how to weave a headband to match the product, make it multi-colored, or weave a bauble to decorate it.
Headbands 1 cm wide can be braided with two, three or even four ribbons. For headbands 1 cm wide or less, I recommend using ribbons 0.6 cm wide. Very thin headbands can simply be wrapped. It is better to braid wide models 4 - 5 cm with 4 ribbons, because they widen towards the center and narrow towards the edge, and therefore it is difficult to braid with 2 12 mm ribbons evenly.
As for the cloves, there is no need to cut them off; on the contrary, I prefer rims with cloves. They stay on your head better and stay more secure when braided into a ribbon. If a child complains that the teeth are pressing on the head, then they can first be covered with an additional layer of tape to soften the teeth.
Braiding method number 3
Next, we will braid the rim with two ribbons. This is also a simple and quick way to braid with ribbons. Despite the fact that there are many master classes on this topic online, it is often not possible to really understand the weaving pattern itself. We hope that our master class is more understandable. Take a narrow metal hoop 0.5 cm wide.
To work you will need:
- Metal rim 0.5 cm wide.
- Ribbon of any color, 0.6 cm wide, 1.5 m long.
- Glue gun or Moment glue.
- Lighter.
- Scissors.
Cut 2 small (1/1.5 cm) pieces of tape and cover the edges of the rim with them. Use a lighter to smooth and glue the edges. We process the other end of the rim in the same way. We bend the remaining ribbon in half.
We clamp the edge of the tape with tweezers or scissors and singe it at an angle with a lighter. Look at the photo: this triangle needs to be removed with a lighter.
We fix the tape with glue on the rim. We got it like this: 2 ribbons lie on top of each other. Take the bottom ribbon and guide it under the top one. The top tape is directed behind the rim, where it connects with the top one. Again 2 ribbons on top of each other.
Popular articles Craft shirt: step-by-step instructions on how to make a stylish paper craft with your own hands (95 photos)
Then again: the lower ribbon is directed under the upper one, and the upper one is sent behind the rim, they should connect again. And so we continue our weaving, pulling the ribbons. It turns out that we have these 2 ribbons alternately located either on the left or on the right side of the rim. If you don’t understand the weaving pattern, you can watch the video: master class kanzashi headband - attached photo below.
At the end of the rim, cut the tape and glue it with glue. There are a lot of headband decor ideas.
On video: kanzashi headbands new ideas master classes.
How to braid a headband with two ribbons? MK / How to Make Ribbon Woven Headband
Watch this video on YouTube
Braiding the headband using the “Zigzag” method
Let's consider braiding the rim with ribbons 12 mm wide. I use contrasting colors for clarity. Let's take pieces 80 cm long and a rim 12 mm wide.
To begin with, we will paste the edges with pieces of tape and melt the protruding ends of the tape with a lighter.
Place the ribbons crosswise on the edge of the headband and secure with a clip. We will leave one edge of the tape a little longer so that we can wrap it around the tip. So, we have two ribbons - left and right. We insert the top ribbon, which is on the right (black), under the bottom of the rim and bring it under the ribbon on the left (red). We lift the red ribbon and put a black one under it on the rim. Now we again have ribbons on the left and right sides.
We put the red ribbon under the rim and bring it out under the black one, which we lift and put the red ribbon under it and again draw it under the rim.
We continue to repeat the steps. We pass the top ribbon (black) under the rim, and the red one on its front side.
We make sure that the ribbons, being on the same side, are parallel to each other. And the corners of the picture were even.
Having finished braiding, we cut one ribbon and glue it. We leave the second one to wrap the edge. We leave the exact color of the ribbon that we left at the beginning.
Ribbon bauble for headband
To make the headband colored to match the decoration, simply cover it with ribbon. But if you want to make a beautiful decor, then weave a bauble from narrow 0.6 cm ribbons and glue it to the headband. You will need approximately 3 meters of tape. Fold it in half and make a loop on the left. On the right we make a second loop and thread it through the first. Tighten the knot.
There remains a loop on the left, into which we will thread a loop made from the ribbon on the right and slightly tighten the left ribbon.
Now we have a loop on the right, which means we will thread the loop into it that we will make on the left. And let's tighten the ribbon again. We repeat these actions, alternately left and right, until the length of the bauble is not enough to cover the rim.
To finish the weaving, cut and glue the ends of the tape. All that remains is to glue it to the rim.
Making a headband
Now, using our little MK, you can easily master the New Year's kanzashi headband . But first, of course, you need to decide what it will be.
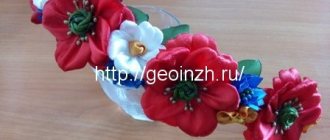
A snowflake headband is a great choice. You can make such a headband in the following way: decorate the finished headband with a snowflake you made yourself, or take a plastic blank, first braid it with ribbons, and then sew or glue the snowflake. As you can see, the snowflake in our example is made from petals of both types, from squares of two different sizes, and is decorated with pearl beads and a motif from a broken ring or necklace.
The crown headband is an excellent alternative to a tiara. The best way to decorate a blank for a headband is to first braid it with thin lines, and then fasten the kanzashi petals. In our example, only narrow petals made of white and blue silk and silver organza are used, as well as decorations - rhinestones.
For those who have a good sense of humor - a herringbone headband . As you can see, to create a Christmas tree you need several green ribbons of different colors, but of the same width. In the example there are only green ribbons, but in principle you can also use silver and white ones - you will get a Christmas tree under the snow. Narrow petals, decorated with beads and rhinestones, make up not only the Christmas tree, but also the star-shaped crown on it.
The Snow Maiden's headband is perhaps one of the most intricate decorations of this kind. Using only narrow petals of blue and white to make up the main part. The feeling of frost and lightness of winter air is created by sharp petals made of a very narrow ribbon in the color of transparent silver.
If your petals don’t turn out smooth and beautiful, again refer to our old story. Remember when we said that even very narrow ribbons can be used for weaving? So, these ribbons can make a beautiful bow headband. You just need to choose New Year's shades - gold, silver, white, blue.
If you really value elegance, then you can create something truly unusual. A great idea is a hat headband. The hat is made of cardboard and covered with silk. Decorating it with a kanzashi flower and a veil will not be difficult.