Simple origami crane diagram – Origamir
The international symbol of origami is the Japanese paper crane.
. Any experienced origamist knows its diagram by heart and can easily fold this figure from memory.
The crane is a symbol of happiness and good luck in Japan. This figurine was folded in ancient times. Several ancient sources describe the making of a paper figurine of a crane (Tsuru).
The gift of a paper crane was sacred and brought happiness and longevity to the recipient. In 1797, a book appeared in China called Sembatsuru Orikata - Folding of a Thousand Cranes.
The book described various methods of making cranes from a paper square and compositions with them.
There is also one sad legend story associated with the paper crane, which gave it additional meaning and turned it into a sacred bird of the world.
During World War II, there lived a little girl named Sadako Sasaki in Hiroshima. She was born in 1943 and was just a baby when her father and mother were killed in the bombing of Hiroshima. Sadako herself survived, but suffered from radiation sickness. The girl fought the disease as best she could, but she got worse every year.
While lying in the hospital, Sadako folded paper cranes. She believed that if she folded a thousand cranes, her wish would come true. It became more and more difficult to work on the cranes, and, realizing that she would never recover, Sadako began to dream of peace for all the people of the Earth, so that there would be no more wars and innocent people would not die.
But she did not have time to make a thousand cranes. After making 644 cranes, Sadako died of illness in hospital on October 25, 1955. Having learned about this, children from all countries began to send paper cranes they had made to Hiroshima in the hope that Sadako’s dream would come true.
A monument to Sadako was erected in Japan, and children still send paper cranes to the Peace Museum in Hiroshima as a symbol of peace and memory.
Making a thousand paper cranes is quite difficult. But making one figurine will not be difficult. So, here is a diagram for folding a paper crane :
Fold a piece of paper in half diagonally
Fold in half again
Open and flatten the pocket
4-5. Turn the resulting figure over, bend the triangle
Open and flatten the second pocket as in step 3.
Fold the paper on both sides
Bend down the side triangles
Pull up one layer of paper, bending the figure along the outlined lines
11-12. Turn the figure over and repeat steps 7-10
13-14. Bend the bottom triangle and return it to its original position
Bend the triangle inward along the marked line
Bend the second triangle
Repeat step 16 on the reverse side
Bend the resulting triangle inward
Make a beak for the crane by bending a small triangle downwards
Now bend both wings down without drawing a fold line. Take the crane by the chest with one hand, and gently pull the tail with the other, and the paper crane will flap its wings!
Anna Privalova
© Masters and craftswomen. Copying is prohibited.
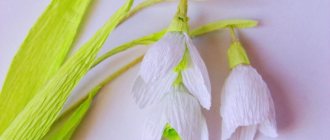
Every year, on every birthday of our children, when they go to bed, my husband and I begin to create beauty to decorate the children's room. Such little things bring a sea of joy and delight to children.
This year we decided to make many, many colorful cranes using the origami technique and hang them from the ceiling in the room. Having woken up and opened his eyes, the child finds himself in a fairy tale where these funny birds fly.
At first he couldn’t believe his eyes and said that he thought that he was still sleeping and having a wonderful dream. But then, looking again, I realized that this was one of the surprises for his holiday. Happiness knew no bounds. And you can’t even imagine how amazed the guests were.
Therefore, I also suggest that you do such a miracle for your little ones.
To create an origami crane we need:
- sheets of colorful paper for origami
- threads
- long needle
How to make an origami crane out of paper:
Take a square sheet of paper.
Fold it in half and then in half again.
Next, fold it diagonally on one side, unfold it and do the same action on the other side.
We bend the corners on both sides inward and get a rhombus.
We bend the corners to the fold line, first on one side, then on the other.
Straighten the bent corners and lift the bottom corner up, folding the figure as shown in the photo.
We perform the same action on the other side.
Now we bend the right side towards the middle.
Then we bend the left side, as well as the reverse side.
Expanding the figure
We bend the lower part up and bend the corner - we get the head of a crane.
On the opposite side we also bend the lower part upward - this will be the tail.
We expand the figure - we get two wings.
We lower the wing down.
We get an origami crane made of paper.
We make many, many colorful cranes.
We thread the needle and tie a knot at the end.
We thread a needle into the hole at the bottom of the crane and bring it out at the top.
The nodule remains outside.
The origami cranes are ready and you can decorate the birthday boy’s room.
Origami crane
Perhaps the origami crane was the first model made of paper. Nowadays, this model has acquired many variants and modifications. It is safe to say that this is the most popular model.
Perhaps everyone who did origami folded these wonderful cranes.
We tried to collect the best crane patterns in this section.
Origami crane (complex model)
Movable origami model of a Crane flapping its wings. The author of the model is Robert Lang. The scheme is quite complex and may require your patience. But, I am sure that you will succeed, even if perhaps not on the first try.
Crane with back
Another variation of the most popular traditional origami model is the Crane. The difference between this model is that at the last stage, when the wings are spread, the back of the crane is leveled.
Crane in the heart, origami model
Another interesting origami model that combines the pattern of a classic crane against the background of a heart. It is noteworthy that the model is made from one sheet of paper, and the effect is achieved due to different colors on both sides of the sheet.
Classic crane, origami
This is one of the oldest origami models, however, a paper crane will never give up its position even to the most modern models...
Decoration of a well
The finished crane well becomes an element of landscape design. Therefore, its decorative design must be carried out taking into account your taste and other elements located in the local area.
To decorate the support, you can dig a ditch around it. You need to pour humus into it and plant climbing plants. It is better to choose unpretentious breeds with beautiful flowers. All the elements that make up the design of the well crane can be designed in the form of some fancy figure, fairy-tale character, animal or bird. The photo shows one of the options. (Photo 2)
Crane master class | DIY crane from bags
To improve your territory you need a good specialist, but...... But every summer resident or gardener can safely be classified as this creative person. After all, every day they come up with and invent something. Somewhere you need to update a flowerbed, and somewhere you just need to make your work easier, so you have to invent something and show imagination and ingenuity. And how many interesting and unusual things can be seen in the garden plot, and all this was done with your own hands, and with love. Crafts for the garden can be made from scrap materials, these can be plastic bottles, basins, lids, pans, plastic bags and much more. From all this, you can create very beautiful crafts for your garden with your own hands and decorate your area with them. Therefore, do not rush to throw away old unnecessary things, because they can be useful to you in your invention. And thanks to them, you can create exclusive works from inexpensive things that will become a good decoration for both your garden and your site.
Our craftsmen are also very fond of birds and therefore they create them with their own hands. Today we will look at one very interesting work by Olga Baturina - a crane made from plastic bags. Also, if you are interested, you can see other works of the author on the website - HERE.
The crane is a beautiful, diurnal bird, which is very easily recognized due to its large size, as well as long legs and neck. The crane has a very loud voice that can be heard several kilometers away.
Cranes represent a symbol of purity, happiness, honesty, and readiness for selfless help. The Japanese called cranes “people in feathers,” and called the bird “the Honorable Mr. Crane.”
The Japanese crane is the hero of many fairy tales and legends. For the Japanese, the crane symbolizes longevity and prosperity.
Probably because of its popularity and beauty, Olga decided to create such a beautiful bird from bags for her garden.
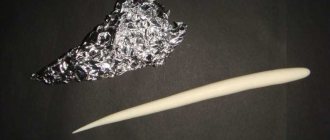
To make a crane you will need: * Plastic bags. * Sketch of a crane. * Scissors. * Thick metal wire. * Aluminum wire. * Textile. * PVA glue. * Dye. * Varnish. * Bandage. * Foam sponges. * Needle with thread. * Styrofoam.
* Beads.
How to make a crane: It all starts with this! Simply draw the outline of the bird and the direction of the feathers on paper.
If you have difficulties choosing the plumage of a bird, then you can find a picture on the Internet to decide on the color scheme or come up with your own bird. If we use a picture from the Internet, it is advisable to print it on a printer so that the sketch is always before your eyes.
We take plastic bags of the desired color, in this case we will use white and black colors. Cut feathers from bags.
We make a different assortment of feathers; the larger the assortment, the more natural the crane’s plumage will look.
We make the longest feathers for the tail and wings, the smallest ones for the head, and the medium ones for the plumage of the body. Perhaps in the process of making the crane, we will need to cut them further!
Now we need to make the base for our bird; to make it we will use thick metal wire. Next, we take the fabric and cut it into strips and with these fabric strips we begin to wrap our frame, unforgettable, to form the thickness of the legs.
Wrap the metal structure with cloth and bandage, and then impregnate it with PVA glue. It’s better to apply it several times so that the glue evens out the surface. If you wrap the impregnated material with glue immediately, you will not get the desired effect. And so the legs turn out to be like cast in structure.
Next we need to make the paws. We will make them from aluminum wire. We make rough sketches of paws from it.
Then we begin to wrap the frame again, but with a bandage. The bandage, just like the fabric, must be soaked with PVA glue before wrapping.
We wrap the frame with a second layer of soaked bandage (this is necessary to make the surface more even). Next, paint the frame in the desired color.
Olga used enamel for painting, you can use what you have available. Then the entire frame can be coated with more varnish.
We begin to make the body of our crane. As you can see inside there are simple sponges and wire. The wire for the neck should be thick and should not be soft. Otherwise, your bird will constantly tilt its head.
We form the body of our crane from sponges around the wire. If it seems to you that there is excess foam somewhere, you can cut it off with scissors. We sew the pieces of foam rubber together, as shown in the photo. If you don't have sponges, you can come up with something else to make the bird's body out of.
- As a result, we should get something like this.
Now we take the fabric and begin to cover our crane with it. Do not stretch the fabric too much, otherwise it will tear. The base is ready! Don't forget your feet! Or rather, about the hips! They are done last.
The trimmed thighs are another way to strengthen the base of the bird! This is what happened! If you don’t like something, you can correct it. With a pen, Olga draws the location of the wings and marks the line of the middle of the bird, that is, divides it in half, like a half carcass.
Now let's move on to the most interesting process of making a crane - sewing on the feathers. You should always start sewing on feathers from the limbs: legs and tail.
The feathers need to be sewn on as symmetrically as possible and also not tightly. The stronger the seams, the longer the bird will please you. If you do this job poorly, your crane will go bald very quickly!
It is advisable to draw feathers in a checkerboard pattern. Also, the next layer of feathers should cover the seam of the previous row. It is very important to follow the direction of feather growth!
The location of the wings does not need to be trimmed with feathers. It's up to you!
- We will cut out the shape of the wing from thick fabric.
Then we take a regular, thin plastic bag and cover the wing blanks with it. This helps keep our wing in better shape.
Now we begin to make the feathering on the wings. Our plumage should be symmetrical. Therefore, it is best to do the plumage in parallel, on both wings at once. And compare them during the manufacturing process.
We trim the wings on one side only. Also, do not forget about the strength of the seams.
This is what the finished wings will look like. But if you want the wings to be not pressed to the body, then they need to be done completely differently!
And this is what the other side of the wing looks like. If you still planned to make the wings differently, not pressed to the body, then you will need to trim them with feathers on both sides.
On the head we will use the smallest feathers. Try to keep them adjacent to each other and not puffy! Then our bird won’t be shaggy!
Maintain symmetry! At the very end, it is better to sew on 1, 2, 3 feathers in pieces. See for yourself how comfortable it is for you!
All that remains is to make the beak, we will make it from foam plastic. We take a suitable piece of polystyrene foam and form a beak from it. We cover the finished beak with fabric or you can use thin leather. In this case, Olga cut out the beak from layers of foam backing sewn together. You can also make a beak, for example, from polyurethane foam. Imagine and do what you have at hand!
We sew the beak in the place we need. Olga made the eyes from beads, you can come up with your own version of making them.
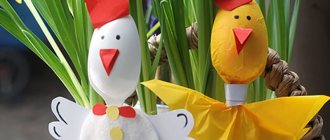
- That's it, the crane made from plastic bags is ready, look how beautiful it turned out.
All he has to do is find a suitable place in the garden and on the playground. Children will be delighted with such a resident.
Finally, I wanted to tell you a little more about this amazing bird. The Russian people have always revered the crane that flies in the spring as a bird of universal happiness and joy. Hearing his barely audible cry, the entire village came out and asked him for health, well-being in the family and much more.
There was also a belief that if anyone sees a pair of cranes first, they will soon attend a wedding. And watching a whole flock of cranes indicated that this year there will be an addition to the family or a meeting with relatives. The ability of birds to cover vast distances at a speed inaccessible to humans has attracted humans since ancient times.
In ancient times, magical properties were attributed to these birds. It was believed that cranes could bring happiness. And if you have ever seen the flight of cranes, then you will have a bountiful harvest, which is why people throughout the village came out to say goodbye to these birds. In the fall, when the birds flew away, they symbolized longing with their cry for their native land.
Indeed, the farewell crowing of the cranes leaves no one indifferent, the notes of despair and sorrow are so clearly heard in the birds’ voices. Villagers sometimes ran for a long time after the crane wedge and shouted: “The road is with wheels,” so that the birds would return home in the spring.
Sometimes they said that these words could supposedly delay the flying cranes, and with them the onset of frost. In Rus', it was always considered a good omen to suddenly see a flying crane in the sky. The Slavs believed that if cranes sat down to rest on a field, then they could safely expect a rich harvest from it.
Seeing the cranes dancing was also an omen of luck and joy. Killing a crane was considered a great sin. They believed that soon misfortune or even death would befall the sinner and his family. It was forbidden to point a finger at flying birds, because, according to legend, this could cause them to get lost.
In the old days, people, knowing the habitats of cranes, tried not to disturb their peace. You were only allowed to look at the birds a little, meeting them by chance, and then quietly leave without disturbing them. By the way, there is an opinion that the prototype of the fabulous “firebird” is none other than the crane.
The unique whine of a crane wedge cutting through the blue sky always attracts people's attention. Inexplicably, cranes awaken sensitivity and sincerity in souls, forcing them to look up to the heavens and think about something important, elusive, eternal...
Altai legend about the crane
One day the birds decided to have a meeting. They began to choose the chairman of the meeting and the choice fell on the late crane. The Crane refused and made excuses for a long time, giving various reasons that he was not suitable for this position.
But the birds said something completely different: “You look respectable and have the right voice!” Why not the chairman! The crane was touched by the bird's praise and agreed, thinking that maybe he really was the most suitable for this. But then Crake came to the meeting and, seeing Crane in the role of chairman, burst out laughing.
Crake addressed the meeting: “Oh, you’re all fools!” Why did you choose Crane as chairman? Well, what kind of chairman is he? Look: - The legs are long, the nose is long, the neck is long. He does not speak, but screams like an orphaned widow. Well, is such a bird really elected as chairman? Hearing the criticism of their fellow bird, the birds raised a loud noise and called a break.
The birds, having gone on a break, were chattering about what had happened, about the correctness of their decision and choice! Opinions, of course, were divided after criticism. Meanwhile, the angry Crane was looking for the critic. He ran into Crake and trampled him and broke the offender’s back. The break ended, and the meeting delved into its problems. The Chairman, as if nothing had happened, led the meeting.
Suddenly, Crake comes in, barely able to stand on his feet and says: “Dear birds!” You, despite my comments, still left this long-nosed Crane as the head of the meeting. Just look at your chairman. It was he who, during the break, attacked me and broke my back. Now I won't be able to fly.
The birds started chattering, making noise and decided to judge the Chairman Crane. They debated and debated for a long time, but in the end they decided: “The Crane, during its flight across the seas, must carry Crake on its back.” Whether the Crane wanted it or not, he could not violate the court decision. And to this day the Crane still carries Crake during flights.
In conclusion, I suggest watching an interesting video about cranes.
Copyright © Attention! The website mnogo-idei.com is protected by copyright law. Copying text and photographs can only be used with permission from the site administration and by indicating an active link to the site. 2021 All rights reserved.
A symbol of peace
Most people know the song about the Japanese crane, which tells the story of the girl Sadako Sasaki, who received radiation sickness after the atomic explosion over Hiroshima. She folded her thousand origami cranes in the hope of recovering, but she never completed 357 birds, as she died from her illness.
The film “Hello Children” was made on this topic. These developments in music and cinema became the basis for the perception of the paper crane as a symbol of denial of nuclear weapons.
How to make a crane out of paper - origami diagram
The paper crane has a beautiful appearance and is an interior decoration. For this reason, many are interested in how to make a crane out of paper? We will talk about this in the article below. Let's look at different techniques, the most popular technique is paper origami, it allows you to make different cranes with different levels of complexity.
About the popularity of cranes
The crane in some countries is considered a symbol of peaceful life and hope. In ancient times, in Japan, figurines of such a bird were made and painted in different colors. Over time, similar art became popular in other countries. There is a belief about such a craft: whoever folds a thousand cranes out of paper will definitely have his cherished wish come true.
Nowadays, the crane personifies peace and is a wonderful decoration for any home interior. But now it’s not about history, but about how to make a crane out of paper using popular methods.
Origami paper crane
Many people haven’t even thought about what they can do to make a crane out of paper. The process of making any crane model begins with designing a blank for the bird. The main blank is a double square. Making such a base is very easy. We have already discussed this folding technique in an article about making shuriken.
Making a crane base:
Scheme
If you learned how to make a crane out of paper and told your child this, then he can make the base himself.
Crane with wavy wings
We figured out how to make a base for a crane out of paper, now let's start making the bird itself:
Crane with wavy wings (Step 1)
Now, you need to bend the corners along the resulting lines into the middle. These folds need to be done with each layer. This way we get a flat surface. (Step 2)
Fold the left and right corners of the diamond on each layer and fold the bottom corner up. (Step 3)
We bend the upper part of one of them at a certain angle, and make a head with a beak, and the second remains in the same position. Crane with wavy wings (Step 5)
The crane is ready. This craft is great to start teaching children, since all the folds are not complicated and understandable.
When making such a craft, it is better to take your time, follow the step-by-step instructions, and as a result, even beginners will succeed in the product.
We recommend looking at other interesting options for paper crafts
Crane with graceful contours
Now megamaster.info will tell you how to make a bird out of paper, which is distinguished by its slender neck and graceful tail. Many people will think that this is a complicated origami craft, but in fact, it is simple to do.
Design process:
Crane with graceful contours (Step 1)
- We take a blank in the form of a double square, make bends on it, bending each side into the center;
- We bend the edges of the resulting workpiece towards ourselves and repeat identical actions with the bottom layer;
- bend the right and left corners of the top layer towards the middle of the workpiece, bend the lower corners of the craft to the sides, and move them inward; (Step 2)
- we get a blank shaped like a lotus, on which we select any narrow petal and bend it at an angle of 90 degrees, that is, we form the head of a crane;
- Now we move the wide parts apart, but don’t touch the remaining thin petal, this will be the bird’s tail. (Step 3)
Having made an origami crane out of paper, you are convinced that a crane can be made out of paper in just a few minutes of free time. And since the craft is easy to make, not only a beginner, but also a junior high school student can handle it.
flying bird
The flying crane is the most common option. The main difference between this type is the ability to move. We will now describe in detail how to make a flying crane out of paper:
Flying bird (Step 1)
- The basis is not a double square, but a straight rhombus; the process of making a straight rhombus was described above, during the manufacture of the previous version; Flying Bird (Step 2)
- we fold one side and the other of the rhombus, iron the fold well, and so we get the upper part of the rhombus, which visually consists of 2 parts;
- We stretch these 2 parts, then we bend all the layers of the upper corner upward; Flying bird (Step 3)
- select any narrow petal and turn it into a bird’s head, for which you need to push the corner into the middle;
- pull the upper petals a little to the side and turn them into wings. Flying bird (Step 4)
The flying crane is ready. In order for him to start moving, you need to pull his tail. Now you are convinced that you can make from paper, not only an ordinary origami crane, but also one that moves.
How to dig a mine
The shaft for the well needs to be dug in 1 day. Therefore, you need to work with assistants. The optimal shape for a shaft is a circle. However, you can also make it square or even hexagonal. The selected contour must be outlined on the ground surface. A shallow hole is dug inside it in exact accordance with the required shape. Next, you need to gradually deepen it to the required depth.
Earth masses are removed from the mine with a bucket or barrel with a rope tied. You can use a brace. Workers can descend deep into the mine and climb up using a rope ladder. It must be securely fixed to the soil surface.
It should be remembered that during the digging process it is necessary to periodically free the internal space of the mine from accumulated gases . They can be hazardous to health. When the mine is ready, the water needs to be pumped out of it. Next you need to strengthen the bottom. Crushed stone or gravel is poured onto it for primary filtering of water.
The walls of the shaft can be laid out in the form of a log house from logs of suitable length. First, 1 frame is laid out at the bottom, which must be carefully aligned vertically and horizontally. Next, the log house is gradually expanded by laying new crowns. To enhance adhesion, log frames are pressed by tapping them with a wooden hammer.
It is better to use a frame made of logs with a pointed lower edge. It is placed in the prepared hole and soil excavation begins. First inside the frame, then around it. Gradually, under the weight of its own weight, the structure will fall down, cutting through the ground with a pointed edge. As the log house is immersed, it is expanded with new crowns to the required size.
To seal the joints, they must be thoroughly coated with clay. Thick boards will help prevent the log house from skewing in the future. They need to be nailed at the corners from the inside.
All wooden elements of the well shaft must be carefully planed and leveled from the inside. This will allow you to freely lower and raise a bucket or other water container.
A simple version of a paper crane
To master new creative skills, start with the basics. To learn the origami technique, you need to start with the simplest crafts. This is what the crane is.
Fold the sheet of paper carefully and according to the pattern - this way you will not get confused and will make a beautiful, neat toy.
Origami crane step by step instructions
- You need to take a sheet of paper and cut a square out of it
- Fold diagonally
- We bend the edges.
- Let's make a triangle.
- Fold it again.
- We alternately wrap both corners of the triangle
- The result is a rhombus, the edges of which need to be bent. Turn the figure inside out.
- Again we bend the edges on one side and the other alternately
- Now you need to bend the edges. We got the head and tail of the bird.
- Making a beak
- Spread the wings. The craft is ready!