Cup and saucer
Prepare a space for the “Coffee Cup” craft and the necessary elements: cardboard, coffee beans, linen fabric or burlap, glue.
Cut out a rectangle from the fabric that is 2-3 cm larger than the size of the cardboard sheet. Glue the fabric to the cardboard from the inside out, wait until the glue dries.
Select the area you want to decorate with coffee beans and draw its borders. Then sketch the cup and saucer.
Apply glue to the sketch of the cup and saucer, as well as the frame, and glue the coffee beans to the fabric.
How to make a floating cup
Seeing it from the outside, people are surprised at how the dishes hold up. And this is the secret of the craft. A carefully hidden support creates the effect of its complete absence. And the decor is pleasing to the eye - a delicate and attractive composition.
Topiary will decorate the mantelpiece, the tabletop above the TV, or fit comfortably into the kitchen interior.
How to do it?
It is very easy to create a beautiful gift or decoration with your own hands. You will need a small set of tools, the necessary materials and the decor you like. Make a floating cup with flowers, candies, shells or coffee beans.
For a present for the New Year holidays, Christmas tree toys, balls and garlands are suitable as decorations. Multi-colored sparkles, beads and “snowballs” open up great possibilities.
Basic materials
To invent your own craft you will need:
- Tea pair.
- Adhesive designed for smooth surfaces.
- Wire, old plug or two-core cable.
- Thermal gun.
- Tin snips or pliers.
- Jewelry and small decor.
- Modeling mass.
Choose a coffee or tea set consisting of a saucer and a cup. It is better if they are thin and light.
Build process
There are a few basic rules that will help you create the perfect steaming cup. First, the mug is tilted no more than 45 degrees and placed in the center of the saucer. Secondly, the height of the topiary should not be more than two times the height of the mug. Thirdly, choose a lightweight cup so as not to risk the integrity of the composition.
@Hobby-kalejdoscop.ru
Next, we proceed to the step-by-step assembly of the craft:
- Prepare the plug or wire. To do this, bend the lower part at an angle of 90 degrees, and the upper part at an angle of 45.
- Degreasing. The surface of the fork, saucer and mug is wiped with a special compound, for example, alcohol.
- Gluing. Using a clamp, glue the tea pair to the bent fork. Let it harden for a day.
- We check the strength of the structure.
- Let's start with the decor.
Be sure to make sure that the workpiece is decorated on all sides. So that there is no unpleasant “surprise” when turning the craft.
Next comes various decorations. For the New Year, small Christmas tree balls of different colors, “rain”, pine cones and other elements characteristic of the holiday are often used. Topiary also looks beautiful with artificial or fresh flowers. Original jewelry made from polymer clay.
Coffee bean cat
This gift will please not only drink lovers, but also happy owners of four-legged and furry pets.
- Prepare for the act of creativity: take a sheet of cardboard, grains, glue, colorless tape;
- Draw or print a cat shape and glue it onto cardboard. Trace the silhouette of the animal and cut it out along the contour;
- Cut out a cat stand from cardboard. Connect the two shapes using duct tape;
- Fill the body of the cat and the stand with coffee beans, attaching them with glue;
- For better stability of the craft, sew it with threads (optional);
Application
Applique as a decorative technique has been familiar to everyone since childhood. By gluing various colored paper figures onto a sheet of cardboard, children create their first creative works. Gradually the process becomes more complicated, natural materials are used:
- flowers;
- leaves;
- cereals;
- seeds.
Remember a skill you learned as a child and transfer it to your repertoire of handicraft tricks.
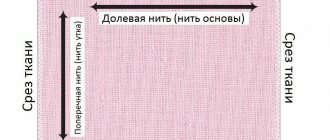
A sheet of cardboard is taken as the basis for the future craft. It can be painted, left natural or covered with burlap. A drawing is transferred onto cardboard, which is easy to choose from numerous photos of a cup of coffee.
If the picture is contrasting and clear, it is cut out along the contour and glued to the base. Grains are glued on top of the drawing, thus filling the entire space of the image.
ADVICE:- It is more convenient to glue the grains with the flat side onto the base. But if you place them with the rounded part down, you get a beautiful textured pattern. Of course, you will have to practice and spend a little more time.
- The grains cannot be placed close to each other - there will still be a gap due to their rounded shape. Therefore, the basic drawing is pre-painted with any brown paint. The most ordinary gouache or pencils, felt-tip pens - whatever is at hand will do.
Fragmentary applique looks amazing when only part of the finished image is filled with mosaic.
In this case, it could be a collage of a hand with a cup of coffee, where the dishes or their contents are lined with natural beans.
Note!
Kinusaiga technique for beginners: what is it, a description of creating paintings from threads
- How to weave a figurine from rubber bands: how to learn to weave animals, toys and what you can make from rubber bands on a slingshot
- How to make flowers with your own hands from paper, fabric and scrap materials. We create bouquets of homemade artificial flowers
All that remains is to frame the image in a decent frame. We received an element of stylish interior or a gift for a coffee lover that looks very expensive.
Even a small image, which is intended to take up space on the table, in addition to aesthetic pleasure, will give the owner an exquisite aroma for quite a long time.
Even if for some reason it is forbidden to drink the strong tonic nectar, no one can stop enjoying the smell.
Coffee house
Prepare thick cardboard, glue, coffee beans.
Cut out five rectangles from cardboard - these will be the walls and floor of the house. Glue them together so that they form the frame of the house. Apply glue to one wall and place the grains on it. Cover all remaining sides this way.
The roof can also be cut out of cardboard and either painted to look like wood/tiles/straw, or sprinkled with ground coffee or beans.
Craft from coffee beans: snake
To create a snake from coffee beans, stock up on:
- Wire
- Black beads
- Cotton wool
- Cotton pads
- Glue
- Coffee beans
Coffee reptile
The process of making a snake from coffee beans:
- Take a long wire. Use it to make a strong base for the snake.
- Cover the wire with cotton wool. For comfort, tear the cotton into small pieces. If you decide to take cotton pads, then tie each disc with a thread to the end.
- Carefully fix the pieces of cotton wool onto the wire. At this point, bend the wire to create a snake shape. Point the animal's face upward.
- Then make the eyes for the snake. You can use dark beads or large dark beads for the eyes. Attach the eyes to the muzzle.
- If you want, you can make the snake a red tongue. Take a thin red ribbon and glue it slightly below the eyes.
- Cover the snake with coffee beans.
Coffee bean snake
For this craft you will need: wire, cotton wool or cotton pads, glue, coffee beans, two beads for the eyes.
Craft mug: 135 photos and video master class on how to make beautiful crafts with your own hands- Crafts from spoons - 125 photos and videos, tips and tricks with step-by-step instructions on how to make crafts
- Crafts from cotton pads - 125 photos of beautiful crafts, features and videos of new cotton crafts
Bend the wire so that it creates a base for the future snake. Choose a position so that the craft is stable.
Attach cotton wool tightly to the wire. Cotton pads can even be tied to a wire by wrapping them with thread. Make sure the wool does not slip on the wire and is firmly attached to it.
Glue the beads onto the head of the future reptile. Wait until they are firmly attached to the cotton wool.
Cover the rest of the snake's body with coffee beans. If desired, you can make a tongue for the snake from a thin ribbon or woven threads.
Craft from coffee beans: cat
This cat made from coffee beans can replace absolutely any gift, becoming an unusual surprise for a loved one.
For the craft, take:
- Cat pattern
- Thick cardboard
- Coffee beans
- Glue
- Clear tape
Coffee bean cat
Cats made from coffee beans Cat made from coffee beans Cat made from coffee beans
The process of making a coffee cat:
- Print out the image of the animal in advance or draw it yourself. Cut out the template and glue it to cardboard paper.
- Using a pencil, draw the template along the contours. Do not press too hard on the pencil. Then cut out the area you outlined.
- Cut out the image of the future cat along the contour.
- Cut a stand from the same material. Connect the cat to this stand using regular tape.
- Attach the glued sides in a circle also with tape.
- Take cotton balls. Glue one of these balls per work so that they are placed very tightly.
- To ensure that all attached parts sit very tightly, secure them with threads. If the threads are very visible, do not worry, since you will still cover the work with coffee beans.
- At the final stage, cover the cat with grains. Leave the ears empty.
Coffee bean tree
This is a rather complex craft that requires a certain skill, time and patience during production.
- Cardboard crafts - 135 photos of useful and beautiful crafts for children and adults
- Unusual crafts: we make cool and original things from scrap materials (120 photos and videos)
- Beautiful crafts: examples of very stylish and unusual options for homemade crafts (125 photos)
Gather the necessary materials: plaster, polystyrene foam, glue, grains, dark threads, sticks for the trunk, a small pot.
Make a foam ball and wrap it with thread. Spread the threads in the place where the barrel will be attached to the ball.
Apply glue to the entire surface of the ball, except where the stick for the barrel should be. Stick the grains onto the ball.
After the first layer of grains has dried, make a second one - this creates the effect of a lush crown. Wait until the glue is completely dry and the grains are firmly attached to the ball.
Apply a layer of glue to the space left for the trunk and stick the “trunk” there.
Pour the gypsum mixture into the pot and place the trunk of the coffee tree in it.
Coffee bean craft: wood
A decorative tree or topitarium is an ideal decoration for your home or office. As a rule, the crown of such a product is made from coffee beans. To make a coffee tree, stock up on the following materials:
- Foam plastic
- Glue
- Plaster
- Coffee beans
- Dark threads
In addition, you will have to take a stick for the trunk, a ribbon and a flower pot.
Scheme for making a ball from coffee beans Craft from coffee beans - wood Craft from coffee beans Craft from coffee beans - wood Craft from coffee beans - wood Craft from coffee beans - wood
The process of making wood from coffee beans:
- Make a ball out of foam plastic, wrap the ball with thread. Secure the ends of the threads with glue.
- Mark the place where you will attach the trunk. Pull the threads apart a little.
- Take glue. Apply it on top of the ball, and then glue the grains. Leave a void in place for the trunk.
- After making the first layer of the crown, glue the next one with glue. Try to attach the grains so that the convex side faces up.
- Leave the ball aside for a while to dry thoroughly.
- Insert a stick into the empty space, lubricating the hole with glue in advance.
- Pour the prepared gypsum solution into the pot. If the pot is clear, add coffee grounds to the solution.
- Insert the stem stick into the plaster mortar and place the blank near the wall.
- When the solution has completely hardened, decorate its surface with nuts, for example, hazelnuts.
- Decorate the tree trunk by wrapping it with ribbon.
Candle with coffee beans
For this craft you will need: paraffin, wick, grains, candle mold.
Melt the paraffin and add coffee beans to it. Hold the wick by the tip and place it in the middle of the candle mold. Pour paraffin into it. Hold the wick in a vertical position until the paraffin hardens.
If desired, remove the paraffin blank from the mold or leave it inside.
Christmas trees made from coffee beans
What is New Year without a Christmas tree? You can even make a small symbolic Christmas tree from coffee beans. It is enough just to take a cone as a base instead of the usual ball, cover it with grains and decorate it with shiny beads and rhinestones. Instead of a star, it is suggested to take the fruits of star anise (the second name for this spice is star anise) or, together with coffee beans, cover the base with cloves (dried fruits of the clove tree). All this will add not only a festive flavor, but also an unforgettable aroma.
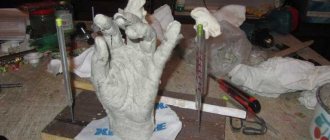
Coffee heart
Prepare cardboard, paper, cotton wool, glue, twine, dark paint, grains.
Fold a piece of paper in half, draw half a heart, then cut out the shape along the outline. When finished you will have a whole heart.
Trace the shape of a heart on cardboard and stick cotton wool on it. Cover the heart with twine to create a relief surface.
Mix paint with glue and paint over the heart shape. Stick on the grains. Decorate the craft as desired.
Tips for making crafts from coffee beans
The advantage of crafts with coffee beans is that they can be done by both a beginner and a master.
Crafts made from coffee cups are suitable for beginners, while more skilled craftsmen will be interested in complex coffee wooden crafts.
In any case, creativity is available to anyone. You can start small, learn how to make crafts from coffee beans from photos, and eventually achieve real success in this matter!
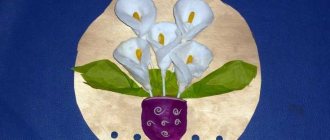
Coffee miracle
From coffee beans you can make not only a tree, but also an unusually beautiful craft in the form of a cup and saucer. If you don’t believe in this, then this master class is especially for you.
The process of making a craft with your own hands can be followed using the example of a master class with a step-by-step and detailed description and photo.
In order to make this product, you will need a cup and saucer, a glue gun, copper wire, twine and, of course, coffee beans. To decorate the work we used lace.
The first step is to decorate the inside of the cup. To do this, roll the twine as much as possible. We do this by holding the threads in our fingers, but not on the table surface.
Cover the bottom of the cup with glue.
We put the already rolled twine on top. Then tightly wrap the bottom of the cup with twine, adding a little glue.
You shouldn’t completely decorate the cup at once. It is better to do this gradually and let the glue dry.
After the internal part is completely formed, we move on to the external part. Tape the edges very tightly and carefully. There is no need to cut the threads.
It's best to find a cup without a handle, but if there isn't one, you'll need to knock off the handle of the cup.
Related article: DIY colored paper crafts without glue and scissors for children
When we have completely finished wrapping the product, cut off the thread, drop a drop of glue onto the end of the rope and glue the thread very tightly to the cup.
Here we have the cup ready.
Now we move on to the second stage of our work - designing the saucer. Degrease it.
We will also start work from the inside. First, we wind a little twine in our hands, then glue it to the middle of the saucer and then wrap the entire inner part, tightly pressing the thread to the thread.
As we work, we apply glue so that the twine sticks well to the saucer.
We work the edges well and move to the bottom of the plate. When the saucer is completely formed, cut the twine and tightly glue the end of the thread to the saucer.
The third step for this craft is to prepare thick copper wire for the future handle of the cup.
Using pliers, we bite off the length we need.
Next we need to form the handle of the cup.
First we wrap it with tape.
And then we wrap it, like other parts, with twine.
Here's what we got at this stage:
Of course, we need to glue the finished handle to the cup and let the glue dry.
We have already done the main work. Just a little left! Take a couple of lace ribbons.
Measure the circumference of the cup and cut the exact same length of ribbons.
The first step is to glue the dark pink ribbon.
Glue light lace on top of the dark one.
You can also decorate a cup with coffee beans. Look how beautiful it turns out in the photo:
We also decorate the saucer with lace. The first step is to cover the edges of the saucer with dark lace.
Glue a light ribbon on top.
In the inside of the cup, it is necessary to secure the copper wire with a thick layer of glue. Let it dry.
The cup in the air is almost ready. Last step.
We fix the bowl in the air using wire. We strengthen the copper on the saucer more tightly.
Article on the topic: Crochet and knit from thick yarn: diagrams with step-by-step description
We wrap both parts of the wire with tape.
We glue the coffee beans tightly throughout this workpiece.
Let's decorate the cup with a bow. To do this, take a lace and a couple of grains.
We tie a small bow on the cup, and glue a couple of coffee beans to one hanging end of the lace.
We cover the entire product with acrylic clear varnish.
Now the craft made from coffee beans is ready. We hope you enjoyed this master class.
Photos of coffee crafts
Tell your friends