Templates
To make a treasury you will need templates . three of them in total and they are all different sizes. One is 5*5 centimeters in size, the second is 10*10 centimeters and the third is 10*15, respectively.
You can print them from this page, or you can take your own.
Template 5*5
Template 10*10
Template 10*15
Making the cover
For the cardboard cover, cut out the cover details: rectangles 14*20.5 centimeters and 13.7*20.5 centimeters, spine 20.5*7.
Glue all the parts onto the padding polyester, leaving gaps of half a centimeter.
Cover the cover with cotton, preferably Korean.
Decorate the cover, sew on all the elements, stitch.
Create a flyleaf.
Mk "Mom's Treasures" is finished with my own hands. The box is ready! This product will be useful for both boys and girls.
Related article: The whole truth about melamine sponges
“Mom’s Treasures”: master class
- We make blank templates for boxes, only three identical types, but different sizes. They should look like this:
- Then we bend each section along the fold lines, like this:
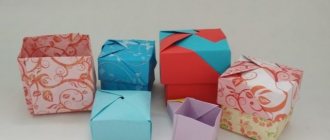
- We put our blanks in boxes (as shown in the picture).
- These are the boxes you should get:
- You can make several such boxes. For example, five pieces, like here, then they will fit perfectly into our mother’s chest.
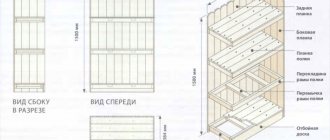
- Now you need to make the chest itself. To do this, cut out four pieces from cardboard. Two of them will be 16*6 centimeters in size, and the other two will be 15.5*6 centimeters. The width will be the same for everyone - 6 centimeters.
- These parts will be the walls of our box, you can attach them, they should fit perfectly, fit snugly, as in the picture:
- We take colored, beautiful fabric and cut it to the same dimensions as the walls. Using these pieces we will paste them over and then decorate them. The fabric can be pink if it is “Mom’s Treasures” for a girl or blue for a boy. And you can also choose a neutral color. For example, light green, as in the photo.
- Let's arrange all the parts and check if everything is correct (following diagram).
- Now it's time to glue our box. To do this, take the walls and carefully glue them with a brush. Then we press them together and hold them for a while until the glue hardens. In this case, we leave one corner not glued. Like this:
- Spread a thin layer of glue on the outside of the box. The main thing is not to overdo it, otherwise there will be excess moisture and the wall will sag. Then we apply the desired piece of fabric.
- We bend the corners of the remaining fabric inward, as shown in the figure:
- The next step is to apply glue to the top of the box walls to secure the fabric to them.
- Carefully fold all the pieces of fabric as shown in the photo:
- We glue all the fabric to the box and bend it, and then glue the remaining wall. Thus, we get a whole box.
- Now let's start creating the box lid. To do this, cut out two parts measuring 16*16 centimeters and one 16*6.2 centimeters. Like this:
- We apply padding polyester and try it on the box. It should look like this:
- Glue the padding polyester and put a piece of fabric of the desired shape on top.
- We fold the remaining fabric along the edges. The lid is ready - you can decorate it.
- To do this, take the lace and the necessary cuttings from colored paper and glue them onto the lid. And you can also use various beads, beads, pearls and whatever is at hand. For example, as in the photo:
- Now you need to glue the scrap paper to the inside of the box to hide all the unevenness and create a beautiful look inside.
- Inside the box we also glue the walls and bottom with paper. This is what a beautiful box should look like:
- Each blank template that we made at the beginning is also covered with paper. You can take something different from the interior decoration.
- Create a pocket inside the lid. You can put various clippings and photos with inscriptions there. And also don’t forget to print out a blank with the child’s first and last name.
- Well, at the end we decorate our small boxes, making inscriptions so as not to get confused about where everything is. For example, like in this image:
- Our “Mom's Treasures” box is ready. All that remains is the easiest and most important thing - to fill it with pleasant little things that bring back such touching memories. You can also look at other images of your mother’s treasure, photos of which are available on the Internet, and create your own masterpiece based on them.
Box patterns
In order not to make a box pattern yourself, you can download and draw it on paper special for this purpose, Goznak. Or immediately redraw from the monitor.
In total you need to make 4 small boxes, one large and one base box. On the first sheet draw all the small boxes, on the second - the large ones.
When the drawings are completely ready, cut them out using a slanting knife on a rubber mat. It is worth paying special attention to the places where the arrows are drawn. In these places it is important to cut out the elements exactly along the main black lines so that the box closes well.
Related article: Crochet chameleon. Amigurumi knitting patterns
The result can be seen in the photo:
Small box:
Large pattern:
The basis: