09/14/2019 Bender Rodriguez Handicraft To celebrate the New Year in a fun and interesting way, it is important not only to set the table deliciously and beautifully and decorate the room, but also to prepare a costume or look. New Year's masks for 2021 will help make the holiday bright and memorable; you can make them yourself by looking at master classes, templates, photo examples and step-by-step instructions. When you make your own image, you have the opportunity not only to save money, but also to get creative, for both adults and children.
From felt
The coming 2021 is the year of the rat. Therefore, it is logical to make masks dedicated specifically to this animal. An accessory made from felt for a children's party would be an excellent option, since the material is soft and does not cause any discomfort. To make a felt “Mouse” mask with your own hands, you will need to spend a little time, show imagination, and patience.
The following materials will be needed:
- felt of different colors;
- thread with needle;
- scissors;
- cardboard;
- rubber.
The work progress consists of the following steps:
- A template is made from cardboard. You can draw the image yourself. It is worth considering that the picture must be symmetrical.
- Blanks for the head are cut out of gray felt, for the ears from pink felt, and for the nose from black felt.
- All elements are sewn on a sewing machine or by hand, with a distance of 2 mm from the edge.
- Sew the nose and ears onto the base. Add the missing elements (mustache, bangs, etc.).
- Fasten the elastic band.
Ribbons, flowers, and buttons are used to decorate the mask. Using your imagination, you can decorate the product to your taste. Additional parts can be fixed with hot glue.
Ready-made mask templates
The easiest way to create the final image is to print ready-made mask templates available on the Internet. Most often, they are immediately painted and you only need to strengthen the mask and tie a special rope so that it completely covers the face.
You might be interested in Crocheting a toy fox - a selection of patterns with descriptions
The greatest demand is for carnival costumes of forest animals. Depending on which character is required for a particular production, a mask can be made. The principle of creation is very similar: a ready-made template is cut out and an elastic band is attached. This could be a bunny mask for children or a bear mask.
Bear mask
A brown bear can have a cute, almost cartoon-like face.
Even a small child can handle the following cutting. This is an ordinary circle with a minimum of details.
The simplest option
The brown bear looks elegant thanks to the additional elements. Bangs add volume and make it look as cute as possible.
Brown "cheek"
Polar bear mask
The polar bear mask is essentially an uncolored template that can be partially colored and turned into an arctic polar bear.
Also, if you give free rein to the child and turn this activity into creativity, the coloring process will become more fun.
Classic white bear
You can use ready-made templates to create a carnival costume, or it’s better to show your imagination and draw it yourself.
Another option
Bear ears
If you can’t create a complete mask, then you should try to draw the bear’s ears with your own hands. After obtaining the desired result, the drawing must be transferred to cardboard. For convenience, the ears can be glued to the headband or secured to a string.
The easiest option is do-it-yourself bear ears
Bunny mask
Very often the performance also requires a bunny mask on the head.
Pink bunny
The next pattern is a winter eared shirt, which is suitable for both a girl’s and a boy’s costume.
Stencil with voluminous bangs
You can also use a coloring template as a basis, which will be interesting to animate with your child.
Toothy rabbit
A less detailed stencil is suitable for younger children.
Bunny for kids
From paper and cardboard
Masks for the holiday in question can be made from different materials, but cardboard is the most affordable. Having chosen the desired character, you can get to work. To do this, perform the following actions:
- Draw a template on a cardboard base, and then cut it out along the contour. Also, do not forget about the eye holes: they need to be cut out carefully.
- Make holes for threading the elastic.
- Decorate the template to your liking.
- An elastic band is fixed in the holes, having previously measured the required length around the circumference of the head.
DIY mask with opening mouth and smile
Greetings, Samodelkins!
From this article you will learn how to make something similar with your own hands from available Chinese components:
In general, as usual, we create problems for ourselves and try to solve them. It seems like nothing special, but let’s figure out how it actually works and how it can be repeated. Further instructions are taken from the YouTube channel “AlexGyver”.
Let's start with reverse engineering, i.e. from reverse engineering: apparently, this is a fashionable medical mask with LEDs. LEDs, as you guessed, are not easy. In this project we will need addressable LEDs.
The finished system also responds to the sound of a voice. At least I can’t think of any other adequate ways here. Moreover, the louder we speak, the wider our mouth opens. What about turning on a smile? Well, let's think of something...
In any case, to repeat this project, you just need a small microphone. You can use, for example, this one with a preamplifier and a noise filter.
You will also need some kind of battery. For example, this very compact lithium-ion bag will fit perfectly.
The basis of this project will be the well-known Arduino Nano board, which will connect the addressable LED strip and microphone into a single system.
Well, of course, whatever one may say, where would we be without a medical mask now? The author ordered several stylish black masks so that in the future, using the selection method, he could choose the most suitable one, so that it could be conveniently dissected, so that it would be normally translucent and all that.
By the way, nowadays purchasing a mask is not a cheap pleasure. This set of masks cost the author 1000 rubles. First of all, purely for scientific interest, let's assemble a model. We won't bother with sizes.
Let's start by assembling and soldering the system. Everything will be connected according to the following scheme:
No step-up DC-DC converters are needed here, a charged lithium can is enough to power both the Arduino nano board and the addressable LED strip, at least up to about 3.5V everything works fine.Now let's move on to the software part. First of all, we need to process the sound. The microcontroller receives sound as voltage fluctuations. Accordingly, the louder the sound, the wider the range of vibrations. All we need to do to determine the final loudness is to take a sample of a couple of hundred measurements in a certain step, for example 10ms, that is, in other words, 100 times per second. Next, in each sample we need to find the maximum value, and in the end we get the sound volume, which we measure in real time.
In the future, we will filter the resulting value with a moving average so that it changes more smoothly.
The next task is the following: we need to understand from what value to measure the signal upward in order to accurately determine its volume. To do this, we need to filter our current volume with a very low coefficient, counting on the fact that the average person is still silent most of the time, rather than speaking. As a result, we obtain a reference line for measuring loudness, as a value from 0 to some maximum.
We convert the resulting range of values into numbers from 0 to 7 in increments of one.
As a result, we have 8 volume levels with automatic adjustment of the lower sensitivity threshold. Now let's deal with the tape.
This LED strip, and in this form it is already a full-fledged matrix, allows you to control each of its LEDs separately.
The author soldered an 8 by 8 matrix, because in 1 byte we have 8 bits, it will display the mouth itself. We need to display the size of the mouth depending on the volume, and volume, as we remember, we have 8 values (levels). Accordingly, for this task we will need 8 frames of the mouth.
And so, horizontally we have 8 pixels, so we can store the state of the LEDs in the matrix like this, one byte per line.
To simplify the task of drawing a mouth at different voice volume levels, you can use the Image Processor program. This is what she looks like:
This program allows you to convert pictures into code for display. We indicate the size we need, 8x8, and select the mode 8 pixels per 1 byte.
Next, take a brush, paint and see the result.
We repeat the procedure 7 more times.
And as a result, we get a two-dimensional array with an opening mouth.
Bringing it to the matrix will not be difficult. We go over the desired line, read each bit and turn on or off the corresponding LED.
You can also make the color of the frame depend on the volume of the sound, that is, each frame will be displayed in its own color.
With the software part complete, you can begin installing the electronics into the mask.
As you can see, the mask works. Next, we need to solve an even more interesting problem: teach the mask to display emotion. This can all be realized using the same reaction to sound. I think everyone knows that sound comes in different frequencies.
We can measure the approximate frequency of sound, and make it so, for example, that if you sing a certain note for, say, 1 second, a certain emotion will turn on (display on the matrix). For example, let a low frequency be a sad smiley, and a slightly higher frequency a smile.
We will need to route the sound from the microphone to the other leg through a capacitor as follows:
Next, we use the Hartley fast conversion library, which will display the frequency spectrum for us. This is what it looks like:
Each data column is responsible for a certain frequency range. Accordingly, the louder the sound in this micro-frequency range, the greater its value. It sees and recognizes pure frequency remarkably well, but recognizing the human voice is not so simple. The fact is that a person’s voice does not have one specific tone; other, so-called overtones, can be seen on the spectrum.
So how do we get a constant value from a bunch of bars that will reflect the approximate frequency of the sound? You can add up all the values in columns, but multiply each subsequent column by a coefficient proportional to the number of the column itself.
Thus, we will immediately separate flies from cutlets and low frequencies from high ones, and we will obtain the reduced frequency, so to speak.
Well, the only thing left to do is check the current frequency, see in what range it changes. If, for example, it has not changed much in 1 second, then the program considers that the person has activated one of the emotions.
Let me remind you that we have only two emotions, one for low frequencies, the second for a little higher. We draw the necessary emoticons in the same Image Processor program and add them to the code.
Author's video:
Source
Become the author of the site, publish your own articles, descriptions of homemade products and pay for the text. Read more here.
From plastic plates
Animal masks for the New Year can also be made from plastic plates. The most interesting thing is that you need to spend a minimum of time and effort on making the accessory, and the result will be excellent.
The manufacturing process is as follows:
- Holes for the eyes are cut out in the plate. If necessary, cut off excess material.
- Cut out ears, nose and other parts from cardboard. Alternatively, the mustache can be made with a felt-tip pen.
- The plate is painted in the desired color and left to dry for some time.
- The previously cut elements are secured with glue to the prepared base.
- To decorate the mask, use felt, satin ribbons or other decor.
- A hole puncher makes holes to secure the elastic.
From foamiran
Today, foamiran is increasingly used for all kinds of toys, crafts, accessories, etc. The shiny material is especially popular: it is great for making masks for the New Year. It is easy to process and cut. It can be glued, stapled, painted with crayons or paint. Since the mask is supposed to be made at home, any complex technologies will simply be inappropriate. The main materials in the work are foamiran, white paper, decorative elements and braid.
The work consists of the following steps:
- They draw by hand or print a template of the future product on paper.
- The sheet is fixed to the foamiran using invisible threads.
- Draw the outline of the template with a pencil.
- Use a knife to make holes for the eyes.
- Cut out the mask using scissors along the contour.
- Circles for the ears are cut out of foamiran of a different color and fixed to the main workpiece.
- Strings or elastic are glued to the inside. It is desirable that they are also shiny.
A similar mask can be made not only for your family, but also for friends. Thus, the New Year's Eve will be bright and memorable.
You can make New Year's masks for 2021 with your own hands using the master classes in question, and using templates and photo examples, the accessory will turn out to be even more attractive.
How to make a paper bear mask for children: step-by-step description
The most interesting, but also correspondingly difficult option is a voluminous mask. Having understood the manufacturing principle, you can create a very interesting option that is suitable for any carnival costume.
Consistent step-by-step instructions
To create a brown bear you will need:
- Printed template.
- Scissors.
- Any glue.
- A rope or braid to secure the mask to your head.
- Scotch.
First step. The stencil is cut out as carefully as possible, it is important to do this as carefully as possible.
You may be interested in Using sodium tetraborate at home in slime
Next, you need to mark the location of the ears, laying out all the components on the table.
The next step is to form the bear's skull. To do this, all cuts are glued together. When the bear's head is ready, the ears are glued on.
Bottom line
Important! Only after all parts have completely dried should you begin to attach the ties.
If you make this holiday attribute from cardboard, you can even use it several times.
For a simpler mask you will need to prepare:
- Cardboard in three colors: brown, yellow, black.
- A cord or elastic band to secure it to your head.
- Any glue.
- Scissors.
- An ordinary pencil.
The template is drawn on brown cardboard. If you do this with a simple pencil, you can achieve the perfect result. After achieving your goal, you need to cut out the stencil.
Outlines of the future bear
The next step is to make the eyes and cut out the holes.
Yellow cardboard is used to decorate the ears.
Centers of bear's ears
After they are glued, you can start decorating the face. To do this, the cheeks are cut out and glued to the main template.
Assembling the bear's muzzle
The picture will be fully “formed” when the nose and string are attached in place.
This cute bear is the result of simple manipulations
Mask in the form of a hoop
A simple way to make a rat or mouse mask is to accessorize with a hoop. A suitable picture is printed on a printer or drawn independently, adjusting to the desired size. If you like to draw, then the second option will be more fun.
When the image is ready, you will need to make a cardboard rim. It is made in such a way that it matches the size of the head. After this, attach the headband to the mask with glue and fasten the edges of the headband with a stapler, while the staples are bent outward to avoid scratches on the head.
New Year's masks made of felt
Felt masks are based on templates for paper New Year's accessories. Colors are selected individually. A wide elastic band is used as a fastening on the head. For the inside, you can take regular fabric.
From papier-mâché
Although the materials required are simple, the process itself will take a lot of time. However, your child will be irresistible at the matinee.
The essence of the work is this:
- Inflate the balloon to a size slightly larger than a person's head. This is necessary so that the mask can be put on easily.
- The ball is coated with Vaseline to prevent the paper from sticking to it.
- Cut the newspaper into small strips and moisten them with glue, after which they paste the ball in a circle. The paper should be applied in several layers to give the product strength. Allow the workpiece to dry.
- When the newspaper on top dries, the ball is lowered and the workpiece is dried from the inside using a hairdryer.
- Make holes for the eyes and head of the required size.
- Form a cone out of paper and glue it to the head.
- The blank is sheathed with fabric of the desired color. Old things are suitable for this. The ears are also made of fabric, and to make them stand, inserts made of cardboard or wire are placed inside.
- Eyes are formed using nylon mesh, as well as colored fabric or paper. The product is modified by making a nose, mustache and other elements.
- A fabric fringe is glued to the bottom, which is pre-cut into strips.
- To ensure that the mask stays well on the head, a tulle insert is sewn in.
The simplest half mask
This mask option is the simplest. Not long ago, children tried to hide their identity during the New Year's masquerade. Materials you will need:
- velvet paper;
- decor;
- rubber.
Progress:
- The outline of the future mask and holes for the eyes are drawn on paper in accordance with the size of the face.
- Cut the workpiece with scissors.
- The product is decorated with beads, sparkles, etc.
- Measure the circumference of the head and cut the elastic to the required length, after which it is secured on both sides of the mask.
Lace mask
A lace mask can turn an ordinary dress into a real carnival outfit. It is preferable to choose black lace. However, you can use material of any color that matches the dress.
The manufacturing process consists of the following stages:
- We print out the desired picture of the future product on paper. You can also draw the template yourself.
- Place the paper on the table and cling film on top of it, smoothing out all the wrinkles. To secure the film, use tape.
- Cut a small piece of tulle, which should be slightly larger than the size of the mask template.
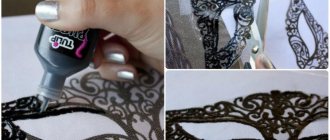
- Carefully coat the tulle with paint. You need to make sure that there are no gaps, since the appearance of the mask will depend on this.
- Let the workpiece dry thoroughly, then remove the tulle.
- Using scissors, we cut out the blank itself and the holes for the eyes.
- We prepare 2 pieces of velvet ribbon in accordance with the size of the head.
- We fix the tape to the edges of the mask and let the product dry.
Simple carnival masks
No carnival would be complete without a beautiful mask. If there is very little time left for the event, then you can make it yourself without spending a lot of time and effort, you just need to stock up on a few materials:
- nylon or thin floral mesh;
- lace;
- braid or thin elastic band;
- scissors;
- thick paper or cardboard;
- pencil;
- super glue or hot glue gun and glue sticks;
- sticky spray.
The first step is to create a template of the desired mask from thick paper or cardboard and cut out holes for the eyes. Apply lace to the template, then mesh, and fasten the fabrics together using a sticky aerosol. Place the blank for about 20 minutes under something heavy, then carefully cut the fabric from the eye holes, cut out the mask according to the template. Glue an elastic band or braid to the mask of the required length. This is how you can quickly and easily create a beautiful carnival mask.
Carnival masks made of decorative feathers.
Carnival masks made from decorative feathers also look impressive. Children especially like them very much. To create such attributes you will need:
- sheet of cardboard;
- thick paper;
- colored decorative feathers;
- a simple pencil;
- glue;
- scissors or stationery knife;
- sequins or decorative stones;
- rubber band or wooden skewer.
You need to make two identical mask templates from cardboard and paper, carefully cut them out and connect them with glue. Let dry, cut out holes for the eyes. Carefully glue the colored feathers in stages. Carefully glue bright sequins or decorative stones around the eyes. To keep the mask in place, you can tie an elastic band to it or glue a wooden skewer to hold the mask in your hands.
A mask is a type of paraphernalia that no child can do without. And in order not to buy the same type of masks in stores, you can easily make your own at home, an individual, original mask, and perhaps involve the child himself.
Adults also often resort to such an accessory, because they often want to be original at some themed party, and here a mask created with your own hands, according to your taste and desire, to match your outfit and hairstyle, will never come to the rescue... But you don’t need to create it a lot of time and effort, you just need to use your imagination and creativity as much as possible, stock up on the necessary materials and make a unique mask with a positive mood!
https://youtu.be/da7Yx7I6uWYhttps://youtu.be/9MPMOmL05_I
_
Made from crepe paper
To make such a mask, materials such as crepe paper, cardboard base, satin ribbon, and feathers for decoration are prepared.
Making an accessory involves the following steps:
- We cut the crepe paper into strips 7*30 cm. You need to make 30 such strips, then fold them in half.
- We roll up the strips, gradually forming a flower. To make it durable, we fasten it with hot glue.
- We attach the flowers to the finished base with glue, avoiding free areas on the base.
- Don't forget to make holes for the ribbon on both edges.
From the gaming test
To make the accessory you need:
- game dough;
- paper;
- pattern;
- plastic face shape;
- acrylic paints;
- decor
The process itself consists of the following steps:
- A template is made from paper according to the selected pattern. After this, they roll out a thin layer of modeling mass several millimeters thick and place the template on it.
- In accordance with the template, a workpiece is cut out of the layer with a sharp knife, not forgetting to make holes on the sides for elastic bands or ribbons.
- The resulting material is applied to the face shape and allowed to dry thoroughly.
- After complete drying, the mask is painted with acrylic paints at your discretion.
- The product is decorated with patterns from play dough, rhinestones and other decor are fixed. If desired, feathers can be attached to the top of the mask.