Do-it-yourself doll from a plastic bottle: disassembling the original version of the craft
Unusual, inexpensive, original, fast - this is how you can describe creating a doll from a plastic bottle with your own hands. They turn out to be very diverse, despite the fact that the base is a bottle. Of course, you need to show your imagination in the plot, in clothes and in decor, but the result will be amazing.
Such a thing can be functional - a candy bowl, a stand for jewelry, a case for threads or stationery, or it can just be a toy for a baby. You will find workshop options on how to make such toys in this article.
Fun for kids
It is very easy to make a bright rattle doll from the simplest materials at hand.
For this you will need:
- a small plastic juice or yogurt bottle;
- multi-colored threads or bright socks;
- scissors and glue;
- filler that will make sound in the bottle - buttons, peas, buckwheat - according to your desire.
First you need to put filler in the bottle. Then, if you're doing the quickest and easiest option, stick a bottle of refill in your sock. Tie the end with threads in the form of a cap.
Draw or glue on eyes. If desired, you can make hair out of threads. The toy is ready.
The second option is more complicated. After filling the bottle, you need to smear it with glue and wrap it tightly with threads, choosing colors to match the image of the “hero”, for example, the top is lighter and the bottom is darker. Decorate your head with thread hair and a crocheted hat.
Make eyes and a mouth on the plastic face.
It is best to do the job with self-adhesive tape; it sticks much better than regular paint.
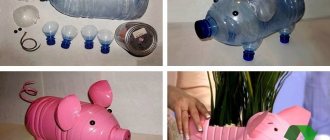
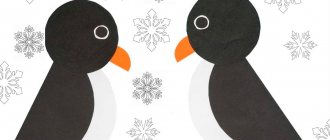
Another interesting option is a doll made from two bottles. It can be designed in the form of a penguin, matryoshka, or smeshariki, as your imagination tells you.
You will need:
- two bottles;
- glue;
- paints;
- threads;
- beads, pieces of fabric, braid for decoration.
Take the first bottle and cut it off at the very bottom. We cut the second one at the level of the middle of the bottle or a little less.
Glue the blanks together, paint the structure in the main color of the future doll.
Color the toy, draw its face.
Using threads and textiles, make clothing items for the doll. In the case of the little penguin, this is a pompom on a hat and a scarf.
Don't forget that plastic bottles are used for more than just drinks. Shampoos, gels, and other detergents are also packaged in plastic. Usually these bottles are thrown away, but you can use them to make useful things in the form of dolls, as in the photo:
Plastic and nylon
These words sound somewhat technical and not as attractive as cambric and velvet, but that is until you see what comes out of such a combination. Nylon is a unique material for making a doll’s head, its face and facial expressions. The bottle gives the figure stability and density. Together they make beautiful dolls.
You will need:
- plastic bottle;
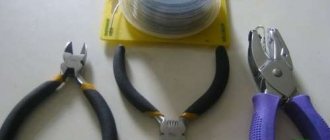
- wire, scissors;
- padding polyester;
- fabric for clothing;
- nylon tights;
- threads;
- cosmetics;
- plastic eyes.
Cut off the bottom of the bottle. Wrap it with padding polyester.
Place the resulting piece into one half of the tights. Tie at the top and bottom.
Read this: Text for wedding invitations: samples of any styles
- Place a round piece of padding polyester through the upper part into the face area; this will be the nose.
- Shape it using a tightener.
- When the nose is ready, place pieces of padding polyester through the lower part where the cheeks will be.
Model the mouth and chin. Glue on the eyes.
- Form eyebrow folds and apply makeup to the doll.
Make a hairstyle from wool threads. Glue to the head. Twist the fingers and the handles from the wire. Wrap them with padding polyester and nylon.
Now the doll needs to be dressed. First we dress the body, then we sew the sleeves to the arms, the finished arms in the sleeves are sewn to the body in the blouse.
A petticoat and skirt are worn on the lower part of the body. The head is tied with a scarf or decorated with various accessories - glasses, a headband, a hat. You can put knitting needles, a bag with a gift, or a basket of flowers in your hands.
Video on the topic of the article
- A selection of diverse videos of creating dolls from plastic bottles is presented below.
Source: https://knittochka.ru/raznoe-2/kukla-iz-plastikovoj-butylki-svoimi-rukami.html
master class with photos and videos
Where do you store your jewelry? Where will you have to because there is no special place? Behind the battery so it doesn't get stolen? In a shoebox because it's convenient? But what if you organize the storage of jewelry in such a way as to combine business with pleasure and have everything at hand in one convenient place, and get a stunning interior decoration from it? Then you need to make a doll-box. Seeing such a beautiful and unusual thing in your living room or bedroom, all your guests will simply be jealous and find out where such an exclusive item was found. In fact, you can create such beauty yourself if you have free time and desire. How to create a doll-box with your own hands, the master class from this article can easily help both experienced and novice craftswomen.
There are many options for creating a box doll. These can be products from a plastic bottle, from a mayonnaise bucket, or from newspaper tubes. In principle, such a box can be made from any plastic container. To do this, you just need to master the basics and try to perform the standard version.
The basic element of each box will be a doll. Then it’s a matter of the craftswoman’s imagination. As a rule, boxes are designed in the form of fluffy skirts, decorated with ribbons, lace, braid, beads, beads and so on. The highest aerobatics would be adding flowers to the decor of the dress using the kanzashi technique. This is a rather painstaking technique that requires time and skill, but if you can master it, then your work will look even more exclusive and original. It would not be a shame to give such a doll-box to your friends for any holiday.
Material for the craftswoman
While empty plastic bottles are typically reused, mayonnaise buckets go straight into the trash when emptied. Then they will have a short journey to a landfill and further pollution of the environment for 80-200 years. What if we break this sad algorithm and give these containers a new, rather uncharacteristic life?
You can easily and not very labor-intensively create a doll-box from a plastic bottle.
Let's consider the stages of creating a product.
Take an empty plastic bottle with a capacity of five liters (in the future you can use other types of bottles). From above it is cut parallel to the bottom where the neck goes into the main part of the container, from below - at approximately a height of 15 cm. Excess plastic can be thrown away. At part of the neck, the hard part is cut off along with the place where the thread is located.
The doll's legs (standard Barbie) are cut off at about mid-thigh. Next, the doll is glued to the top of the bottle. To do this, you can use an O-ring (or other available material) and glue or electrical tape. All plastic parts are covered with padding polyester. This work can be done using glue or a stapler, whichever is more convenient for the craftswoman (see photo below).
2 circles with a diameter slightly smaller than the diameter of the bottle are cut out of cardboard.
Satin (it will look best, but if you don’t have it, you can use another fabric) is used to line the top and bottom of the bottle, as well as both cardboard circles.
Using glue, one circle is mounted inside the future box, and the second on the bottom outside. This will give the box neatness and stability.
Next, the top of the doll is shaped. You can sew a top, which will later be connected to a skirt, or you can make a top from ribbons. At this stage everything is in the hands of the craftswoman.
A strip of satin fabric is glued on the outer and inner parts of the bottle, which will act as a connecting element between the top and bottom of the box.
The last stage is the final decoration process. The skirt is decorated with lace ribbons or other materials. This will hide the ignoble origin of the source material and make the finished product look expensive and vintage.
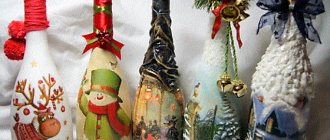
The design in the form of a wedding dress will look very relevant. This bride doll will be an excellent gift for a wedding or anniversary. As an additional bonus, put money or a gift certificate in it. Such a gift will outshine all boring and boring envelopes, even of the most modern design.
During the New Year, it will be very appropriate to decorate a doll-box in the shape of the Snow Maiden. It will be an excellent independent gift, and if desired, it can be filled with something, for example, sweets.
The same principle is used to make a doll-box from a mayonnaise bucket. The peculiarity will be that the top of the box will be the bottom of the bucket, and the bottom of the product will be the lid.
On a note! First you need to fill the lid with alabaster, this will ensure the stability of the finished craft.
Making a box doll from newspaper tubes will be especially chic for advanced craftswomen. This is very painstaking work, but it will allow you to create a unique product of the highest level. You can get acquainted with the technique of weaving from this material in this video.
The finished product will show how much work the craftswoman put into it and, accordingly, it will be valued much higher.
Video on the topic of the article
A selection of videos about making doll boxes:
dekormyhome.ru
DIY doll made from plastic bottles
For some, plastic bottles are just trash and they immediately get rid of them. And some may see their forms as a funny toy. So I decided to make a rattle doll.
But this doll is not for small children, but simply a decoration for your home. Surely each of you has a chatty neighbor, and I suggest you make a copy of her. But here it will rattle only at your request.
Let's get started, I guess.
You don’t need a lot of materials; every home has it all:
1. Two plastic bottles 2. Scotch tape 3. Multi-colored scraps of fabric (for clothes) 4. Woolen threads (for hair) 5. Flesh-colored nylon sock 6. Filling for Tryndychikha - peas, beans, or just small pebbles
7. Scissors and a sharp stationery knife.
№1
Let's make the body. We cut off the bottom and top of the bottle, we don’t need a huge doll, but you can choose its height yourself.
№2
We fasten the top and bottom of the bottle with tape. Don't skimp on the tape; it will be sad if your doll falls apart one day.
№3
Cut off the top of the second bottle and try it on, this will be the head.
№4
If the dimensions suit you, we move on.
№5
We pour the “explosive” filler into the doll’s body and begin dressing the doll. I simply cut off the sleeve of an old children's sweater. It was just the right color and size for me.
№6
Now we need hands.
№7
№8
We make palms from pieces of nylon socks and padding polyester. Carefully sew them to the shirt from the inside out. We roll a roller out of padding polyester and cover it with fabric. This will be the upper torso. Sew the top and bottom of the body.
№9
You can fill the “bust” a little more tightly, so Tryndychikha will look a little more colorful.
Doll made from plastic bottles
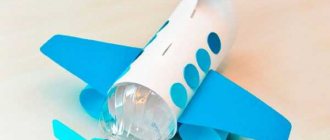
Called the DIY Craft project, this amazing idea comes from Barcelona-based blogger and doll designer Eva Monleon (Misako Mimoko). Not only is the plastic bottle doll itself a very beautiful and unusual toy, it also has another unique feature: you can adjust the length of her hair yourself.
The stylish doll can be given any hairstyle, braided and decorated, which will certainly delight your children. In the humble opinion of the author of this article, at the moment this is the most outstanding craft that we were lucky enough to find and post on our website.
“I remember playing with one of these dolls myself (along with my little toy Pony!).
I loved them so much that I thought it would be great to have the doll have a stylish hairstyle with hair in all the colors of the rainbow and especially a lot of fashionable pink.
The other children loved to comb her long colored hair, adjusting it, making it longer or shorter, using bobby pins and elastic bands to create different fashionable hairstyles.
- I hope you will be as happy as I was when creating and playing with this little sweetheart doll!”
- — from Eva Monleon's blog
-
- So, how to make such a cute craft from plastic bottles?
- We will need the following materials:
- - two transparent five-liter plastic bottles (bottles) with caps,
- - remnants of colored yarn,
- - marker,
- - paints and brushes (or spray paint),
- - red felt (or a small piece of other dense red fabric),
- - knife (office, for paper),
- - scissors,
- - awl,
- - glue.
- From the optional:
- — heat gun (optional),
- - electric drill or soldering iron (optional, for making large holes in plastic bottles).
We make a doll from plastic bottles.
1. Making the shoulders.
Using the photos as a guide, cut off the top of one of the bottles (cutting roughly down the middle of the bottle). Then we also cut off the neck and lid from this upper part. We get a blank that will be the “body” of the doll. We will then insert the neck of the second bottle into the hole of the first bottle, so we need to make sure that the hole is made to be the right size.
2. Making the head.
Now let's start creating the doll's head. To do this we need to take a second plastic bottle and make it shorter.
You will need the top (it should be cut large, since this will be the doll's face) and the bottom (it should be small, like a hat, since it will have the doll's hair on it) parts of the bottle, that is, you need to take and remove the middle part, as shown in drawing.
The cover is removed from the top. You can, of course, leave the second bottle entirely, but most likely it will be too huge for your head.
Check if the two parts fit together well. Connect them together and make sure they will hold tight.
3. Color and create the face.
Now we need to color our craft blanks. You need to paint from the inside. There is no need to be afraid of painting unevenly; on the contrary, distinct brush strokes create a unique image of the doll. It is best to paint plastic bottles with acrylic paint, but you can also use aerosol paints, which are convenient to use.
- The color chosen for the doll's body is blue (you can choose another), and for the head a calm yellow-sand color is chosen.
- Please note that the paints must dry thoroughly before we proceed to the next step.
- When the blanks have dried, you will need to glue together the body (shoulders) of the doll and part of the head (face).
Next, we begin to create the doll’s face. First we need to take the two covers we have and glue them where the doll will have eyes.
Then you need to color them as in the photo, adding eyelashes above the eyes with a marker. The nose (circle) and smiling mouth are cut out of red felt (or any other dense fabric) and also glued to the face.
face with glue. However, you can simply draw them on with a marker or red nail polish.
4. Add hair.
The doll's hair will be positioned as shown in the photo. First, attach the hair to the back of the doll’s “face.” We mark the head from the inside with a marker and pierce holes with a sharp awl.
You can heat the awl over a candle or gas burner to make piercing easier and the holes more accurate. You can also make holes with a thin electric drill or a small soldering iron.
The closer the holes are to each other, the thicker the doll's hair will be, and the wider the holes are, the more threads can be placed in each of them. However, it is better to stick to the golden mean.
Now begins the most interesting and time-consuming part of the work - creating hair from yarn!
Cut three strands of yarn to the required length. We thread them through a needle, tying a knot on the other side and fasten them to the doll’s head, starting from the bottom of the head. Each hole is filled with several tufts of hair.
For the doll from this master class, 5-6 bunches were needed for each hole. You can also thread the doll's hair in large bunches through wide holes using tape.
We do not fill the junction of the two parts of the head with hair (that is, we retreat from the upper border by about one centimeter).
5. Top of the head and bangs.
Once the main part of the doll's head is completed, the face is drawn, and the beautiful colored hair is already attached to the back, you can begin to move on to the top part. There are two nuances here.
Firstly, it is better to make smaller holes more often (they look better), and secondly, you need to mark with a marker where you will need to make bangs. The bangs are made from shorter threads. The remaining threads are long.
You should start attaching the hair from the edges of the upper part of the workpiece to the center.
6. Finishing the doll.
After all the hair is secured, we connect both parts of the doll’s head, putting the upper part on the lower part like a cap. Of course, if you see that the head is not holding well, then you can fasten the parts with glue, however, then you will no longer be able to disassemble the doll and adjust the length of its hair.
How to make a doll's hair shorter?
To do this, you need to remove the “cap”, pull the hair inward, fastening it from the inside of the head with an elastic band or tying it in a knot, which will allow you to do any short hairstyles. Then put the “cap” back on.
How to make your hair longer?
Gently pull the ends of your hair to create different lengths. Or, after removing the “cap,” remove the elastic band from your hair or untie the knot. Long hair will be available to you again!
Now all that remains is to comb the doll’s hair with a wide-toothed comb, trim her hair evenly, trim her bangs - and that’s it! A stylish, unusual doll made from plastic bottles is ready! You can start playing with it. To create your doll's hairstyles, we recommend experimenting with ribbons and your favorite hairpins - it's very exciting!
Source: https://www.FunnyBottle.ru/publ/igrushki/kukla_iz_plastikovykh_butylok/3-1-0-117
Materials for work
In fact, making a doll is quite easy. Therefore, this toy is perfect for sharing fun with your child. For work you need to take the following materials:
- Two small plastic bowls.
- The top of a Barbie toy.
- Foam rubber.
- Atlas.
- Lace of different colors.
- Satin ribbons for clothes.
- Unusual braid 118 centimeters long.
- Glue gun.
- Small flowers.
- Threads and scissors.
- Bottle stopper.
Unique doll made from a plastic bottle
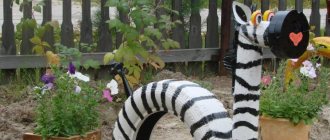
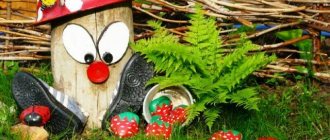
Crafts made from plastic bottles have become a part of our lives. They decorate the local area or flower beds in the vegetable garden and front garden. This gives individuality to each yard and signals to guests and neighbors about the talents of the owner.
But if everyone possible has already settled in the garden: from plastic elephants to pigeons, then it’s time to decorate the interior of the house. Or make a gift with your own hands for your closest friends.
A doll made from a plastic bottle and a few instructions for making it will help with this.
Master classes: doll made from a plastic bottle
Let's go from simple to complex. Making a toy is a great way to spend more time with your child and develop his creative skills. You can even roughly divide the master classes according to the age of the child for whom (or with whom) the craft is being created.
Option 1. Rattle doll for little ones
[aaa1]
If the baby is not even a year old, then he will really like a loud but kind toy in the form of an animal rattle. Every young mother can do it. It is known that toddlers are very attracted to unusual sounds. So take a small plastic bottle and fill it.
Depending on the sound you want, the filler can be water, sand, peas, various cereals, beads, large or small beads. And now you need to sew a cover on the bottle in the form of different animals: cats, dogs, hedgehogs, baby elephants, frogs, etc.
It all depends on your skills and the samples you find (you can even take templates for a finger theater). If you want, make a whole set to tell your child good old fairy tales, such as “Kolobok” or “Turnip”.
After the covers are ready, put them on the bottle and pull them down from the bottom so that the contents are not visible.
Option 2. Doll for children from one to three years old
When the baby gets to his feet, he immediately has a desire to move different things around the apartment. These could be slippers, boxes, bags and, of course, a stroller with a baby doll. Do the latter yourself. For this you will need a liter milk bottle.
Take the necessary measurements and sew a cover on it to make the body of the doll. Make a head from a white nylon stocking and small scraps of padding polyester, use a needle and thread to form a nose and mouth, and then glue ready-made eyes (accessories for the production of soft toys) and hair from loose pieces of wool yarn.
You will need a little yarn, because only the forelock will peek out from under the baby’s hat. Sew the head to the body with threads, then begin making the arms and legs (they are created in the same way as the head). Attach the upper and lower limbs to the body using knitting needles with external plugs so that the doll can “move” its arms and legs.
Now all you have to do is put her in a small stroller, and you are guaranteed a fun walk.
Option 3. The most fun dolls in the world for children from 3 to 5 years old
[aaa2]
If you look at the photo, you will definitely be eager to make such a fun group for your home. Making them is very simple. All you need: a half-liter plastic bottle of an original shape, a spoon (plastic, but preferably wooden) and a lot of multi-colored braid, ribbons and yarn.
The secret of this wonderful craft is in the color of the clothes and the expression on the doll’s face. Draw a cute, joyful face on a wooden spoon and get a new, beloved friend for your baby. Next, you need to glue fluffed threads from a ball of wool yarn to the spoon so that you get hair.
If desired, you can decorate your head with a hat or ribbons, tie braids, etc. Now we “dress” the doll. To do this, we select colors, materials and begin gluing the braid or ribbons to the bottle. After this, we thread the spoon into the neck of the container and fix it with plasticine.
These dolls are easy to make to look like people you know, making them a great homemade birthday gift.
Option 4. Doll for a girl of senior preschool age
At this age, toys often become a child's best friends. Make this lightweight model with your little one, and she will say “thank you” for a little friend that is convenient to carry in her purse.
To make it you will need to find the smallest bottle. Two circles are cut out of fabric: large and small in diameter. We cover the neck with a small piece of fabric, and the rest of the bottle with a large one. Take a piece of rope (15-20 cm), sew it a little in the middle, these will be “clasped” hands. Sew small “lantern” sleeves at the ends, and attach them, in turn, to the body.
[aaa3]
The head is made from a round piece of knitted fabric in a white or cream shade. Hand stitching is done along the edge of the circle, and then we tighten the thread and fill it with small pieces of padding polyester.
Sew on a couple of black beads (eyes), make a mouth and glue on hair from woven pieces of yarn. Glue the cap on top.
You can make a lot of such dolls, because the ideas for doll dresses and hairstyles are simply inexhaustible.
Option 5. Box doll for practical children and adults
If you think that every item in the house should have a practical value, then make an original box for various small items or children's treasures. Take a 1.5-liter plastic bottle and cut it into three parts: neck, middle part, bottom. You can throw away the middle one; you won’t need it for this craft.
Using a Barbie doll
You can make an amazing thing with your own hands from a plastic bottle and a Barbie doll. It will serve both adults and children, and will keep secrets or little secrets of girls in its depths. You can make it small or spacious and put small things there that are usually scattered on the floor in a child’s room.
Available materials can easily be found in any home, with every housewife. You will need:
Barbie doll or regular doll;
plastic bottle;
felt-tip pen or marker;- glue;
- glue gun;
- stationery knife;
- scissors;
- padding polyester;
- needles and threads for sewing;
- satin for a doll's dress;
- lace, beads and beads for decoration;
- lining fabric.
Available materials must be prepared in advance . This will significantly speed up the production of the box and teach the child how to work well with materials.
Mark the bottle with a marker, divide it into three parts and cut it, separating the bottom and top from the middle. The middle part is set aside; it will no longer be needed. The frame of the box will consist of the lower and upper parts of the bottle. Their diameters must match.
Do-it-yourself doll from a plastic bottle: quick and easy master class
Plastic bottles often lie idle in the pantry - just in case. You can easily find a use for them and make a beautiful and interesting craft from a plastic bottle. A cute doll made from a plastic bottle is made quickly and easily with your own hands, and the result is a cute interior toy.
Master class on creating a doll
A detailed master class will help you master the process of creating a doll.
To make a doll, you will need the following materials:
- 2 transparent five-liter plastic bottles (bottles) with lids;
- some leftover colored yarn;
- markers;
- paints and brushes (or aerosol paints in cans);
- red felt (or a small piece of other dense red material);
- knife (stationery, for paper);
- regular scissors;
- awl;
- glue.
May be useful at work:
- heat gun;
- electric drill, possibly a soldering iron (can be useful for making large holes in plastic bottles).
Step by step instructions
The neck of one of the bottles is cut off approximately in the middle of the bottle, and then the neck with the spiral for the cork is cut off from the same part. A second one will be inserted into the hole of the bottle later; at this stage you need to make sure that the holes are of the appropriate size.
To create the doll's head, take a second bottle and cut it off. You will need the upper part for work. It should be cut out large enough to create a doll's face. A cap with hair will be made from the bottom one, so it should be smaller. To do this, you need to remove the middle part.
After this, the lid is removed from the top. These two parts should fit together well and hold tightly.
Now they begin to decorate the blanks. It is necessary to paint only from the inside so as not to get stained with paint. The next stage is started only after the paint has completely dried.
After the blanks have dried, the body and shoulders of the doll are connected to each other.
Plastic caps are used to make the doll's face. They are glued to where the eyes will be. Using a marker, eyelashes, eyelashes, and eyebrows are drawn in. The nose and mouth are also drawn. You can outline the mouth with a marker after gluing a piece of red felt in the shape of a smile.
The most labor-intensive process is attaching the hair to the doll.
The inside of the head is marked with a marker, and then holes are pierced with a sharp awl. You can pre-heat the awl. This way it will be easier to work - the hot metal will melt the plastic, and there will be no sharp, torn edges in the workpiece.
The more holes there are and the closer they are to each other, the thicker the doll’s hair will be and the more interesting her appearance will be.
In addition, the size (diameter) of the hole itself will determine which bundle can be inserted inside.
Yarn is used for the hair itself. It is best to opt for the one that best retains its appearance over time - containing acrylic and nylon. The length is chosen at the discretion of the master.
Using a needle, the bundle is removed from the middle of the head, and a knot is tied from below, inside, which will prevent the threads from falling out. Having densely filled the entire surface, leave an empty area about one centimeter below the upper border of the junction of the two parts of the head.
It is better to make holes in the upper part of the head more often than in the lower part, so the hair will turn out much fluffier and more interesting. In addition, with a marker you need to mark the place where the bangs will begin. For the bangs, the threads must be cut shorter than for the rest of the head.
Attach the hair from the top to the center.
To put the doll together, you need to put the upper part of the head on the lower one, like a hat. You can attach the parts together using glue.
This doll model is interesting because the hair length can be adjusted. To do this, the cap of the upper part of the head is removed and the threads are pulled inward a little, secured with an elastic band or a hairpin, and then the upper part of the head is put back in place.
If the length of the hair needs to be adjusted, then you cannot glue one part to the other, as this will prevent you from removing the top.
To return your hair to its original length, you need to pull the ends of the threads or, taking your head apart again, untie the knot inside. You can comb the doll with a wide-toothed comb. Hair threads can be used to braid any hairstyle - from a simple ponytail or bun to braids of varying degrees of complexity.
Simple bottle doll
You can make a simple bottle doll using a 1.5 liter bottle and thread. Holes are poked in the cork with an awl. Also, using an awl, holes are made on the back of the bottle, however, you can limit yourself to just the cork. Then threads are threaded through the holes and tied with a knot from the inside.
Use a marker to draw a nose, mouth and eyes on the bottle. You can glue parts of the face by cutting them out of paper or any other material of your choice.
Large holes are made in the middle of the bottle on the sides, into which braids of thread are threaded. Knots are tied at the ends of the braids. To keep the handles tight, thread the braids through the neck, pulling them into the hole using a crochet hook.
It turns out to be a wonderful, cheerful doll.
Video on the topic of the article
Source: https://potta.ru/podelki/kukla-iz-plastikovoj-butylki-svoimi-rukami-master-klass-bystro-i-prosto-2