Materials for organza topiary
To create a beautiful topiary with your own hands, you will need the following:
- floral organza (I used yellow organza) – width 70cm, length 3-4m;
- textile flowers;
- foam base ball (I use a ball with a diameter of 10 cm);
- toothpicks;
- trunk;
- plastic or ceramic pot;
- gypsum;
- a piece of foam;
- sisal;
- various decor - inserts, butterflies, birds, etc.;
- stapler with staples;
- glue and heat gun.
Topiary with organza strings
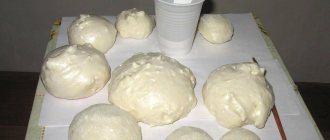
Funtiki are small parts made of organza that can be assembled into a single composition. In the photo you can see what they are. The name is funny, and they are not difficult to make.
Each tree of happiness is unique, even if it is made from the same materials
Funtiki are made like this:
- Cut into small squares. It is undesirable for the side to be more than 7 cm. Ordinary organza may fray at the edges, but floral organza will not cause such trouble. Therefore, almost every master class advises taking it.
- Fold the workpiece diagonally with your own hands, slightly moving the corners.
- And then the fabric needs to be folded so that it gradually becomes an accordion. To do this, mentally divide the square into four parts.
- Such a pound is fixed with a regular pin.
- You can fasten two blanks with a stapler or just thread.
Ready-made pounds can be fixed on toothpicks: it will be very convenient to attach them to the ball later
These are the trimmings that can be used to decorate a topiary. You will have to make a lot of them if you want a lush tree. A video or photo master class, it happens, explains how quickly you can make many of these pound cake blanks at once.
How to make a pound from organza (video master class)
Instructions for making topiary with your own hands
The creation of organza topiary begins with the production of so-called “trimmings”, otherwise they are also called “counters”. To do this, you need to cut the organza into equal squares measuring 7x7cm. You can also use squares with sides measuring 6.5 cm, but personally I like the size of the square with sides equal to 7 cm.
After all the organza is cut into squares, you should take two squares.
Place one square on top of another.
Fold in half into a triangle.
And in half again. Secure at the bottom with a stapler. This is what the “trimming” looks like from above.
Now the toothpicks should be broken in half.
And apply glue to the tip of the “trimming” and glue a toothpick.
You will need a lot of such trims. It takes me more than 100 “trimmings” to make one topiary.
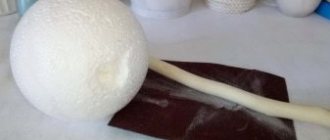
Next, you need to make a hole in the ball and glue the barrel into it using glue.
To make the tree, I use ready-made foam balls, but you can also use various children’s plastic balls as a base.
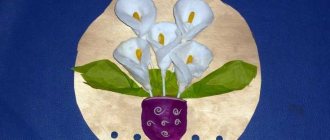
It is recommended to steam textile flowers before use. To do this, I use an iron and carefully steam each flower. For my topiary I use daisies.
The flowers must be stuck into the base of the ball.
Now take the trim pieces and stick them around each flower.
Also filling gaps between colors.
When the entire crown is ready, you need to dilute the plaster. Gypsum is diluted with water to the consistency of sour cream.
Place the trunk with the crown in the pot and secure the trunk with a piece of foam plastic or a piece of sandwich panel. This is necessary so that during operation the trunk is securely held in the pot.
Fill the pot with gypsum mixture. Immediately insert the decor on a stick here (if there is one). I had a watering can with a butterfly to match the organza and flowers, it turned out very beautiful.
Next, the plaster needs to be decorated with sisal or other similar material.
I glued two ladybugs to the pot, and one more to the watering can and to the trunk.
Organza topiary with textile daisies is ready. It turned out to be a very nice tree in my opinion.
Creative success!
Author of the master class with step-by-step photos Irina Sazonova
(Votes: 4)
Do-it-yourself decorative pillow made from scrapsWoven rugs in the home interiorFlower pots - original ideas for a “house” for indoor plantsWinter garden in the apartment: a greenhouse for the soulGlass blocks in the interior: time-tested quality
Basic materials for work
Any master class on making topiary with your own hands initially involves the preliminary preparation of all the materials necessary for the work. In this case you will need:
- two meters of floral organza;
- base-ball made of foam plastic, papier-mâché or plastic;
- branch or stick for the stem-leg;
- several types of multi-colored ribbons;
- glue "Moment";
- ball-head pins or toothpicks;
- stand (pot, glass, jar, etc.);
- gypsum or cement to secure the trunk.
The main advantage of organza when creating topiary is its elegant and formal appearance.
In the photo you can see that the roses turn out lush and airy, and the tree itself is not overloaded with details. Combined color schemes using material of several different colors look best. If the tree is monochromatic, then more decorative elements should be used. Especially if the color is white. Organza looks very elegant in combination with flowers made from satin ribbons or dried flowers.
Preparing the base and trunk
The base for the crown can be selected ready-made or made with your own hands from sheet foam. If it is too narrow, then several sheets are first glued together, the glue is allowed to dry, and a ball or heart of the appropriate size is turned out with a knife. The foam very easily includes pins to secure organza roses in it and secure the stem. The foam crown is lightweight, so it will not affect the stability of the topiary.
A suitable stick or branch is selected for the trunk, which does not have to be straight. Topiaries that resemble bonsai look very interesting. When making such trees with your own hands, it is recommended to attach 2-3 small organza crowns to them. Also suitable for the trunk is a bamboo stick, a piece of thick wire and other blanks that must be durable.
A variety of options can be used to finish the barrel. The corresponding master class with a step-by-step description and an attached photo or video suggests a lot of ideas for decorating a topiary leg. It can be painted, wrapped with thin twine, rope or tape, and covered with a layer of transparent or colored varnish. If the topiary will be used as a DIY gift, then one or two bows made of satin ribbons can be tied to the trunk.
Creating flowers and crown formation
Having prepared with your own hands a suitable base and trunk of the future Tree of Happiness, you need to, following step-by-step instructions or photos, start creating the main elements of topiary - flowers. They can be made of different sizes or completely identical. By color they can be arranged randomly or in a certain order. The shape of flowers can be just as varied.
There are a lot of options; you can even conduct a separate master class with step-by-step photos or videos on creating organza flowers. The easiest way is to cut a narrow strip of this fabric and roll it up like a snail, finishing the edges over a burning candle. But to get a lush, beautiful rose, you need to work on creating each bud. For this work you will need a template that strictly corresponds to the shape of the future flower or individual petals. You can do it yourself.
For each flower, parts in the required quantity are cut out according to this template, and then the edges of each are burned over a candle flame. This master class must be performed very carefully, following step-by-step recommendations, photos or videos, so that the petals turn out beautiful and neat.
As a result of melting, the edges should shrink slightly and the petal itself should bend slightly, which will create a volume effect. The finished petals are collected into a bud and connected with several stitches with a needle and thread or drops of glue. Small shiny beads that act as stamens are also attached with glue.
The finished flowers are attached to the foam base using pins with balls; they can be replaced with toothpicks) or simply glued. According to the advice of the experts, it is advisable to combine these two materials in order to obtain a reliable fastening, which in the future will not allow the flowers to fall off at the wrong time.
Additional decorative elements do not have to be made with your own hands. Decorations made from satin ribbons, fruits, dried flowers, artificial flowers and anything else that is available are great for this. You need to use your imagination or watch a master class with step-by-step photos.
When decorating the crown, you need to alternate your flowers with additional details. It is important to observe moderation so as not to oversaturate the topiary with unnecessary decor.
Making a stand
The stand for the Tree of Happiness can be a flowerpot, glass, jar, cup or pot, decorated and perfected with your own hands. When choosing a suitable option, it is necessary to take into account that in a topiary, the stand should not be larger in diameter than the base. Therefore, you need to choose it very carefully.
You can decorate a suitable container with paper or fabric, decorating them with patterns of thick (coarse) threads or ribbons. The choice depends on the idea of the craft and the chosen style. A universal master class with step-by-step photos is suitable here, in which you can see not only how to make the stand itself, but also how to strengthen the topiary in it.
To “plant” the Tree of Happiness, it is recommended to use any quick-hardening building material - cement, gypsum, dry mix, etc. When performing “planting”, you must follow the step-by-step recommendations:
- Seal the bottom of the stand (if there is a hole in the flower pot).
- Make a solution from the selected building material.
- Pour the prepared solution into the stand.
- Insert the topiary into the “soil” and level it.
- Hold the tree for a while to allow the building mixture to set.
It is recommended to decorate the “ground” in the stand with the same organza, artificial grass, colored sand, stones or glass beads. When using bulk materials, this must be done at the stage of installing the tree in the solution, so that they also attach to the surface and do not fall out in the future.
Decorations made of paper, sisal and ribbons are laid after the solution has hardened and fixed to it with glue.
Some interesting ideas for decorating the Tree of Happiness
1. Marine-style topiary: for decoration, shells, artificial starfish and other similar paraphernalia are used, which are glued between the flowers.
2. Money tree: in addition to fabric and ribbons, it is recommended to make inclusions of coins and “fake” bills.
3. Walnut topiary: walnuts (kernels, shells), pistachios, hazelnuts, peanuts are used. They can be painted and framed with organza and ribbons.
Organza topiary always turns out elegant and beautiful if you study the master class when making it, follow step-by-step instructions and use ready-made photos as an example. It can become not only a worthy interior decoration, but also an original gift for a loved one. Caring for this tree is very simple - just periodically brush off the dust with a special broom or blow it off with a regular hairdryer (cold air). If you do not place the topiary in direct sunlight, then this unusual tree will delight you with its beauty for a long time.
How topiaries conquered the interior
Initially, topiary was the art of decorating bushes and trees. Special gardeners worked in the wide parks surrounding the castles of the nobility. Their position was called topiary. They gave the tree crowns bizarre shapes.
Gradually, the topiary moved into the interior of the house. This demonstrates the Japanese art of bonsai. It lies in the ability to grow an exact small copy of a large plant in your apartment and decorate it in a whimsical way.
Now you can create topiary even if you don't have a castle with an adjacent park, and you're not a Japanese gardener. Today, topiary refers to stylized images of trees made from artificial materials. Most often, their crown is shaped like a ball. They serve to decorate the interior.
There is a belief that the round shape of the crown of an ornamental tree concentrates positive energy and keeps it in the house. That’s why topiary is also called the tree of happiness. They are considered a symbol of growth and prosperity, bringing prosperity and well-being.
Topiary “On the Wave”
- floral blue organza;
- ping pong ball (or other round piece);
- a sprig of corilius (blank for floristry);
- alabaster;
- miniature bucket for flowerpots;
- beads;
- lagurus (natural dried flower);
- toothpicks;
- sisal;
- stapler with paper clips;
- glue gun and rods;
- scissors;
- shells.
- Cut the organza into squares with a side of 5 cm. Place one on top of the other. Roll diagonally. The resulting triangle is cut in half again. Secure the corner with a stapler. There should be a lot of such blanks.
- Glue a toothpick into the corner of each organza piece. Use a glue gun for this.
- Make a hole in the ball. Glue the corilius there. The barrel can be painted in advance.
- Stick the organza on toothpicks into the ball. You can additionally fix it with a drop of glue. It is important that there are no gaps between the pieces of organza.
- Prepare a solution from alabaster. Pour it into the bucket, level it and insert the base of the trunk. Hold it upright while the solution sets.
- Decorate the base of the trunk with sisal, and the crown of the tree with dried flowers, shells and beads.
Topiary “Orange mood”
- decorative tangerine blanks (you can paint a tennis ball);
- a small children's ball made of thick rubber;
- cotton wool;
- blank for the barrel;
- glue "Moment";
- small flower pot;
- gypsum;
- green organza;
- white organza;
- threads;
- needle;
- scissors;
- green cord;
- brown cord.
- Make a cross-shaped cut on the rubber of the ball. Release the air and fill it with cotton wool, divided into small pieces.
- Stick the barrel blank into the ball, twisting it slightly into the cotton wool. Then pull out the barrel, fill the resulting hole with glue, and place it back. Leave to dry for a day.
- Cut the green organza into strips 5x10 cm. Fold into a triangle. Tuck the corners of the resulting triangle toward the center again and secure with thread. Sew into small bundles.
- Cut the white organza into 2.5 x 10 cm strips. Fold in half. Connect the middles of the sides with stitches to form a diamond. Pull to make a flower. Stamens can be made from gold embroidery threads.
- Place a square of green organza on the ball. By collecting and placing bunches of leaves and flowers between the folds, form a crown. Decorate with fruit preparations.
- Cover the trunk with brown cord, laying it in a spiral.
- Seal the hole in the bottom of the pot. Make a solution from gypsum and pour it there. Install the trunk with the crown, temporarily securing it with tape. Leave to dry for a day.
- Cover the base of the tree with green cord.
There are different techniques for making organza topiary. Each craftswoman has her own secrets. Don’t be afraid to replace store-bought preparations with improvised materials, get creative and experiment. Remember that nothing will decorate a tree of happiness more than your good emotions when making it.
Flowers for topiary
There are many different ways to make organza flowers.
- The easiest way: a long ribbon is burned over a candle and rolled up, giving it the shape of a flower. The lower end is secured with a thread and a needle. The result is beautiful pink buds.
- The second method: templates of two or three sizes are cut out of thick cardboard. Organza blanks are made from them. The edges of the blanks are burned over a candle flame so that the edges do not crumble and the petals acquire a convex shape. When performing this operation, do not forget about safety precautions - organza melts easily and flares up quickly, so it is better to hold it with long tweezers rather than with your fingers. The blanks are stacked and fastened. The center is decorated with beads, sparkles, and glass beads.
- Third way: The organza is cut into squares, each folded diagonally, slightly shifting the corners, and folded into a fan or accordion. By connecting several “pounds” with a thread or stapler, you get a lush, beautiful flower.
Buds, bows and leaves are made from satin ribbons.
Pay attention to this material - How to make a birdhouse with your own hands?
By choosing materials in delicate pastel shades, you can make a wedding topiary from organza . In this case, a composition of luxurious roses is decorated with gold rings.
The finished flowers are glued to the base or pinned to it with pins with a bead at the end (it is better to combine both). At the same time, they are alternated with other decorative elements: nuts, sweets, dried flowers and cereals, fruits, etc.
You will be interested in this article - Do-it-yourself garden figurines for a summer residence.
New Year's topiary
Berries in the snow
New Year's topiary “Berries on the Snow” is suitable for both beginner needlewomen and experienced craftswomen who will gain new ideas and inspiration! Tree of happiness on a foam ball d=12 cm, base - halves of walnuts. The main decor is small foam apples and sisal balls.
The crown is also decorated with plastic snowflakes, sugar and smooth foam berries, and bouquets of stamens. The finished topiary is treated with artificial snow in a can. The master class is available in video format and in a step-by-step article with photos.
Go to master class
First snow
New Year's tree of happiness made of dried chestnuts, acorns with caps, walnuts, as well as sisal and rattan balls, star anise, cinnamon sticks, plastic snowflakes, a garland of beads and foam berries.
The crown is on a foam ball with fabric wrapping. The topiary is planted in a restored old pot, filled with plaster and crushed stone. Master class from Alena Tikhonova in video format, as well as step-by-step instructions with photos.
Go to master class
Tips for making basic topiary parts
The basis for the crown. Typically, the crown of any classic “tree of happiness,” be it living or, as in our case, artificial, has the shape of a small ball (according to Feng Shui, this is a symbol of positive energy). You can buy it ready-made (handmade stores sell foam or polyurethane foam balls of any size) or make it yourself from newspapers.
A foam ball is the basis for the topiary “crown”
Topiary trunk . The simplest topiary trunk is a dry wooden stick, not exceeding 5 cm in diameter. You can make a trunk from wire. Showing imagination, it is given a bizarre shape. In many cases, the trunk is additionally wrapped with ribbons, decorative paper, or covered with paint.
To create a topiary trunk, a wooden or plastic stick is suitable
Flowerpot for planting a tree. A topiary pot, as a rule, is additionally decorated on the outside. But, for example, a beautiful clay pot, painted cup, transparent glass or vase looks impressive even without decorations.
The topiary pot can be decorated with fabric
Coffee topiary
Garden of Eden
A tree of happiness on a foam ball with bronze paint, a crown of coffee beans glued in even rows with the core facing up.
The main composition runs diagonally and consists of layers of white petals, branches of alder cones, foamiran and paper roses, stamens and bonsai grass. Also, 2 doves made a nest from sisal on the crown. Master class on topiary from coffee and roses in video format, as well as in an article with step-by-step photos.
Go to master class
Spices of the East
To decorate the topiary, exclusively natural materials were used (except for felt for the leaves and satin ribbon for the bow). Coffee tree of happiness on a foam ball with a diameter of 8 cm in a brown ceramic cup. The trunk is a curved branch of corilus, painted bronze.
A crown of coffee beans, a central composition of dried citrus slices, bay leaves, felt leaves, and a “button” of salt dough. Small decor: peppercorns, cloves, cardamom, corn, dried peas, bows and stars pasta.
Go to master class
Dew drops
Topiary made of coffee beans with bronzed crown and trunk. Decorative tree in a dark brown cup made of unfired clay, with a polished corilus branch as a trunk.
The crown of coffee beans is decorated with a composition of fabric and foamiran flowers with satin ribbons. The image is complemented by a colorful butterfly on the reverse side. There is a luxurious scattering of pearls all over the coffee tree of happiness.
Go to master class
Coffee dreams
A small topiary made from coffee beans is a typical example of a simple and quick way to make a tree of happiness for beginning needlewomen
. The simple design and available materials do not require any preparatory work. Thanks to this, the craft will take 1.5-2 hours, taking into account the glue drying. Moreover, almost all elements are interchangeable and easily accessible. We offer a master class on how to make topiary - in video format and in an article with step-by-step photos.
Go to master class
Topiary with artificial flowers
Heavenly Harmony
The “Heavenly Harmony” topiary is made on a synthetic padding ball, planted on plaster in a plastic flower pot, the trunk is a curved wooden branch. The tree of happiness is decorated with homemade flowers made from viscose napkins, sisal balls, berries and fabric roses.
At the base there are sisal balls, a pot with lace, satin ribbons and flowers. The composition is completed by a double satin bow tied under the crown on the trunk.
Go to master class
Awakening of Spring
The flower tree of happiness “Awakening of Spring” is a colorful and wildly blooming meadow, personifying sunny May days and warmth. We used homemade flowers from napkins and felt, ready-made foamiran and fabric roses, sisal balls, stamens, leaves and small inflorescences. There is a decorative butterfly perched on the crown, and a cute foam bird at the base of the topiary. The tree is mounted on plaster in a tall flower pot with a perforated border.
The master class is presented in photo and video format with subtitles, tips and recommendations from the author.
Go to master class
Charm
Purple-white topiary from flowers is made quite quickly, but labor-intensively - buds from cardboard egg trays are formed in several stages: cutting out blanks, painting and assembling, gluing felt or organza leaves.
We offer step-by-step master classes in video (FullHD 1080p) and text format with photos.
Go to master class
The scent of spring
Wedding tree of happiness in white tones with green splashes in the form of artificial leaves, which are in harmony with light green sisal and a large green apple at the base, refreshing and enriching the composition. Topiary on a ball made of newspapers, a crown made of apricot kernels, the main decor is prefabricated flowers from cardboard trays for eggs.
An elegant thin trunk of a curved shape is a branch of Corilus. The decorative tree is planted on plaster in a low ceramic cup. The main elements are painted rich white - in Provence style. The master class is available in photo and video format with detailed step-by-step instructions.
Go to master class
Orange mix
Orange topiary from orange peels is made quickly, but requires preparatory work: drying the orange peel and citrus slices takes 3-7 days. In addition to orange flowers, foam tangerines, berries, satin ribbons and bow-shaped pasta were used for decoration.
We offer a detailed master class in video, photo and text format with step-by-step instructions for making topiary yourself.
Go to master class
Tree with a heart-shaped crown
Before starting work, it is advisable to draw a sketch of the future tree. Instructions for creating an organza topiary will be given in a master class in which a heart-shaped cardboard blank is used as a base, and a suitable branch is used for a tree trunk.
To work you need to prepare:
The tools you will need are scissors, a stapler and a small glue gun.
The operating procedure is as follows.
- A heart is cut out of cardboard.
- The barrel is glued to the workpiece.
- Gives volume to the heart. To do this, coat the workpiece with glue, take a crumpled newspaper and place it in the middle of the cardboard heart.
- Wrap the heart in napkins and secure with thread.
- Dilute plaster or alabaster with water to the consistency of liquid sour cream.
- Styrofoam or pieces of polyurethane foam are placed at the bottom of the pot, the solution is poured into the prepared container and the barrel is inserted into the solution. Leave the structure to dry.
- Organza is cut into squares measuring 5*5 cm. The number of squares depends on the size of the heart.
- Fold each square diagonally, slightly moving the corners. Then fold it in half again. Bend the corners on both sides. The workpiece is fastened at the base with a stapler.
- When all the parts are ready, start gluing the organza cones to the heart using a glue gun.
- When gluing parts to the base, adhere to this order. First, organza blanks are glued along the contour of the heart, then on all sides.
- Glue the organza parts to the surface of the plaster.
- Decorated with beads and flowers.
- A satin ribbon is tied to the trunk and to the pot.
Money tree topiary
Abundance
Money topiary “Abundance” is made on a homemade ball with roses from paper bills. On the crown are symbols of abundance and prosperity. On the ball there was a frog, a bunch of grapes and a scattering of coins. The pot is made by hand from plaster, painted in 3 layers with an antique effect, stylized as a wallet with a metal zipper. The trunk - a curved salex branch - is fixed in a pot with plaster casting.
Go to master class
Spring luxury
Money topiary on a finished foam ball with a curved trunk in a plastic pot. Gypsum casting was used to fix the trunk. Crown decor - handmade roses from paper money, 99 flowers! Sugar berries and stamens, plastic leaves and yellow paper roses are also used.
The Tree of Happiness “Spring Luxury” is designed in fresh and bright yellow-green colors. Topiary is perfect for a gift or to decorate your kitchen interior. We have prepared for you a step-by-step master class with photo and video instructions, as well as a detailed presentation of the finished product.
Go to master class
Sea shell topiary
Lavender sea
Decorative tree made of shells and roses “Lavender Sea” is a beautiful and unusual topiary on 2 trunks in a neat painted pot filled with plaster. The crown is decorated with shells (painted with mother-of-pearl acrylic), delicate roses made of ceramic plasticine and balls of purple sisal. In addition, the tree of happiness is decorated with buttons wrapped in satin ribbon, smooth berries and sisal balls.
Go to master class
Blue Lagoon
Marine topiary "Blue Lagoon" combines the beauty of nature with artificial decor. The shells of the snails, which form the basis of the crown, are painted with ultramarine acrylic paint. The compositional center is half of a large rapana. A pot is a tin can decorated with popsicle sticks, shells, and scrap material. At the base of the tree, on a scattering of small shells and sisal, a blue decorative bird is planted.
Go to master class
coral reef
The sea topiary is made from a variety of shells with homemade clay roses and sisal balls. The shells are painted in coral, mother-of-pearl and soft blue.
The composition of the tree of happiness is complemented by bright plastic inhabitants of the seas and oceans: crabs, octopus, starfish. The ball is wrapped in twine and sisal, the trunk is sanded, plaster casting is used, and the pot is wrapped in linen rope.
Go to master class
Topiary made from satin ribbons
You can make an exquisite ribbon topiary with your own hands using satin ribbons of various widths and different techniques for working with them.
YOU WILL NEED IT
Luxurious roses from satin ribbons (3 master classes)
Flowers made from satin ribbons: DIY beauty (3 master classes)
Author - Olga Eftodieva
Author - Elena Popova
Author - Irina Gevraseva
Author - Yulia Skrynnikova
You can watch the master class in the video lesson.
Topiary in the shape of a heart
Sapphire Heart
Coffee topiary “Sapphire Heart” with a foam base 15 cm wide, a curved Salex trunk, planted in a lilac plastic pot on plaster. The heart is thickly covered with coffee beans painted in 2 layers: bronze and white. The crown is decorated with foamiran roses, two types of artificial flowers, green leaves, alder and larch cones, as well as small cones. The barrel is painted white.
Go to master class
On the wings of Love
This heart-shaped topiary combines a textured coffee surface with elegant floral decoration. Roses made of ceramic plasticine in various shades of pink are in harmony with the butterfly and a scattering of pearls with stamens. The tree of happiness is planted in a white ceramic cup, the trunk is made from a curved branch of corilus (salex). The composition is completed by delicate wings made of natural feathers.
Go to master class
Autumn topiary
Walk in the garden
The “Walk in the Garden” topiary is made of artificial fruits and vegetables, flowers and small inflorescences. The trunk is painted with chocolate acrylic; for color support, the crown is also decorated with dried chestnuts. On top there is a nest with quail eggs, and on the other side there is a straw hat with a rapeseed ribbon. A decorative bird perches at the base of a fruit tree. The topiary is planted in a metal bucket, the trunk is reinforced with plaster casting.
Go to master class
Magic Glade
The autumn tree of happiness turned out to be unusual: a successful combination of natural material and artificial decor. Chestnuts, acorns with caps, walnut shells, apricot kernels, sisal are harmoniously combined with berries, fruits and vegetables made of polystyrene foam, artificial flowers and grape leaves.
The composition is complemented by a decorative dragonfly and a snail shell. A dense meadow with well-arranged gifts of autumn, a tree of happiness in orange-brown tones.
Go to master class
Notes of autumn
An original topiary made from chestnuts, acorns with pluses, walnut halves and sisal. In addition to natural materials, decorative elements were used to decorate the crown: artificial rose hips, smooth and sugar berries, and foam stamens.
At the base of the autumn tree there is a composition on decorative moss. The clay pot is decorated with wooden sticks and coffee beans, and the rim is painted with yellow acrylic to tie in with the napkin roses on the crown.
Go to master class
Autumn mood
Fragrant topiary “Autumn Mood” using natural materials: flowers made from orange peel, dried citrus slices, peeled apricot and peach pits, cinnamon, a bunch of acorns, dried flowers. The trunk is a twisted branch, a clay pot filled with plaster (to firmly fix the heavy tree of happiness).
We offer a step-by-step master class on the natural tree of happiness: text version, photos and full video MK in FullHD quality with subtitles. Choose the format that is convenient for you!
Go to master class
Seasons
The Tree of Happiness is an unusual format: a series of master classes in the same style, but with a different set of materials. Autumn theme - acorns, pine cones and orange flowers. New Year theme - with larch cones, red stamens and artificial grass. Spring theme - with pink foamiran roses, pine cones and bonsai branches.
Each topiary is planted on a plaster cast in a metal bucket, the trunk is 2 curved branches of corilus (salex). A foam Christmas tree toy with a diameter of 4 cm was used as a ball.
Go to master class
Birdsong
A topiary of chestnuts, acorns and nuts with decorative doves and a ladder is planted in a small clay pot on plaster. The crown is decorated with piles of acorns with pearls and prefabricated decor: satin bows with white sugar berries. The curved trunk and ladder are painted bronze; at the base, on sisal flaps, doves nestle in a twisted nest. The pot is decorated with satin ribbon and lace.
Go to master class
Manufacturing
The master class on creating organza topiary will begin with making a trunk. It’s better to take a branch, since you won’t have to make the shape yourself, but only correct the existing one or leave it as is.
The branch is tightly wrapped with satin ribbon, the end of which is secured with hot glue. You can wrap it not only with tape, but also with white twine. You can not wrap it at all, but simply varnish it. You can try to combine several snags into one and make a double or triple topiary, which will definitely add originality to the tree.
A good option would be to mix different types of jewelry. For example, satin ribbons and corrugated paper.
To make organza topiary, the master class requires you to have a small foam ball available - about 7 or 7.5 cm in diameter. But if it is not there, then you can make the base for the crown yourself. For example, from old newspapers or using a balloon that needs to be covered with pieces of paper. You will get a ball of papier-mâché. You can glue several pieces of foam plastic together, and then grind out a ball of the desired size.
Next, you need to insert the driftwood into the foam ball and secure it all with hot glue. You can use anything as a flowerpot, but the main thing is that the shape is similar to a flower pot. Now you can start decorating the flowerpot: you need to insert a driftwood into it and fill it with foam. There is no need to fill it completely, as the foam tends to increase several times.
Materials for making a tree of happiness
Ready decor
To make topiary you will need a wide variety of ready-made materials for needlework:
- Satin ribbons, bows.
- Organza, felt, mesh.
- Flowers from foamiran.
- Sisal and sisal balls.
- Beads, glue half-beads.
- Corrugated paper.
- Ready-made decorative elements: artificial flowers, fruits, berries.
Popular natural and improvised materials for the tree of happiness are:
- Coffee beans.
- Pasta of various shapes.
- Cinnamon sticks, peppercorns, bay leaf.
- Dried orange, lemon, tangerine - peels, slices.
- Decorative stones, pebbles, glass.
Homemade decor
The basis of the composition of almost any tree of happiness (with the exception of express topiary, on which mostly ready-made elements are glued) is a prefabricated decor from a variety of materials. Most often these are pre-collected flowers.
How to make topiary with your own hands - step-by-step instructions
- Preparation of prefabricated decorative elements.
- Making a ball or using a foam blank.
- Decorating the crown using the chosen technique with previously prepared elements.
- Decorating the pot and securing the trunk - filling it with plaster or securing it with crushed stone.
- Assembling a tree of happiness.
- Final decoration of the topiary.
The proposed step-by-step instructions on how to make topiary are indicative: for convenience, some steps can be swapped or combined.
Symbolic meaning of the tree
The tree symbolizes development, dynamic growth, seasonal withering and restoration, wealth and well-being. The branches mean versatility, variety of choice, and the common trunk is a symbol of unity. In mythology, a tree is a magical, powerful image, the abode of gods and spirits. In Feng Shui practice, the tree of happiness in the home is a symbol of prosperity, abundance and wealth. In addition, a topiary created independently is an original gift, a sign of respect and love, a real surprise for connoisseurs of handmade crafts.
An excursion into history The etymology of the word “Topiary” comes from the ancient art of topiary cutting of garden trees and shrubs - “Topiar” (Topiary material from Wikipedia). From Latin, topiaria is a gardening art that has been actively developing in Europe since the times of the Roman Empire. Shrub sculpture was carried out by specially trained slaves - topiaries.