Paper pencil
You will need: toilet paper rolls, colored corrugated paper, scissors, glue, a ruler and a simple pencil.
Master Class
- Measure the length and circumference of the sleeve.
- Prepare strips of colored paper to fit the sleeve.
- Cover the bushings with colored paper.
- Cut a cloud from a sheet of paper so that all the sleeves fit on it.
- Glue the bushings onto the stand (cloud).
- Cut out the flowers and glue them onto the pencil holder.
The paper pencil is ready! I recommend watching this video!
DIY. Budget DIY office stationery organizer. Desktop organization.
Required tools and materials
Before starting work, you need to prepare the following materials:
- a cardboard cylinder that will serve as the base of a pencil holder (a toilet paper or wallpaper roll);
- twine, yarn or other suitable thread for decorating the product;
- colored paper and cardboard;
- a small piece of velor or velvet fabric;
- one or more tapes;
- large button;
- super glue and PVA.
If the bushing is very tight, a hammer and nails may be needed.
Creating a cardboard pencil holder does not require significant material investments
Salt dough pencil
You will need: water, flour, extra salt, a cardboard jar for the frame, PVA glue, scissors, a piece of decorative rope or corrugated paper, gouache, a brush, a button, stacks, acrylic varnish for crafts, a toothbrush.
Master Class
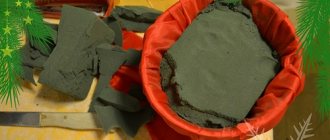
- Knead the salted dough in this way: add a glass of flour, a glass of salt, add water, then knead until the desired consistency of the dough. Separate part of the dough, add beige gouache, then knead.
- Roll out the cake to a thickness of 10-15 mm.
- Apply PVA glue to the outer rim of the jar and wrap it with dough. Cut off the excess with a stack and smooth the joints with a damp brush.
- Create a small dotted texture with a toothbrush on the surface of the dough.
- Knead the brown dough, roll it into a flat cake 10-15mm thick.
- Cut a 5cm wide strip of brown pastry and glue it to the bottom of the jar.
- Make 2 large owl eye bases from white dough, then glue them on.
- Make a beak out of brown dough and glue it on.
- Make eyes from turquoise dough and glue them on.
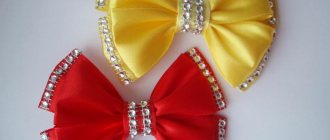
- Roll out 8 strips of pink dough, twist them into 4 flagella and make a bow, then leave it to dry for 2 hours.
- Make droplet-shaped owl wings using brown dough, then glue them on.
- Weave ropes of beige dough and glue them onto the neck of the jar.
- Roll out a sausage from white dough, draw the texture of the lace with a stack and glue it as a collar under the beak.
- Place the craft in a warm place for a day.
- Paint the bottom and wings with brown gouache and decorate with white dots.
- Draw the pupils and eyelashes with black gouache, wait until the paint dries, then paint white highlights on the eyes.
- Glue a pink bow above the wing.
- Glue a button with a bow from a corrugated strip onto the lace.
- Cover the craft with varnish and wait until it dries completely.
The salt dough pencil is ready!
Option 1. Salt dough owl stand
Stylish desktop decoration
To make such a cute owl at home, prepare:
- flour;
- water;
- table salt;
- stack;
- toothbrush;
- a cardboard jar of a suitable size;
- acrylic lacquer;
- PVA glue;
- corrugated paper (can be replaced with decorative rope);
- scissors, gouache, brush.
Step 1 . To knead the salt dough, pour a glass of salt and flour into a large bowl, then add water and knead to the consistency required for modeling. Separate a little of the finished dough, add beige gouache to it and knead well.
The jar is wrapped in salt dough
Step 2 . Roll out the dough into a “cake”, the thickness of which is 1-1.5 cm. Apply glue to the outer side of the jar, then wrap it with dough. Trim off any excess dough and smooth the seams with a wet brush.
Step 3 . Using a toothbrush, make a slight stipple over the surface of the dough.
Step 4 . Then knead the brown dough and make the same flat cake 1-1.5 cm thick. Cut a 5 cm thick strip out of it and glue it to the bottom of the jar, as in the photo.
Creating eyes for an owl
Step 5 . Make 2 eye bases from the white dough and then attach them. Make the beak from brown dough, and the irises from turquoise.
Step 6 . Take the pink dough, roll 8 strips out of it, and from them make 4 ropes and make a bow. Leave the part for a couple of hours to dry.
Step 7 . Make teardrop-shaped wings from brown dough and glue them to the body. Glue the ropes woven from white dough to the neck.
Final decor of the pencil holder
Step 8 . Make a sausage from white dough, draw a lace texture on it with a stack, and glue the finished collar under the beak.
Step 9 . Place the craft in a warm place for 24 hours. After that, paint the bottom part with brown paint and make white dots.
Step 10 . Draw eyelashes and pupils, and after the paint has dried, paint white highlights on the eyes. Glue a bow above the wing.
Owl pencil made from salt dough
Step 11 . Glue a button with a corrugated strip bow on top of the lace. Apply varnish to the craft and wait until it dries completely. That's it, the pencil holder made from salt dough with your own hands is ready!
→ How to make a tattoo machine with your own hands
Original pencil holder
You will need: a tin can, white and green fleece fabric, green felt, scissors, padding polyester, glue gun, thread, needle, centimeter, pencil, plastic eyes for toys.
Master Class
- Measure the height, bottom diameter and circumference of the jar.
- Cut out 2 pieces each from white and green fleece according to the dimensions (can height + 0.5 cm allowance and circumference + allowance).
- Sew the parts together with a back seam using a needle, or use a machine. You should get 2 blanks, as shown in the picture - one green, the other white.
- Turn the white part inside out and set the cylinders aside.
- Make 18 paired pieces (faces with ears) and sew them together, leaving a hole for stuffing. You should get 9 faces.
- Mark the location for attaching the eyes.
- Stuff the faces with padding polyester and sew up the hole.
- Glue the plastic eyes to the designated locations.
- Wrap the jar with padding polyester and sew the edges, then sew on the bottom of padding polyester.
- Place the green fleece piece on the can.
- Glue the padding polyester to the bottom of the jar.
- Apply glue to the bottom of the jar and glue the white fleece piece, and sew the edges of the white and green fleece together with a blind stitch.
- Glue on the animal faces.
- Cut out the leaves from felt and glue them too.
The original pencil holder is ready! I recommend watching this video!
Desk organization - 5 DIY pencil holders
Necessary materials, tools and utensils
To work you will need:
- wax crayons 450-500 g;
- 2 straight vessels of different sizes (in this master class we used a French press flask 9.5 cm in diameter, 15 cm high and a plastic glass 6 and 9 cm, respectively);
- bottom separator (solid iron nut);
- weight for filling a small glass;
- a deep container for water that can be placed on the stove (bowl or pan);
- potholders (preferably silicone);
- latex gloves.
The dishes must be clean and dry. It is convenient to work with transparent glass: you can observe the process and adjust the location of color spots. The height of the small vessel should be slightly greater than the planned height of the product.
Apple shaped pencil
You will need: an oval-shaped plastic bottle, red liquid acrylic paint, golden cord, artificial leaf, glue gun, plate, nail file.
Master Class
- Pour paint into the bottle and shake well so that the entire inner surface of the bottle is painted.
- Drain off any remaining paint.
- Place the bottle on a plate and wait until it dries completely.
- File the edges of the neck if necessary, removing excess paint.
- Wrap the neck with golden lace and glue the leaf.
The apple-shaped pencil is ready!
Option 10. DIY apple pencil
A simple craft using a few pencils.
To work you will need:
- oval plastic bottle;
- plate;
- red acrylic paint (liquid);
- file;
- golden lace;
- glue gun;
- artificial leaf.
Step 1 . Fill the bottle with paint and shake well to thoroughly coat the entire interior surface. Drain off any remaining paint.
Step 2 . Place the bottle on a plate and wait until the paint is completely dry. If necessary, file the neck and remove excess paint.
Making a pencil holder in the shape of an apple
Step 3 . Tie the neck with a golden cord. At the end, glue the leaf. The apple pencil holder is ready!
→ TOP 11 ways to sew gloves with your own hands
Creative pencil holder
You will need: glass jar, yellow liquid acrylic paint, black permanent marker, nail file.
Master Class
- Pour the paint into the jar, close the lid and shake well to evenly color the inside of the jar.
- Drain off any remaining paint.
- Wait until completely dry.
- File down the edges of the jar neck, removing excess paint if necessary.
- Draw a funny face with a permanent marker.
The creative pencil holder is ready! I recommend watching this video!
DIY Organizer for STATIONERY * 3 BUDGET options * Bubenitta
Funny animals
In every home where a small child lives there will be empty glass jars of baby food. Don't rush to throw them away. They will be useful for creating an interesting company of animals. The containers must first be washed, all labels removed, and dried. For painting, you can use an aerosol can of paint.
It is better to choose bright colors. After drying, you should draw a sketch of the muzzles with a simple pencil.
Note!
How to make flowers from cold porcelain: chic floristry and DIY crafts for the New Year step by step
How to make cold porcelain from potato, corn starch, liquid, without soda. Recipes and cooking methods
How to properly make a birdhouse with your own hands from scrap materials: we create an original birdhouse according to sketches
Color the faces with colored markers. Animals can do anything. It all depends on your imagination.
Minion pencil holder
You will need: superglue, hole punch, scissors, EVA polymer material (bathroom mats are made from it) in blue, white, black, gray, brown, wooden skewer, black and blue felt-tip pen, simple pencil, printout of the template.
Master Class
- Print the template and cut out the blanks.
- Cover the outside and inside of the jar with yellow polymer.
- Glue the blue resin jumpsuit and black buttons onto it.
- Glue on a white background for the eyes, then brown eyes and black pupils, a black strap for glasses and a gray frame.
- Draw stitches on the overalls with a blue felt-tip pen and a minion smile with a black felt-tip pen.
Minion pencil holder is ready! I recommend watching this video!
DIY Minion / Stationery organizer / DIY pencil holder / Master class