DIY children's crafts made from cotton pads are inexpensive and hygienic; they are safe to give to children who are learning to make their first applications and show their imagination. You can make flat and three-dimensional figures - flowers, snowflakes, snowmen, dogs, and even roll a snowball - but soft and fluffy, not cold!
Flower and New Year themed crafts work well. This activity is a useful joint leisure activity for parents and children.
If the craft turns out to be particularly successful, it can become an original decoration for the interior of a child’s room, a unique present, and even take a prize at a school exhibition of DIY work.
What are the benefits of cotton pads?
Cotton pads are easy for children's hands to work with - they are easy to cut with small scissors, fold and bend, glue, paint with watercolor paint, a marker or felt-tip pen, and combine with other materials.
It is enough to follow simple instructions on how to properly make crafts from cotton pads, and even a small child will turn out a real masterpiece.
Working with a round, colorless object develops children's imagination - it teaches them to look at a familiar shape in a flexible and non-standard way, and this will come in handy when they become adults.
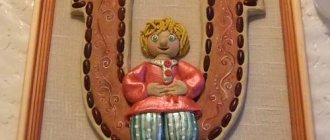
A selection of photos of crafts made from cotton pads clearly demonstrates how many magnificent things can be made from them, and may prompt you to come up with your own idea.
It’s better to start with the simplest master classes on crafts made from cotton pads. Anyone who has learned the technique of work and understands the capabilities of this craft material will begin to produce very beautiful and high-quality things, and their skills will improve with each craft.
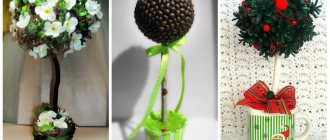
Do-it-yourself topiary made from cotton pads: where to start
Cotton pads are inexpensive, buying them is not a problem, and there are a lot of ideas on what else they can be turned into. With your own hands you can crush, bend, twist the disks to understand what they can turn into. In most cases, a master class is not needed - the discs themselves twist into a flower.
For one rose we will need several cotton pads, a bead and a thread with a needle
Such a bud roll can be supplemented with a bead, or rhinestones, or a core cut from corrugated paper.
We roll up the disks, securing them with thread, and attach a bead to the center. The more disks you use, the more magnificent the rose will be.
Just try to make more of these flowers, figuring out what to make the core out of. You can watch some master class and take the idea from there. Candy, buttons, bugles or sequins can be hidden inside a flower made of cotton pads.
An alternative method of making roses not from several, but from one cotton pad
Perhaps just a small mother-of-pearl bead sewn into a bud will be the best decoration. Or you can use not just a bead, but a hairpin with a bead. In this case, you will insert pins into the foam ball.
Rose made from cotton pads (video)
Topiary made from cotton pads: step-by-step instructions
Let's assume the buds are ready. By the way, there is a good alternative to them - making roses with your own hands from several disks. That is, if a bud with a bead is one disk, then such a rose is made up of several circles at once.
If you spray cotton pads or ready-made flowers a little with spray paint, this will significantly enliven the composition. And in combination with pearl beads, the decor will become more complete
The master class then proceeds according to the following scenario:
- Start making the crown. You will need a base ball, conventionally it will be a foam ball, which can be bought at a craft store. This ball can be left white, and flowers from cotton pads will be fixed to it.
- Leave a hole in the workpiece where the tree trunk will be threaded. If it’s easier for you to work this way, then you can attach the trunk to the finished crown, or you can immediately fix the trunk in the ball with hot glue.
- Glue flowers from cotton circles very carefully, the material is delicate and easily soiled. It is better to paste from top to bottom, avoiding voids.
- Next, when the crown is ready, decorate the trunk. Typically, bleached twine, white satin ribbon or lace ribbon are used.
- Now the tree needs to be “planted” in a pot to make a real topiary. Take either a ready-made flowerpot or any container that can be decorated. Pour gypsum mortar into it and plant the tree there evenly. Wait for it to dry.
The top layer of plaster can be decorated with the same discs, making waves or small cotton balls out of them.
A quick way to make topiary from cotton pads (photo MK step by step)
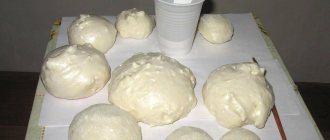
For the tree, in addition to cotton pads, we will need plasticine, glue, a base ball, a flower pot, a stick for the trunk and decor.
Fill the pots with plasticine, glue the trunk to the base
We fix the workpiece in a pot with plasticine without additional effort
Dropping a drop of glue onto the center of the disk, glue it to the base ball and press it. This way we completely cover the base.
We get a crown in the form of ruffles. Waiting for the glue to dry
The plasticine holding the topiary trunk needs to be hidden with decor. For this you can use beads or seed beads, sequins or ribbons, sisal or yarn, foam balls, etc.
We decorate the crown. To do this, you can use ribbons, beads, sparkles and any other materials; you can decorate the crown with a homemade brooch or bows
Depending on the method of design and decoration of the crown and trunk, the finished topiary may differ
Tools and improvised means
No special equipment is required. As a rule, you need a sufficient number of disks themselves, stationery scissors and glue, a needle and thread, watercolors, a brush, decorative pins, sheets of cardboard and colored paper - regular and self-adhesive, multi-colored beads of different sizes made of glass and plastic, beads, shiny sequins, beautiful buttons, satin ribbon and other similar decorations.
Depending on what kind of craft is planned, plastic cocktail straws (for example, for a flower stem), toothpicks, spruce and pine cones, tree leaves, pine twigs - anything that your imagination suggests - may come in handy.
Below are beautiful ideas for crafts made from cotton pads, easy to implement even for a six-year-old child.
Crafts from bags: master class on knitting from plastic bags and the best handmade ideas (90 photos)- Where to start drawing
Crafts from twine: a step-by-step master class on making useful and beautiful products (95 photos)
Creating a Christmas tree
A sheet of cardboard is rolled into a narrow cone and glued along the edge. The trunk must be stable, so the base of the cone is made even; if it is not possible to roll it properly, you need to trim it with scissors.
All cotton pads are folded into triangles - first in half, then in half again: these will be spruce paws.
Starting from the base - from bottom to top - the disks are attached in horizontal rows tightly to each other to make the Christmas tree fluffy. You can attach it with pins with colored heads - decorations will immediately appear on the tree, or with a stapler.
The Christmas tree is decorated with balls - the beads can be sewn or glued. If you wrap the Christmas tree with braid, it will play the role of garlands.
Crafts from ice cream sticks: 100 photos of original ideas for using wooden sticks- Crafts from paper and cardboard - 110 photos of the best simple patterns for children and beginner craftsmen
Crafts for girls: simple, beautiful and interesting crafts. The best ideas with explanations and step-by-step instructions for creation (70 photos)
You can decorate such a Christmas tree to your liking - with rain, confetti, or even hang real small glass Christmas tree decorations.
Postcard with a snowman
When making crafts from cotton pads, it is important to act step by step, without overtaking events - this will teach the child perseverance. For this fun and unusual card you will need the following materials:
- 2 thick cotton pads (to make the image three-dimensional);
- a sheet of thick colored paper or thin cardboard - the color you want for the postcard;
- sheets of thin colored paper for a hat and scarf;
- orange colored paper for the carrot nose;
- scissors;
- office glue;
- 2 buttons (for eyes);
- markers.
Variegated chickens
To make chickens from cotton pads, you will need the pads themselves, cardboard base, scissors, paints and glue. If you want to decorate the finished picture with decorative elements, this is always at your discretion.
We paint the cardboard in the background colors. For example, it could be a lawn: green grass and blue sky.
Article on the topic: Knitting raglan for children using the example of a blouse for a child under one year old: diagram and description
Preparing the chickens. We paint two cotton pads yellow, and we also paint two cut out triangular wings yellow. Next, we cut out the scallops and beaks, paint them red, and also cut out the legs and paint them brown.
When the discs and cardboard are dry, you can begin gluing the applique. The bodies go first, then one wing for each chicken. Next we glue the scallops and beaks, and then the paws. The eyes of the chickens can be drawn with paints or a marker, or you can glue black beads or seed beads.
Our chickens are ready!
Making a postcard
One of the cotton pads is cut with scissors for the head so that it becomes smaller than the diameter of the disc-base of the snowman. Button eyes are glued to the head with glue. (Eyes can be made from special stickers or cut out of colored paper.) A hat, scarf and carrot for the nose are cut out of colored paper.
The cardboard sheet is carefully folded in half. To ensure that the fold is perfectly even and the cardboard is bent well, you can draw a line along the ruler with the blunt side of the scissors. This is a blank postcard. Cotton pads, a hat, a scarf and a nose are glued to the front of the card.
The postcard is ready! Such a snowman will also make a decoration for window glass, if you make it not on cardboard, but on a transparent film with glue applied to both sides. This film can be purchased in any department of goods for children's creativity.
Snowman for the holidays
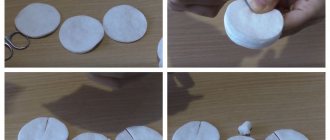
For a snowman made from cotton pads, you need to take four cotton pads, cardboard for the base, black buttons (three medium and two small), glitter, a piece of orange thick fabric, two small twigs for hands, scissors, paint and glue.
We paint the base cardboard with gouache; the background depends on your imagination. Since a snowman usually consists of three large balls, for the first and largest one we take a whole cotton pad and glue it to the dried background. We cut out the second ball with scissors and make it slightly smaller in diameter than the first, and also glue it, slightly overlapping with the first. And we cut out the third, smallest cotton pad, which forms the head, with a diameter even smaller than the second cotton pad. Glue the disk head to the snowman's body. We press everything carefully, but firmly so that it sticks well to the cardboard.
Related article: Hot stand: weaving pattern using macrame technique
Now we glue the buttons. Two small buttons act as eyes, and the middle ones act as buttons on the snowman’s body. We glue the branches to the places of the hands. We roll the orange thick fabric into a cone - this will be a carrot nose - and glue it by the bottom to the upper disk. A snowman's hat or bucket can be cut out of black or gray cardboard, or it can be cut out from the remaining cotton pad and, painted black with gouache, glued to the applique.
The remains of cotton pads can be glued to the bottom of our future picture, these will be snowdrifts. Let's complete the craft with decoration: apply sparkles to the snow and the background; instead of sparkles, you can use beads or small beads.
Photos of crafts made from cotton pads
Read here: Crafts from pipes - instructions for designing and installing useful things from pipes (90 photos)