Craft from buttons “Tree”
To make this button craft no less beautiful than in the picture, we will need:
Tools:
- Pencil
- Scissors
Materials:
- Buttons of different sizes in green and brown shades
- Canvas, cardboard or board for the base of the picture
- Multi-colored paper or fabric (for creating birds)
- A sheet of white A4 paper
- Glue
Instructions for making crafts from buttons:
1. First we need to print out a tree template on a white sheet of paper.
Sample:
2. We cut out the tree template and transfer it to the base of our future painting.
3. We have a sketch of a tree. Now let's start creating a full-fledged picture. To do this, take green buttons and use glue to glue them along the contour of the sketch to the crown of the tree.
4. We take brown buttons and glue them along the contour of the tree trunk.
5. We cut out the bird templates and transfer them to colored paper or fabric.
6. We place the birds in the crown of the tree.
The picture made from buttons “Tree” is ready!
Instead of using a template, you can draw your own tree and decorate it with buttons and other accessories. Then you will have your own masterpiece!
From this video you will learn how to make a craft from buttons with your own hands in the form of a picture. This tree can be made with children.
And this is a real masterpiece of buttons. Draw your own picture and decorate it with buttons. Here's a video for inspiration!
Unusual crafts
Creating a panel of buttons can not only be a fun activity for children, but will also help improve concentration. Working with small parts will increase your perseverance and accuracy.
There are a lot of ideas for creating paintings. You can make a tree, a baby elephant, a car, a balloon, a flower, put an inscription with buttons - the number of options is unlimited. When performing their first work, the child will need the help of an adult to correctly apply the sketch to the base. And he will be happy to do the work of filling out the sketch on his own - he will select the colors and sizes of buttons. For the first work, it is advisable to choose a simple drawing. You can offer to make a tree. The work will require cardboard, glue and flat buttons. The drawing is applied to the base and filled in.
Related article: Knitted hat with a pompom for a girl: diagram with description and video
More complex panels can be made on fabric stretched over cardboard. The outline of the design is applied to the fabric, and only then the buttons are attached using glue. This picture looks more original and beautiful. Similarly, you can make a postcard as a gift. Draw a green Christmas tree and decorate it with button toys. You can also use buttons to make an inscription or put a name on the card.
DIY button craft “Ice cream”
This button panel can not only decorate your wall in the house or nursery, but also become an excellent gift for friends. Such button crafts can be made with your child, since the manufacturing process itself develops fine motor skills, perseverance, coordination and imagination.
So, in order for us to make a DIY button craft “Ice Cream”, we will need:
Tools:
- Pencil
- Scissors
- Paint brush
Materials:
- Raspberry colored buttons (various sizes)
- Light beige buttons (various sizes)
- Photo frame
- Matte acrylic paint
- A piece of burlap (size for a photo frame)
- White paper for template
- Glue gun or super glue
- Rhinestones (optional)
Step-by-step instructions for making crafts from buttons with your own hands:
1. Prepare your work area. Take a white sheet of paper and draw an ice cream cone on it. Cut it out with scissors.
2. Next we will work with the frame. Paint it white with matte acrylic paint.
3. Use scissors to cut a rectangle out of the burlap. The size of the rectangle should match the size of the frame.
Note:
The burlap will be stretched over the cardboard, and the resulting “canvas” will be inserted into the frame.
Therefore, we advise you to add allowances on all sides up to 5 cm before cutting out the burlap. 4. Apply glue to the paper ice cream template and attach it to the burlap diagonally.
5. Next we move on to gluing the buttons. Place beige buttons on the waffle cup template, and pink buttons on the ice cream template.
6. The finished version of the resulting panel can be additionally decorated with rhinestones and a cherry on top.
Your original button panel is ready!
No less original are panels made of paper and panels made of beans.
Panel with elephants
Let's try another master class for creativity with your child. Let's make a product with the image of an elephant. On a sheet of colored paper we draw one elephant or several, in our case there are two. We paint one green and the other purple. After the paint has dried, you can start filling the elephants with buttons. It is better to glue the large ones first, and then fill the remaining space with small ones. The eyes are best made from white and black buttons. Between them, draw a heart with a pencil and place small pink buttons along the contour.
Related article: How to make a beaded bauble with a name: we make simple products with photos and videos
A picture made from buttons is a fairly simple idea, but it allows you to get a chic result that will serve as an interior decoration for a long time.
Craft from buttons “Owl”
This DIY craft made from “Owl” buttons looks very beautiful in the interior of a children’s room. Thanks to the detailed master class and the provided owl template, this painting is very easy to make, so you can safely make it together with your children.
So, to make crafts from buttons with your own hands, you will need:
Tools and materials:
- Felt pen or pencil
- Tassels
- Glue gun (if you don't have one, you can use super glue)
- Buttons of different colors and sizes
- Paints of different colors
- Canvas or thick cardboard
- Frame (optional)
DIY button craft “Owl” is made according to the following instructions:
1. Decide what size your craft will be. The size may vary depending on the number of buttons you are willing to allocate for the craft. Take a canvas and draw a picture of an owl. You can take the template we provided.
Owl craft template from buttons:
Helpful tip:
If you don't have canvas, you can use a thick sheet of cardboard.
2. Paint the owl template with paints and let the drawing dry completely. Choose colors for the drawing to suit your taste. But they must match the colors of the buttons you prepared.
3. Carefully glue the buttons to the finished owl drawing, matching the colors. Correctly selected buttons to match the color of the pattern will help hide possible distances between the buttons, and such flaws will not be noticeable.
Note:
When working with a glue gun, follow safety precautions.
When finished, be sure to unplug it from the network. 4. If you wish, you can frame the finished picture from buttons.
That's all. Our "Owl" is ready! You can choose a different owl template and make your own crafts. As a result, you will get no less beautiful crafts from buttons:
Button Crafts: 11 Great Ideas
As a child, my favorite pastime when visiting my grandmother was looking at the buttons that were kept in a colorful box. How different they were: large and very large, small and very small, glossy, matte, pearlescent, made of various materials and varied shapes. Even then I liked to make jewelry and panels from this splendor. Nowadays there is a variety of crafts made from buttons on the Internet. I bring to your attention some of them, bright and unusual.
Content
- Photo frame made of buttons
- Volumetric bouquet - a gift for mom
- Applique postcards
- Pencil holder
- Button crafts for little ones
- Decorative Easter egg decorated with buttons
- Simple button brooches
- Beads and button bracelets
- New Year's balls made of buttons and pins
- Original Christmas wreath
- Button tree paintings
Photo frame made of buttons
A photo frame decorated with buttons will fit perfectly into the interior of a child's room. You can decorate an old wooden frame, or you can make a template from thick cardboard. You can choose a simple template that even a first-grader can do. But if parents provide help, more complex ideas can be used.
You can glue buttons to the workpiece using a glue gun or PVA glue. You can arrange buttons in different ways, combining them by color and size. Flight of fancy!
For example, like this.
Volume bouquet of buttons for mom
It would be great if a dad and his children made such a bouquet, especially since to make it you will need “male” tools and materials: wire, wire cutters and pliers.
Button bouquets are all the rage right now. They are made for brides, for birthdays, as decorations for hair and clothing. The accessories are very beautiful and easy to make.
Try making your own button bouquet.
Step one
Choose multi-colored buttons large, small, medium.
Step two
String buttons on soft wire one at a time, starting with the largest diameter. The size of the flower depends on the number of buttons, and the shape and color depend on your imagination.
Step three
When there are enough buttons for one flower, insert the end of the wire into the second hole of the buttons so that a loop is formed above the smallest one.
Step four
Pull the buttons tightly and, using pliers or your hands, twist the wire. Use wire cutters to trim the ends.
Step five
Make several flowers of different sizes and colors and form a bouquet. For example, this way.
Place the bouquet in a vase filled with buttons, pebbles or colored sand.
Applique postcards
A paper applique is a wonderful product in itself, but it will become even more interesting if you decorate it with buttons.
Try making options like this. It's amazing how a button transforms a craft. I am sure that the proposed applications will inspire you to create your own.
Pencil holder
A simple, practical idea for making a pencil holder. Follow the example of the heroine of the proposed video and become the owner of a stylish and useful piece of furniture.
Button crafts for little ones
Buttons are a suitable material for making crafts for even the youngest crafters. Adults need to prepare a simple applique template, safe glue and larger buttons. These are the cute crafts your craftsmen will make.
Decorative Easter egg decorated with buttons
This idea for making a symbolic craft is suitable for older children. At the initial stage, you will need the help of your parents.
To work you need:
- wooden, foam, plastic egg blank or chicken egg;
- candle or plaster;
- glue gun;
- colored small buttons.
If you don’t have eggs made of wood or polystyrene foam, we’ll make them from chicken eggs. To do this, make holes at the bottom and top of the egg and blow out the contents. Fill the empty shell with melted wax, let it cool - the workpiece is ready. Instead of wax, you can use plaster.
Now it's time for the kids to get involved. Select buttons of appropriate size and color and paste over the workpiece.
This is how beautiful it will be.
Simple button brooches
These are simple, but always delightful crafts for children. To make them you will need a glue gun, buttons of different colors and sizes, a special pin (sold at a hardware store) and an idea.
I suggest the following:
I am sure that children will more than once ask their parents to return to making cute brooches.
Beads and button bracelets
If 3-year-old children string buttons onto a strong thread, they will get beads or a bracelet. Perhaps not the most elegant decoration in the mother’s opinion, but the baby will be delighted.
This bead making technique is more difficult, but kids can handle it.
This type of beads is also needed in every home.
With older children you can make a more elegant decoration. The manufacturing technique is visible in the photo.
New Year's balls made of buttons and pins
This master class captivated me. A beautiful decoration is born before your eyes. The process is exciting.
To make crafts you need:
- foam ball or polyurethane foam;
- bead pins;
- buttons;
- ribbon.
Step one
Secure the ribbon in a loop on the ball with a pin.
Step two
button at a time to the ball with a pin. You can put buttons one on top of the other and combine them by color and size.
The end result will be something like this.
The foam ball can be replaced with plastic, and the pins with glue. The manufacturing process will not be so simple, but the result will be no worse.
Decorative Christmas wreath
Continuing the New Year theme, I propose to make a Christmas wreath. Essentially, it is an applique of buttons, beads and ribbons. Looks elegant.
To make an original Christmas wreath you will need:
- thick cardboard;
- flat buttons of different colors and sizes;
- PVA glue;
- ribbon;
- scissors;
- colored paper for the wreath background.
Step one
Cut out the base for the wreath in the form of a ring from cardboard. Cover with colored paper and let dry.
Step two
Lay out the button pattern on the template. Don’t glue it yet, take a closer look, maybe it’s worth adjusting.
Step three
Glue on the buttons, starting with the largest ones, then filling in the space with smaller ones.
Step Four
Several buttons can be glued in a second or third layer, at your discretion.
Once the buttons are in place, leave the wreath overnight until completely dry. This is important because wet cardboard tears easily. Step Five
Now it's time to make the loop. You can make it from ribbon, leather or fabric.
The craft is ready! All that remains is to find a suitable place for it in the house, and perhaps give it to friends or acquaintances.
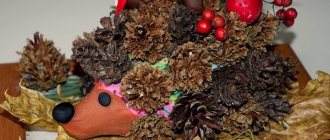
Button tree paintings
It is worth noting such crafts using buttons as panels and paintings depicting trees. They are colorful, varied, each with a special mood and hidden idea, but equally beautiful. Please be inspired and create!
Each button, especially if it was taken from an old family box, carries with it a story or a piece of memory about our family and friends. It would be great if the ideas of the proposed master classes inspire you to create beautiful things that will not only decorate your home, but will also be a reminder of goodness and goodness.
Photo frame made of buttons
Have you ever tried to make a photo frame with your own hands? It turns out that it is very easy to make. In this master class we will learn how to make a photo frame decorated with buttons. Let's quickly find out how to make such a craft from buttons with your own hands.
To create it we will need:
Tools and materials:
- Scissors
- Ruler
- Pencil
- Cardboard
- Buttons of various colors and diameters
- Glue
- Needle with thread
- Felt (optional)
Step-by-step instruction:
1. Cut two rectangles from cardboard equal to the size of the frame.
2. In one of the rectangles in the middle, draw a rectangle the size of the photo. For a photograph 13x18 cm, you can use the following dimensions:
3. Cut out a rectangle along the outlined contour.
4. To ensure stability, the photo frame will need a stand. To make it, cut out a shape corresponding to the one shown in the photo. In our case, its size is 7x17 cm.
5. At a distance of two centimeters from its top, draw a line and bend the cardboard along it.
6. Now cut out two pieces measuring 17x4 cm and one 26x4 cm. As a result, you should have six pieces.
7. Glue parts 2,3,4,5 as shown in the photo:
Note: Apply glue to the edges of the parts, not the entire surface, so that you can easily insert the photo later.
After doing this, your frame should look like the image on the left:
8. Now glue the front part of the frame to the side parts.
9. If necessary, cut off excess parts.
10. Now let's start gluing the stand. Apply glue to the bent upper part of the stand and glue it diagonally approximately in the middle of the back wall of the frame.
You now have a photo frame with a slot at the top for placing pictures.
You can stop at this stage and decorate the frame with buttons, or you can continue with us to add even more beauty to the frame.
Original decor can be made from felt and buttons. Well, let's get started!
11. Cut the felt to fit the frame and then finish the edges with a blanket stitch.
12. Select buttons that match the base and glue or sew them to the felt.
Now simply glue the felt to the front of the frame.
That's all!
What do you think of this version of crafts made from buttons? By adding a frame, you can make an equally original product with your own hands. Experiment and create!
Some more button frames for inspiration:
In this way you can decorate not only photo frames, but also frames for mirrors.
Pictures made from buttons - photo examples
Note!
- What can be made from wool (95 photos): felting for beginners, master class, felting techniques
- How to weave a “Dragon Scales” bracelet from rubber bands on a machine: photo examples, weaving patterns
How to make flowers from fabric: 95 photos of DIY step-by-step ideas
Please repost
0
DIY button shoes
They look original, don't they? Let's look at how to make these shoes from buttons with your own hands. To make this shoe decor, we will need:
Tools:
- Glue gun
Materials:
- Glue stick
- Buttons of various colors and diameters
- Shoes we want to decorate
Step-by-step instruction:
1. First, take the shoes and use a glue gun to begin gluing them with buttons.
All! Our button craft is ready!
In this way, you can decorate almost any shoe with your own hands and create unusual crafts from buttons.
You can also sew the buttons instead of gluing them. It turns out no less original!
And using your imagination, you can create simply stunning crafts from buttons with your own hands from shoes:
Interestingly, buttons can be used to decorate not only shoes, but also clothes, as well as bags:
DIY button bracelet
What a positive button bracelet, isn't it? It turns out that making these button crafts with your own hands is very easy! Even children can do this. Let's take a closer look at how to make such a bracelet from buttons. We will need:
Tools and materials:
- Multi-colored buttons of various diameters with four holes
- Decorative buttons (optional)
- Two beads
- Cord (preferably waxed)
- Scissors
- Super glue
Instructions for making crafts from buttons with your own hands:
1. Take the waxed cord, measure and cut two pieces.
Helpful tip: For ease of use, you can make them longer: we recommend choosing a length that can be wrapped around your wrist 3 times.
2. We are planning the design of our future button bracelet. To do this, select the appropriate buttons and put them in a row to see how the bracelet will look.
3. Take both cords together and string them into the loop of a decorative button. 4. Stretch the threads so that they cross inside the loop.
5. Take super glue and drop a little bit into the loop on both sides. 6. Stretch the laces for good fixation and press them against the button.
Helpful advice: To prevent the laces from getting tangled together, you can tie the second half of the bracelet while weaving the first half of the craft.
7. Take a button and thread the laces into two parallel holes. 8. Move the strung button closer to the previous one and string one lace diagonally. 9. We stretch the second cord crosswise also diagonally, but without pulling the thread to the end, we drip super glue onto the crosshairs and hastily pull the thread. 10. At this point you need to carefully fix the location of the crosshair. You can help yourself with pliers by pressing them firmly on the joint. But do not overdo it to avoid breaking the button. When you fasten buttons in this way, then they are well fixed in place and do not move. 11. We continue to do the same actions with subsequent buttons.
12 . When we have finished making the first part of the bracelet, then we untie the second part and continue to string the buttons in the same way. 13. Don’t forget to try the bracelet on your hand from time to time so as not to make it too long.
14. Leave the same length for the ties on both sides.
15. We take a bead, string it with both threads and make a knot where the bracelet should end.
16. If there is excess length, then cut it off.
17 .
Now we need to secure the bead at the end of the bracelet so that it can serve as a tie. To do this, tie a knot in front of the bead. 18 .
We do the same actions with the second bead. Helpful advice: Try not to make the bracelet short, as it will be difficult to put on, and it may happen that it will not fit at all