- September 23, 2019
- Holidays
- Mikhail Petrov
Many people want to give an unusual birthday gift to their beloved mother. After all, going to a store and buying something is very simple, but less original. Therefore, one of the best options would be to make a DIY card for your mother’s birthday. Moreover, even a child can handle making an original postcard. And interesting and non-standard manufacturing methods will amaze not only the recipient, but also the manufacturer himself, because making a postcard will be no less interesting than receiving it. So, ideas for birthday cards for mom.
Manufacturing steps
- Choose colors for making cake tiers. You should not take monochromatic and gloomy colors; it is better to use many different colorful and positive colors. Cut out the tiers of the cake, and be sure to think about how many tiers the sweet greeting on paper will have, because this is very important, because you shouldn’t make the cake too voluminous, but you also don’t need to make less than three tiers. Don’t forget to leave a border of paper about one centimeter long around the edges so that the cake can stick to the cardboard. You should leave the side and bend it in the direction in which the cake will be attached to the cardboard.
- Cut out the candle for the cake and the decoration on the cake itself. It is worth choosing a design that will be combined with the main decoration of the card. The candle can be cut out of red paper and glued yellow in the middle, this will enhance the feeling of fire and the candle will look more realistic. Such a homemade craft - a postcard for mom - will look festive and will increase the holiday atmosphere and lift everyone's spirits.
- Choose cardboard for the background. It is necessary to use pastel colors for the postcard. Blue, pink, and other not bright, but festive colors are perfect for this purpose.
- After these steps, you need to glue the tiers of the cake in the correct location. Design and decorate the card as you wish. You can write your wishes on the side.
Such homemade birthday cards for mom will not only be beautiful and interesting, but will also remain in memory as unusual and colorful greeting cards.
Unusual and voluminous
If you want to make a complex and unusual birthday card for your mother, there are many such options.
Which one is right for your mother personally is up to you to decide. Each of them is original, beautiful and easy to perform in its own way.
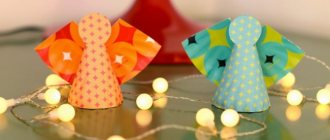
- Quite simple, but very effective in execution postcard, inside
. You will decorate the front side with decorative elements as your imagination tells you, and inside the card you need to glue two thin ribbons on which you will attach small elegant flags with letters. On your mom's birthday, write a congratulation, a good wish, or an original declaration of love to your dear mother. Such an amazing and cheerful card will lift your mother’s spirits and pleasantly surprise her. Even a child can make such a surprise!
where the surprise is hidden
A rather simple, but very original and beautiful option would be a postcard - an accordion . To do this we need a long rectangle made of cardboard. Our rectangle needs to be folded several times in different directions so that the output is an accordion. Then each section of the accordion must be designed at your own discretion. On one side you can make an applique, on the other you can draw a beautiful wish.
For your beloved mother's birthday, you can give an interesting, cute applique card of two owls or other birds. Such a card will bring mom a lot of positive emotions. And it’s very easy to do. To do this, you just need to cut out blanks from thick paper or different colors of cardboard, and then glue them in the correct sequence onto the cardboard base. To make the picture look three-dimensional, it is better to glue the applique on double-sided tape. We write warm words of wishes and give them to our beloved mother! It’s not a shame to give such a birthday card to your godmother!
Magnificent and original
If you really want to give your mother something more complex, give her something that will truly surprise and give positive emotions.
Take some of your precious time and create a 3D postcard, or a postcard from unusual materials. This is not at all difficult to achieve, but it will require a little more time, as well as patience and perseverance, attention and hard work. But such a masterpiece will be truly appreciated and will cause a flurry of positive emotions!
Mom will be pleasantly surprised to receive an “endless postcard” as a gift! This is an incredibly beautiful, original postcard that can delight anyone. Its main secret is its special design, and your imagination will tell you the decorative design. This “endless” card will be a kind of symbol of gratitude and endless love for mommy; the surprise will bring real delight!
Master class “How to make an endless postcard?” watch in our video:
Postcards with dresses
look quite unusual, feminine and incredibly stylish . It’s not at all difficult to create such magnificence, but it looks simply amazing - just what your beloved mom needs! Your mother will definitely like such an original card; she will treasure it carefully and remember her beloved child with tenderness. Use your imagination. You don’t have to do everything exactly as shown in the master class.
You can add your own twist, change colors or materials, add what you think are missing decorative elements, etc. but most importantly - kind, warm and sincere words for your beloved mother!
We bring to your attention a couple or three more options for making original cards for mom , using unusual materials and applications. The basis of such cards will be paper and cardboard, and the decor can be buttons, rhinestones, beads, ribbons, threads, in general, everything that you find in your box at home! A master class can be a starting point for you to develop your further imagination and add some zest. Give your mom an exclusive card and joy for her birthday!
Beautiful card for your beloved mother's birthday
In order to create such an unusually beautiful card you will need:
- double-sided cardboard coated white;
- paper with poems, maybe with notes, with an aging effect;
- - artificial leaves and flowers;
- — two round stickers with congratulatory inscriptions;
- - blue ribbon;
- - colored sequins;
- — a sticker or pre-printed inscription “Congratulations!”;
- - pencil, scissors, ruler, double-sided tape, glue.
Let's get to work.
We make the base of the card from white cardboard, maintaining this size or cutting it to the desired size. Then fold the sheet in half.- Next, you need to make the key element - the envelope. You can use the diagram according to which this envelope is made (the diagram was taken from the Internet), or you can find a more complex option. The envelope is made of paper with an aging effect. If you can’t find such paper, you can take a regular sheet of paper, print beautiful poems on it and age it with tea or coffee.
- We paste the finished envelope onto the postcard, on the front side, slightly diagonally, decorate it with several stickers or inscriptions; beautiful stamps can be a beautiful addition. To make everything look beautiful and neat, we use double-sided tape for gluing.
- We fill the envelope at our discretion with flowers and leaves of different colors, decorate with sequins. Sequins are secured with glue.
- We make a bow from the ribbon and secure it with tape under the envelope.
- At the bottom we paste the inscription “Congratulations!” a beautiful and unusual souvenir is ready! We sign the card and give it to our beloved mother.
In conclusion, I would like to note that in your postcard, made with your own hands for your beloved mother, the most important thing is not the paper, ribbons or rhinestones, and not even the wishes that you write on the spread of the card. The most important thing is your sincere desire to please your mother, to show care and attention!
Views: 17,468
Unusual DIY card for mom made from buttons
An interesting and very unusual solution would be to make a greeting card from buttons. This homemade birthday card for mom will look festive and unusual. It is best to use buttons of a similar structure and shape for this purpose, or, conversely, use bright buttons of completely different shapes and sizes; in any case, a postcard made with love for a loved one will be liked more than all the others. This original birthday card for mom, made in an unusual way, will please a loved one and will not leave her indifferent.
Scrapbooking card for mom. Mother's Day card in vintage style
You are probably already familiar with the concept of paper applique. This means it won’t be difficult to master scrapbooking! A postcard for mom made using this technique will become a precious gift that will only reveal its attractiveness over the years.
After all, this type of craftsmanship was invented in order to preserve the most pleasant family memories.
Scrapbooking card for mom. Mother's Day card in vintage style
To make a card using the scrapbooking technique for mom, you need to prepare several sheets of paper with a suitable print, lace, beads or adhesive rhinestones, as well as a ruler, tape, scissors and stationery glue.
Craft materials
First of all, we will fasten two fairly thick sheets of paper together with tape. They should open like a book - inside we will place wishes or kind words.
Fold or glue two sheets of paper
We will paste the top sheet onto a white paper base so that it peeks out from under it.
Glue the background sheet onto the paper backing
And we roll up the edges of this sheet slightly, trying to make it look natural.
Roll up the edge
We get the base of the card, the upper part of which has an aging effect.
Postcard base
We arm ourselves with a ruler and tear off a piece of paper with a different, darker design.
Fragment with a darker pattern
We make its edges uneven, carefully tearing it off along the perimeter.
Making the edges jagged
In the same way, we tear off another fragment, a larger one, and a piece of decorative mesh.
Three different fragments
We assemble our composition, consisting of several paper layers, between which a mesh is placed.
Assembling the composition
We decorate the product with lace.
Glue the lace napkin
And we bring it to perfection using decorative flowers and nylon ribbons.
Flowers and ribbons
To make the card more elegant, we tie two types of ribbons - we use the white one as the base, and tie a soft pink one on top of it.
Ribbons
We complement the composition with a narrow satin ribbon, leaves, flowers and a monogram.
Decorating a postcard
We get a charming bouquet that looks especially impressive against the background of “aged” paper.
Bouquet on a background of aged paper
Now we need a three-dimensional inscription - “To Mommy”. You can carefully cut out this inscription from thick colored cardboard, polyethylene foam, or sculpt it from a hardening modeling mass. We paste this inscription next to the bouquet.
Glue the inscription
And our gift is ready!
Mother's Day card scrapbooking
You can make such scrapbooking for Mother's Day and any other holiday to congratulate your closest, beloved and dearest person.
See how to make a chic bouquet for your mother in our master class “Roses from corrugated paper”
Corrugated paper rose
Sequencing
- Choose buttons that will look beautiful in combination with each other and in combination with the background.
- Choose colored cardboard for the background, here the child’s imagination can develop, you can use a color that you like.
- Glue the buttons with hot glue or sew them with thread. Now the main thing is to use threads that will match the background and buttons.
- Add strings to the buttons, do it all in the style of balloons. Now you can choose to write a congratulation.
Anyone can make such simple cards for mom with their own hands. The pictures will delight not only mother, but also everyone who came to the holiday.
Sequence of actions
- Choose a background for the postcard so that it is not bright and does not catch the eye. The ideal option would be to make a birthday card for your mother with your own hands with a blue, pink or lilac background.
- Cut out balloons from colored paper in different colors. You should cut it carefully so that the balls look like balls and not squares.
- Next, take strings, again in cheerful and cheerful colors, attach these strings along the edges of the postcard spread, and also glue them to each paper ball.
- Cut out flags of the same or different colors, write “Happy Birthday!” on the flags so that an inscription can be created from many elements.
- So how to make a birthday card for mom from all this variety? After all, such a number of components can confuse the manufacturer. A hand-made card for your mother’s birthday will turn out if you put the flags on strings on the sides of the spread; you must check that the inscription from the flags is in the right order.
- Glue the balls onto the cardboard.
The postcard is ready! Such a voluminous miracle will please any holiday lover. Be sure to write a congratulation, put a date and indicate the person who made this creation.
Card-pendant for mom “Butterflies”
This delicate card can be of any shade. It is especially important to choose your mother’s favorite color.
To create a postcard you will need:
- a sheet of thick white paper for the base;
- scrap paper for decoration;
- 2 strips of lace;
- butterfly and flower preparations;
- durable cord;
- matching beads and other accessories as desired;
- ready-made chipboard for inscription.
- First of all, a blank for the future postcard is cut out of white paper and folded in half. Its cover will be decorated with an equal-sized piece of scrap paper with a discreet pattern. If desired, you can blur it slightly or add other interesting effects.
- After the scrap paper is glued on top of the cover, using a hole punch you will be able to create a hole in the upper left corner of the future product. This will allow the birthday girl to beautifully hang it in a visible place in the future. A cord is inserted into the resulting hole. It is best to secure it with a metal eyelet.
- Now you can start decorating the card. First, secure the lace in the chosen place. Flower blanks are attached on top of it with glue or double-sided tape. And the butterflies are glued to another part of the postcard.
- All that remains is to place the beads and other selected accessories on the product in a random order, and, in addition, securely fasten the chipboard for the inscription. Let the words be placed on it: “to my beloved mother” or any others chosen by the donor.
Next, you can give the birthday girl a ready-made card along with warm wishes.
Video of creating DIY birthday cards for mom
Postcard with a secret
Birthday card! DIY crafts.
Cool postcard - DIY envelope
“Gift for Mom” / DIY
Postcard with pompoms
An interesting and original way to make a postcard is the method with pompoms. To do this, you need to have, in addition to all of the above, pompons, which can be made manually from wool threads, or you can take ready-made ones. Such a postcard will not only look beautiful, attractive and cute in appearance, but will also be very tactilely pleasant for everyone. You can take such a postcard, touch it, if your mood is in decline, and it will immediately begin to rise.
Sequence of creating a postcard
- Select pom-poms so that they are similar in color and have similar tones.
- Next, you need to glue the pompoms onto the paper so that they form an “ice cream”; you need to glue them closer to the top of the card.
- Cut out the horn itself from paper, it can be of any color, the tone of the horn will not affect the beauty of the postcard.
- Glue the cone under the pompoms to create ice cream. It should look solid, with no gaps between the ice cream and the cone.
- We decorate the postcard with inscriptions, drawings and wishes. Without such things, the card will remain unfinished, so you should pay special attention to this.
The main thing is to put your soul into making or choosing a gift, then whatever the gift is, the recipient will like it, and the sender will not be left without well-deserved gratitude.
I would like to note that if you want to surprise your mother even more and make her birthday unforgettable, then you should not limit yourself to postcards alone. You need to use your imagination, think about what else can be made from the materials you have at home. You can, for example, make congratulatory flags, a firecracker or some other similar holiday attributes, and don’t forget about delicious dishes to make your birthday a great success.
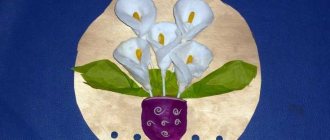
Card in the shape of flowers made of paper
An extraordinary approach to making such a postcard will definitely be appreciated. After all, women have always loved flowers, and if you make a card in the shape of flowers, it will be a magnificent sight; such a gift will never go unnoticed. There is no need to rush when making such a postcard, because the more carefully the work is done, the more interest it will arouse among those present. And thanks to its simple structure, this work is suitable even for the youngest children.
Applique technique
Applique is cutting out and gluing various figures onto a base.
Even kids can make a postcard using the appliqué technique. You can cut out the necessary elements using a template. First, create a composition on the table, and then glue the parts to the background one by one.
adalin.mospsy.ru
adalin.mospsy.ru
A simple, but no less interesting method is tear-off appliqué. Pieces of colored paper are torn from a large bush and create an image with ragged edges. Interesting works come from magazine pages.
www.babyblog.ru
A more complicated option is a volumetric applique. The postcard will have a 3D effect.
adalin.mospsy.ru
ja-rastu.ru
First you need
- Cut out three circles from paper. It is necessary to cut as carefully as possible. The colors for the circles should be pastel tones, but not too pale, otherwise the work will not be successful.
- Now we need to cut out three more circles, but smaller ones - this way we will make the inside of the flower. You need to choose the distance so that the flower is of the desired proportion and nothing catches your eye.
- Cut out three more circles of the smallest size; they will be the centers of our flower. These circles must be selected based on the size of the flowers. You can make all three flowers of different sizes - from small to large.
- Next, you should choose a background for the vase of flowers. Again, you should not use a bright background; it is better to have a pastel color.
- Now you need to cut out the stems for the flowers; it is better to take strips 15 centimeters long and one and a half centimeters wide. It is necessary to take, of course, green color, fold these legs in half in width.
- Glue the flower circles on top of each other, from large to small. Then glue the stems of the flowers to the flowers themselves. Again, it is necessary to do the work efficiently and carefully so that the stems of the flowers do not peel off from the flowers themselves.
- Now you need to take the flowers and glue them to the paper in the form of a bouquet. You don’t need to glue them too widely, you shouldn’t leave them unglued, because then the young author’s creation can crumble right in front of the guests.
- After all this, you need to cut out a vase from colored paper; you can choose the color yourself. Once the vase is cut out, you can glue it on.
Such a card will cheer up your mother, the feeling of the holiday will be greatly enhanced, flowers will decorate any celebration and will never go unnoticed.
If you want to repeat any of the above, then you shouldn’t be afraid that you won’t like the gift, because if the gift is made with soul, then your mother will definitely appreciate it. You should never neglect homemade gifts, because purchased ones, no matter how good and expensive they are, will never replace such gifts.
Romantic card with butterflies
To work you need:
- 2 sheets of thick white paper;
- paints;
- brush;
- special hole punch with a butterfly-shaped hole;
- hot glue;
- simple pencil.
On one sheet of paper, draw a bright abstraction using paints of different colors. Fold the second piece of paper in half and paint the front side with a soft blue color. After the paint has dried, draw a tree branch on a blue background. To do this job you will need a thin brush. If you are worried that the branch will not turn out beautiful right away, first draw it with a simple pencil and then paint it. Now it's time to create butterflies! To do this you will need a special hole punch. Its holes are not round, but butterfly-shaped. You can also cut out butterflies along a pre-drawn outline. When the required number of figures is ready, use hot glue to glue them to a tree branch, creating an arbitrary composition. All is ready!
Please your mother with a nice gift! After all, if you make a card for her with your own hands, you will pay attention to her, and she will definitely be happy about it!
No special skills are required to create the cards described above. They are quite simple to make, and the whole process will take you no more than an hour! And in conclusion, a short video that shows how you can make a birthday card with your own hands: https://www.youtube.com/watch?v=xhHg3zaR3u8
Execution order
- Cut out four hearts from paper. You need to cut it out carefully so that all the hearts match each other.
- Glue two of them onto cardboard in the order you like.
- Glue the remaining two hearts onto the first two so that only the middle is glued.
- Design the card the way you like. Straighten the hearts so that the hearts become voluminous.
- Write congratulations and wishes for the coming year.
Mom will definitely see love if she receives such a card. We must make our mothers happy and wish them a long life, family warmth and comfort. After all, the most difficult fate is that of mothers, because they see the child’s life from the very beginning and experience it with him, all the downs, ups, joys, whims - all this affects the appearance and health of mothers! We must value and respect the work of mothers and give fewer reasons for offense and quarrels.
DIY postcard for March 8th for mom: step-by-step master class
Mom is the closest and dearest person who will always understand and support in any situation. Let's make our mothers happy and give them positive emotions. We suggest making a gentle, beautiful and very simple card for mommy on March 8th .
Postcard materials
- Cardboard;
- colored paper;
- satin ribbon;
- scissors;
- glue.
Step-by-step instructions for making a postcard
1. Fold a sheet of cardboard in half - this will be the basis of the future postcard.
2. Let's start creating paper tulips. We take sheets of different colors and cut out small rectangles. Fold in half and cut out tulips of various shapes.
3. Cut out the stems from a green leaf.
4. Draw and cut out the leaves.
5. Arrange the details in the form of a bouquet on the front of the card.
6. Cut out small circles from white or pink colored paper.
7. Glue all the elements of the bouquet.
8. Glue a satin bow and the inscription: “Happy March 8th.”
Watch the video for a few more options for holiday cards.
The dress on the postcard is a symbol of femininity, tenderness and beauty. Make decor in the form of a dress using the origami technique.
Gorgeous tulips will look bright on a postcard.