It is very important for kids to create and experiment. You constantly need to select different materials, textures, sizes and colors for them. This is how fine motor skills, imagination, perseverance and attentiveness develop. We want to make it easier for you, so we've put together 10 beautiful and easy vegetable craft ideas for kindergarten!
How to make a turtle from squash?
Recommendations for making a turtle from squash:
- To do this, take self-adhesive , using black and yellow colors, thereby repeating the colors of the turtle so that it comes out like a real one. We cut out geometric shapes from it (diamonds, rectangles), making the black ones wider.
From paper
- Now we carefully glue the black figures onto the convex surface of the squash, and then the yellow figures on top of them so that the first ones look like a black frame for the yellow element.
Paste
- We use black plasticine to equip the turtle with its head, tail and legs, and white plasticine to decorate the eyes.
We create
- We connect the plasticine parts with the body, getting a real Tortilla.
- The turtle is ready, but it lacks an interior . Let's add a water lily , cutting it out of green cardboard or paper, and placing a golden key on it. We cut it out of thick paper and wrap it in gold self-adhesive tape.
Entourage
- All that remains is to place the squash turtle on this green island. That's all, now you have a turtle in your house!
Ready
Cute carrot giraffe
You can make a beautiful giraffe out of carrots. This craft is very easy to do, so it can be done with a child of 3, 4, 5, 6 years old. To make it easier for you to understand how to make a giraffe, we want to show you a detailed description with step-by-step instructions. You can also watch the video master class.
You will need:
- Carrot
- Toothpicks
- Felt pen or paint (for spots)
- 2 matches
- Knife
Progress:
- We make preparations from carrots. We cut off the thick part for the body; if the carrot is too large, you can cut off the excess.
- From the same carrots we cut out the legs, neck, ears and head of the giraffe.
- Now we begin assembling our giraffe. Take the body and attach the legs to it using toothpicks.
- In a similar way we attach the neck and head.
- To attach the ears we need to shorten the toothpick.
- We cut out the mouth with a knife.
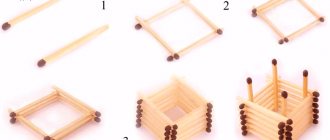
- We make the horns from matches, to do this you need to break it in half. We sharpen the piece with sulfur using a knife from the reverse side. We do this for both horns.
- Using a felt-tip pen or paint, apply spots and draw eyes. Our beautiful giraffe is ready.
Video giraffe made from carrots
cartoon bugs
Light and cute cartoon bugs, reminiscent of little people, are created from ordinary apples; this type of craft will be easy to make with children.
Required materials and tools:
- Large apples;
- A few apple seeds;
- Toothpicks;
- Knife.
We take two apples, one of them should be larger than the second, and place them one on top of the other. A small apple on top of a big apple. We fix them with a toothpick. These fastened apples will be the body of the future little man.
Then take an apple and cut four pieces from it. We use two of the parts as legs and fix them at the bottom of the body. The remaining parts will serve as handles; they need to be fixed on the sides. Now take a small apple and cut it in half. This will be a hat for a man.
Apple seeds will be needed to create the eyes and nose. We cut out the mouth using a knife on the apple itself. Or you can cut a piece from an apple and secure it on your face with toothpicks. You can also make the bug in a horizontal position.
Related article: Openwork patterns with knitting needles: diagrams and descriptions of simple patterns for original blouses with photos and videos
Vegetable fantasies
Contained in sections:
- Crafts made from natural materials
- DIY autumn crafts for the garden and school
- Vegetables. Everything on a vegetable theme for children
Showing publications 1-10 of 411. All sections | Crafts from vegetables and fruits
New
Photo
The best
Construction from waste material (eggplant) “Vegetable garden on the window”
Recently, the use of household waste has become more popular, especially for plastic containers. I thought about why not make a vegetable garden on the window, using eggplants instead of store-bought containers for seedlings? From plastic bottles you can make...
Photo report on the competition “Gifts of Autumn - Crafts from Vegetables”
The children from the “Podsolnushki” preparatory group took part in a vegetable crafts . The work turned out wonderful. Alice the Pussy made from potatoes and carrots and the Baby Penguin made from zucchini were awarded diplomas. crafts at home with their parents, and the Seniors...
Chipmunk from bow
Such a wonderful chipmunk made from red onions with white stripes and a fluffy tail made of onion feathers, as in the photo below, can be made independently without much difficulty, let's take a closer look at the method of creating it.
First, take two red onions of the required size and shape. Freshly picked onions are best; they will be the same color and more elastic. Then we make white stripes on them; to do this, we cut the top skin of the bulbs and carefully remove it like shavings. Thus, a white stripe is obtained in this place.
Now it's time to shape the body. To do this, take a skewer or toothpick. You need to stick it into the body of the onion, this will make the chipmunk’s neck, we put another onion on it - this is the head of the animal.
It's time to make a ponytail. We take the feathers of green onions, bend them, creating a shape for the tail, at the bottom of the onion you need to tighten it with a thread or elastic band. Then you need to boil the sugar syrup, calculating half a teaspoon of water per three tablespoons of sugar. When the sugar dissolves and cooks a little, you will get a sweet glue, you need to coat the onion feathers with it, then they will stick together and become a whole tail, then you need to dry it. Now you need to pierce the bottom and middle of the tail with skewers and attach it to the back of the chipmunk’s body.
All that remains is to make the paws. To do this, you need to make cuts on the front of the bulb. In order to detach the legs from the body, you can put something under them.
Now we take a new onion and cut off small slices from it, make small cuts in the head and stick the slices into them, so we get ears. We will make the eyes from olives or raisins. And we create the mustache again by making cuts on the bulbs.
Related article: DIY shell painting: master class with photos