In kindergarten, children are often assigned to do crafts at home using natural materials. Sometimes even parents find it difficult to think of what to create. A DIY pumpkin carriage craft, made using a master class and step-by-step instructions, will surprise any teacher.
Pumpkin is a symbol of fertility, which is why it is the queen of the autumn Harvest holiday.
What tools and materials will be needed
To make a craft, you need to prepare the following tools and materials:
- pumpkin for the carriage;
- cutting knife;
- spoon for removing seeds;
- squash or small zucchini – 4 pcs. for wheels;
- sheet for installing crafts made of plywood, chipboard, OSB or furniture board;
- acrylic paints;
- rhinestones, ribbons for decoration;
- tulle for curtains;
- doll;
- horse;
- wire for fastening wheels;
- glue gun and rods for it.
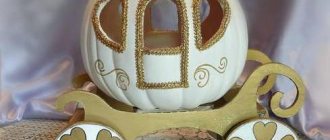
The pumpkin is selected from decorative varieties; it is better if it immediately looks like a round-shaped carriage
Which pumpkin is better to choose?
To make a pumpkin carriage craft for kindergarten not only neat and beautiful, but also original, it is important to choose and prepare the material correctly.
Selection tips:
- select a healthy pumpkin without cracks or scratches;
- fruit weight from 300 g to 1000 g;
- it is desirable that there is a stalk 5-10 cm long;
- if you collect a pumpkin in your own plot, choose a mature one that has not been lying on the ground.
How to prepare a pumpkin for making a carriage craft
In order for crafts made from pumpkin carriage vegetables to last longer, the fruits are dried naturally. To do this, they are hung in a well-ventilated, dry area. The pumpkin is dry if the seeds inside ring when you shake it.
However, this method is not suitable for crafts for kindergarten, since the assignment is usually given out a week before the due date. This time is not enough to dry the fruits. Therefore, pumpkin is prepared differently:
- the fruit is degreased; to do this, it is washed with soap and under running water;
- leave for 5-10 minutes to dry, mark cutting lines with a marker;
- Use a sharp knife to cut off the top or bottom; it is advisable to do this at an angle;
- Use a tablespoon to scoop out the pulp from the core, leaving 1-1.5 cm of peel.
To prevent the surface from darkening, the inside of the pumpkin is coated with lemon juice.
In this state, the fruit is left to dry. To make the moisture leave faster, crumpled newspaper is placed inside, it will absorb the juice.
Attention! To make sure that there is no pulp left inside the pumpkin, sand the surface from the inside using sandpaper. The outside is coated with alcohol to degrease the surface.
How to make a carriage for Cinderella from a pumpkin with your own hands
After drying the fruit, they begin to work. A rough sketch of the future work is drawn onto a sheet of paper.
Instructions for creating a pumpkin carriage craft for kindergarten step by step:
- Use a marker to mark the lines for the cut. Using a sharp knife, make cuts along the contour at an angle. Decorate the window and doors.
To ensure better adhesion, the surface of the pumpkin is coated with alcohol. - The peel is degreased, a layer of primer is applied and painted with acrylic paints. You can also add the desired color using aerosol dyes. Leave to dry.
Doors and windows are outlined - After the paints have completely dried (it’s better to leave it overnight), begin attaching the wheels. They are made of wire and wrapped with tape. Make a hole in the pumpkin to attach the wheels.
The middles of the wheels are attached to a wire 3 mm thick - The carriage is painted with paints, ribbons and rhinestones are glued on. A crown made of paper is attached to the handle. Windows and doors are decorated with fabric. They place a doll inside the carriage.
Using wire or canapé skewers, connect the horse to the carriage
What and how to make wheels for a pumpkin carriage
To make the carriage look more realistic, durable wheels are made. For work you can use the following materials:
- lids from bottles or cans, they are painted in the required color, knitting needles are drawn on them;
To ensure better paint adherence, the lid is sanded with sandpaper and coated with 1-2 layers of primer. - small unripe pumpkins or squash;
The fruits are washed with liquid soap and coated with alcohol, then primer and acrylic paints are applied - Circles are cut out of cardboard, knitting needles are made from pieces of wire or thread.
The frame is wrapped with thread or twine to hide the joints and give the wheels an aesthetic appearance.
The front wheels of a carriage are always smaller than the rear wheels. Therefore, two pairs of different diameters are prepared. Work order:
- A ring with a diameter of 5 cm and 3 cm is made from wire. Knitting needles are made from segments of 7 cm and 5 cm. A 0.5 cm plasticine tablet is placed in the center. Wire is alternately laid on top of it with a distance of 1.5-2 cm along the contour of the circle. At the ends it is passed through a ring and twisted to strengthen it.
- PVA glue is poured into a small container and diluted with water 1:1. Strips up to 1 cm wide are made from newspaper or waste paper. Moisten the workpiece in the adhesive solution and begin to wrap the wire frame.
After drying, coat with primer and paint
Master class on making a cardboard carriage with your own hands
To work you will need:
- thick cardboard;
- wooden blocks;
- lace;
- skewers;
- ice cream sticks;
- wide wire, two-core and single-core;
- white acrylic paint;
- screwdriver and screws;
- stationery knife;
- hot glue.
Manufacturing instructions.
First, we make a diagram of the cabin, transfer it to a thick sheet of cardboard. Using a stationery knife, cut out the blank. To connect the carriage parts, you need to cut strips 14 centimeters long and glue them with hot glue. Using skewers, wire, and wooden blocks we make wheels with a diameter of 10 and 14 centimeters. Using screws, fasten the axles to a wide wire.
We connect the two axles of the carriage with the cabin using screws. We cut out two parts for the doors and decorate them with ice cream sticks. We make parts for the chest, which will be located behind the carriage. We glue them together with hot glue and decorate them with sticks. We glue the finished chest to the carriage.
We prepare a rectangular part that will be the bottom of the carriage and glue it. To give the bottom of the carriage neatness, we cover the ends of the wire with sticks. To give relief, we decorate the carriage body with napkins. We make a seat for the coachman from thin wire and cardboard. We decorate windows, doors and seats with decorative cord or ribbon. We make benches inside the carriage and cover the cardboard with fabric. We sew pads and place them on benches. We cover the wheels with gold braid. Let's lay out the rug. We decorate the carriage with lace.
We make a roof out of cardboard, cover it with acrylic paint and decorate it.
Such a spectacular carriage can be used to decorate a wedding table.
How to carve an autumn craft, a carriage from a pumpkin with mice
For the harvest festival, crafts from vegetables are prepared; for originality, you can make a version with mice.
DIY pumpkin carriage master class:
- The pumpkin is washed, the top is cut off and the inside is cleaned. Markers are used to mark windows and doors. Use a sharp long knife to cut holes. The peel is washed with soap, covered with alcohol, primed and painted. The wheels are made from beet slices, the middle is placed on the back, and the edges on the front. Mice and coachmen are made from acorns. Muzzles made of plasticine.
Using half a toothpick, attach the wheels to the carriage. - Mice can be made from long turnip varieties. Uneven shaped cucumbers are suitable. The turnip is a ready-made mouse, the top is the muzzle, and the bottom is the finished tail. Wheels made of wire bent into several turns are attached to the pumpkin carriage. The tails of the mice are attached to the carriage with threads or thin wire.
Mouse ears are made from almond or hazelnut shells - Another option for making mice is from cones and nuts. For the body, several long bases are selected. The top is cut off. Using glue or plasticine, attach the nut to the cut site. Eyes are drawn with a marker.
The cut top of the cone is broken into husks, and paws and ears are made from the segments
How to decorate a pumpkin carriage
The decor of the craft is made from acrylic paints, rhinestones, ribbons and fabric. Before painting, the surface is degreased with alcohol and coated with a primer. Acrylic paint is applied on top.
Install the craft on a sheet of plywood, fix it for reliability
Doors and windows are decorated with transparent fabric made of organza, tulle or tulle. The pumpkin tail is cut off or covered with a decorative crown.
Attention! To fix the paints, the surface is coated with acrylic varnish. It is applied with blunt movements using a sponge or an aerosol composition is used.
The carriage is painted with acrylic paints or an outline, making curls that look like metal
The fabric is attached to the pumpkin with push pins or sewing needles for marking with decorative balls. To make the craft look original, it is decorated with wooden elements for furniture and boxes. The elements are painted with gold paints.
To make the carriage look realistic, a horse is attached to it and a princess doll is seated
How to make a winter carriage
A do-it-yourself winter carriage from a decorative pumpkin is made from dried fruits. The surface is thoroughly sanded inside and out with sandpaper. Apply two coats of primer to prevent the bright orange color from showing through.
The ponytails are wrapped with masking tape if you want to maintain a natural appearance.
Paint is applied from an aerosol can. Patterns are made using an acrylic outline, a chipboard and a scrapbooking cutter. Painted with paints in frosty shades with metallic effects.
White and silver shades will give the product a frosty frost effect.
Glue is applied over acrylic paints according to the pattern. While it is not dry, sprinkle glitter from metallized paper. To prevent them from crumbling, the craft is covered with 2-3 layers of acrylic varnish.
The composition is decorated with candles and garland
Assembling the carriage body for Barbie
- To prevent your own carriage from turning out lopsided, first calculate the middle of the bottom part and the center point of the lower curved wall. They are connected.
- Using tape, glue the edges of the bottom part and the curved line of the side at a right angle.
- Attach the second side wall in the same way.
- The remaining free ends of the bottom are twisted.
This is how the dolls, ready for a walk, fit comfortably inside the carriage.
Other pumpkin carriage ideas
It’s not difficult to make a fairytale carriage. The works turn out to be original if you use ready-made decorative decorations.
A tiara crown will decorate the pumpkin tail
Rhinestones, ribbons and chipboards give the product an elegant appearance. Decoratively curved wire used as carriage wheels will create charm.
The frame for the brooch is installed in the place of the windows, and the photo frame is installed in the place of the door.
Cardboard carriage for Barbie
This toy will serve not only to create an external environment in the corner where Barbie “lives”. On a landau with an open top, the doll will be able to make real trips. And even invite your friends to ride. And Barbie’s owner’s friends will be jealous when they see what kind of carriage she now has!
You can make it with your own hands from an old cardboard box. Not only an adult, but also a teenager familiar with design can cope with this work. And since the carriage is made from cardboard, you will also have to cut out the parts with your own hands, using a shoe or stationery knife, scalpel or other sharp tool. Well, design talents are, of course, required when working on the appearance of the crew.