It can be performed using any of the techniques presented below, each of which involves the use of a specific set of tools, consumables and accessories to decorate your creation. Here you will definitely find a suitable craft for Cosmonautics Day, for kindergarten and school. In addition to making a rocket, you and your child can learn the poems for Cosmonautics Day, which we posted here earlier.
Paper and cardboard rocket for children with templates
Using a sample, you can make a beautiful model without extra effort and in a short time. To ensure that within a quarter of an hour there is a rocket on your table that can impress a schoolchild or preschooler, you need to follow the instructions exactly and prepare in advance:
- colored paper;
- PVA glue;
- black cardboard;
- pencil, ruler, scissors.
The instructions offered for children can be used in a labor lesson at school or in a creative activity in kindergarten. If you need to complete your homework on creating a model of a rocket, then the option presented below is also suitable for execution - the finished space composition will definitely be favorably assessed by the teacher.
Step-by-step production of an interstellar ship:
- Decide on the color of a sheet of colored paper for the base. It should be bright and attractive, such as purple.
- Twist a pipe from the prepared rectangle. Glue the edges.
- Start making the top. Using a jar, compass, or anything round, draw the appropriate shape on the yellow piece of paper. Cut out and then cut the resulting circle in half.
- Use red construction paper to cut out the strip. Connect it to a sleeve that acts as a base.
- Twist a cone from the finished semicircle. Glue the outlines together to secure the shape.
- Glue the cone to the red rim.
- Create a porthole to view the Earth from space. Make a circle of a different shade or attach your photograph to the yellow tube.
- Decorate the bottom of the ship. Using blue paper, cut out 3 semicircles.
- Roll each piece into a cone, sealing the edges.
- Attach three blanks to the pipe along the diameter.
- Prepare the takeoff/landing area. Glue a circle (yellow or white to choose from) onto the black square.
Having made a launch pad, it can be used for successful flights and landings of both the manufactured rocket and similar models.
Applique paper rocket with diagrams and templates for children (need to be printed, cut and glued)
Another easy paper rocket craft can be made for kindergarten or school. It’s not difficult to make; even a preschooler can do it. Below I will add templates and diagrams of the rocket that you will need to print, cut and glue.
To make a rocket we will need:
- colored paper
- scissors
- pencil
- PVA glue
Step-by-step instruction:
- To begin, cut out a strip from blue paper
- We sharpen one end of the resulting rectangle, as can be seen in the photo below - this will be the rocket body
- From a red sheet we cut out the wings and nose of the future rocket.
- Glue the red parts (nose and wings) to the rocket body
- We cut out small circles from red sheets - these are portholes and glue them to the rocket
- The final step is to cut out the flame for the rocket from three colors - yellow, orange and red
- We glue the resulting flame parts together, placing one on top of the other.
- All that remains is to glue the flame to the rocket body. That's all, our paper rocket craft is ready, you can launch it into space.
Below, as promised, I post diagrams and templates for making a rocket from paper and cardboard:
How to make a bright rocket out of cardboard and paper with your own hands - diagrams and models
If preschoolers are delighted and delighted by a small toy rocket, the size of a bottle, then older children will love the “full-length” spacecraft. Having your own intergalactic ship will allow younger schoolchildren to feel like real captains and show courage, bravery and bravery, as the main traits of a man’s character.
How to properly make a large model of a rocket out of paper and cardboard with your own hands for a child, see the next master class with diagrams, photos and videos.
Necessary materials for a DIY paper and cardboard rocket model
- carton boxes
- colored paper
- yoghurt cups
- disposable plates
- plastic covers and buttons
- letters and numbers on adhesive backing
- bobbins of thread
- flower pot
- foam circle and pieces of fabric
- letter stencils
- markers
- scissors
- pencil
- satin ribbons
- thick foil
- glue gun
A simple diagram of how to make a rocket model from cardboard and paper with your own hands
- Start creating a bright rocket with the help of the kids. Let children help you with their favorite toy tools. Use a large household appliance box as the base of the rocket. Ideally, from the refrigerator.
- Make the top of the rocket from a painted flower pot, disposable dishes and plastic spools of sewing thread. Decorate the details with pieces of satin ribbons and voluminous stars made of colored paper.
- Cut a round window in the front wall of the rocket. Wrap the foam circle with multi-colored satin ribbons and glue it to the panel in place of the porthole. Glue a few spools of thread a little higher and mark them with adhesive numbers. This will make it easier for the little pilot to count down the time before launch. Below the window, place another instrument panel to make the rocket more interesting.
- On the right side of the space rocket, equip the fuel tank lid with bright plastic buttons. Plastic bottle caps, thread spools, and old buttons from various devices will be useful for this.
- Don't forget about the front door. Draw a large oblong rectangle on the back wall of the rocket and cut three sides (bottom, top and right). The remaining left side will serve as a curtain. Decorate the captain's door with decorative elements.
- Draw two “legs” on thick cardboard, cut out the parts and cover them with foil. Fix the elements on the bottom of the right and left walls of the rocket. At this point the spacecraft is ready. For a clear picture of how to make a bright rocket out of cardboard and paper with your own hands, see the model diagram.
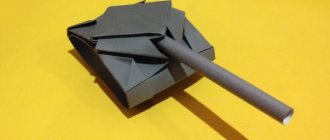
Step-by-step master class: paper rocket using origami technique
If you want to take the craft to a kindergarten, craft it with a child aged 3-4 years, then this is very easy to do with the help of lightweight double-sided cardboard. To make it interesting for your child, use colored material.
Perform all actions step by step:
- Cut out a square. Fold the workpiece in half and unfold. Bring the two opposite edges to the middle, where they touch, and then unfold the sheet - you should get three vertical folds. Now fold the workpiece so that a diagonal fold strip is formed and unfold the sheet.
- Fold the top two corners towards the middle.
- Two centimeters from the center of the top edge, fold the right side of the leaf towards the middle and turn the part back out.
- Repeat the above step on the left side of the piece and then flip the piece over.
To decorate origami, you can make an applique - glue a raging flame, observation windows, and even place a passenger in one of the windows.
How to make a rocket out of a toilet paper roll for kids
To make a craft, you will need to take three cardboard rolls left over from using toilet paper, colored and silver tape. The standard scheme for creating a rocket is as follows:
- The tubes are secured with colored adhesive tape.
- The uncovered surface is covered with silver tape - the body is ready.
- Cut out two triangles. This is how the wings of a spaceship are created from cardboard.
- Decorate the prepared elements with silver tape.
- The workpieces are cut to the middle along the long side of the triangle, located at 90° relative to the other side.
- Make two parallel cuts at one end of the silver pipe.
- Insert the wings into the body with a notch in the notch.
The final step is to glue the red fabric or paper strips inside the cone. They will simulate flames escaping from a rocket.
So another rocket made from scrap materials (toilet paper rolls) is ready. Below you can see another option for making a rocket out of cardboard.
Crafts for Cosmonautics Day: paper and cardboard rockets for kindergarten and school
Below I will publish some interesting ideas for crafts for Cosmonautics Day, which comes on April 12. All of the listed crafts can be made independently with your child for kindergarten and school. After this, I will continue to publish step-by-step master classes on how else you can make rockets with children.
SONY DSCPaper craft. Rocket.
To make this easy paper rocket model, you will need colored paper and colored tissue paper.
* The body and stabilizers are made of colored paper, and the parachute for its smooth descent is made of colored tissue paper.
* Prepare a sheet of paper measuring 170x250 mm and make a cone out of it as shown in the image.
* If you want to know how else you can make a paper cone, go to our article Paper Cone.
1.
Preparing the cone
— The paper will curl into a cone more easily if you stretch it between the table and the ruler.
- Spread the edge of the cone with glue and glue it together.
— Prepare a template for the base of the cone. It can be made from cardboard or thick paper. It is worth noting that the template is needed because it is used to trim the rocket body.
— Now you need to put the template on the finished cone, draw a line with a pencil along which you will need to cut with scissors to get rid of the excess.
2.
We are preparing stabilizers.
— Prepare 3 sheets of thick colored paper measuring 8x17 mm.
— Each sheet must be folded in half lengthwise and placed on each according to a template (N1 and N2) and traced with a simple pencil.
— You need to bend the edges of the stabilizers and connect them with glue.
— Our rocket has three pairs of stabilizers (large and small). They are there to give the rocket stability during flight.
- On the template, mark 3 points that are at equal distances from each other (this is like dividing a circle into 3 equal parts).
- Using a template and three marks, mark three points on the rear of the rocket and connect these points to the nose of the rocket.
- Using the marked lines, begin gluing the stabilizers.
3.
To make a parachute canopy, prepare tissue paper. Its size should be 280x280 mm.
Fold the paper several times as shown in the image and cut it. You have a dome.
4.
Prepare slings from threads. There should be a total of 8 slings of the same size.
— For the required size, calculate 1.5 times the diameter of the parachute canopy and add the length of the rocket body to the resulting value.
Popular articles Page for a children's book in pop-up style
— Now you need to glue the lines to the parachute canopy. Paper patches will help you. After this, fold the parachute canopy so that the lines along with the patches are collected one to the other.
5.
All slings need to be tied into a knot at a distance from the canopy of approximately 1.5 times the length of the canopy diameter and after that make another 2nd knot at the end of the slings.
— Place all the lines inside the rocket body—for convenience, you can use a wire hook.
— The 2nd bundle node must be secured to the nose of the rocket using a needle and thread.
— Stick the parachute into the rear of the rocket.
You can launch the rocket by hand (preferably at an angle of 60-70 degrees). As she begins to fall, the parachute will open and she will land smoothly.
How to make a craft rocket out of corrugated cardboard for February 23 and Cosmonautics Day
At thematic exhibitions dedicated to special occasions, models made of corrugated cardboard always attract attention and arouse interest. Together with your child you can make a three-dimensional rocket. The kid will certainly be happy to join in the process and will delight you with his diligence.
A rocket is made from cardboard as follows:
- Strips 15-20 mm wide are prepared (cut from corrugated cardboard).
- The rocket body is being made. Pipes of 10 strips are twisted. The blanks are fixed with glue.
- The finished rolls are shaped into a cone by pressing the middle part inward.
- A circle is rolled up from a pair of strips 4 cm wide. Its diameter should correspond to the diameter of the cone.
- Turbines are made from strips 15 mm wide. 5 strips are used to roll the roll. You need to make only 6 copies - white and orange in equal quantities. They are glued together.
- Cones are formed from three white blanks.
- The hull of a spacecraft is assembled by gluing parts together. A white stripe is used to mask the joints.
- The portholes are glued. Turbines, white and orange, glued together are also attached to the body.
Such a craft for Cosmonautics Day - April 12 or for Defender of the Fatherland Day can last for many years. You don’t have to worry at all that it will break or become deformed. Even if your baby gets enough of playing with a cardboard rocket, it will definitely take pride of place in your home interior - on a table or shelf.
Do-it-yourself large (volumetric) paper rocket for children
Such an unusual solution, how to make an entire rocket house at home, will definitely appeal to every child. Small models, of course, bring a lot of joy to kids, but participation in the implementation of a large-scale project causes real delight in children. In addition, then in a homemade building you can play and feel like a real astronaut going to the Moon, into interstellar space or a traveler striving for distant and mysterious planets.
So, how to make such a space house for children with your own hands?
To make a rocket, you will need to take cardboard (quite thick) and colored paper. The adult's task is to draw, cut out and glue the parts of the spaceship. Let the children decorate the house themselves - give them the opportunity to draw, glue stickers and use other prepared decor for decoration.
This is what the diagram looks like.
Another model made using similar technology.
And this is a master class in creating a three-dimensional homemade product. The plot describes a very interesting idea of creating a paper rocket. Just don’t forget that working with thick cardboard requires the participation of an adult, and children from 12 years old can make such a space house. Younger children are involved only as assistants to parents.
Missile guidance systems
Nowadays, almost all missiles have a guidance system. I think there is no need to explain that it is simply impossible to hit a target that is hundreds or thousands of kilometers away without an accurate guidance system.
There are a lot of guidance systems and their combinations. Only among the main ones can be noted the command guidance system, fly-by-wire guidance, ground-based guidance, geophysical guidance, beam guidance, satellite guidance, as well as some other systems and their combinations.
A missile with a guidance system under the wing of an aircraft.
A fly-by-wire guidance system has much in common with a radio-controlled system, but it is more resistant to interference, including that intentionally created by the enemy. In this type of control, commands are transmitted through a wire, which sends all the data necessary to hit the target to the missile. Transfer in this way is only possible until the launch.
Popular articles Gilomecon / forest poppy plant: photos, types, cultivation, planting and care
The ground reference guidance system consists of highly sensitive altimeters that allow you to track the position of the missile on the ground and its terrain. This system is used exclusively in cruise missiles due to their features, which we will talk about below.
The geophysical guidance system is based on a constant comparison of the angle of the rocket’s position relative to the horizon and stars with the reference values set into it before launch. The internal control system returns the rocket to course at the slightest deviation.
When aiming along a beam, a missile needs an auxiliary target designation source. As a rule, it is a ship or an airplane. An external radar detects the target and tracks it if it moves. The missile is guided by this signal and aims at it itself.
The name of the satellite guidance system speaks for itself. Targeting is carried out according to the coordinates of the global positioning system. Basically, such a system is widely used in heavy intercontinental missiles that are aimed at static ground targets.
In addition to the above examples, there are also laser, inertial, radio frequency guidance systems and others. Command control can also provide communication between the command post and the guidance system. This will allow you to change the target or completely cancel the strike after launch.
Thanks to such a wide range of guidance systems, modern missiles can not only blow up anything, anywhere, but also provide accuracy that is sometimes measured in tens of centimeters.
Rocket made of colored paper at home: applique
This option for creating a spaceship is quite feasible for children aged 5-7 years. The application and templates can be used by educators and primary school teachers, additional education teachers and creative parents. The craft for children offered here will be an excellent interior decoration, gift, themed poster or postcard for Cosmonautics Day. To make an applique from geometric shapes you will need the following materials and tools:
- white pencil;
- PVA glue;
- scissors;
- colored paper;
- black cardboard.
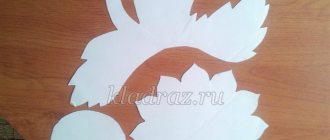
The application is done step by step. In order for your child to make a paper rocket, you need to control the entire process. The technology looks like this:
- Prepare the necessary materials in advance.
- Use templates to make applique.
- Cut out the elements of the spaceship, its tail and the starry sky according to the template.
- Mark the boundary of the lower part of the interstellar vessel with a white pencil.
- Using a pencil or scissors, wrap the edges of the triangles that will make up the tail of the ship.
- Glue the triangles in three layers.
- Consistently attach the rocket parts and create a starry sky
A child can make such an application either at home or at school during the lesson. He will definitely succeed and will become the real pride of his owner.
As you can see, there are many options for making crafts on the theme of space. You just have to decide on the appropriate one and give your child the opportunity to realize his creative potential. The finished copy - a rocket made of paper and cardboard with your own hands for children - will bring joy to the child, excite his imagination and encourage him to conquer new heights, because now he will have his own ship, which can send its owner to any corner of the galaxy.
A few more options for paper applique:
What fuel is used in a rocket?
When choosing the type of rocket fuel, most attention is paid to the features of using the rocket and what engine it is planned to equip it with. Roughly, we can say that all types of fuel are divided mainly according to the form of release, specific combustion temperature and efficiency. The main types of engines include solid fuel, liquid, combined and ramjet engines.
The simplest solid fuel is gunpowder, which is used to fuel fireworks. When burned, it does not release a very large amount of energy, but it is enough to launch a colorful charge to a height of several tens of meters. At the beginning of the article I talked about Chinese arrows of the 11th century. They are another example of solid propellant rockets.
In some ways, gunpowder can also be called the fuel of a solid rocket.
For combat missiles, solid fuel is produced using a different technology. This is usually aluminum powder. The main advantage of such missiles is the ease of their storage and the ability to work with them when they are fueled. In addition, such fuel is relatively inexpensive.
The disadvantage of solid fuel engines is the weak potential for deflection of the thrust vector. Therefore, additional small liquid hydrocarbon fuel engines are often used for control in such rockets. This hybrid combination makes it possible to more fully utilize the potential of each energy source.
The good thing about using combined systems is that it allows you to avoid the complex system of refueling a rocket immediately before launch and the need to pump out a large amount of fuel in case of cancellation.
Separately, it is worth noting not even a cryogenic engine (refueled with liquefied gases at a very low temperature) and not a nuclear one, which has been talked about a lot lately, but a ramjet engine. This system works by creating air pressure in the engine as the rocket moves at high speed. In the engine itself, fuel is injected into the combustion chamber and the mixture is ignited, creating a pressure greater than at the inlet. Such rockets are capable of flying at speeds that are several times the speed of sound, but to start the engine they need pressure, which is created at a speed just above one speed of sound. This is why launch aids must be used.
Popular articles Do-it-yourself topiary for beginners: basics of making