Nitography is a drawing technique for children where woolen threads are used to embody an artistic image. The design can be made in several ways: by soaking the threads with paint and sliding it over the paper, laying out the appliqué according to the pattern, and also using stamps. In kindergarten, classes on non-traditional drawing techniques are held in the middle and senior groups, that is, with children 4–6 years old.
The benefits of learning different drawing techniques
Drawing for children is the first creative activity. Artistic activities contribute to the formation of a versatile, harmonious personality. They train fine motor skills and prepare hands for writing, teach attention to detail and concentration.
There are many drawing techniques, but non-traditional ones are considered especially useful for children. Creating drawings with palms, soap bubbles, stamps, threads and other original methods in childhood is much easier and more fun than with a pencil or brush. Having mastered various techniques, the child begins to think more broadly and can more accurately depict the intended image on paper.
String-art technique
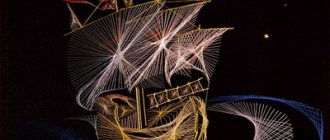
Literally translated – “threads of creativity.” The creation technology assumes the presence of only straight threads in the picture. Volume is achieved through the overlapping and interweaving of threads.
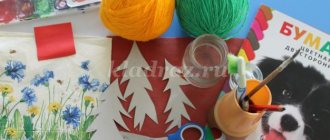
Necessary materials:
- thick cardboard, cork board or foam;
- small nails (no more than 2.5 cm long) or pins with beautiful heads;
- threads, you can choose one or several colors of different materials;
- scissors;
- hammer;
- felt-tip pen or pencil.
At first, it is recommended to choose simple drawings consisting of one object for work. This will make it easier to master the technique of creating panels. It is best to start with simple shapes: circle, polygon, heart, flower, tree. To give the painting a more voluminous look, you can use threads of different colors.
For variety, it is recommended to decorate the panel with removable decorative details, for example, a bird can be placed on a tree, toys can be hung on a Christmas tree, and fruits and flowers can be added to a plant.
The master class described below will help you create a beautiful picture yourself.
First you need to prepare the basis for doing the work. The background for the future drawing is selected, and then applied to cardboard or other dense material. For coloring, you can use paint or wood stain. Allow the base to dry thoroughly and only then apply a sketch of the picture.
Nails or pins are driven in along the contour of the image. The most important thing when creating an outline is to ensure that the nails are at the same distance from each other and at the same depth.
After this, you can begin the most interesting part - pulling the threads. Tension should be done from top to bottom. To create a geometric pattern, it is better to maintain a certain sequence in thread tension. In other cases, the more layers of threads lie on top of each other, the more impressive the panel will look.
Even a small child can create a picture from threads and nails. For example, an adult can create the outline of a Christmas tree, and a child can independently stretch the threads. To create Christmas tree decorations, you can cut out a template from thick cardboard and wrap it with multi-colored threads. Toys can be decorated with beads, ribbons or beads. You can attach such decorations to the Christmas tree using a glue gun.
Article on the topic: 88 chic stencils - vignettes, patterns, corners for decoration
A joint activity with a child will help develop abstract thinking and expand the child’s knowledge about modeling.
Description of the nitcography technique
Drawing with thread and paint is remarkable for its simplicity and unusualness. The resulting images are abstract. In them you can see the Firebird, a flower, sea waves, a whirlwind. Children use their imagination and thereby develop their creative imagination.
The following fairy tale-story describes the technique in an interesting and accessible way:
“Once upon a time there was a thread. She was completely alone. One fine day the thread decided to go for a walk. The weather was wonderful - the yellow sun was warm, the grass was green, and fluffy white clouds were frolicking in the blue sky. And she liked the picture around her so much that she wanted to transfer everything to a sheet of paper. But the trouble is, the thread did not have a friend - a pencil and a friend - a brush. Then she decided and plunged into the bright paint herself. A thread jumped onto the paper, and immediately the sun, grass and perky clouds appeared on it!”
There are different techniques for creating designs using threads. Let's look at each separately.
Drawing with threads
The “magic thread” drawing technique fully lives up to its name. With just one simple movement of the hand, a picture appears on the paper. Why isn't it magic?
The essence of the method is to use thread instead of a brush. It is saturated with paint, but the drawing is not displayed, but is obtained in a slightly different way:
- The woolen thread is dipped into a container of paint.
- When the thread gains color, it is placed between two sheets of paper. The pictures will be more interesting if you lay the rope in a zigzag.
- Then, lightly pressing the paper, the thread is pulled out. It leaves an intricate mark that can be added to or cut out and used as applique.
Examples of pictures drawn with threads and paints:
To obtain a multi-colored print, paint is poured into a container (flat and long, such as a soap dish) in strips of different colors. The thread is saturated with red, blue, yellow, and green at the same time.
Drawing with stamps
The use of threads in non-traditional drawing techniques is quite extensive. Another way to get an image is to dip a thread stamp into paint and attach it to a sheet of paper.
For the lesson you will need:
- base for the stamp - a wooden or foam block, a square of plasticine, thick cardboard;
- wool threads (thick yarn);
- PVA glue;
- brush and paints.
PVA glue is applied to the base according to the intended pattern (star, spiral, animal figurine). The thread is carefully laid out along the intended line. As soon as the stamp dries, the thread is saturated with paint.
You can do without glue by simply winding the ropes around the beam, or make prints immediately with a ball soaked in paint. To obtain an imprint, the seal is applied to a sheet of paper.
Illustrative examples:
Master class on creating a painting using the nitcography technique
This master class will tell you about creating a colorful painting using the nitcography method, which depicts a cat.
Using this tutorial as a basis, you will be able to select your own patterns and create your own original work, since such thread drawing is quite easy to master. This handicraft will especially captivate beginners and children, both at home and in kindergarten. Necessary materials for work:
- thick cardboard (you can also use a sheet of fiberboard to create a picture);
- scheme;
- threads of suitable shades (for children it is better to choose bright colors);
- glue;
- scissors;
- toothpick.
We begin the master class by transferring the diagram onto cardboard or a sheet of fiberboard. Pay special attention to the selection of thread colors. In the process of creating such a picture using the nitcography method, any materials can be used in the form of leftover yarn from knitting, colorful acrylic threads, as well as floss, which will need to be pre-folded several times. The main condition is their equal thickness.
Read
Brilliant rhinestone embroidery and diamond technology
Advice for beginners: do not use material that has a non-smooth structure in thread printing at the initial stages. Although threads with shaggy or curly components give an interesting effect in the end, they are quite labor-intensive to work with.
You can use construction adhesive used for gluing foam baseboards.
If you decide to involve children in this activity, read the instructions for the selected adhesive regarding room ventilation.
So, using glue, you need to smear a line on the sheet. This can be done using a toothpick or a thin stick. It is much more convenient to do this with these objects rather than with a brush. This makes it much more convenient to spread glue in hard-to-reach places among the glued threads. Next, on the uncured adhesive base, we begin to carefully glue the thread, step by step, gently pressing it with our fingers. Thus, it is gradually necessary to arrange the material according to the template. The tip of the thread is cut off at the moment when you reach the point of making a sharp, impossible reversal of the thread, or when you need to introduce the next shade.
We continue the lesson on learning the technique of nitcography. At the beginning of the process, the outline of a large template is glued, after which it is necessary to move on to filling the entire space in the middle of the product. Small elements, on the contrary, are initially filled in the inner part and then the outlines are formed.
Try to glue the threads close to one another, without creating unnecessary gaps. Only in this way will you be able to obtain a neat and high-quality product.
During the work process, a moment may arise when it is necessary to replace one color of the material with another. Thanks to a multilayer thick base in the form of cardboard or fiberboard, this will be quite easy to do.
In this master class on the nitcography technique, we will look at an example of changing one color to another using the example of a cat’s tongue. Take a paper knife and cut the desired contour of the surface where you decided to change the shade of the threads. This piece is torn off together with the paper layer. On the resulting empty surface we glue the material of the desired shade. These steps can be carried out repeatedly, but carefully, taking into account the remaining layers of cardboard.
When creating the edges of a painting using thread printing, do not trim each of the fibers individually. This operation will not help you save on material. Try to take the threads beyond the boundaries of the product, and then cut everything in one line. The pile remaining on the edges can be easily hidden in the frame under the baguette.
At the end of the work, try steaming the finished product using an iron through a damp cloth. This action will help the threads press against each other, and the picture itself using the threadography technique will look smooth and beautiful. You will get such a wonderful bright cat, as in the photo, as a result of a simple scheme of actions.
Read
Florentine bargello technique with examples of circuits