This classic, incredibly feminine, and at the same time elegant accessory will never go out of style. It would seem, what is so special about a simple decoration? But it is precisely this that gives airiness and lightness to the entire image of a beautiful lady.
It’s interesting, but not only the fair half of humanity is indifferent to the bow. In the Baroque era, gentlemen decorated their frills, hats and even shoes with a bow. And today a classic tuxedo or tailcoat of a true gentleman cannot be imagined without a bow tie.
Kanzashi bows for school, step by step with photos
Option 1.
Take 2 different shades of 4 cm wide satin ribbons and cut them into 32 cm long pieces. Fold them with the wrong sides facing each other. Place a ruler on one edge and make a mark at 11.5cm by folding the tape over. Secure the bend with a tailor's pin.
Do the same manipulation with the second edge of the ribbons. For one bow you will need 2 such blanks.
Using the crossing method, fold one piece, as in the picture. Secure the center with a pin.
In mirror image, do the same with the second workpiece.
Fold the ends of the first part underneath.
Bend the left end again under the bottom, connecting to the top, and bend the right end up, also connecting to the top. Secure the bottom with a pin.
With the second part, repeat all the same operations in mirror image, performing the last bend of the ends in reverse (right - up, left - down).
Gather both parts with a thread.
Use a glue gun to glue the hairpin to the bow.
Cut a narrow strip from a satin ribbon in one of the shades to cover the middle of the bow. Glue the strip.
Decorate the bow with a bead or other decor.
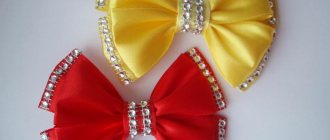
Option 2.
Cut the 5 cm wide tape into the following sections: 5x25 cm - 2 pieces, 5x21 cm and 5x13.5 cm.
Fold the longest pieces in half, shiny side down, then turn them over and connect the ends, securing with a pin.
Thread one ring through the second, forming a bow. Secure with tailor's pins.
Take a piece of medium length, bend it in half, straighten it. Bring the ends towards the center on the reverse side. Staple it.
Bend the shortest part in half, cut the edge diagonally, singe the edges.
Glue rhinestones to the edges.
Gather the middle piece in the center with a thread using small stitches, pull it together to form a bow, and secure the thread.
Gather a small piece of rhinestones in the center with thread. Tighten the thread without cutting it. Using the same thread, gather the largest bow, pull it off, and secure it.
Using a glue gun, glue the remaining bow to the center.
Glue a hairpin or elastic to the bow.
Cover the center of the bow with a strip of satin ribbon of the same color.
Decorate the center as you wish.
Satin ribbon bows for school, step by step with photos
Option 1.
Cut a satin ribbon 1.3 cm wide into 8 cm pieces. Fold the piece in half, making a mark at the fold, and straighten it out. Fold the right corner down and the left corner up.
Bring the ends together, bend them towards the center and singe them.
Make 58 of these petals. Glue a half-bead into the center of each petal with Moment “Crystal” glue.
Glue a row of petals along the edge onto a round piece 3.5 cm in diameter made of foamiran or felt.
Turn the workpiece over and do the same on the other side in a checkerboard pattern.
Turn the piece over and continue gluing the petals in a checkerboard pattern.
Glue a bead to the center.
This bow can be attached either to a hairpin or to an elastic band.
The bow is ready.
Option 2.
We will make ears from two pieces of tape 21x4 cm.
We'll bend the corner back and bring it together with the center.
Let's wrap it up. Secure with a pin or clothespin.
We will do the same procedure with the second segment.
From a ribbon of the same color we cut 2 pieces measuring 4x9 cm, and from a ribbon of a matching tone, cut pieces of 2.5x8 cm.
We superimpose the smaller segment onto the larger one in pairs. Cut it off at an angle. You should get 2 such parts.
We sew the parts together in pairs.
We glue them together. Glue it to an elastic band or hair clip.
We fuse together 2 pieces of the same ribbons measuring 18x4 cm using the method of singeing the edge with a lighter.
We bend the segments in half, bringing the ends together to the center. We sew the workpiece in the center, forming a bow.
We collect the bow. First glue a large bow to the elastic band, and glue a small one onto it.
We close the center of the bow with a narrow strip of satin ribbon and decorate it with a beautiful middle.
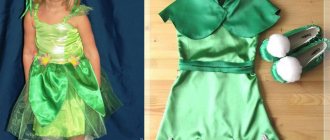
Two-color and gift item
Using ribbons of two different colors you can create an elegant and stylish decoration. This technology is suitable even for beginners. This product can be used to decorate a stylish elegant dress and a beautifully styled hairstyle. It is necessary to prepare a wide and thin piece of tape, each 15 cm long.
Step-by-step instructions for creating DIY ribbon bows:
- First you need to measure the tape of the required size.
- Place one on top of the other and roll it into a ring.
- It is necessary to connect the product blank with glue, and then iron it.
- Tie a narrow ribbon in the center of the bow to cover where the ends meet. You should get a knot.
- The ends need to be cut and glued.
- If you decorate the gift box with a handmade bow, it will look much better. Depending on the situation, it can be made lush and voluminous or modest but elegant.
This option is very simple and easy to make if you follow the instructions:
- You need to take a tape up to 2 meters long.
- It should be wound around the open palm of your left hand, and then carefully removed.
- The end must remain free.
- On one side of the workpiece you need to cut off both corners, approximately 5 millimeters.
- To ensure that the tape does not unravel when cut, it must be carefully burned.
- The same procedure must be done on the second side.
- Next, the workpiece must be aligned so that the cut parts are connected in the center.
- The ribbons should be tied with the free end.
- After this, each petal is straightened to give shape and volume.
A self-created lush bow can please a young girl if it is a decoration on a holiday box or woven into a beautiful hairstyle.
In order to make such a bow, you need to have 6 pieces of ribbon 5 cm wide and 12 cm long, as well as 6 blanks 3 cm wide and 11 cm long. Each one will need to be burned carefully around the edges so as not to unravel. Additional materials will be a piece of feta, small beads and thin elegant braid.
How to make a beautiful bow from a ribbon step by step:
- First, take the wider pieces and fold them in half.
- After this, sequentially assemble onto one thread, pull together well and secure.
- Repeat the same manipulations for narrow segments.
- Cut a circle of feta, the diameter of which should be approximately 4 centimeters, and then glue a large blank to it.
- Take a thin braid, the length of which should be 12 centimeters. You need 6 such pieces. Fold each into a ring.
- Place it on the petals and glue them on the front side.
- Fix the product on top with a narrow variation.
- Pour a small amount of glue onto a piece of fabric with a diameter of 1 centimeter.
- Place the beads tightly in a circle and cut out.
- Place the decor in the center and secure with glue.
Using a fork you can make a small decoration for a card. The process should include the following steps:
- You need to take a fork in your left hand.
- Loop a small ribbon over it so that the edges are on the right.
- Next you need to throw the far end behind the fork over the lower front end.
- To do this, it needs to be brought out between the teeth in the center and brought out from behind.
- The other end must be inserted into the same hole, only from above.
- After this, you need to turn the fork over and tie both ends with two knots.
- Remove the resulting decoration from the fork and trim the ends. To prevent them from blooming, they need to be carefully scorched.
White bows for school master class
To work you will need a white ribbon 5 cm wide, a glue gun, a thread with a white needle, a piece of white felt and a white elastic band.
- Cut the tape into 10 cm long pieces. In total, you will need 17 such pieces.
- Take one piece. Fold the top corner on the right side down, aligning it with the bottom, and then fold the same corner up. Secure with a pin.
- Fold the bottom left corner up and then down. Lock it in. In the same way, assemble the same part from the remaining 16 segments.
- Place the piece with the corners facing up and sew the 2 bottom edges of the diamond with large stitches, without pulling it together.
- Remove the pins and tighten the thread. You should get a petal like in the picture. Make the remaining 16 petals in the same way.
- We string 8 petals onto one thread and sew them together. It should be a circle. Then we sew 2 more circles of 6 and 3 petals.
- Glue an elastic band onto a circle of felt 5 cm in diameter.
- First glue the felt blank to a large circle of petals.
- Next, glue the middle circle of petals, and the smallest one on top.
- Glue the middle of a beautiful half bead into the center and the bow is ready.
Custom crafts
In addition to simple options for making bows, there are also more complex ones. They will require more time and effort, but the result will be a magnificent decoration that will appeal not only to you, but also to everyone you know.
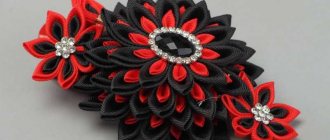
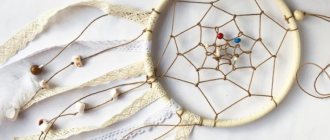
Necklace made of grosgrain ribbons
To create a beautiful and original decoration we will need:
- 4 m of ribbon in the color you like. Its width should be no more than five centimeters;
- a piece of felt;
- glue;
- decorative elements (rhinestones, beads, pearls) to decorate the finished product.
Stages of creating a necklace from grosgrain ribbons:
Take a square piece of tape and fold it diagonally. We repeat this procedure several times.- Cut off the sharp edges of the folded tape. As a result, we get a petal. The number of such blanks depends on the size of your future product.
- We burn the ends and secure it with glue.
- We glue all the made petals together and get a finished flower.
- We make two more of the same flowers, one of which will be slightly larger.
- We attach the selected decorative elements to the center of the flower. White or golden beads will look most beautiful.
- We glue the finished flowers onto previously prepared (cut in the shape of a crescent) pieces of felt.
- We glue three flowers to the center, and fill the remaining part of the felt with the previously made petals. We glue them in the same direction as in the flowers.
- Cut two identical pieces from the grosgrain ribbon and glue them to the back of the product. We tie a voluminous bow from them and hang the necklace around our neck.
Beautiful bows for school, ideas with photos
Bows for school on September 1st, step by step with photos
Option 1.
To work you will need:
- 24 pieces of satin ribbon measuring 2.5x14 cm;
- 9 pieces of nylon tape measuring 1x8 cm;
- glue gun;
- felt blank with a diameter of 3.5 cm;
- 1 elastic band or hairpin;
- scissors.
Take 1 piece of satin ribbon and tie it in the center with a loose knot. Bring the ends together, wrap them in the middle, and singe them. Do the same with the remaining pieces of satin ribbon.
Using the same principle, make 9 petals from nylon tape.
On 1 piece of felt, starting from the edge, first glue the petals of the satin ribbon, and in the middle, glue the petals from the nylon ribbon.
Glue an elastic band or hairpin to the back of the bow.
Option 2.
To create a bow you will need:
- 10 pieces of satin ribbon measuring 2.5x12 cm;
- 3 pieces of tape measuring 2.5x16 cm;
- 3 pieces of organza ribbon measuring 2.5x16 cm;
- glue gun;
- scissors;
- 2 beads;
- decoration for the middle.
We put 5 pieces of 12 cm in a stack, align them along the edges and fold them in half.
We stitch the middle with thread. We tighten the thread and sew a bead on top.
Take the tip of the top tape of one of the edges and bring it forward. We place each subsequent part of the tape on the previous one, aligning the ends along the edge. We fasten the bottom with a pin.
We do the same on the other side.
We turn the edges of the workpiece towards each other, and place the right edge on top of the left. We solder the ends with a lighter.
Make the other half of the bow in the same way, sew the halves together.
Fold one piece of tape 16 cm long in half and mark the middle. Turn the top edge of the tape to the right and lower it down to the intended middle. Do the same with the bottom edge. Secure the center with a pin.
Fold the second ribbon, 16 cm wide, symmetrically, making curls to the left.
Fold the third ribbon, 16 cm long, in half, unfold it and bend the ends towards the center.
We sew the details. The first two segments should be on top, and the third in the middle.
We tighten the thread.
We sew the bows together.
Fold all three pieces of organza in half one by one, unfold them, bring the ends together in the middle and secure them.
Sew all the details of the organza bow together in the center, placing 2 pieces on top and one on the bottom. Let's pull the thread.
Sew the organza bow to the rest, placing it underneath.
Glue an elastic band and a beautiful decoration for the middle to the bow.
Bow - Butterfly
The next bow is a butterfly, but in only women’s colors, and the principle of creation is the same as what men usually wear. Although I believe that this is a classic option that can be used for different purposes.
You can play with sizes and fabrics.
The fabric is very soft to the touch and has a nice color. Length 16 cm and width 4.5 cm.
- Fold the fabric in half and pin it together.
- My fabric frays a lot, so I process it on a machine, but in principle you can sew it by hand. I sew it in a circle and leave a small hole.
- Through this hole I turn the fabric inside out.
- Now I sew up the remaining hole by hand using a blind stitch.
- I mark the middle and stitch along it, gathering a bow.
- I cover the middle with a piece of the same fabric.
And this is what I got. I like! And you?
Back side.