- September 27, 2019
- A woman's world
- Natalia Romanova
A key holder is an accessory for keys and electronic chips. Outwardly, it looks like a wallet, only inside, instead of sections for coins and bills, there are special clips. You can buy it at a haberdashery store, but you can also make it yourself. The last option is good because you can create a product that suits your needs in size, color and design.
The best option is a handmade leather key holder. This material has a number of advantages: it lasts a long time, does not tear from contact with sharp objects, and looks elegant and expensive.
Making a leather key holder with your own hands is not difficult, you just need to have sewing skills and a set of tools and materials. Exactly what materials will be needed will be described below. The article provides information on how to make a key holder out of leather with your own hands; a video master class will help you understand this better.
Manufacturing begins with choosing the design of the future accessory. The next stage is creating a pattern. You can make your own leather key holder in two versions: a pencil case and a slider.
Key holder-pencilcase
This type of key case is the easiest to manufacture. It looks like a small pencil case fastened with a button.
To make it you will need:
- Genuine Leather;
- awl;
- braid for braiding;
- button;
- needle and strong thread;
- scissors;
- paper, ruler and pencil for creating a pattern.
The key holder pattern consists of two parts:
- Rectangle - the main part of the product.
- Strap.
First of all, you need to decide on the size of the product. The height of the finished accessory should be 1-2 centimeters greater than the length of the largest key, and the width depends on your imagination, as well as what you want to put inside.
On a sheet of paper, draw a rectangle as follows: the horizontal line should be equal to the height of the product, the vertical line should be equal to the width multiplied by two. The resulting pattern must be attached to a piece of leather and outlined, not forgetting to add half a centimeter on each side to the seams, and then cut out.
Now we cut out the strap. To do this, draw a rectangle on paper 1 centimeter wide and a length equal to a third of the height of the future key holder plus 2 centimeters. We round off the top of the resulting strip. We apply the pattern to a piece of leather, outline it and cut it out.
We lay out a rectangle of leather in front of us, mark the middle and fold it, smoothing the fold with our fingers. Using a ruler and an awl along the perimeter (except for the top side), we make holes at an equal distance from each other, retreating 7 millimeters from the edge.
Fold the flap in half. On one of the halves, mark the middle on the outside and sew a strap at a distance of 2 centimeters from the edge. We bend our rectangle in half again, find out where the end of the strap will be, and mark this place with a dot. We sew the button: one half on the strap, the second on the main part of the product.
We take the braid and thread it through the holes so that both halves of the rectangle are connected. We secure the end of the braid with threads. So, we made a leather key holder with our own hands, now you can use it.
Making an open key holder
Almost any material into which hooks can be installed is suitable for its manufacture. An interesting idea is to use wooden photo frames with hooks screwed into the bottom. Insert a family photo and the keys of each family member hang accordingly under his photo.
Also, the keys can play the role of the image itself - replace the back wall of the photo frame with plywood, paint it and screw in the holders so that the keys hang within the frame.
Products made from wooden planks or plywood are just as easy to make. Draw the outline of the future product on paper and transfer it in full size to the tree, then cut out the desired shape.
Sand the cuts with fine sandpaper and start decorating. Wood and plywood must be treated with a primer - this will keep the product looking fresh for a long time.
To decorate wooden crafts, you can use paper, paint, beads and any accessories, just use your imagination! After decorating, install hooks and fastenings for the key holder itself.
- Wooden decor - the most unique examples of interior decor 97 photos of the best ideas 2019-2020
Decor for a nursery: simple and stylish interior design from leading experts (55 photos 2021, 60 - 2021)
Paintings for the interior - how to choose a selection in accordance with the overall style (80 photos)
Thematic designs can be burned onto plywood and wooden products. You can burn an image of a car above the hook for a car key, and an outline of the baby above the child’s key.
Also popular are two-layer plywood products, in which the key fob is part of the key holder itself. The keychain is simply inserted into the base like a puzzle piece.
You can also make a laconic small shelf with fasteners. In such a simple and convenient organizer you can store not only keys, but also phones, glasses and other small things that get lost when packing.
A suitable material for decorating a key holder is polymer clay. It comes in many colors and once baked becomes very durable. To make a clay key holder, you need to make a wire frame for it, then the chance of breaking off a hook or a small part tends to zero.
Slider key holder
This option is more complicated and will require more time, skills and materials. But it is also more convenient. It is necessary to prepare the following tools and materials:
- a flap of skin;
- suede or thick fabric for lining;
- leather belt;
- key holder with carabiners;
- punch;
- accessories;
- lighter;
- PVA glue;
- acrylic paint;
- paper, ruler, pencil for drawing patterns;
- scissors.
First, we draw a product design on paper, and then we begin to create a pattern.
We collect all the keys we need on the holder and measure the total width and length of this bunch. Draw a rectangle on paper, add one centimeter to the resulting dimensions at the top and bottom, and two to the right and left. This is the basis of the product. Draw one similar rectangle on both sides of the base. These are the future valves. If desired, their corners can be rounded. The leather key holder pattern is ready.
Apply the pattern to a piece of leather and cut it out. We cut out exactly the same part from the material prepared for the lining. We glue both parts together. After the glue has dried, carefully process the edges with a lighter.
We tint the edges of the product with paint. After drying, using a special leather punch, we make holes around the entire perimeter. We pass a strap through them and fasten it to the inside of the future key holder.
We attach the key holder, as well as accessories to taste: buttons, laces, decorative items.
Wooden key holder without hooks
An extremely interesting model, and now we will get to know it. For work we will need:
- Blank: wooden block 20*15 cm.
- Clear nail polish.
- Stain.
- Brushes for working with varnish and stain.
- A jigsaw or chisel for working with wood.
- Wire for forming a loop.
Step-by-step diagram-instructions for the master:
- Let's ask my husband or make the preparation ourselves. We need to cut horizontal furrows 1-1.5 cm deep, the channel of which will go not just deep, but also down. This modification will allow us not to use hooks. The keys are simply inserted into the groove without falling out of it.
- Let's make 5-6 parallel channels on our workpiece.
- The edges of the product must be smoothed using a plane or sandpaper.
- As soon as we get rid of all the roughness, we will cover the workpiece with a layer of stain.
- After the product has dried, apply two or three layers of clear varnish.
- We form a loop and hang the finished key holder on the wall.
- If you have wood carving skills, or can use the services of a craftsman, complement the model with skillful carvings. This could be engraving, signatures of family members, or your talisman symbol. After finishing decorating, varnish the product again.
Wall-mounted bottle key holder
The model we are about to meet will find its place on a bedside table or on a shelf in the living room. For work we will need:
- A shaped glass blank created in special furnaces (such products are used for fusing).
- Wooden base.
- Permanent glue, brushes.
- Clear nail polish.
- Set of hooks.
Step-by-step diagram-instructions for the master:
- We work with a wooden base. We get rid of roughness and varnish it. We leave the area along the contour of our “bottle” free of varnish. We glue the glass blank using very strong glue.
- We cover the product with transparent varnish on all sides.
- After the product has dried, we form a row of hooks along the lower edge of the key holder.
The key holder is an original invention for the whole family. The presented models will not only decorate your home and fill it with a unique style. Key holders will allow you to add a touch of order and grooming to your family nest. And the model, created with your own hands, will become a pleasant reminder of the work done.
https://youtu.be/7UJRbGpvwUohttps://youtu.be/6a7DUH6RQgk
_
Decorating the key holder
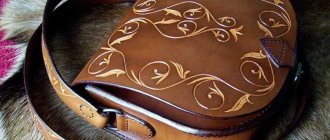
In stores we often see leather wallets, bags, passport covers, shoes and much more, decorated with beautiful patterns. But few people know that similar decor can be applied to accessories made independently.
What decoration methods are there? First of all this:
- embossing;
- perforation;
- inlay;
- pyrography;
- weaving;
- painting.
The choice of decoration method depends only on your skill and imagination. We advise you to practice on an unnecessary piece of leather before rushing to decorate the finished product.
Let's look at some of them that are most suitable for decorating our key holder.
Key holder made from sawn wood
The style and originality of a wooden key holder will not go unnoticed by your guests. This is an ideal option for anyone who loves working with wood. Order of steps:
- Process the cuts using sandpaper.
- Remove dust, moisten the workpiece with water, dry it and sand it again.
- Cover the wood with several layers of stain.
- Print any picture, go over it and the base with acrylic varnish, put the image on the cut, roll it with a roller.
- After some time, roll up the paper layer, after moistening it with water.
- Make holes for fastenings and secure the finished product to the wall.
Embossing
This type of decoration is the most popular way to decorate leather products. The simplest, but at the same time very effective method is blind embossing.
Before work, the leather (it is better if it is vegetable tanned) must be evenly moistened with water. This is best done with a foam sponge, but it is important that the flap does not become too wet.
We place the leather part on a flat surface (it is better to put a wooden board or thick rubber underneath so as not to spoil the furniture), place a stamp on it, and then hit it with a hammer. The harder we hit, the deeper the relief will be, so it’s important not to overdo it.
After finishing work, you can dry the skin only under natural conditions.
Perforation
This method consists of making holes in the skin using special punches. Moreover, on small accessories, for example on our key holder, both simple patterns and complex outlandish ornaments look good.
Perforation, as a way to decorate a hand-made leather key holder, is advantageous in that it is accessible to any needlewoman. It is easy to use, and punches, including shaped ones, can be easily purchased at a sewing store.
Variant of their traffic jams
If you have wine corks lying around your kitchen, don’t rush to throw them away. They can serve as material for a key holder. Here are the instructions:
- Cut out the fiberboard base.
- Cut the corks in half and glue them to the plate, maintaining a minimum distance.
- Install hooks.
- Hang the accessory on the wall.
Note!
Corrugated paper flowers: TOP 100 photos of ready-made options + instructions on how to make them yourselfDIY family tree: instructions for creating a family tree + DIY design ideas
Do-it-yourself sun lounger: photos with instructions for creating sun loungers + detailed diagrams of the stages of work
The key advantages of this type of cork decor are functionality, originality and environmental safety.
Key storage is a practical and useful thing. There is nothing complicated in creating it yourself, because the Internet is full of detailed master classes on making key holders with your own hands.
In addition, the design process will take very little time, and the end result will fully repay the invested effort and money. Therefore, if you are free, then it makes sense to organize a similar solution in your corridor.
Leather product care
Despite the fact that genuine leather is a fairly strong and wear-resistant material, there are several rules for using such a product:
- You should not leave a leather accessory in direct sunlight for a long time: it may change color.
- The product can only be cleaned with a dry or slightly damp cloth. Chemicals and large amounts of water are contraindicated for natural leather.
- It needs to be dried under natural conditions. A hairdryer or radiator is not suitable for this purpose.
- Accessories with embossing are cleaned with a woolen cloth slightly moistened with water.
If you follow all the recommendations, a homemade leather key holder will last a long time, and you can show it off to friends and colleagues more than once. By the way, this is also a great gift for anyone.