Candy ship master class
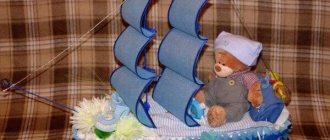
If your friends are getting married soon and you don’t know what gift to give, then this sweet gift is just right. It’s not that easy to make, but if you try, everything will work out and the bride and groom will remember this ship for a long time.
To make a sweet boat you will need:
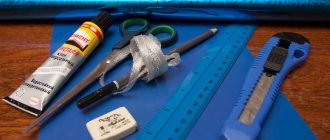
- Pencil and ruler;
- Sandpaper and regular;
- Scissors;
- Knife;
- Penoplex 5 centimeters thick;
- Scissors, pencil, ruler, knife, paper, sandpaper (block).
- Glue gun;
- Corrugated paper in red, white and green colors;
- Gold and white braid;
- Gold-colored lace no more than 2 millimeters thick;
- Gold beads;
- Gold threads;
- Golden floral mesh;
- Chocolates “Martian”;
- Red and white satin ribbon;
- Three sticks, skewers, toothpicks;
- Artificial flowers, petals;
- Round candies;
- Organza.
Making master class with photos
- You need to start making a composition from the foundation. It's not difficult to make. You can use a special drawing program Paint .
- Cut out the template using scissors and place it on the foam plastic, trace it with a pencil. You will not be able to cut parts from foam plastic using scissors, so use a kitchen knife with serrated teeth. Use it like a saw. Try to do this obliquely so that when you connect the parts you will end up with a boat.
- Sand all the side parts of the parts using sandpaper. This is necessary to ensure that there are no unevenness or roughness.
- Glue the resulting parts together using a glue gun.
- Now the ship needs to be covered with corrugated white paper.
- Excess and protruding paper must be trimmed.
- Now we need to make eight roses and nine buds.
- For one rose you will need nine rectangles measuring 3 by 9 centimeters.
- For the core of the rose you need a rectangle 6 by 8 centimeters. Round its corners on one side.
- Now you need to cut out a droplet from cardboard. Its width is three centimeters and its height is five centimeters.
- Apply this drop to 3 by 9 centimeter rectangles, circle and cut off the excess. These will be rose petals.
- Curl the petals with a toothpick. This will give them a more natural look.
- Let's start forming the bud. To do this, take a candy and attach its ends to the middle with tape. Simply put, wrap the candy with tape. Place it in a large rectangle - the core. Twist it to form a bud .
- Tie the resulting bud with white threads.
- Now glue the petals to the bud . The first row will consist of three petals, and the second row of six petals.
- Make nine buds of different colors. Also make four red roses and eight white roses.
- Now we will make sails. They can be made from floral mesh or organza. The width of the sail is equal to the width of the ship, then it gradually reaches six centimeters.
- We prepare satin ribbons and glue them to the sail or sew them on using a sewing machine.
- Let's move on to making masts. They can be made from sticks, wrapped in gold corrugated paper. Attach the completed masts to the sails.
- Decorating the ship. Cover it with mesh, and glue the seams connecting the parts with gold braid .
- Attach the sail to the ship. To do this, take a skewer fifteen centimeters long and wrap it in gold corrugated paper.
- Make small holes on the deck and on the edge of the bow using an awl, insert and glue skewers. Then attach the sails to them.
- You need to make a hole at the end of the skewer that is inserted into the bow of the ship and insert a gold cord there. Wrap it around all the sails and secure it to the back deck.
- Now we take the roses and glue them around the entire perimeter of the ship.
- Your DIY wedding ship is ready!
Wedding gift made of candy: ship of family happiness
Having received invitations to a wedding, the first question that arises is what to give the bride and groom. Here is one of the options for a beautiful gift that is very easy to make with your own hands.
A ship made of candy, given as a wedding gift, symbolizes a long, sweet family life, like a cruise on an endless sea of happiness and love. The process of creating a ship occurs in three stages.
The first of these is making a base or basket. For the base of the ship, you can take a ready-made oblong-shaped basket. A shoe box will also work if you fill it with polyurethane foam. But you can make the base yourself. To do this, an elongated blank is cut out of polystyrene foam. Length 10 cm, width in the middle 15, edges 8-10, height 10 cm.
In order for the base to take the shape of a real ship, you need to step back 5 cm from the front edge, and 3 cm from the back edge and cut off the excess diagonally, rounding off the cut lines. Next, you need to cover the product with colored corrugated paper, first along the height, and then at the top and bottom. Instead of paper, you can also use brocade fabric embroidered with beautiful threads.
This completes the preparation of the base.
The second stage is the production of decorative items. The first thing you need for a ship is sails. To create them you will need mesh or organza. To make the sail denser and more beautiful, it is better to fold the fabric in half. Next, two strips are cut, one slightly longer (for the main sail). At the bottom their width should match the width of the ship, and at the top a little smaller.
The strips are covered around the perimeter with satin ribbon. From wooden skewers, yards are made along the width of the workpiece and glued to the sails in several places. Then the sail is secured to a long skewer. Now you need to make candy wrappers. Two types of packaging film are perfect for this: colored and transparent.
Small squares are cut out of both types of film, placed on top of each other, slightly moving the edges, and pierced with a toothpick. The candy is placed inside such a wrapper and wrapped, secured to a toothpick with a beautiful ribbon or tape. In the same way, instead of paper candies, several cones of different sizes are rolled up.
In the future they will be useful for decorating the bow of the ship. The more different candy wrappers and candies there are, the more beautiful the ship will be.
The third stage is the final one, assembling the entire craft. Sails are attached to the base of the ship in the middle. On the sides everything is decorated with prepared candy wrappers and candies.
To make the ship more like a real one, you need to attach a large paper cone in the middle of the bow, and smaller ones at the edges. The same is done on the other side.
Now all that remains is to connect the two large cones with twine, stretching it over the sails.
Wedding gift - the ship is ready. It can be supplemented with various symbols of celebration. For example, attach rings to sails as decoration. They can be made from wire and covered with gold ribbon. Also, when making the base, you can make a recess in it in advance for a bottle of champagne.
The edges of the ship can be decorated with various satin ribbons, or bows can be made from ribbons and secured to the sides. To emphasize the sea theme, you can add shells to the craft.
To make a ship, it is better to choose cone-shaped candies or truffles; they are easier to decorate with candy wrappers, and they look much better in a craft.
On the ship, you can make an inscription with the names of the bride and groom as a name, or make a flag and put the names on it. It is preferable if the entire composition is in the same color scheme.
A wedding gift made from candy is a great option. Any couple will undoubtedly be delighted, because even without words he will be able to convey the love and warmth of the relationship of the giver, reminding the spouses of a memorable day for a long time.
Source: https://womanest.ru/podarok-na-svadbu-iz-konfet-korabl-semejnogo-schastya/
DIY sailboat from a bottle
To make such a composition you do not need to be a master.
Even a child can do it. To make a sailboat with your own hands you will need:
- Plastic bottle;
- Skewers;
- Colored paper;
- Threads;
- Nail;
- Scissors;
- Awl;
- Glue gun.
Step-by-step master class on making for beginners.
- To prevent the bottle from rolling, cut a hole in a small box and place the bottle in it.
- Use an awl to make three holes in the bottle.
- We insert wooden skewers into the holes and secure them with a glue gun. Two skewers should be straight, and one should be inclined, it is located on the bow of the sailboat. The skewers will hold the masts.
- At the bottom of the bottle, in the middle, screw in a self-tapping screw or nail . This is the back deck of the ship.
- Draw sail templates on paper. Then we cut them out and transfer them to colored cardboard or paper.
- We put on the sails for the match.
- We pull the rope. These will be thick threads.
- Your DIY bottle boat is ready!
Useful video: master class
Below is a tutorial on how to make a wedding candy ship using thin polystyrene foam. You will need to cut several identical blanks. Corrugated paper is used for decoration, and the sails are made of organza and braid.
If you have the opportunity to please your loved ones on their wedding day, then you should definitely take advantage of it. Making a wedding ship out of candy is not as difficult as it seems at first glance, and it’s even easier to order such a masterpiece from a master. The resulting gift will leave a pleasant impression not only in the hearts of the bride and groom, but also in the memory.
Anastasia Belozerova
Wedding planner
Previous article
For lovers of luxury - a bachelor party in a restaurant: ideas with photos
Next article
Money surprise
As a wedding gift, you can make a picture with a ship made of money, which can decorate any interior, and money can be taken out of it at any time needed. To create a painting you will need the following items:
- frame (preferably wooden) A1 format,
- school atlas,
- banknotes of different denominations (8 pcs.),
- coins of different denominations (from 5 pcs.),
- twine, double-sided tape, matches.
First you need to choose the background of the future canvas. To do this, take a school atlas, select and cut out the maps you like (preferably world maps, depicting oceans), which should be enough to cover the entire background of the picture.
Cut out cards will look better if they are aged a little - to do this you need to burn their edges a little and make burnt spots using matches.
Now you can start assembling the money vessel: the first tier consists of two banknotes folded lengthwise. The edges of the bills are made sharp to create the bow and tail of a ship. The second tier is made from one bill, which is also folded lengthwise, and the edges are bent at an angle.
The second tier is inserted into the first. To create masts, you need to take two bills, roll them into a tube, and fasten the ends with double-sided tape so that the tube does not unwind. To create a sail, take three bills, which are first folded in half and then folded into triangles.
When all the elements are prepared, it is necessary to assemble the picture: geographical maps for the background are attached to the base of the frame using double-sided tape, and a money vessel is placed on the resulting background.
The canvas is decorated with coins, between which you can pass a string. The finished picture is inserted into a frame.
It is not necessary to additionally pack the surprise so that the newlyweds can immediately appreciate it.
The presentation of the painting is well supported by the following congratulation: “The ship is a home, the crew members are a family who must do everything together and harmoniously. Then there will always be provisions, prosperity, happiness, and love on the ship.”

