Lesson 1: what to make temari balls from
In our country, these products are used as decoration for homes, cars, Christmas trees, key rings, and even beads, bracelets, and earrings are made according to their type. Depending on the function of the product, one or another material is taken: for Christmas tree decorations - a foam base, for toys - fabric.
For any temari you will need the following materials:
- foam or tights, fabric, cellophane;
- wool, cotton and sewing threads;
- scissors;
- 30 cm paper strip 0.7 mm wide;
- tape measure;
- pins;
- needles of different lengths.
If a foam mold is used as a basis, then wrap it with wool without gaps, and then with bobbin threads. Rewind tightly in different directions. Once all the gaps have been closed, insert the end of the thread (about a meter) into the needle and secure the weave of the ball in different directions with small stitches.
You can make temari balls with your own hands from tights or other elastic material. Form them into a circle, cover them with cellophane and cut off the excess ends. Without glue, spread the polyethylene and start wrapping it with bobbin threads, that is, you do everything the same way as with a foam ball.
Embroidery techniques
Some people mistakenly classify temari as a braiding craft technique. But this is the same type of embroidery as cross stitch - the needle and thread for the pattern are not simply threaded between the marking threads, but are inserted and withdrawn from the warp underneath them, securing the pattern in place.
Temari embroidery patterns are mainly based on the use of geometric shapes: squares and rhombuses, circles and ovals, concave and convex polygons.
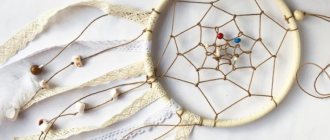
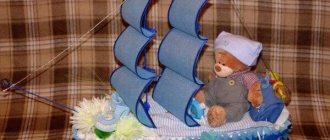
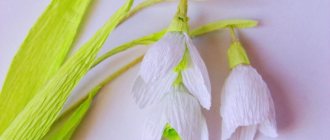
In addition to figurative paintings, masters also embroider symbolic images of objects that surround them in life: a spindle, a boat, a star or flower, a month.
Your ball will acquire a certain meaning depending on which pattern you choose - previously, workers of each craft or class embroidered their own special temari, from which it was later easy to guess the author.
If you are new to this needlework, check out the standard embroidery patterns:
- diamond in a square;
- intersecting spindles;
- a star with a different number of rays;
- flower with several cores;
- hexagons;
- patterns with overlapping corners.
Take note of the patterns in the following diagram. Perhaps you will embroider your first temari using one of these ideas.
You can learn the technique of creating a simple encircling pattern by watching the following video.
There is no clear classification of temari patterns. The thing is that each embroidered ball is the embodiment of the creator’s imagination. Therefore, first, familiarize yourself with simple schemes, so that you can then combine them to create your own unique works.
Lesson 2: making markings
Attach the paper strip to the ball and pin the beginning with a pin. Then wrap the temari in a straight circle. The Japanese art of embroidering balls is characterized by clear markings, which form a particular pattern. Once you measure the circumference, remove the strip and fold it in half. Cut the fold into a triangle. Mark intersection points with pins, preferably multi-colored ones.
According to this pattern, from the first point, wrap the ball with a strip in the opposite direction, also bend it in the middle and mark it with a needle. It is this strip between the poles that is laid out in equal sections and then marked into sectors using pins. In complex ornaments, a measuring tape is used. Beginners can make only four marks on the equator.
After all the pins have been placed, you need to check that from any position of the ball their parallel ends are located on the same line. After marking, you get a kind of globe with meridians and an equator.
Temari: embroidering a ball on 8 sectors (video)
The described master class allows you to master the art of embroidering temari balls based on a simple technique of this technique. If you want to complicate the work, you can mark not by “4”, but by a larger number of meridians, and also combine different directions of embroidery threads to form completely new, interesting patterns. As a result of such fantasy work, an innumerable number of variations of ornaments for embroidering Japanese balls of happiness can be obtained.
Lesson 3: embroider temari balls
We continue the marking master class. Take a contrasting bright thread (similar in thickness to iris) and wrap the ball at the marked points. Now you can clearly see the lines of the poles, meridians and equator. Tie the thread with a simple knot (so that it can linger among the plexus of threads).
Next, thread a thread of the same color into the needle and secure all the lines using 2-4 mm stitches. When embroidering, be careful not to move the marks. Remember, the needle must be long and sharp to pass through the embroidered temari balls. We secure the thread in a simple way: bring the thread through half of the ball and carefully cut it at the base.
Now embroider a simple pattern of squares. Insert the needle and thread near the pole and go clockwise around each mark, making small stitches to secure in a perpendicular direction. It turns out to be a square. After 1 centimeter, take a thread of a different color and continue temari embroidery. Do not cut off excess threads, as the main and additional shades alternate.
As soon as the square reaches the middle of the marking, move on to the next motif. There should be 6 figures in total. Unsewn areas can be left as is or decorated as desired.
Materials and tools
A master class on temari will not require special materials and tools. Everything you need can be found in every home. To make balls you will need:
The basis. To do this, you can use a ready-made foam piece, a rubber or plastic ball, or you can also use a papier-mâché ball.- Threads. Thin coils are used for winding the workpiece. “Floss” or “Iris” are suitable for embroidering a pattern on a product.
- Needle. To create DIY temari for beginners, it is recommended to use a needle with a blunt tip. This will avoid deformation of the base.
- Paper - strip (1 cm by 30 cm).
- Sewing pins with heads.
- Tape measure.
Using simple materials, Japanese needlewomen made a strong amulet for happiness and good luck. The power of the amulet depends on the energy of the master, his skill and mastery.
Embroidering spindles
Let's look at another pattern for temari. The master class will be devoted to spindles or petals. Divide the ball into four parts as described in the lessons above. Now use three needles of different colors to divide the meridian line into equal 4 parts between the existing marks.
Next, make a knot and insert the needle and thread into the ball not far from the first pin. Now you need to go around all the pins, creating a “petal-spindle”. The thread should not be placed loosely or pulled together, otherwise the pattern will be deformed. Change colors to create an unusual design.
Please note that the next row becomes larger and wider than the previous one, due to which the “spindle” pattern is obtained. Embroider the design until you reach the interlacing of the poles. Next, you also create 4 more vertical “spindles”.
Japanese temari balls have an unusual color, so we will make an interlace. Turn the ball over so that the edges of the petals point up and down. Use three pins to divide the meridian so that one of them is in the middle of the spindle. We embroider the petal according to the same pattern, only insert the needle under half of the design. As a result, it turns out that on each side the petal either overlaps the previous spindle or hides behind it.
Creating a chrysanthemum
Let's move on to floral patterns for temari. A master class on embroidering chrysanthemums requires attention and skill. Make markings into 8 or 12 sectors, the more, the more magnificent the flower will be. Next, mentally divide the distance from the pole to the equator into three parts and insert a pin along each meridian one third from the equator. This will be the size of the chrysanthemum.
Now you embroider a kind of four-digit star with threads. Then, using the same scheme, create a figure that seems to be superimposed on the first one. To make it easier to see the angles of the stars, alternate pins of two colors when dividing the petals. The result will be four pins of each color, forming a square.
Now, using the resulting markings, in the same sequence, embroider the stars until the pattern reaches the equator. It is best to embroider flowers on a dark green temari background. To get a beautiful chrysanthemum, make the base with gold threads, and alternate further rows from light pink to dark red. Also make a second chrysanthemum on the opposite pole.
Embroidering wings
Divide temari into 6 sectors. Embroidery of balls begins with a hexagon at the poles in the same way as a square was created earlier. Next, outline the corners of the wings. To do this, use three pins to create an isosceles triangle, dividing the distance from the pole to the equator in half.
Now, using a contrasting thread, we embroider peculiar wings that intersect each other, and begin with marking pins. To make it clear, let’s call the three marking pins A, B, C. From top A we go to base B, make a stitch and go perpendicular to the base clockwise to top C, from where we go to base A, from which we create top B.
As a result, the hexagon is sheathed on all sides at the top of the poles, and three triangles are formed at the bottom. The wings can be made on both sides, then the pattern does not cross the equator or will be on one side, but the triangles are embroidered to the last. Empty spaces can be left or decorated as desired.
Making balls
In order to make balls, you will need any available material you have at home. For example, tights or leftover unused fabric, a small ball or foam. These items, in any case, are always at hand. If you are making balls from scraps, then tie them on top of some plastic round object. The inside of a chocolate egg works great. Experienced needlewomen, when creating temari rattles, fill the inside with large grains.
You need to make the main part of the circuit yourself. Only then do we begin to wrap it with woolen threads with chaotic movements, as in the photo. Make sure you don't lose the round shape. Choose any shade of thread; an elastic thread will be applied on top of it.
As a result, you should end up with a wool ball measuring 7 cm in size. It will be soft to the touch, which is very convenient for arranging needles that will help outline the future embroidery pattern.
The ball must be made pleasant to the touch by wrapping it with smooth thread. If you want, you can make it a dull color. But the ball looks best in blue, scarlet and green colors.
Read
Crochet and knitted openwork skirt with diagrams and descriptions
After all the manipulations have been done, insert the thread into the needle and pierce the ball through it so that the needle comes out from the other side. If it becomes difficult, use pliers. Remove excess thread by hiding it under the adjacent fiber.
You don’t have to hide the tail, but later make a loop out of it, which you can use to hang it on a chandelier or other objects that you need to decorate with your own hands.
We intertwine rhombuses
Take the temari and divide it into the equator and 8 sectors. Now in each hemisphere, divide half of the meridian into two and mark it with pins. These will be the corners of the diamonds on the temari. The master class on marking the ball is described above when considering the embroidery of wings. The equator is then divided in half again. It is these marks that will determine the width of the diamond.
Next, embroider a rhombus. From the top of the north pole marking pin, make a stitch at the equator marking, then go to the top of the southern hemisphere mark. Grab the markings at the equator and go to the peak at the north pole.
First, embroider rhombuses that touch each other at the corners at the equator. Then embroider shapes that intertwine the sides. The embroidery pattern is the same as for creating intersecting spindles. That is, if you look at the rhombus, the opposite sides are under the pattern, and the remaining two sides are on top of the ornament. Use different colors of thread to create an unusual, bright design.
Five pointed star
Let's look at how to embroider a star on temari. A master class on marking and embroidery is described above when studying the process of creating a chrysanthemum. Make a ball, determine the equator and divide it into five sectors. Further from the equator and pole, mark the middle. And with threads you embroider the borders of a five-pointed star according to the template that you drew in childhood with a pencil.
Now along these lines you embroider first in one color for about five to eight millimeters, then in another color until the corners of the star reach the equatorial line. On the reverse side you embroider a similar figure.
You can experiment a little with embroidery and jump over a row. That is, you start embroidering five millimeters in one color, then leave the background a centimeter and make a star in a different color of the same thickness. The result is two stars on one pole, with the large figure overlapping the lines of the small one. If you use transitions like diamonds, you will get intersecting lines. Empty spaces and the middle of the figure can be decorated with decorative details.
Basic rules for making temari:
- wrap the ball with woolen threads, then with bobbin threads;
- wrap in different directions, tightly, without gaps;
- If desired, secure the ball with random stitches in different directions;
- Make the markings even, especially the poles and the equator;
- use multi-colored pins to mark different levels;
- start working with a large node;
- leave the knot at a distance of 3 centimeters from the start of work;
- Secure each line with a 2-5 ml stitch;
- embroider clockwise;
- fastening is done using a needle, with which you capture not only the line of the pattern or meridian, but also part of the base in the perpendicular direction;
- when the thread ends, pull the needle on the other side of the ball and cut the end close to the base;
- When embroidering, the thread should not be loose or tight, as in this case the design will be deformed.
Even a beginner can make any Japanese balls. Temari (master class with squares) start with 4 sectors, then move on to more complex patterns. You can draw a circle on paper, dividing it into sectors (diagonals), draw a pattern and repeat it on your ball using threads.
Temari loop
The master class in which we tried to make the Japanese art of temari, namely its embroidery, is coming to an end. All we have to do is make a loop so that we can attach it to some things and interior items. In order not to spoil the pattern on the ball, the loop must be made at the connection of the pattern.
Read
Weaving baubles and bracelets from floss with decorative details
The rope for such a craft can be made in two ways, such as the loop method and the braid method. The second method can be made from six threads, which are threaded into a needle one at a time and make a knot on the edge, then they are inserted into a ball and begin to make a braid with your own hands. You can choose the length of the main material to suit your taste.
The Japanese art of temari is very interesting and entertaining, and the temari technique is easy to learn. It is imperative to study the video and photo instructions in order to have an idea of how to make temari balls and what to use them for.
This kind of art will not leave you indifferent, as it looks unusual and attracts with its mystery.