Making topiary from autumn leaves with your own hands
To make topiary from maple leaves, you will need:
- napkins;
- newspapers;
- glue;
- wooden stick;
- stand;
- leg-split;
- fresh maple foliage;
- pot;
- gypsum;
- floristic grass;
- decorative tape.
How to make the base for the crown
For the base, make a ball of newspaper, wrapping each layer of newspaper over the next. Then wrap the resulting ball with thread. Tear the napkins into many pieces, apply glue to the base and cover it with pieces of napkins in several layers. This will give your ball its final neat shape. Leave it to dry.
How to make a trunk
Lubricate the stick with glue, decorate with twine, and leave to dry.
Assembly of decorative wood
Make a cross-shaped cut in the ball. Apply glue to the top of the barrel and place the part into the base, lightly pressing the two parts of the product. The edges of the cut must be treated with a heat gun.
How to decorate a tree
Let's move on to decorating our tree. Take a nail and make a small hole in the base ball. You should drop hot glue into it - and you can insert a leaf into the resulting hole. Continue gluing the leaves onto the base. You can also attach berries or any other decoration to it.
Making a tree stand
You can use various containers for a topiary stand. A pot is best. Pour plaster into it. When it begins to harden, place the topiary in the center of the pot and secure.
Next, start decorating the stand. Take the floral grass and place it on the dried plaster. For density, fix the material with a heat gun at intervals of 3-5 cm. Take the ribbon and tie it with a bow, attach it to the stand. In addition, you can decorate the stand with foliage.
How to make crafts from tree leaves with your own hands
The beauty of autumn trees has been described more than once by creative people in their poems and paintings. It is the autumn colors and colors that not only delight the eye, but also help provide the prerequisite for imagination to make crafts from tree leaves with your own hands.
Leaf applications
If you have already read our article about crafts made from natural materials on the theme of autumn, you are probably convinced that absolutely any materials can be used in creativity. But the most accessible ones are still leaves, because if you need to look for specific trees for pine cones or chestnuts, then the leaves literally lie under your feet and ask to be collected.
What to do with the collected leaves? Of course, appliqués, three-dimensional crafts, postcards and everything that your imagination is capable of.
Leaf applications are something that both adults and children love to do. In kindergartens and schools they often offer this type of creativity.
Using only natural materials, you can make not just crafts from tree leaves with your own hands, but real collages containing bright colors, twigs, and various roots. That is, there is a lot of scope for your imagination.
The most common crafts include those made on a sheet of paper. Such applications are considered the simplest. We lay out the composition we need, glue the leaves, add a few details and we’re done. Such crafts are created for schools, and as a gift, which includes simplicity, and of course the invested soul.
We offer you some interesting instructions on how to make crafts from leaves with your own hands in the form of an applique. Choose the one you like and get to work.
Tree made from dried leaves
Dry leaves are a much more fragile material than fresh leaves, so you need to work with them very carefully. But if you put in every effort, you will end up with the most beautiful tree. In this detailed lesson you will learn how to make topiary from dry leaves correctly.
You will need:
- wire 25-30 cm long (two pieces of thin wire and one thicker);
- corrugated paper in three colors;
- pot or decanter, plaster, potassium permanganate;
- tape, thread, newspapers, colored paper;
- dried flowers and foliage, which should be prepared in advance;
- heat gun, beads, decorative paper.
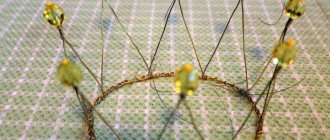
Making a barrel
Each wire is wrapped in corrugated paper. To keep the paper firmly in place, apply a little glue to the end of the wire. Secure all three wires together with tape, and then wrap the thin wires around the thicker one.
How to make a stand
To obtain a beautiful topiary from maple leaves, it is recommended to use not a pot, but a small decanter. It will add grace to the finished product. Gypsum mixed with potassium permanganate for brightness can be used as a filler. The gypsum mixture is poured into a container while it is still wet. Then a wire barrel is inserted inside the decanter.
Creating the base and crown
Form a ball from colorful paper and newspapers. To get the desired shape, wrap the base with tape and thread. Now let's start executing the crown. We will use roses and other dried flowers, as well as leaves. It is preferable to make topiary from autumn maple leaves.
Let's look at the process of making the crown and base step by step.
- Glue dried flowers and leaves to the base using a heat gun.
- Make small paper balls. Cover the base with them and fix a square made of decorative paper on it in the place where the barrel will be inserted into the ball.
- Make a small hole in the crown and apply glue inside it. Place the base on the trunk and apply light pressure.
- Decorate the crown of the topiary with miniature beads, and make a pattern of roses on the decanter.
That's all, the autumn tree is ready!
You may also be interested in the article in which we talk about how to make topiary from corrugated paper.
How to make topiary with your own hands: a master class on creating crafts and its detailed characteristics
DIY autumn topiary serves as an example of a bright and incredibly colorful craft, distinguished by an unprecedented combination of different shades, their harmony and integrity of images. Making your own topiary step by step is quite simple - first you need to decorate the flower pot, which is the basis of the composition. Depending on the size of the intended craft, the shape, volume and material of the pot are determined. The main condition for selection is its optimal combination with all other elements and parts of the product. It should maintain the integrity of the picture, complementing the overall ensemble, and not destroying it.
Useful tips
To prevent dry leaves prepared for crafts from breaking, it is necessary to treat them in a glycerin solution at the rate of 200 ml of the substance per 400 ml of clean water. Next, you should put the leaves in tight bags and fill them with this composition, and seal the bags. Leaves are left in bags for 3 days. Then they are taken out, dried on a paper towel - and you can start making topiary.
You can dry the leaves in large magazines or reference books. Just lay out the leaves among the pages, and place a weight on top of the reference book.
Another method is drying with an iron. But this method is suitable for preparing only small leaves. Place them on thick cardboard, cover with paper, iron with a slightly heated iron so that all moisture evaporates.
You can also dry the leaves in the oven. To do this, set the temperature to 50-60 degrees. It is necessary to constantly monitor the condition of the leaves: it is important that they do not lose their shape during the drying process.
In order to dry the leaves without losing their shape, they can be placed in dry calcined sand and left for a month. Bulk flowers – roses, lilies and dahlias – are dried in the same way. In this case, they should be placed in the box with the stem down. But asters and daisies are placed in a container with sand with the stem up.
Natural drying of leaves involves hanging them on a rope in a well-ventilated area. In this case, the leaves are collected in bunches and hung with the stems up.
Pendants and garlands made of maple leaves
You need to take two or three leaves, preferably of different sizes, cover them with transparent varnish or dip them in paraffin melted in a water bath, and then tie them together with a thread, which can be decorated with beads to match the leaves and, making a loop out of it, hang it, for example, under ceiling of a children's room.
You can complicate the task by collecting leaves treated in this way into a garland. From which it is easy to create an intricate pattern, fixing it on the wall, or around a picturesque branch placed in a vase, or placing it in a high-hanging pot of flowers and simply letting it hang freely along the wall. If you combine several of these garlands, you will get a bright curtain for the window.
Related article: How to lay tiles on a wall: laying and how to lay it correctly with your own hands, ceramic tiles yourself
Original ideas for topiary design
An excellent solution is to decorate the topiary with maple leaves. You can make them with your own hands from colored paper, fabric, foamiran. Living material collected from the street works well. The leaves can be attached to the base entirely, or you can create flowers from them. The roses turn out very beautiful. You can easily make them from maple leaves with your own hands in a few minutes.
For one flower, 10-12 beautiful fallen leaves of different colors are suitable. They should not be dry. The middle of the craft is formed from the first sheet. It is folded with the front side across in half so that its leg touches the top. Then the sheet is rolled into a roll. The core is ready.
Now you need to wrap other leaves in layers around the core. They should also be folded right side in half. In this case, the core roll is located below the new bent leaf. The next one has the edge of the bend slightly bent and wrapped around the core. It turns out as if the middle was dressed in a coat with a collar.
Then the next sheet is taken. Folds in half. The edge of the bend is bending. The leaf wraps around the core in the same way as the first element placed on it. Thus, a rose bud is formed.
Such flowers are attached with glue to the base of the topiary. To do this, holes are made in the ball with a nail, which are filled with glue, and roses are inserted into them. You can do the same with the following materials:
- leaves of maple and other trees;
- cones;
- bunches of rowan;
- acorns;
- artificial flowers;
- beads;
- ribbons;
- lace;
- dry blades of grass.
Autumn is a wonderful time when there is a huge amount of living material to choose from in nature. Moreover, it is at this time that the most vivid and memorable works of authorship are produced.
Tree of Happiness
We present to your attention a master class “Topiary from autumn leaves”. In it you will learn how to make such a miracle for decoration with your own hands.
Before starting work, you need to familiarize yourself with the materials
which we will use in today's master class:
- scissors;
- newspapers, napkins or plain paper;
- glue (super glue, glue gun);
- a wooden stick or pencil (it all depends on the size of your tree);
- container for wood (yogurt cup, pot, bottom of a plastic bottle);
- wide tape;
- dry tree leaves (maple leaves make a good craft);
- gypsum;
- satin ribbons, beads, stones.
Once you have stocked up with everything you need, you can begin work.
Let's prepare the pot for use. After you choose the desired container (it could be a yogurt cup, a pot, the bottom of a plastic bottle), you have the right to decorate it. You can use paint, nail polish to paint the pot, or use ribbons and pebbles to cover the outer surface (you can choose the colors, sizes, shapes of the materials yourself).
When the appearance of our pot is much more attractive than before, we can move on.
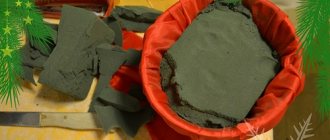
Let's prepare the base. As for the base that will hold the tree trunk, here you can choose any mounting mixture (cement-sand mortar, putty, plaster or alabaster) or the same floral foam/foam.
If you prefer the first option, we recommend using alabaster. It is affordable, you can buy it at any building materials store, it is easy to install and does not crack.
Instructions for using alabaster:
To fill 1 container with alabaster you will need about 300-400 g of the mixture and about 1.5 glasses of water. Stir the solution for several minutes. As soon as the mixture thickens to the consistency of thick sour cream, pour it into a container, then install the barrel and hold it level for 2-3 minutes. Leave the mixture to dry for 12-24 hours.
If you use gypsum, then its consistency should resemble thick sour cream, and the drying time for such material is 30-35 minutes.
Next, you need to prepare the tree crown itself. You can use plain paper, newspaper and even napkins. You need to crumple the paper so that you get a smooth ball, and to prevent it from unfolding, we will secure it tightly with wide tape. When the crown is ready, you need to make a small hole for the future trunk of our tree.
Preparing dry leaves for decoration. In order to properly secure the leaves to the crown of the tree, we will use a glue gun (working with it requires extreme care).
The leaves can be stacked on top of each other, making all sorts of compositions that your imagination and soul desire. Here are photos that you can use when making wood. You can also add touches such as beads and stones.
The final stage is making the trunk of our tree. You can use any wood stick as a trunk: a strong branch (previously dried), a simple pencil, a knitting needle, sushi sticks or a wooden stick (the height of the trunk may be different, depending on the height of the pot, the diameter of the ball and your wishes about the height of the product). If you don’t like the original appearance of the trunk, then you can wrap it with ribbons, strands, or simply paint it with paint (nail polish).
What do you associate with autumn? With the first trip to school or with the harvest? Or maybe with walks through the autumn forest, with the aroma of chestnuts (roasted or not) and armfuls of leaves? How would you like, like in childhood, to drag home a handful of chestnuts and a mountain of leaves, losing them on the flights of stairs? The desire is hindered by a very rational thought: “What then to do with this wealth?” You can make a magnificent miracle!
In this master class I will show and tell you how to make topiary from natural material with your own hands.
In this work, step-by-step photos will be provided for convenience.
Topiary from leaves step by step: master class for beginners
Leaves prepared with your own hands can decorate a tree. The main task is not to disturb the harmony of the craft. And this needs to be done in such a way that the crown is rounded, the color transitions are natural, and the berries only emphasize the autumn mood of the topiary.
The master class continues as follows:
- Without additional decor, the topiary will be faded. Openwork ribbons and braid in the color of wood will do. The flowerpot can be decorated with beads and red buttons.
- Fix a couple of leaves on the trunk - only small and neat ones.
- Place cut yarn threads in a pot to match the crown. They will imitate an autumn carpet. You can also throw miniature cones and acorns there.
- At the foot of such a tree there may also be a small pumpkin, as another attribute of the autumn atmosphere.
To secure the sheet to the crown correctly, first the ball is punctured, a drop of glue is poured into the hole and only then the sheet is fixed
Just as appetite comes while eating, so here inspiration can come while working. You can complicate the master class with your own hands by adding different decor - bugs, dried flowers, artificial moss, etc.
You can also decorate a topiary from leaves in a school theme. Makes an excellent decor for a classroom or a bright decoration for your student’s desk.