Crafts with an autumn theme look original and interesting at any time of the year. The availability of the material and the ease of making miniature trees, funny animals, and three-dimensional compositions allow you to create stunning decor for interior decoration. Autumn topiary is one of the many creative options using the gifts of nature. Anyone, even a child, can make a bright tree in a pot with their own hands. To do this, you need to properly prepare the material and strictly follow the step-by-step instructions of the master class.
Collection and preparation of autumn material for topiary
You can start collecting material for seasonal crafts from mid-summer. During this period, most fruit trees produce a harvest, fruits appear on chestnuts, oaks and spruces. You can get a sufficient number of seeds, seeds, and shells by simply wandering through a forest plantation, a park, or in your own garden.
To create a topiary, only whole materials that are not affected by pests and rot are suitable. In order for the collected components to deteriorate as slowly as possible, they must be prepared before use. Each type of natural element has its own rules:
- Chestnuts. After collection, they should lie for at least 3 weeks in a cool place. Drying is necessary so that they do not puff up and lie flat on the base. During this time, their top layer will strengthen and the shape will become flattened.
- Fruit seeds. The material must be washed well and cleared of any remaining pulp. If necessary, boil cherry or plum pits for 5 minutes. Then they need to be fried in a frying pan, in the oven, or left in the sun for the whole day.
- Acorns. Single-seeded oak fruits must be washed and dirt, leaves, and larvae removed with a brush. Then they are thrown on a towel, allowed to absorb water and fried in the oven over low heat for 1 hour.
- Walnuts. Half shells are suitable for topiary. To split the nut into even pieces, you need to insert a knife between the halves and lightly hit it with a hammer. We remove the core, clean the inner sides of the shells from the veins, and leave to dry for several hours.
- Cones. To prevent unopened coniferous fruits from changing their appearance after drying and starting to open, they must be treated with wood glue. The material is dipped into the mixture several times, the glue is allowed to drain and laid out on oilcloth to dry.
Master class with step-by-step creation of autumn topiary
Decorative topiaries have become favorite crafts for creative people. Simple master classes are held at various events and city holidays. Parents and their children make miniature trees for the autumn holiday in schools and kindergartens. To make your own crafts from natural materials, all you need to do is study the proposed master class and follow all the steps step by step.
Preparation and selection of base
A wide variety of containers are suitable as a topiary stand. It could be a bucket, a beautiful mug, a flowerpot, a cut plastic bottle, an old box and other interesting ideas. But the best option is a flower pot. It is better if it matches the color and texture of the future trunk and crown. To prevent the tree from leaning to the sides and falling, the base must be weighted with filler.
There are several ways to decorate a pot in autumn. The simplest option is to decorate with fabric. The matter must completely envelop the container. The edges sticking out from above must be glued to the inner side. The base can also be painted in the color of the crown or decorated with gold organza ribbons, artificial bunches of rowan berries, and various leaves. The combined design will look original.
Barrel – sanding and painting
The axis holding the entire structure of the craft plays an important role when creating a topiary. The mini-tree will look natural and natural if the trunk is made from a real branch. In the planting behind the house or in the park you can find a rare and beautiful specimen, exactly repeating the outlines of a mighty oak or maple. It should be a thick branch with slight bends.
Natural material for the future trunk must be carefully prepared. We remove the bark from the branch and sand it with sandpaper until a perfectly smooth surface is obtained. To make the autumn topiary more natural, some woody areas and knots can be left. Then you will have to treat them with epoxy resin. Then the workpiece is painted with a brush or spray in the color chosen according to the theme. A gold, bronze, or dark brown trunk will look great.
To make a trunk, you can also buy ready-made corelius branches. The unusual natural material is part of a hazel bush and has a bizarre shape with varying degrees of curvature.
Crown formation
You can buy a spherical base for the crown in a store or make it yourself. The purchased version will be made of polystyrene foam. Thanks to a huge range of sizes and densities, this is the easiest way to select the ideal shape. To prevent the ball from melting upon contact with glue, it is wrapped with twine.
Many creative people want to make truly original, original crafts. Therefore, they prefer to use homemade products as a basis. You can form a crown for autumn topiary of any size from the following materials:
- Paper. Coat the sheet with PVA glue and crumple it into a tight ball. Then gradually add paper strips until you get a ball of the desired size. We glue the protruding edges and wrap the workpiece with thick thread.
- Papier mache. From newspapers and glue you will get a large dense ball for fixing any decor. We tear the paper into pieces and gradually glue it onto any round element.
- Scotch. We make an even ball out of paper and wrap it with tape to the desired size. This option is suitable for fixing three-dimensional decor, for example, flowers from napkins, maple leaves, plastic apples, pears, since it will not be possible to make a perfectly flat piece.
- Threads. The fragile, delicate base is only suitable for gluing practically weightless material. We wrap the inflated ball with yarn moistened with glue and let it dry. Then we release the air and take out the former form.
- Wool. To make a ball you will need special wool for felting, tools and skills in working with the material. You need to start preparing the craft by studying the detailed instructions for felting wool.
- Polyurethane foam. We coat the lampshade with cream or oil, fill it with foam, and distribute it evenly. After drying, remove the mold and trim the edges.
Installing the trunk into the base - what solution to fill
The filler for the stand can be anything. Simple gravel pebbles, sand, crumpled paper, and foil will do. The most reliable and durable of all options is gypsum casting. It will take more time to make the solution and dry it, but this will make the craft stable and durable.
You can mix the mixture directly in the pot. It should be thick enough to hold the spherical craft well. Place the prepared and painted trunk into the liquid mass, leave the pot to dry until the moisture has completely evaporated (3-12 hours). Then we decorate the base with sisal balls.
Decorative design of the crown/ball and fixation to the trunk
To make the craft decorative, the bare base must first be wrapped in sisal. It is better to take natural coarse fiber in shades that are as close as possible to the autumn theme. Brown, orange, yellow colors are suitable. We coat some areas of the twine with glue and apply the material to the workpiece.
We make the first layer of decor from chestnuts and nut shells. Materials can be pre-painted or left in their natural form. We glue the parts to the sisal over the entire surface, alternating randomly with each other, not forgetting to leave a small area for the trunk.
Until the craft is densely overgrown with decor from wrinkled and fragile materials, the crown must be placed on the prepared trunk. We make a hole in the base up to half the ball, coat the branch with glue and send it inside the crown of the topiary. While the glue has not dried, the base must be given the desired position.
At the next stage, we begin decorating the tree with the main elements of the composition. First we attach the sisal balls. To make them tough and not fall apart, when rolling, you need to wet your hands with glue. Then we fix maple leaves, grape leaves, and acorns evenly to the chestnut meadow. We mask all unsightly cracks with sisal balls painted with seeds.
Master class on making crafts
To make the work unique, you should familiarize yourself with the autumn topiary master class. The main thing is to understand the sequence of the process, and for the rest the master can rely on his feelings and imagination.
In general, creating a craft can take from several hours to several days. The nuance is that all the elements of the wood dry well before decorating and are firmly secured.
So, do-it-yourself autumn topiary, master class:
1.The base is usually made in the form of a ball. This part of the craft is the main one; it acts as the crown of a tree.
You can make the base in several simple ways: using newspapers or polystyrene foam, which can be purchased at a specialized craft store. A square is cut out of it, which is then turned into a ball. In turn, it is wrapped with paper and thread to make it easier to glue leaves and other objects to it. Next, you need to make a hole in it for the barrel.
If foam plastic is not at hand, then the ball is rolled from crumpled newspapers, which are wrapped in layers with thread or tape. Then torn napkins are glued onto the base using glue. Ideally, the ball should be dense and neat. The size of the base depends on the wishes of the author. Next, the workpiece needs to be allowed to dry thoroughly. It is best to let the base sit for a day or night.
2. Barrel. The base will be attached to it. You can make it from a strong stick, or you can use wire, which needs to be twisted into a rope, wrapped with satin ribbons or twine for beauty.
The branch should be decorated with stain, braid or twine. The trunk can be created in any shape; it does not have to be straight. If it is curved, the decorative composition will look more original. However, the choice of shape depends on the imagination of the person doing the needlework.
3. A stand or vase containing a tree. It must be sustainable. Stones and sand are placed in a beautiful flower pot, box or other container. If the pot is already heavy, then it can be filled with construction foam into which a tree trunk is inserted.
Topiary of autumn leaves
Materials for simple crafts can be found in any park within the city. With the onset of autumn, bright leaves, bunches of rowan, beautiful branches are always available and in any quantity. You only need to purchase a flower pot, a foam ball, and several strips of foam rubber as a filler for the container.
First of all, you need to make a strong frame for the craft. To do this, fill the pot with foam rubber, compact it well and insert a branch. We put a foam ball on its other end. The resulting gaps can be filled with a glue gun or left as is. The weight of a topiary made from leaves will be light, so there is no need to worry about the structure falling.
Decorating the workpiece is very simple. Use a small nail to make a hole at the base of the crown, drip glue into it and insert the leaves in any order. Add rowan sprigs. You can also decorate the pot itself. It can be a satin bow, thread, fabric, colored paper.
Topiary made from natural materials: creation technology
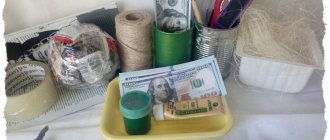
A stylish autumn accessory made from natural material will look great on the windowsill in a children's room or in the dining room. The gifts of autumn provide an opportunity to imagine. The master class describes in detail the instructions for making the craft. For this product, it is better to take maple leaves, as they have unexpected colors, as well as spectacular rowan clusters. In addition to these materials, you will need:
- Plastic pot.
- Wooden stick.
- Styrofoam balls or plaster mixture.
- Glue gun.
- Stones.
- Moss litter.
- Black acrylic paint.
Step-by-step instructions for creating an original tree with your own hands are as follows:
- First you need to take a plastic pot and fix a wooden stick inside it, filling it with plaster. If there is no plaster, but there is a foam ball, then the stick should be fixed in it.
- The next step involves carefully covering the entire piece with black acrylic paint. Once the pot and stick are painted, the product should be allowed to dry.
- When the workpiece is dry, you can begin decorating, the most interesting part of the work. To do this, you need to prepare a gun with a glue stick.
- A foam ball should be attached to the stick. It is convenient for work to lay out the gifts of autumn in front of you. Each cutting must be lubricated with glue and inserted into a foam ball. The composition should be diluted with rowan bunches, leaves, and twigs.
- Similarly, you should decorate the entire upper zone of the topiary. You can attach several leaves to the trunk of the product.
- Moss or stones will help cover the plaster surface or foam in the pot. You can insert several branches of viburnum or rowan into the pot.
Topiary of fresh autumn flowers
This DIY autumn craft made from fresh flowers will be an excellent gift for any occasion. A product made from natural materials can be given as a gift to a teacher, friends or relatives. An original bouquet simply cannot fail to turn out worthy and beautiful. Its creation requires a minimum of time and financial costs. With the correct formation of the crown and base, live chrysanthemums will retain moisture and freshness for a long time.
Materials and tools
To make this craft you will need a small flower pot, floral sponges, stabilized moss, fresh chrysanthemum flowers, plant stems, and tree branches. To fix the materials you will need the following tools:
- Gerbera wire;
- Paper clips and staples;
- Stretch film;
- Anchor tape for bouquets;
- Elastic ribbon for creativity;
- Scissors, hot glue, thread.
Creating a topiary
First of all, you need to prepare all the initial elements. We make the trunk from gerbera wire, add branches and stems, and wrap everything with special moisture-permeable tape. If the crown is small, you can get by with one thin stick. If desired, decorate it with green ribbon.
The base can be quickly made from a floral sponge. We lay a piece of polyethylene at the bottom of the pot and lay the material in the form of a hemisphere with the slide up. We insert the barrel into it and fix the place of interaction with a special tape.
We will also make a spherical base for the crown from a floral sponge. Place the piaflor in a container of water and wait until it is completely saturated. We carefully form a circle and insert the trunk into it. To retain moisture for as long as possible, wrap the resulting base tightly with stretch film.
It is better not to prepare chrysanthemums for crafts in advance. When the entire holding structure is ready, cut off the caps at an angle of 45 degrees and place them at the base of the crown. To make it easier to transfer living stems, you can make small holes in the sponge with a toothpick. It is better to distribute flowers taking into account their size, this way you can avoid the formation of voids. At the final stage, we line the surface of the pot with stabilized moss and decorate the pot to your taste.
When immersing flowers in the crown base, at least 3 cm should remain between the chrysanthemum cap and the sponge ball. Otherwise, the living topiary will quickly lose its freshness.
Tree of Happiness
We present to your attention a master class “Topiary from autumn leaves”. In it you will learn how to make such a miracle for decoration with your own hands.
Before you start, you need to familiarize yourself with the materials that we will use in today's master class:
- scissors;
- newspapers, napkins or plain paper;
- glue (super glue, glue gun);
- a wooden stick or pencil (it all depends on the size of your tree);
- container for wood (yogurt cup, pot, bottom of a plastic bottle);
- wide tape;
- dry tree leaves (maple leaves make a good craft);
- gypsum;
- satin ribbons, beads, stones.
Once you have stocked up with everything you need, you can begin work.
Let's prepare the pot for use. After you choose the desired container (it could be a yogurt cup, a pot, the bottom of a plastic bottle), you have the right to decorate it. You can use paint, nail polish to paint the pot, or use ribbons and pebbles to cover the outer surface (you can choose the colors, sizes, shapes of the materials yourself).
Related article: Floss baubles with names: weaving patterns, how to weave and how to make them, pattern generator
When the appearance of our pot is much more attractive than before, we can move on.
Let's prepare the base. As for the base that will hold the tree trunk, here you can choose any mounting mixture (cement-sand mortar, putty, plaster or alabaster) or the same floral foam/foam.
If you prefer the first option, we recommend using alabaster. It is affordable, you can buy it at any building materials store, it is easy to install and does not crack.
Instructions for using alabaster:
To fill 1 container with alabaster you will need about 300-400 g of the mixture and about 1.5 glasses of water. Stir the solution for several minutes. As soon as the mixture thickens to the consistency of thick sour cream, pour it into a container, then install the barrel and hold it level for 2-3 minutes. Leave the mixture to dry for 12-24 hours.
If you use gypsum, then its consistency should resemble thick sour cream, and the drying time for such material is 30-35 minutes.
Next, you need to prepare the tree crown itself. You can use plain paper, newspaper and even napkins. You need to crumple the paper so that you get a smooth ball, and to prevent it from unfolding, we will secure it tightly with wide tape. When the crown is ready, you need to make a small hole for the future trunk of our tree.
Preparing dry leaves for decoration. In order to properly secure the leaves to the crown of the tree, we will use a glue gun (working with it requires extreme care).
The leaves can be stacked on top of each other, making all sorts of compositions that your imagination and soul desire. Here are photos that you can use when making wood. You can also add touches such as beads and stones.
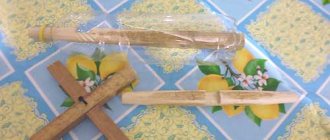
The final stage is making the trunk of our tree. You can use any wood stick as a trunk: a strong branch (previously dried), a simple pencil, a knitting needle, sushi sticks or a wooden stick (the height of the trunk may be different, depending on the height of the pot, the diameter of the ball and your wishes about the height of the product). If you don’t like the original appearance of the trunk, then you can wrap it with ribbons, strands, or simply paint it with paint (nail polish).
Related article: Crochet Christmas openwork angels. Ideas
When all the elements are ready, all that remains is to assemble them into one whole composition. We put the barrel on the ball, first fill it with glue, fix it and hold it for a few seconds. We place the finished tree in a pot with a mixture of gypsum or alabaster, we also fix it and check how firmly the trunk holds in the pot.
What you can get is shown in the photo:
Beautiful examples and ideas for creating topiary on the theme of autumn
For many needlewomen, inspiration comes precisely during the creation of their next masterpiece. There are many original ideas for making autumn topiary. Everyone chooses a suitable craft design based on the availability of the material, the season, the complexity of the composition, and the need to process the elements.
A chestnut tree with only fruits looks boring. But if you add burlap leaves, twine bows, and walnut shells to it, you will get a beautiful and colorful topiary. A great idea is to create a tree from just pine cones. Some of the material can be bleached, painted with gold paint, and sprigs of pine needles added.
To make a craft from several components, you will need to stock up not only on pine cones and chestnuts, but also on acorns, nuts, autumn flowers made from corrugated paper, and thin leaves from napkins.
An extraordinary solution is a topiary made from one type of material. The berry tree looks beautiful, but it will require lengthy processing of the fruit before starting work. A complex craft on the theme of autumn - a tree made of maple leaves. You can simply insert them into the base in any shape or roll up stunning roses. The material for such crafts also requires special processing.
A tree of dried flowers will remind you of autumn. Dried spikelets, beautiful leaves, flowers and whole inflorescences, poppy boxes and other materials are suitable for creating topiary. If desired, the composition can be enlivened by simple coloring.
Original ideas for topiary design
An excellent solution is to decorate the topiary with maple leaves. You can make them with your own hands from colored paper, fabric, foamiran. Living material collected from the street works well. The leaves can be attached to the base entirely, or you can create flowers from them. The roses turn out very beautiful. You can easily make them from maple leaves with your own hands in a few minutes.
For one flower, 10-12 beautiful fallen leaves of different colors are suitable. They should not be dry. The middle of the craft is formed from the first sheet. It is folded with the front side across in half so that its leg touches the top. Then the sheet is rolled into a roll. The core is ready.
Now you need to wrap other leaves in layers around the core. They should also be folded right side in half. In this case, the core roll is located below the new bent leaf. The next one has the edge of the bend slightly bent and wrapped around the core. It turns out as if the middle was dressed in a coat with a collar.
Then the next sheet is taken. Folds in half. The edge of the bend is bending. The leaf wraps around the core in the same way as the first element placed on it. Thus, a rose bud is formed.
Such flowers are attached with glue to the base of the topiary. To do this, holes are made in the ball with a nail, which are filled with glue, and roses are inserted into them. You can do the same with the following materials:
- leaves of maple and other trees;
- cones;
- bunches of rowan;
- acorns;
- artificial flowers;
- beads;
- ribbons;
- lace;
- dry blades of grass.
Autumn is a wonderful time when there is a huge amount of living material to choose from in nature. Moreover, it is at this time that the most vivid and memorable works of authorship are produced.