What boxes can be used
In addition to the fact that decorative boxes designed in-house are an interior decoration, they also help organize free space in the house. This especially applies to apartments whose area is small.
If you put extra things in boxes, then they will be easy to find later. In order to remember what purpose the box is intended for, it can be marked with a specific color scheme. This method will help both adults and children get used to order. This indicates that decorating the box will not only help decorate the interior, but will also instill neatness.
It is important to note that the box cannot be left in its original form, because it will spoil the appearance of the interior. Initially, a style is selected, and then applied to a specific box. There are many options for using the item in question. Depending on the size of the box, they can be aimed at different purposes. For example, storing rings and other jewelry.
If there are kids in the apartment, then the box can act as a place where pencils and other office supplies will be located . The box can also be used to store a phone charger. For each room you can choose your own box design style.
Option for decorating boxes for the kitchen:
It is also useful to read: Comfort in the home with the help of Provence style
For Valentine's Day
Romantic, delicate decoration will come in handy here. Curly cutting in the form of hearts, flowers or multi-colored circles works well. The walls of a do-it-yourself surprise box for Valentine's Day can be decorated not only with a photograph of lovers, but also with beautiful poems about love. The traditional white and red color scheme will highlight the holiday theme and add a festive mood.
Whatever your box ends up being, it will certainly be a wonderful and unforgettable gift for its recipient. After all, only a homemade surprise box can combine three things at once - beautiful packaging, an original surprise and an unusual gift.
What surprise to give to your friend, read here. Making a gift for dad with your own hands: ideas for children.
DIY decor of cardboard boxes for storing things
Decoration will be one of the most creative stages of design. In this case, different raw materials and techniques are used. The main thing here is the presence of experience and imagination. There are several options for designing boxes for things. This includes the decoupage technique.
You will need to prepare:
- base;
- adhesive;
- washcloth and brush;
- paints, which can be acrylic or oil;
- scissors and napkins.
Initially, you need to sand the box, then apply paint to it and cut out pictures. The drawing is applied to the plane, after which its location is marked using a pencil. Paint is smeared along the remaining edge; it is worth considering that the image cannot be touched. You need to give it time to dry and glue the image. Next, the background material is used, which is placed on the box and lid. At the same time, there should be no bends.
On the piece of paper there is a box, which is outlined using a pencil. The base is folded inward, taking into account the bend, and excess paper is cut off. You need to paste over the bottom, inside and sides, decorate using beads and rhinestones.
How to choose cardboard?
To choose cardboard for round boxes, you need to take into account the basic principle: the material must be flexible. Therefore, thick double cardboard, in which household appliances are packaged, is definitely not suitable. It is best to take thick paper or a packaging version of cardboard for cakes - making a craft from such material will not be difficult and you can be sure that there will be no unsightly folds on it. Also suitable:
- cardboard for children's creativity;
- photo paper for printer;
- poster board;
- coated or uncoated whatman paper;
- designer cardboard.
This is interesting: Culinary Studio of Yulia Vysotskaya
Whatever option you choose, keep in mind that the density of the material should be from 180 to 250 g/m2.
Gift box decor
Depending on the size of the gift, you can adapt the size of the box to fit it. The master selects the design depending on the reason for which the box is being created. An ordinary shoe box will do as a base. Here are some examples of packaging creation:
Heart shaped box
To do this, you will need to prepare a template and white paper, scissors, pencil, and glue gun. You will need to print the template on white paper and cut it out and fold it along the line. Take a narrow part and make a cut along the line, which is reflected in the form of an arrow. The templates are cut out on thick paper and cut out, you need to make a couple of hearts and two stripes.
When using scissors, follow the fold lines so as not to cut through. On long parts, many vertical cuts are made, and they are only brought to the fold. Wide parts are glued to the smaller heart so that the cut is on the other side. To make the lid, you will also need to make cuts, only on narrow elements.
They are designed vertically. These elements need to be glued to another heart. At the same time, you need to take into account that the cuts remain on the inside. Next, the box is covered with the resulting lid. The finished version of the box can be used as a gift for Valentine's Day.
Rectangular box
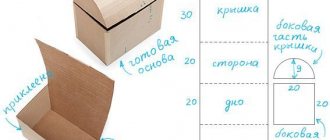
You need to use thick paper, a ruler and compass, a bow, scissors and a pencil. You will also need an adhesive. A pair of circles with a diameter of five centimeters are depicted on paper. Then, with a similar step of the compass, six marks are made on the circle at an equal distance from each other. All marks are connected to each other inside the circle.
You will need to draw lines outside each corner; in one circle they are four centimeters long, in the second they are two centimeters long. Next, the lines are connected to form rectangles. On the right side, draw a small part with a beveled top. Next, the craftsman needs to cut out the resulting parts along the lines; when using scissors, the inside of the circle and parts with a beveled top are outlined.
All figures are bent along the marked lines and glued together, a lid is put on the box and decorated with a bow. It is important to note that for each fake you need to make a lid in three-dimensional form so that it looks original in appearance.
Square box
To design, you will need to use scissors and sheets of thick paper, a ruler and pencil, as well as adhesive and bows. A square is cut out of paper, measuring twenty by twenty centimeters. It depicts vertical lines, as well as a couple of horizontal ones. To do this, step back five centimeters from each edge.
A square should form in the middle. When using scissors, the master makes grooves by running the scissors along the intended lines. However, you cannot cut the paper. The fold is made along the recesses. Next, the paper is cut along short lines and the resulting elements are folded and glued together. To make the lid, you will need to cut a square, the side of which is sixteen centimeters. It depicts a pair of vertical and horizontal lines.
You should retreat about 3 centimeters from the edge. Then they are cut and bent, gluing is done in the same way as described above. The box is covered with a lid and decorated using a bow. Also, instead of a simple lid, you can use a couple of triangles that will fit completely onto the box.
You can also make a pyramid-shaped box. To do this, use a thick sheet of paper, a ruler and scissors, and a pencil. In addition, you will need to use a hole punch and a disk, ribbon or yarn. In the latter case, the element can be replaced with a plate.
A square is cut out of paper, then using 4 lines it is divided into nine parts. You need to make marks in the central part of all sides of the large square. Triangles are depicted inside. A plate is applied to the sides of the triangle and traced. Next, a figure is cut out along the marked lines. The result is a shape similar to a flower.
It needs to be bent along the lines and form a pyramid. Then holes are made in the upper part, where the ribbon is threaded and tied.
It’s also useful to read: Making a large clock on the wall with your own hands
Festive packaging for cake
The cake box should not only be beautiful, but also durable. This nuance should be followed when making a round “house” for a confectionery product.
Materials:
- poster cardboard;
- stationery scissors;
- compass;
- pencil;
- ruler;
- PVA glue or “Moment”;
- fabric in 2 companion colors.
Instructions:
- Draw a circle of the required diameter on cardboard and cut it out.
- Draw a rectangle whose height will be the height of the box.
- Make an allowance of 4 cm to one side of the rectangle. Cut out the part.
- We cut the allowance in several places and glue it to the circle.
- Draw a circle whose diameter will be 1.5 cm smaller than the first. Cut it out.
- We cover the resulting circle with fabric and glue it on the back side.
- Glue the bottom into the base blank.
- Repeat steps 1-4 for the box lid.
- From cardboard we cut out a rectangle about 8 cm high, equal to the diameter of the base plus 2 cm.
- Glue the side parts of the resulting strip together.
- Glue the strip into the base so that about 5 cm protrudes outward. The lid will be placed on this protrusion.
- Let's start decorating the box. We make circles of fabric a few centimeters larger than the circumferences of the bottom and lid.
- We notch the edges of the fabric circles and glue them to the bases.
- We cut out rectangles from the fabric, which we cover the outer and inner sides of the circle.
- To hide the seam of the fabric from the outside, you can make a small fold. The cake box is ready.
What materials are used for decoration
To prepare the product in question, you first need to prepare a work area. Several criteria will need to be taken into account. Initially, they think about what the future box will look like, select materials and remove everything unnecessary from the table.
To fill a box with something, you need to take into account multiple factors, including the person’s lifestyle and hobbies, who the item is intended for, and design elements.
Lay out on the work surface:
- scissors;
- adhesive;
- pins;
- textile;
- pencil;
- scotch;
- paper;
- decorative elements, for example, rhinestones, beads, etc.
Depending on the external design, you can immediately find out what is inside the box. To give visual effects, you need to use fabric, and it can be new or be scraps of clothing, wallpaper or jute, burlap.
How to make a round hat box
How to make a round hat box?
On New Year's Eve, you could find the most unusual and wonderful masks and costumes in stores. I personally couldn’t resist the luxurious crown. Red velvet, gold, gems! The crown was irresistible!
This is interesting: Kostya Tszyu Zab Judah
While I was carrying it home, I imagined myself as Freddie Mercury in an ermine robe and a crown. The whole family was delighted with my purchase. The crown was placed on a shelf of honor. But soon I realized that it was... collecting dust. And the crown is not a shelf for you; you just can’t wipe it with a rag. So... So we need a hat box! Fine. It is not difficult for me to provide such a beauty with a decent hat cardboard - there is cardboard - cut into A2 sheets.
What methods are used
In this case, you can use different techniques. In particular, the design of the box can be carried out using a method associated with printing on cardboard. This method is one of the most relevant.
Depending on what kind of seal is used, there are varieties:
- flexo printing - in this case the image is transferred directly to cardboard;
- laminating - cardboard is covered with paper on which a design is applied;
- varnishing and embossing.
The next method involves using fabric. Currently, it is quite popular to store items in a box, which is covered with fabric on top. This product looks original. This element fits perfectly into the interior, allowing you to increase its coziness and comfort. The fabric can be used both to cover the box and to decorate the lid. The fabric can be applied both from the inside and from the outside.
The scrapbooking technique is the art of designing postcards with elements in three-dimensional form. This method is used to decorate a gift box or casket. The master has the opportunity to show his imagination, because there are no restrictions or a unified design methodology.
This method fits perfectly into the manufacture of such elements for decorating a box:
- ribbons;
- pom-poms;
- voluminous objects;
- beads or beads.
A box decorated with your own hands becomes an expensive gift, an effective decoration, and reliable storage for things and household items. At home, you can decorate the box using different techniques. These items are prepared with your own hands. For example, it will also be possible to paint the product using the stencil method.
For this purpose, a surface of a single color is used. Initially, the master prepares materials, including acrylic paints, which can also be replaced with gouache, sheets of thick cardboard, a sponge and a brush. A design, or rather its silhouette, is cut out of a sheet of cardboard; it is permissible to paint the background of the box with a different paint. Next, the stencil is pressed tightly against the box and, using a sponge with paint, is soaked.
For decoration purposes, you can use a cookie box. It can be decorated with pictures cut out from magazines. Initially, you will need to select magazines and other publications with suitable pictures. For gluing, glue is used, for example, PVA. It is best to fill the entire surface in this way.
Decoration is done by using egg shells. This technique is quite effective, has some positive aspects, including saving time and giving amazing results. You should prepare a lot of shells, brushes and paint, manicure sticks, glue.
The shell is applied in the form of a mosaic to the surface of the box. The stick is used for leveling. The material is covered with another layer of glue on top.
Features of the decor of New Year's packaging
One of the special features is that when designing, the craftsman takes into account who the box is intended for. If these are children, then they choose images of cartoon characters and colorful pictures. For adults, a more strict, but at the same time festive design is used.
It also takes into account what year is coming, often an animal is depicted on the box, which symbolizes the coming period.
Master class - decorating a box with fabric with your own hands
To decorate the box when using fabric, you can use any type of material, including from guipure to satin. Despite what will be put in the box, the person who receives the gift in this design will be impressed. Handmade shows that the craftsman values the recipient of the gift.
The following stages of work can be distinguished:
- the size is initially adjusted, taking into account a couple of centimeters of allowance;
- elements are attached using transparent glue or tape;
- decorative items are applied, for example, beads;
- the lid is trimmed, the fabric is attached in the same way.
Photo of the process of decorating the box with your own hands:
Thus, decorating boxes requires the existence of different techniques. Boxes can be used to decorate a gift or as a decorative element.
Each decoration method has its own nuances
Working with different materials always has its pros and cons (see table)
| Decoration method | Auxiliary tools and materials | Features of work | |
| Covering a box with paper products | scissors, pencil, ruler, brush, varnish, | PVA glue, stationery knife | make quickly and easily, materials are available |
| Covering with fabric, ribbons, etc. | marking soap, glue or double-sided tape | Rich appearance, good for making jewelry boxes | |
| Decoupage | acrylic paints, sandpaper, cut out designs, | painstaking work requiring skill and patience | |
| Painting with acrylic paints | paints, brushes, varnish, pencil, | sandpaper | the manufacturing process is delayed due to the need to wait until each layer of paint and varnish dries |
| Use of buttons, sequins, coins, rhinestones and similar materials | transparent glue-moment, paper or fabric for the base | the original appearance of the finished product, the work will require diligence, since gluing small parts will take a lot of time | |
The exciting process of turning a nondescript box into a work of art can be a very rewarding hobby for anyone. It’s better not to settle on just one, but to try different methods of decoration. This will require a lot of time and patience, but the end result is undoubtedly worth the effort.
