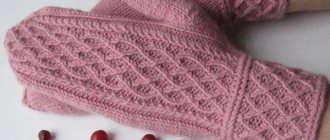
Mittens “Snow twigs”
The pattern, made with knitting needles using the brioche technique, will look great on both women's and men's mittens.
Size: 8.
If necessary, the size of the mittens can be adjusted by decreasing or increasing the number of loops.
To knit this model of mittens we need to prepare :
- yarn, 100% sheep wool, white – 100g;
- a little of the same yarn in a contrasting color;
- set of toe knitting needles No. 2.
Description
Repeated sections of the pattern are highlighted in the description *-*.
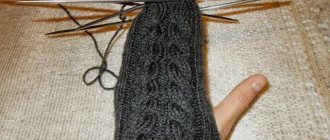
We knit 48 stitches with white yarn and switch to circular knitting, distributing the loops onto 4 knitting needles of 12 stitches each. We make 12cm of rib knit. p. on 1 purl. P.
Then we do 1 circle. a row of contrasting threads - * remove 1 p. from n., 1 p. p.* For the further pattern of the pattern, we do not take this row into account.
We knit the main pattern with knitting needles on the outside of the mittens using 18 sts. The inner side is made with a two-color patent elastic band.
For those who are not familiar with the technique of making two-color elastic in circular rows, it will be easier to understand from the video - watch the master class.
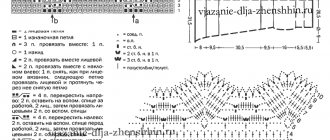
Basic pattern algorithm:
- 1r. (white thread): * 1 k/p, 1 p. slip from n., from 3 sts → 1 k/p slanted to the right, 1 p. slip from n., 1 k/p, 1 p. from n., from 1 p. → 5 sts, 1 p. slip from n., 1 k/p, 1 p. slip from n., from 3 sts → 1 k/p slanted to the left, 1 p. remove from n., 1 k/p, 1 p. remove from n.*;
- 2 rub. (contrast thread): * remove 1 p. from n., 1 p/p*;
- 3 rub. (st. n.): *k1/p, remove 1 p. from n.*;
- 4r. (k.n.): *remove 1 st from n., 1 purl/p*;
- 5 rub. (st. n.): * from 3 sts → 1 k/p with a slant to the right, 1 p. slip from the n., 1 k/p, 1 p. slip from the n., from 1 p. → 3 sts , 1 p. slip from n., 1 k/p, 1 p. slip from n., from 1 st → 3 st, 1 p. slip from n., 1 k/p, 1 p. slip from n., from 3 stitches → 1 k/p with a tilt to the left *;
- 6r. (k.n.): *remove 1 st from n., 1 purl/p*;
- 7r. (st. n.): *k1/p, remove 1 p. from n.*;
- 8 rub. (k.n.): *remove 1 st from n., 1 purl/p*.
We repeat these 8 r. to the desired height of the mitten. There are only 8 repetitions in our master class.
To make the thumb, transfer 8 sts to a pin and then knit the finger using knitting needles. stitch according to the usual knitting pattern for mittens.
We also make the top of the mittens by closing the buttonholes according to the classic pattern.
For everyone
Mittens have always been an indispensable element of winter clothing even in Rus'. Of course, they were homemade, made from sheep or goat wool. Such a product was indispensable for a person of any status and condition.
Wealthy noblewomen covered their mittens with beads, embroidered patterns, and fur cuffs over knitted items that were often dyed brighter colors with natural dyes. And various maids and serfs were content with the classic version, which, although simple, perfectly warmed frozen fingers.
It's fashionable these days
Currently, mittens are not going to give up their positions. They even overcome the onslaught of leather gloves, which may look more elegant, but certainly don’t provide much better warmth. Even now, if you ask an experienced craftswoman about this topic, she will not only show you how to knit mittens. But it will also surprise you with the variety of different knitted patterns.
Thus, the “Princess” mittens, knitted with knitting needles, simply amaze with their tenderness and elegance. The fact is that they are made using very high-quality yarn, which will be discussed a little later.
Such an accessory will become not only beautiful mittens for a little fashionista who wants to warm up her frozen fingers. But also a stylish addition to the winter wardrobe of a true lady who can make them herself.
Since the “Princess” mittens with the description do not require any special skills or costs.
Something you can't live without
It's time to prepare the materials for the mittens. To be honest, they are all the same as if you decided to knit any other winter product.
Yarn
. Its choice should be given great importance, since the preservation of the warmth of your hands will depend on the density of the fabric. So, you should choose threads with a high content of sheep, goat or merino wool. In addition, the composition may include angora, cashmere, viscose and nylon, which will provide your mittens with stretch and softness. In total you will need about 200 meters of yarn.
Spokes
. In this case, a set of 3-4 knitting needles, which are usually used for knitting stockings or socks, is ideal. Their thickness directly depends on the yarn you choose.
You will also need:
- Various knitting things, like a marker or an automatic row counter.
- Beads or half-beads for further decoration.
And finally, how to knit mittens if you have no idea where to start? Or is this your first large-scale creation, which is why you are immensely worried. Then you will need a pattern of “Princess” mittens. She will put your anxiety into place and describe in detail the plan for creating the product.
Mittens “Princess” with description
It's time to start making mittens. To make this lesson clear to knitters of all levels, the process will be discussed step by step, which makes it much easier to understand the new material.
Finishing touches
The mitten is completely ready to add decorative elements. To do this, we will take a transparent thread and use it to fix the beads in certain places of the product.
That’s it, now all that remains is to repeat all the steps in the process of making the second “Princess” mitten, the description of which we have already read earlier. Keep your hands warm and stylish with these homemade cold winter accessories!
These mittens are the idea and creativity of Brooklyn Tweed. This is a fashion designer. His real name is Jared Spot. A young man is a designer who knits his own patterns. He is distinguished by a creative look at ordinary things and a very subtle execution technique. Conducted more than one international project with other designers.
There is a diagram for these beautiful mittens. Let me tell you right away, only a master can do it.
- Explanations for the diagram:
- empty cell - front loop,
- loop symbol - front crossed loop,
- yarn over circle,
- letter T on the side - 2 knit stitches together,
- if the letter T is turned in the other direction - 2 crossed knits.
1577 Svetlana, I’ll correct you a little. Empty cells are purl loops. I knitted these really extraordinarily beautiful mittens.
From personal experience: If you knit exactly according to the pattern, then the palm and finger should be knitted in a 1x1 rib with a crossed knit, which gives the product greater density, this must be taken into account when calculating the number of loops, or take knitting needles one number larger than usual (in the photo these places are knitted with stockinette stitch). You should choose “smooth” yarn. I knitted with 50% mohair, the pattern was somewhat lost, but the result still brought a lot of pleasure. By the way, in fact, knitting these mittens is easier than it seems (I'm an average knitter), the main thing is to be careful. Here you don’t even need to bother with your finger - everything is in the diagram. I wish everyone good luck in creating this masterpiece (well, I really like them)!
The ability to knit mittens with knitting needles allows you to make original gifts for almost any person - this item of clothing is relevant for almost any resident of our country, and thanks to the variety of types and colors of yarn, as well as the available patterns, you can make this product original and unique.
In addition, handmade knitted items never go out of fashion and are regularly present in the collections of the world's leading designers.
A master class on warm princess mittens for the winter, which is published in this article, will help turn ordinary mittens into a real work of art and will not take much time and effort.
The use of various patterns, embroideries and ornaments in the process of knitting mittens makes this product truly bright and unique. And, despite the apparent complexity of making some patterns, creating them is quite simple - you just need attention and accuracy.
One of these patterns is the “Twigs” pattern, or it is also called “Princess”. Indeed, only a real princess deserves to wear mittens with such a beautiful pattern. This pattern is very similar to branches and is formed by yarn overs and decreases done in a certain way.
Although it looks and sounds quite complicated, our master class on warm mittens with a simple Princess pattern will help you with this work.
Mittens "Princess"
Size: 7-8.
For work we need:
- yarn containing kid mohair and silk – 50g;
- knitting needles No. 3.5;
- hook No.0.5;
- markers (M);
- additional thread;
- beads for decoration Ø4 mm – 14 pcs.;
- bells for decoration, 11 mm – 4 pcs.
Description and master class
Left mitten
We collect yarn in three threads, 42 p.
We switch to circular knitting.
Install M.
We make 4 rows with a scarf pattern. Then we knit the cuff according to cx. No1 to a height of 5cm.
Next, we switch to a shawl pattern and knit 4 rows.
We increase the number of sts by 1 p., knitting two from 1 p. We have 43 loops in total.
Next we perform from the 2nd to the 18th p. scheme.
Symbols for the diagram - see below.
In the 18th r. We knit the outermost 11 stitches with an additional thread. The thumb will be knitted on these loops.
We transfer the knitted loops back to the left sp.
We knit from 2 p. → 1 l. p., 7 l. p., from 2 p. → 1 l. p. We have 9 loops left.
We continue to perform the pattern according to cx.
On the 1st sp. everything and. n. we rent for extra. thread and place it on the wrong side of the mitten.
We repeat the steps for the second joint.
We sew the front stitches from both knitting needles. p., using a stitch from stitch to stitch.
We turn the product inside out and use the same seam on the faces. p. sew the remaining loops.
We return to the loops for knitting the thumb. By removing the add. thread, transfer the loops to three sp.
We knit a finger along cx.
Next, if desired, you can decorate the mittens with crystals by sewing them in the places indicated by yellow cells in cx.
Step-by-step photos - see below.
The technique for making beads - bells - is also shown in detail in the photo.
Right mitten
Performed in a mirror image to the left along cx.
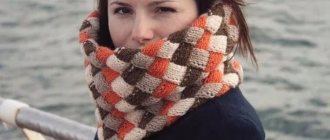
Brioche mittens with braids
SIZE : Single.
YOU WILL NEED:
- Yarn Novita Natura (100% wool; 50 g/100 m) - 1 skein milky white (010);
- 1 skein of sulfur (045);
- stocking needles No. 5;
- knitting needles for braids.
PATTERNS AND DIAGRAMS
RUBBER AROUND
* K1, p1 *, repeat from * to *.
2-COLOR PATENT PATTERN (WHEN KNITTING IN THE CIRCLE)
1st round.r. (milky white thread): * K1, yarn over and slip next stitch *, repeat from * to * to end of row.
2nd circle.r. (gray thread): * yarn over and slip next stitch, p1. knit in a patent pattern (= yarn over and purl the next stitch together) *, repeat from * to * until the end of the row.
3rd circle.r. (milky white thread): * K1. Patent pattern (= yarn over and knit the next stitch together), yarn over and slip the next stitch *, repeat from * to * until the end of the row.
Then repeat rows 2-3.
"BRAID" PATTERN
Execute according to the scheme.
KNITTING DENSITY
16 p. = 10 cm, knitted with a patent pattern in 2 colors (two-color knitting).
COMPLETING OF THE WORK
LEFT MITTEN
Using two milky white threads, cast on 28 stitches and distribute them between 4 double needles, 7 stitches each. Beginning of circle.r. between double needles 1 and 4 - on the outside.
Perform 1 lap.r. with an elastic band. Then break one thread.
Continue knitting with a 2-color patent pattern in the round according to the pattern, starting with the 1st round. milky white color, then repeat fragment A-B on stocking needles 1 and 2 and fragment B-C on stocking needles 3 and 4:
1st round.r. (milky white thread): * K1, yarn over and slip next stitch *, repeat from * to * to end of row.
1st round.r. (gray thread): * yarn over and slip next stitch, p1. patent pattern (= yarn over and purl the next stitch together) *, repeat from * to * until the end of the row.
2nd circle.r. (milky white thread): * K1. patent pattern (= yarn over and knit the next loop together), yarn over and slip the next loop *, repeat from * to * until the end of the row.
2nd circle.r. (gray thread): * yarn over and slip next stitch, p1. patent pattern (= yarn over and purl the next stitch together) *, repeat from * to * until the end of the row.
Continue knitting in the same way and knit each row with milky white and gray thread.
In the 5th circle, knitted with gray thread, start a pattern of “braids”.
Knit on stocking needles 1 and 2. On needles 3 and 4, knit as follows: 3 sts, transfer 4 sts to an auxiliary needle (thread at work) (count the slipped loop + yarn over as one loop), knit 4 sts to the left stocking needle, then 4 sts from an auxiliary needle, knit 3 sts.
Then perform the 6th round. milky white thread.
Knit from 6 p. gray thread up to the 12th p. milky white thread, and then repeat the rows marked in the diagram 5 more times - a total of 6 “braids”.
Attention: When the cuff width is 7 cm, in the next circle.r. (with milky white thread) start increasing the keel of the thumb.
Knit until the last 2 sts on knitting needles 2, then knit 1, yo, 1 knit, yo, 1 knit. - a total of 4 stitches added to the keel = 5 stitches on the knitting needles.
Perform 5 circles. straight, alternately with gray and milky white thread.
Then repeat these increases = 9 stitches on the needles.
Continue working until the length of the keel is 6 cm (= 12 rounds with milky white thread).
Tie to the beginning of the keel and transfer 9 sts of the keel to a separate thread.
Cast on 1 st at the keel section and knit until the length of the mitten matches the length of your index finger.
Reductions from above
Stocking needles 1: knit. p. + remove the yarn over like a knit stitch, knit 2 p. together with the knit stitch, pull the removed loop through the knitted one, knit the remaining loops on these knitting needles.
Stocking needles 2: knit until the last 4 stitches, knit. p. + remove the yarn over like a knit stitch, knit 1, pull the removed loop through the knitted one. Transfer the loop to the left stocking needle, pull the 2nd stitch through it and knit the last loop.
Stocking needles 3: knit in the same way as on knitting needles 1.
Stocking needles 4: knit in the same way as on knitting needles 2.
Perform 3 circles. straight, alternately with gray thread and milky white thread. Repeat these decreases as above = 12 stitches in total, 3 on each double needle.
Perform 1 lap.r. milky white thread: faces. knit loops and yarn overs together, knit and purl. knit loops purlwise.
Break the thread, pull its end through the remaining loops, tighten and fasten.
RIGHT MITTEN
Knit fragment B-C on needles 1 and 2, and on needles 3 and 4 repeat fragment A-B.
Knit the keel of the thumb with milky white thread on stocking needles 3.
Thumb
Distribute 9 sts of the keel, as well as 3 sts of the lower part of the thumb onto 3 stocking needles, 4 sts each, and knit with a 2-color patent pattern in the round.
Having knitted to the middle of the thumbnail (knit the last row with gray thread), begin decreasing.
Perform 1 lap.r. milky white thread: faces. knit loops and yarn overs together, knit and purl. knit loops purlwise.
Then knit 2 stitches together with a slant to the left until the end of the row = 6 stitches will remain on the knitting needles.
Break the thread, pull the end of the thread through the remaining loops, tighten and fasten.
ASSEMBLY
Steam the mittens.
Beige option
Those who know how to knit can create amazing things and also delight their friends and loved ones. One of these charming gifts are mittens for real princesses. A variety of patterns, yarn colors and decorations will help make such a thing a very attractive and invaluable gift. Things that are knitted with your own hands have always been and will be in fashion. Our tutorial shows how to knit such mittens with a description. Following the instructions, we will turn ordinary mittens into a work of art.
What you need to prepare for knitting:
- half-wool threads of beige color;
- fluffy black thread with a silver thread;
- knitting needles number 2.5 and hook number 2.
We need to cast on 40 stitches on the knitting needles. We knit the first row with purl buttonholes. Then we knit all the even rows, knit two loops together and yarn over, and so on until the last buttonhole of the row. We knit all odd rows as the first. In this way we knit up to the 18th row. In the next two rows we knit all the knit stitches and evenly add 6 buttonholes. And in row 21 we knit the entire row with knit stitches, and the next row with purl stitches, 23 with knit stitches.
Related article: Quick DIY birthday gift with photos and videos
Now the canvas needs to be divided into two parts. There will be 23 buttonholes on each knitting needle. We leave one of the halves on the other half, and continue knitting the rest. This will be the front part of the mitten. Already starting from the 25th row, we begin to knit taking into account the pattern. The diagram is presented below. Next we should knit with braids, adding two front buttonholes in each row.
We need to knit this pattern in 42 rows until we reach the bump. Now we make a bump - from one buttonhole we make 6, knit a knit one, then make a yarn over, knit again, yarn over, knit. We unfold the work and begin to knit 5 purl buttonholes and turn them over again - 5 knit buttonholes. Turn again and knit 5 purls. It turns out that we knitted 4 rows with a cone pattern. We turn the product to face us and transfer the buttonholes to the hook. You need to put a thread on the hook, as shown in the photo. Now we knit all the buttonholes together. We transfer the resulting buttonhole to the right knitting needle. Following the picture, we knit a purl buttonhole. We knit the bump, and taking into account the pattern we knit it to the last buttonhole of the row. We knit the next row of the pattern in the same way.
It is better for us to knit the cones on the wrong side using the front buttonhole. The drawing will be completed on the 56th row. Let's look at the photo to see what it should look like:
Now we knit from rows 57 to 63. We knit the back part with black thread. Now we move on to the knitting needle, which will be additional. And from rows 25 to 41 we knit with knit stitches the way the knitting looks. Next we knit the finger. In the 42nd row we cast on 7 and 8 more buttonholes. We knit 20 rows like this. In row 21 we decrease by 4 stitches. We knit the next row with purl buttonholes. In the 23rd row we decrease 4 buttonholes. We tighten the loops in the next row using a hook.
Note. It is better to leave the thread longer. This is necessary to sew the finger in the mitten well.
Next, fold your finger and cast on 7 stitches at the bottom. To make it more convenient, attach your finger to the front side of the product. Now we knit 62 rows with facial buttonholes. Next we knit a flower in the center. To do this you will need an even thread and a hook. We make a chain and then 6 single crochets in the second buttonhole. We knit the second row with 14 single crochets. In the next one - 18 single crochet.
Article on the topic: Do-it-yourself motankas made of thread: master class with photos and videos
Now we need to sew the resulting circle to the front part of the mitten, in the middle of the cones. We knit two parts of the mittens together. In the 64th row the stockinette stitch is knitted. The next row will be purl stitches. We knit 66 rows like this - knit stitch, two together, 17 regular rows - knit stitch, 2 together and 2 knit stitches, 17 knit stitches, two together and one knit stitch. Next we knit the odd ones with purl.
From the 68th row we do everything the same, only we decrease the stitches by 2, that is, already in the 74th row there will be 9 knit stitches. And so we go until there is 1 left, we get this in the 82nd row. We tighten the product using a hook. We secure the thread with half-columns. All that remains is to connect the parts together. Important! Where the knitting is black, we stitch with a beige thread, and the beige thread with black. For decoration, where the mesh begins, we stretch a black thread. You can string beads onto a thread, secure them with knots, and our mittens are ready.
Double-sided mittens “Churros”
sided brioche mittens for size S. If you have a larger size, then the width and finger can be left unchanged, but with the long one you can be tricky.
- Savana yarn from Alessandra (100% merino, 50 g/125 m) 1 skein each in white and gray.
- Stocking needles No. 2.5 and No. 3.5
Description On a needle No. 2.5 we cast on 32 loops using a two-color Italian cast-on. We knit one row of hollow elastic and switch to knitting English elastic. We knit 16 rows of cuff.
We switch to needles No. 3.5 and start knitting according to the pattern.
in the 18th row of the pattern, we put 12 loops on the finger, close the knitting around and continue knitting according to the pattern. We divide the last 8 loops by color and tighten the loops of each color separately.
We return to 12 finger loops, lock the knitting around and knit 16 rows or as many as you need. Again we separate the loops by color and tighten them.
We knit the second mitten in a mirror image.
Let's start knitting products
Knitting cuff
Knitting pattern with description
So, you are ready to get to work. First you need to cast on forty-two loops and divide them evenly onto three or four knitting needles. Mark the beginning of the row with a marker and join in a circle. A marker is necessary to ensure that the pattern does not get lost when knitting.
Knit one round to the marker, remove the marker. Next, remove the loop as a purl, without knitting, leaving the thread behind the knitting. Then place a new marker. Knit one round and then repeat the previous two once.
We knit the cuff further. Pay attention to the fact that the cuff pattern consists of only two types of loops. They are repeated twenty-one times in each circle. Every second circle the placement of the marker changes. So you need to knit until there is one loop left before the marker.
You need to repeat this pattern according to the diagram up to five centimeters of the finished mitten. Then you need to purl one circle to the marker. Then add one stitch - there are now forty-three on the needles - and repeat the first sixteen rounds.
Knitting Thumb Mittens
Knitting pattern with the Princess pattern.
We continue to knit the ornament. Next you need to move on to knitting the transition to the thumb. To do this, you need to knit seventeen loops, and eleven of them must be immediately removed onto a spare knitting needle. Then knit the row to the end. There are forty-three loops on the knitting needles. In the next round, pick up nine stitches from those on the spare needle. So you have fifty-two stitches in your row. Until the fiftieth round, simply knit according to the pattern. As a result, you should have twenty loops left. Divide them into two knitting needles, turn the mitten inside out and simply sew the halves together with a needle.
The thumb is knitted as in any other pattern. There is no pattern on it, so it is easy to knit.
The right mitten is knitted symmetrically - just turn the pattern into a mirror image.
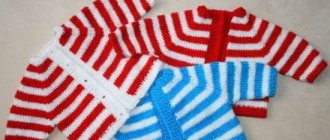
Children's mittens made using brioche technique “Leaves”
We will need:
- yarn containing 80% acrylic, 20% merino wool, 50g per 135m, gray (No1) - about 30g;
- the same sectional colored yarn (No2) – about 25g;
- set of toe knitting needles No. 2.
Description
We cast on 40 loops with knitting needles using yarn No. 1 and knit an elastic band in the round, 1 k/p by 1 p/p to a height of 8 cm.
We put yarn No.2 into work and knit 4 rows with a two-color patent elastic band.
We continue to knit the inner side of the palm with this pattern, and on the outer side from the 5th row. go to the “Leaves” drawing.
His algorithm for knitting 20 loops:
- 1r. (No1): (1 l. p., 1 p. re-p. p. with n.)x3, from 3 loops knit 1 l. p. with a slant to the left, 1 p. retake. purl p.s., 1 l. p., 1 p. will be reshot. purl p.s., 1 l. p., 1 p. will be reshot. purl p. with n., from 1 p. knit 3 p. (= 1 l. p. + 1 n. + 1 l. p.), 1 p. purl p.s., 1 l. p., 1 p. will be reshot. purl p. with n.*;
- 2 rub. and all even (No2): * 1 st. purl p.s., 1 l. P.*;
- 3 rub. (No1): *1 l. p., 1 p. sn. inside out p.s., 1 l. p., 1 p. off. inside out p. with n., from 3 loops knit 1 l. p. with a slant to the left, 1 p. dc. inside out p.s., 1 l. p., 1 p. off. purl p. with n., from 1 p. knit 3 p. (= 1 l. p. + 1 n. + 1 l. p.), 1 p. slip. inside out p. with n., (1 l. p., 1 p. remove from the wrong side. p. with n.)x3*;
- 5 rub. (No1): *1 l. p., 1 p. sn. inside out p. with n., from 3 loops knit 1 l. p. with a slant to the left, 1 p. dc. inside out p. with n., from 1 p. knit 3 p. (= 1 l. p. + 1 n. + 1 l. p.), 1 p. sn. inside out p. with n., (1 l. p., 1 p. sn. purl. p. with n.)x4*;
- 7r. (No1): *1 l. p., 1 p. sn. inside out p. with n.*;
- 9r. (No1): *1 l. p., 1 p. sn. inside out p. with n.*;
- 11r. (No1):* (1 p. p., 1 p. sn. purl. p. with n.)x3, from 1 p. knit 3 p. (= 1 p. p. + 1 n. + 1 l. p.), 1 p. off. inside out p. with n., (1 l. p., 1 p. sn. purl. p. with n.)x2, from 3 loops knit 1 l. p. with a slant to the right, 1 l. p., 1 p. off. inside out p.s., 1 l. p., 1 p. off. inside out p. with n.*;
- 13r. (No1): *(1 p., 1 p. remove the wrong side. p. from n.) x4, from 1 p. knit 3 p. (= 1 l. p. + 1 n. + 1 l. p.), 1 p. off. inside out p.s., 1 l. p., 1 p. off. inside out p. with n., from 3 loops knit 1 l. p. with a slant to the right, 1 p. take off. inside out p. with n., (1 l. p., 1 p. remove from the wrong side. p. with n.)x2*;
- 15 rub. (No1): *(1 l.p., 1 p. remove purl st. from n.)x5, from 1 p. knit 3 p. (= 1 l.p. + 1 n. + 1 l. p.), 1 p. off. purl p. with n., from 3 loops knit 1 l. p. with a slant to the right, 1 p. take off. purl p. with n., (1 l. p., 1 p. remove purl. p. with n.)x2*.
Repeat the pattern to the desired height from 1p. 20 rub.
We knit the thumb according to the classic pattern with sectional-colored yarn. We perform decreases for the toe of the mittens in the usual way.
We offer another interesting model of mittens for knitting.
Brioche style is also used for the main pattern. There is no description in Russian for this model, but experienced craftswomen are quite capable of understanding the drawing using the diagrams.