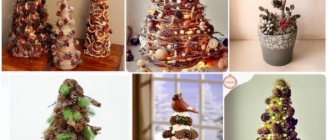
How to make a wreath from pine cones
We will need:
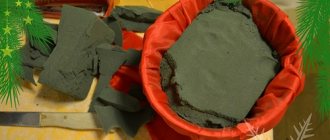
- Base (this can be a wire blank or a cardboard circle)
- Pine cones
- Paints, brushes
- Hot gun
First of all, you need to paint the pine cones. You can choose paint of any colors. Here your imagination can wander as you please. Choose a color scheme that matches the interior of your home. But first you need to paint the cones with white paint so that the multi-colored paint will look more beautiful and brighter.
Place the pine cones in a box and paint them with white spray paint.
When the pine cones are dry, you can take colored paints and get creative
Use thin wire to tie the pine cones to the base.
If you have a cardboard base, then the cones can be glued tightly to each other with a hot gun.
Fill in the entire base, being careful not to leave any gaps, so your pine cone wreath will look more gorgeous.
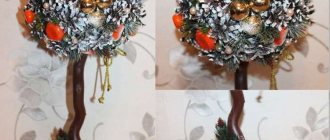
You can make a more formal wreath from pine cones. To do this, you will need to paint the pine cones white and dilute them with yellow leaves.
For the base, you can use branches twisted into a circle, which also need to be painted with white paint.
Use hot glue to attach the pine cones and leaves to the wreath.
The result will be a more monochromatic wreath, slightly diluted with bright accents in the form of leaves.
Making a bright vase for fruits or flowers in the form of a basket
In this section we will tell you how to make such a vase-basket:
For this job you will need:
- Pine cones (about 50 pieces or a little more)
- Thin and thick wire
- Hot melt adhesive
Stages of working on a vase
Now let's look at making a vase step by step. To begin, we connect the cones to each other in a circle with thin wire. It is better to choose a wire that matches the color of the cones, so it will be less noticeable.
We start weaving like this: wrap the short end of the wire around the first cone and twist around the long end:
We substitute the second and subsequent cones to the previous one and wrap the wire around it. We fasten 10 - 12 cones into a circle so that their lower parts are on the outside of the ring.
We proceed to tying the second ring according to the same pattern, only with fewer cones. Now there should be 8 - 10. The basket in this master class consists of two rings, but you can make it deeper by tying a third ring of cones.
We glue the rings using hot glue.
For the handle of the basket, we take 8 or 10 cones and attach them with thin wire to a frame made of thick wire.
You can attach thick cardboard to the bottom of the vase or insert 2 - 3 cones, attaching them with hot glue.
Such a vase can be decorated with ribbons, flowers, and festive compositions can be made in it, including New Year’s ones.
You can make such a vase of any diameter with your own hands, simply by gluing the cones together.
To get started, select a suitable thick cardboard for the bottom of the vase and cut out a circle from it.
We begin to glue the cones along the edge of the cardboard, laying them on their sides so that the top of the head is on the outside. For one row, select cones that are equal in size, then the vase will turn out even. We glue the second, third and subsequent rows in the same way as the first, forming the vase to the desired height.
Read also: How to properly plant hyacinth in a pot
This vase is suitable for compositions of dried flowers and artificial flowers, for various New Year's compositions. You can choose a suitable container, insert it inside the vase and use it for fresh flowers or as a flowerpot.
In addition to all of the above, you can decorate any ready-made vase or other no longer needed container with pine cones, making it a magnificent element of interior decor.
The main thing is not to be afraid to experiment!
Basket of pine cones: step-by-step description
This is a very interesting version of crafts made from pine cones, since the basket can be used in everyday life by putting some objects into it. It will give your home comfort and its own unique style.
To prevent the basket of pine cones from losing its appearance over time, the cones must be fully opened.
We will need:
- Pine cones from 50 to 100 pieces
- Hot gun
- Wire (thin and thick)
- Cardboard
We start making the basket from the base. To do this, wrap the first cone with wire
The second cone is screwed tightly to the first.
By attaching a cone to a cone we will make a circle.
We make the second tier of the basket the same way, only we take a couple of fewer cones
If you need to keep the pine cones closed for a while, soak them in wood glue for about 30 seconds. If, on the contrary, you want to open the cones, then boil them over a fire for 30 minutes, and then dry them on a radiator or in the oven.
For a small basket, two tiers are enough, but if you want it a little higher, then make a third tier, in which again take 2 fewer cones than in the previous one.
Fasten the tiers together using a hot gun.
To make the handle of the basket, take a thick wire of the required length and attach the pine cones to it using thin wire.
Now the handle can be connected to the base.
You can decorate such a basket of pine cones using spruce branches, leaves, and dried flowers.
If your buds are dark, you can lighten them with bleach and then dry them well.
Santa Claus made of pine cones
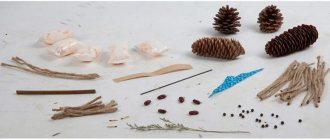
You will need: cones, polymer clay, PVA glue, brush, superglue, hairspray, glitter, thin wire, ribbon.
Master Class
- Make a Santa Claus hat in this way: roll a ball out of polymer clay, then make a cone, bend the tip and attach it to the pine cone.
- Make 4 balls of polymer clay: one ball should be large - make a beard from it. Make two medium-sized balls - form a mustache out of them, and use one small ball for the nose.
- Attach the pieces to the pine cone.
- Brush over mustache and beard to create realistic stripes.
- Thread a piece of wire through Santa's hat and twist a loop.
- Place the craft in the oven for 15 minutes (135 degrees) to allow the clay to harden.
- Remove the craft from the oven. Polymer clay may peel off due to high temperature. If this happens to you, don’t despair - just glue the fallen parts back on.
- Tie the ribbon to the wire.
- Spray the hat with hairspray.
- Sprinkle with glitter.
Santa Claus made from pine cones is ready!
You can make a wonderful snowman out of cones. Watch this video for a detailed master class!
Crafts made from pine cones will perfectly decorate the decor and will be an excellent gift that cannot be found in stores. This natural material can be collected in parks, forests and plantings. It is worth noting that before the process of making crafts, you need to thoroughly clean the cones. If you have collected unbloomed cones, after cleaning, cover them with wood glue, since in a warm environment the cones may bloom and your craft will deteriorate. Imagine and create with your own hands!
Unusual souvenirs are always considered the best gifts. A handmade gift will be doubly valuable. The imagination of the craftsmen extends not only to all kinds of decorations, but also to objects that can be useful in everyday life. They can be boxes and vases. But how to make such a present unforgettable is the task of the master. For those who want to please their loved ones with an original gift, we will tell you how to make a vase from pine cones.
If you look around, you can find a lot of materials at hand that offer unlimited design possibilities. Some of them are literally lying under your feet. These are natural materials, or rather, conifer cones. But for making flower vases, for example, pine ones are more suitable. This is facilitated by their rounded shape. Spruce and cedar are less suitable because their shape is elongated, and this creates a slight inconvenience for decorating such a voluminous object as a vase.
On the Internet, every master of handicrafts offers his own master class on a vase of pine cones. Some are accompanied by a video or photo that demonstrates the work process step by step. Each one is unique. But the principle of making an object is the same: the base of the vase is a cut plastic bottle or other suitable object, and the cones are the material for decorating them.
How to make a vase from pine cones
We will need:
- Pine cones
- Thermal gun
- Wire
Use brown wire so it doesn't stand out in your craft.
We begin work on a vase of pine cones by creating the base.
We collect the cones in a circle using wire in the same way as was described in the master class on how to make a basket of pine cones.
The size of the circle depends on what size vase you need.
Make several such circles. If you want a vase that expands at the top, then the circles should be larger each time.
Use a hot gun to join the tiers together.
Glue a circle of thick cardboard to the bottom to make the vase more stable.
If you want to make a decorative vase, take a bowl of the required size.
Turn it upside down.
Take a hot gun and glue the pine cones to each other in the shape of this bowl.
Don't forget to dry each row.
Finally, spray the resulting vase of pine cones with hairspray.
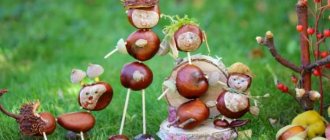
Products made from pine cones may vary in theme. In addition to vases and baskets, the creation of which may not be interesting for all children, you can make figurines of your favorite animals.
Let's look at a step-by-step master class on a vase of pine cones
First you need to tie the cones for the base (bottom) of the vase. We take one large central cone and form a circle of six cones around it. We connect them with each other and with the center. This is what we end up with:
In the second row we attach the cones at an angle of 30 - 45 0 relative to the bottom. We connect them with threads to each other and to the first row.
In the third row, we place the cones parallel to the previous row, at the same angle.
We connect the fourth row of cones in the same way as the previous ones.
In the fifth and sixth row, we tilt the cones inward and tighten them, giving the composition a spherical shape.
The seventh row will be the last. It is better to use smaller cones for it. Pull them together as tightly as possible.
So that you can put fresh flowers in the finished vase, you need to place a cut plastic bottle inside. If desired, coat the vase with clear varnish.
The vase is ready! You can put artificial or fresh flowers in it.
You can make a vase for artificial flowers, as in the photo:
The weaving of this vase differs from the previous version in that the role of the bottom is played by one large cone and another five or six smaller cones are located at a slight angle to it. Next, we knit the cones using the same technology, giving the product the desired shape.
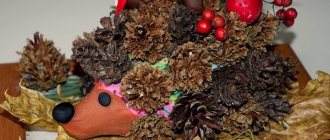
How to make a bear from pine cones for kindergarten
We will need:
- Pine cones: one large and several smaller ones
- Glue
- Acorns (or rather caps)
- A little black plasticine
For the body we need a large bump. For the head, it is better to use a smaller and slightly flattened cone.
1. Hot glue the head to the big pine cone.
2. Look for 4 small bumps for the paws so that they are approximately the same size and attach them to the body.
3. Using the acorn cap you can make a nose.
4. Glue the hat onto the bear’s face, and attach a ball of black plasticine in the center.
5. The eyes can be made from 2 cone scales, and the pupils from plasticine.
6. You will need two more caps of acorns for the bear’s ears.
This craft will take a minimum of material and very little time. But joint creativity will cause a lot of emotions in a child. Moreover, the bear is the hero of many children.
DIY pine cone panel
Do you want to decorate your wall with an unusual painting? For this there is such a craft as a panel.
Cones can amazingly depict flowers on a panel. All you have to do is paint them.
You can attach the cones to the base of your picture in different directions. Also separate the lower or upper tier of the pine cone, using them separately.
It is not necessary to completely fill the base; you can come up with an interesting composition by supplementing it with other materials.
Glue all elements using a hot gun.
You won't find any kind of crafts made from pine cones. If you think that brides choose only bouquets of flowers for their wedding, then you are mistaken. There are original girls with imagination who prefer to use other gifts of nature.