In every home there is a vase that has already lost its presentable appearance or is obsolete. It doesn't have to be hidden in a closet. You can give it a new life by mastering the technique of decoupaging a glass vase. To complete such work you will need a few materials, patience and aesthetic taste. A do-it-yourself vase made from napkins, if the execution technology is followed, can become a worthy interior decoration.
Materials and tools
In the segment of creative products, decoupage occupies a large part. It is also used to decorate ceramic kitchen utensils. Simplicity of execution and many decoration options allow even novice craftsmen to decorate and embellish objects. Therefore, every year new materials are developed for this type of creativity. Various gels, varnishes with unusual effects, interesting designs on various bases are becoming the subject of interest for needlewomen around the world.
In order to make decoupage vases in vintage style, you will need the following materials:
- PVA glue or decoupage varnish;
- double napkin with an image or fabric;
- paints;
- brushes;
- rice paper;
- acrylic varnish in a can;
- acrylic contours;
- alcohol.
Ideas for decorating vases
Currently, there are many popular styles and options for decoupage that can be used to decorate any vase.
With their help, you can give a new look to any product, harmoniously combining the design with the overall style of the interior, or prepare a vase as a gift souvenir for every taste - from classic to sophisticated and fashionable style.
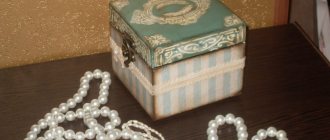
Romantic vintage
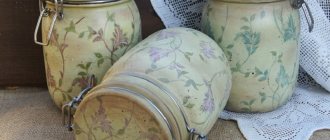
This style is not only one of the classics, but it is also luxurious and never goes out of style.
Decorations in this style feature antique effects, beautiful floral arrangements, and dark backgrounds.
To decorate a vase in a vintage style, you must follow these steps:
- Apply a layer of light paint (white, brown, yellow) to the cleaned surface;
- after drying, add another layer of darker paint on top to contrast with the previous one;
- You can transfer the prepared picture onto the resulting background and then cover the vase with a layer of transparent varnish.
There are also special varnishes that, when applied, create natural cracks on the surface (craquelure). They differ not only in color, but also in the size of the cracks, their shape and quantity - the higher quality the material, the better they look.
Cracks can be filled with special bronze powder before varnishing. Vintage vases are usually decorated with flowers, floral patterns, butterflies, birds, silhouettes of a woman's face and images of crowns, and old photographs.
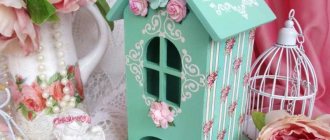
Shabby chic
This style, like vintage, implies a worn-out effect and the creation of romantic mystery. It differs from the previous one in more refined and embellished details - here the cracks are not made “old”, but elegant and luxurious. The details are more delicate, mainly a pastel palette is used: light green, pale pink, blue, beige, yellow tones.
Floral motifs in this style are combined with beautiful images of animals, angels, small birds, ribbons - anything that gives the vase coziness and tenderness can be depicted in the decoration.
To decorate a vase in the shabby chic style, you can use the following scheme of actions:
- Apply brown or dark yellow paint to the surface of the vase.
- After it has dried, cover the vase with light crackling paint of such a color that it is noticeably lighter than the previous one. You will get delicate romantic cracks, not as contrasting as in the vintage style.
- Paste pre-prepared pictures - for example, with images of flowers, leaves and butterflies.
- Cover the entire treated surface with a layer of clear varnish. Once dry, apply another coat if necessary to ensure the vase is smooth and shiny. This coating will last longer than a rough layer of paint and paper, and will be much more practical to use.
It is worth noting that the effect of antiquity can be created using ordinary paper napkins, creating torn edges of the picture and gluing them in such a way that they are replaced along the contour or at the junction of the images. For example, a white background of napkins on a pink or green surface.
By following these simple recommendations, you can easily create unique stylish vases in a short time that will create a cozy atmosphere in any room or become a wonderful souvenir for a birthday, wedding, anniversary or New Year's holiday.
Execution Process
The glass vase decoupage master class should begin by degreasing the surface. You can use alcohol for this. The next step is to paste the rice paper. This is done in order to give the surface a vintage look. The rice paper needs to be torn a little on the top and bottom sides. If the vessel has a convex shape, the paper may lie unevenly. Therefore, breaks on both sides will allow you to adjust the position of the paper.
You need to glue the paper very carefully. Due to its thin structure, it may rupture. But if this happens, the empty areas can subsequently be covered with other fragments. Once the rice paper is pasted, the product must be given time to dry. To make drying faster, you can use a hairdryer.
After the product has completely dried, you can begin gluing the picture. You should choose in advance which fragment will be glued and try it on the product. It is better not to cut out the fragment, but to tear it out of the napkin. This option will allow you to get rid of straight lines that will stand out on the product. If the edges are uneven, the drawing will merge with the general background without clearly defined boundaries.
Wall vases
You will need: glass baby food jars, a board, clamps for clamping the jars, a hammer, screws, a drill, a punch or a screwdriver, 2 hooks for hanging, a brush with iron bristles, a marker, a rope.
Master Class
- Clean the board with a wire brush.
- Make a hole in the clamps using a hammer and punch. It should be on the opposite side of the clamp.
- Mark the places where the jars will be attached with a marker on the board, then drill them.
- Place the jars into the clamps, then insert the screws into the drilled holes in the clamps and secure them tightly.
- Drill holes for hooks (further fastening).
- Insert the hooks and tie a rope to them.
Wall vases made from glass jars are ready!
Images suitable for work
In addition to napkins, other material can be glued to products. Designs can be printed on rice paper. They are called decoupage cards. They are very convenient to use. They come in large format and fit well on the surface. But such materials are usually expensive.
If you don’t want to overpay, you can make decoupage drawings yourself. You need to print the image using an inkjet printer on photo paper. In order for such a picture to be suitable for work, it needs to be thinned out. This can be done using tape. Tape is applied to the back of the printout and carefully removed along with a thin layer of paper. This way you can easily get a thin image suitable for work.
Another way to get the desired image is to print it on a napkin. For this you will need:
- jet printer;
- masking tape;
- paper.
You should select a suitable image in advance and prepare it for printing. You can arrange several drawings on one A4 sheet.
Then take a two-layer napkin and separate its bottom white layer. This is where the image will be printed. To prevent the printer from crumpling this thin sheet of napkin , it must be glued with masking tape to a regular sheet of writing paper. With this method, the printer can easily print an image on a napkin.
Materials
The item that will be decorated – a glass vase, glass, jar or bottle will do. Upon completion of the needlework, even the most inconspicuous container will become a beautiful flower vase.
- A primer for decoupage will come in handy, but you can do without this component.
- Paints – acrylic or gouache.
- Brush.
- Napkins for decoupage.
- Scissors.
- Foam sponge.
- Film - a file for sheets works well.
- PVA glue.
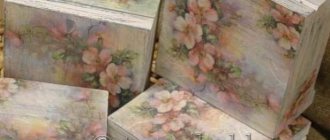
Decoupage floor vase
In order to figure out how to make a floor vase with your own hands, you should get acquainted with the mixed decoupage technique. In this case, not only the image glued to the glass is used, but also other materials. Egg shells, construction putty, or napkin strands can be used.
Let's consider one of the options for making a vase with your own hands. The master class should begin with the preparation of materials. To create the product you will need:
- image on a napkin or other basis;
- glass vessel;
- white paper napkins;
- primer;
- acrylic paint;
- varnish;
- PVA glue.
To make a vase from napkins with your own hands, you must first prepare the base. It should be degreased with alcohol and coated with a primer. When the vase is dry, you can start decorating.
The prepared image is glued to the surface of the product using PVA glue. It is generously moistened with glue and leveled. To make the drawing fit better on the surface of the vessel, you can use a document file. The image must be placed on the file and wetted with a brush. Then carefully transfer it to the product. The image must be removed from the file by lifting one corner. Having placed it on the vase, all folds must be smoothed out with a brush.
After this stage, the entire surface of the vessel must be sealed with rice paper or napkins. Then the product must be left to dry. When it is completely dry, you can start decorating with napkins. They should be rolled into thin flagella. The more strands there are, the more beautiful the vase will be.
Original vase
You will need: a small glass jar or glass, nuts of sizes M5 and M8, superglue for metal work, paper, pencil, gloves, scissors.
Master Class
- Trace the bottom of the jar on paper, then cut it out.
- Glue the M5 size nuts together using the template, then leave to dry. It is worth noting that along the edges you need to glue the nuts that extend beyond the template so that the lid will hold on in the future.
- Glue 4 M8 size nuts to the bottom of the jar and leave to dry.
- Fill the vase with water and insert flowers through the lid.
The original vase is ready! I recommend watching this video!
How to make a VASE with PRINT from a glass jar / VASE OF JAR #DIY NataliDoma
Additional decor options
In addition to the above options for decorating a glass vase, there are other types of decoupage. In the craft store you can find different types of modeling gel. It comes in color and also transparent. Using this gel you can create various effects on glass. This option looks good in combination with motifs printed on rice paper.
Another method of decoupage is the use of craquelure. This effect can be achieved in two ways. The most expensive of them is the purchase of a special varnish, which, when applied, creates cracks on the surface. This surface is decorated with an image, resulting in a vintage style of the product. Another type of crack creation is the use of eggshells. If you pre-glue the shell onto the surface, you get a rather interesting effect . And in combination with the image, you can achieve good decorative results.
By creating a glass vase using the decoupage technique, for example, with a yellow flower in the avatar or other ideas, you can achieve truly unique results. The main thing is to do the work carefully and constantly improve your skills.
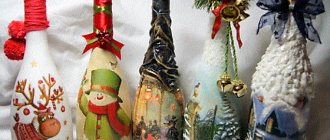
Decoupage vase with threads
In addition to napkins, threads are used in the decoupage technique, and the product looks unconventional and interesting in appearance. Even beginners can do this kind of vase decoupage.
In the process of work, you cannot do without white spray paint, napkins with pictures, PVA glue, putty, syringe, scissors, white thread, varnish in an aerosol can, toothpicks, alcohol and cotton wool.
Decoupage and everything you need
To decorate items, there is no need to shop in specialized stores. You can purchase almost everything you need at the office or ask your younger brothers and sisters.
To start decorating, you need to have on hand:
- Table napkins or rice paper
- Brushes
- Small container for soaking
- Sharp scissors
- Acrylic or polyurethane varnish
- Stationery glue (it is better to use PVA)
And, of course, the product itself is a vase. Decoupage can be made not only for flower vases, but also for bottles, jars or containers for bulk items.
After you have collected the basic materials for the work, you can purchase other decorative elements. It can be:
- Stencils with various designs
- Beads, rhinestones, multi-colored threads, glass
- Stained glass paints
- Paper with artistic images
Not only decoupage
Having mastered simple decoupage of bottles with napkins, you always want more. The smooth surface of the bottle does not provide texture, which can be used to achieve a more interesting effect. You can create an interesting surface with tights or stockings. A master class on this type of decor can be found on the Internet.
To do this, cut one part from a pair of tights, soak it in a mixture of PVA glue and water (proportion 1 to 1) and put it on the bottle. Lay out coattails, waves, any texture.
Instead of tights, you can use decoupage with fabric; the procedures for materials and techniques are similar.
Leave a few spots flat to apply the napkin. Dry completely, prime with a special compound or acrylic paint. Now you can decoupage the bottles, tint them, bring your ideas to life, or leave them as is.
Article on the topic: Birdhouse made of plastic bottles: MK (+40 photos)
Another way to get texture: wrap the bottle with threads; colored threads are quite suitable for sewing of different thicknesses. Colored thread decor is also quickly obtained when using cotton yarn for knitting.
Using alternately threads of different colors you can get a very stylish decorative item; secure the threads with PVA glue. The decor of bottles with twine and threads should be varnished and used as a vase, or you can prime, paint and stick on napkins.
History of decoupage
Translated from French, “decoupage” means “to cut out.” This technique appeared in the east in the 12th century, where they first began to decorate furniture, walls, and household items with decorative pictures. Created by hand and varnished, they created the illusion of artistic painting.
In Europe, this technique gained popularity in the 17th century; society ladies enjoyed decorating their salons with cute little things brought from oriental craftsmen.
Additional features
The technique of “cutting out pictures” seems simple only at first glance. In fact, it is quite versatile, divided into types: direct, reverse decoupage, classic, volumetric. Having updated the vase using the usual method of direct decoupage, with the help of auxiliary elements it is turned into a real masterpiece. To see this, let's consider several additional techniques used in the decorating process.
The impression of wear
There are several ways to recreate the image of a hundred-year-old item from a brand new, just purchased vase. One of them is artificially created abrasion of an object. To use this technique, you need to prepare two types of contrasting acrylic paint, brushes, wax or candle wax, and fine-grit sandpaper.
The vase is first painted in a light color and given time to dry. Then rub the areas of future abrasions with wax. Apply dark paint and dry completely again.
At the next stage, using sandpaper (or a hard sponge), carefully remove the wax, rubbing the surface until a realistic look of an aged product is obtained.
Preparation
To decoupage a vase with your own hands, you need to prepare in advance the tools and materials for the upcoming work. Everything is purchased at construction markets and handicraft stores.
Beginners can use the sales department of the office.
In craft stores they buy ready-made pictures on decoupage cards, rice paper, and napkins.
But this decoration technique allows you to work with designs on any paper media: magazines, newspapers, photographs, posters - on everything that can be found at home.
So, for work you will need:
- vase of any size, from any material;
- pictures (the motif is chosen to taste);
- acrylic foundation paint;
- varnish for the material from which the vase is made, as well as finishing varnish;
- soft brushes;
- sandpaper;
- alcohol for degreasing;
- gypsum or acrylic primer;
- PVA glue, half diluted with water, or office glue, you can use a special one for decoupage;
- sponge for shading paint;
- a bowl of water in which the pictures will be soaked.
A basic set of materials and tools is listed. With its help you can produce the simplest version of decoupage. For the flight of creative imagination, you will need additional materials. If the design is supposed to be made voluminous, use textured paste with special fillers, for example, sand. This will help create relief, which will be covered by the landscape picture.
To get an aging effect, you can use craquelure varnish - when it dries, it breaks the paint and covers the surface with a thin mesh.
Vases are decorated with rhinestones, round glass beads, feathers, mother-of-pearl, and even eggshells. Sometimes fabric, foil, gold thread or ribbons may be needed to complement the artistic image.
Preparing a glass, ceramic or plastic flower vase occurs in different ways. A primer can be applied to the plastic surface. Smooth and sliding materials are left as is before gluing, only lightly treated with coarse sandpaper to create adhesion between the surface and the adhesive base.
Knowing the basic techniques of decoupage techniques, you can use them at home on any objects and surfaces. But for better quality work you will need an individual approach. Let's consider master classes on vases made from several different materials.
Plastic
The plastic surface is usually primed to create a more expensive look. After drying, sand it with sandpaper,
achieving absolute smoothness.
Then it is painted twice with tonal acrylic paint.
Sometimes white paint is used as the first layer
, and then a tone
corresponding to the picture is applied.
The dried surface is degreased with alcohol before gluing .
The napkin is placed in a bowl of water, then taken out, laid out face down and the carrier paper is removed, leaving only the top layer with the pattern. For example, napkins come in three layers, which means two layers should be removed.
The prepared thin layer of the picture
is coated with glue and carefully applied to a degreased surface.
Often the design is cut or torn into fragments, and the composition is put together on the vase itself.
Each element is carefully smoothed with a damp brush
.
The finished product must be left until completely dry, and then several layers of varnish must be applied to the surface.
If the vase needs tinting, shading of the background and other work that enhances the artistic value of decoupage, they are carried out before applying the varnish coating.
Glass
Glass is transparent, and this is often used by decorators to perform the reverse decoupage technique.
An example of direct decoupage is given above. Decoration is carried out on the outside of the vase, that is, on the glass.
Reverse decoupage involves gluing appliques to the inside of an object - behind glass. In this case, there is no need to apply varnish on the front side.
When starting to work on a vase, you should wash off the dust, dry it, and then do everything as in direct decoupage, only in the opposite direction.
First, a picture is glued under the glass, then craquelure is applied, the background is shaded and secured with finishing varnish.
By decorating a large floor vase, you can completely change its visual structure. Using putty and gypsum primer, it is quite possible to turn it into an old antique vessel, then select the appropriate picture and cover it with matte varnish.
"Antique"
This technique of decoupaging a vase with napkins can turn an absolutely nondescript object into a real masterpiece. A special varnish, which is applied between layers of wet paint, gives such products a vintage look.
After the varnish dries, the surface cracks. The size and number of cracks directly depends on the amount of varnish.
To properly age a vase and achieve the desired effect, we have prepared instructions for beginning needlewomen:
- Degrease and dry the vessel
- Cut out the design and soak in water for a minute
- Lay out the design on the fabric. Apply glue liberally to the back side
- Place the fragment on the vase with the wrong side. Cover the outside with adhesive.
- Dry the workpiece. For a faster effect, you can use a hairdryer.
- Apply the first layer of craquelure varnish, then the second. Dry each layer.
- At this stage, you can fill the cracks with bitumen or bronze powder.
- Cover the vase with varnish and let dry.