Needlework
06/30/2018 Anastasia Prozheva
Each of us uses a calendar. It is necessary so that we know what day, month or year it is. Every year or month we buy new and new calendars. What if you create a perpetual calendar with your own hands and spend almost no money? The essence of this calendar is that we create individual details, such as numbers, months and years. It is very convenient to use and can serve you for a long time.
Manufacturing process
Making a perpetual calendar with your own hands can be seen in the example of a master class.
For this we will need: a calendar blank, glue, a brush, a sponge, a napkin and decoupage varnish, a stencil with numbers, a stencil with months, acrylic paint, stain.
We will use all wood blanks. Firstly, it is very easy to glue any part onto wood. Secondly, if we want to change the design of our perpetual calendar, we can simply remove the top layer and start painting the product again.
We start by coloring the entire workpiece. Using a sponge, stain all surfaces of the wood, including cubes and rectangles. Let it dry.
Now let's start working with the napkin. We separate the top layer and cut out or tear off the design that we want to use for the perpetual calendar. We place it on our blank and see if it fits.
If yes, then apply a couple of drops of glue to the center of the picture and carefully spread the glue over the napkin using a brush. Since the napkin is very thin and can tear, you need to do everything very quickly and do not pass it over one place several times. Let it dry a little, and now our drawing is glued.
If you want to put something on the back, such as a quote or another design, then print or cut the tissue paper again and adhere to the back, applying glue to the middle and spreading it to the edges.
Article on the topic: Crochet blouse for a newborn boy and girl: how to knit a blouse with patterns and description of work
Now it’s time to work with the stencils. We use a stencil with numbers for cubes, and a stencil with months for rectangles. Using these geometric shapes, it will be easy for us to move them in the blank for the perpetual calendar. We glue stencils around the cubes and planks. Then we cover everything with colored acrylic paint, let it dry and remove the stencils from the base.
The cubes must be glued according to this pattern. Don't worry that there is no number "nine", you will use it by turning the cube with the number "six" upside down.
Then, using a colorless varnish, you can take an acrylic one, cover our calendar completely and let it dry.
DIY perpetual calendar
Hello, dear readers and DIYers! In this article, Steve, author of the YouTube channel “Steve Ramsey - Woodworking for Mere Mortals,” will tell you how easy it is to make a “perpetual calendar.”
So, the master will share with you the secret of how to make a perpetual calendar.
Sounds tempting, doesn't it? The calendar structures and organizes our entire life. But not only its presence is important, but also its execution. Materials. — Plexiglas or plexiglass — Cherry boards — PVA glue — Vinyl spray varnish.
Tools used by the author. — Clamps — Electric jigsaw — Circular saw — Scissors — Milling machine — Screwdriver, drills — Ruler, pencil, square, rubber spatula. Manufacturing process. For this project, the author takes several planks of cherry wood. This board has already been sawn to 8 mm thickness. The other two boards will form the base of the structure. They are already cut to the required length.
Steve uses a router to cut profiles around the perimeter of the wood pieces. Then he has to make a small cut into which the glass front of the calendar will fit. To do this, the master sets the blade of the circular disk at an angle of 15 degrees. Steve's workshop found a small glass of suitable sizes. The author removed it from a photo frame. These frames are very inexpensive. It is advisable to use plexiglass or plexiglass, because the perimeter of the glass will not be protected by anything. Initially, the author was going to use two boards for the base of the calendar. But after he inserted the glass into a groove specially made for it, he noted that one board was quite stable and stable. Also, at first Steve wanted to put all the numbers on a wooden panel, but after thinking about it, he realized that for this he would have to buy a laser engraver - and this thing costs a lot of money. Another idea was to use an inkjet printer, but in this case the numbers would not be as clear and accurate as they should be.The author comes up with a third solution: a vinyl cutter, a plotter, which is available in any sign and advertising company. In one of them, the author places an order by providing employees with a file with a calendar layout.
Now all that remains is to transfer the numbers and letters onto wood or glass. Steve prefers glass as a base - it looks cooler! The author takes images from the backing sheet onto transport film.
Steve made markings on the film so that there was a frame/border around the entire perimeter of the sheet, which would help him later adjust the size of the layout to the size of the glass. Next, Steve will need a polishing tool or plastic spatula to press all of these symbols properly. Now it is important not to drag the film, but to sort of peel it off the glass. Several signs still stuck on the transport film. The author pastes them in by hand. And that's what happened! The author originally wanted to glue the numbers to the back of the glass, but their adhesive surface is too gray. Now all that remains is to make the slider - the frame. First, he cuts out a rough version of the window from paper to make sure it is the right size. Next, he transfers all the parameters onto a wooden board. Even before the author cuts out a window in the board, he cuts out a couple of small strips from the same board to make a slider strip from them.
Now Steve uses an electric jigsaw to cut out a window, having previously made four entry points in the board.
Then he glues the strip on. He sawed it in such a way that the wood fibers in it ran in a direction perpendicular to the direction of the grain on the board. This way the whole part will become more rigid and the window will not sag.
Grinds all edges of the frame on an orbital machine.
And stick on the days of the week.
Good mood, good luck, and interesting ideas to everyone!
Source
Become the author of the site, publish your own articles, descriptions of homemade products and pay for the text. Read more here.
Interesting examples
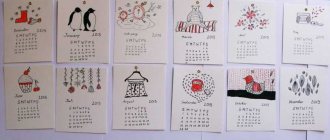
As you can see, you can use different blanks and cover our perpetual calendar with different patterns. It can not only be covered with napkins or paper. If you are good at drawing, then try to draw something on it. Perhaps you are a wood carver and can cut out a beautiful pattern or burn a picture, numbers, months. Using your imagination, you can create exactly the decor item that will fit perfectly into your interior. In the photo below you can see a selection of interesting ideas.
What materials can be used for creativity?
When creating a calendar for children with your own hands or a stylish interior decoration, you can use a variety of materials.
This beautiful calendar easily combines and combines paper and cardboard, wooden bases and plywood boards, candy boxes and soft felt, fabrics and threads.
To give originality to the appearance of the finished product, preference is given to decorative ornaments and decor.
For the creative process, you can use last year's postcards and craft paper, family photographs and beautiful pictures, figurines of animals and birds, and any waste materials.