master class with photos and videos
Nowadays it is difficult to surprise someone with a gift. But you want to make an exclusive gift? A lesson can come to the rescue, thanks to which you can learn how to make strawberries from candies with your own hands. It will help not only to create a fragrant berry, but also in the future, having mastered the techniques and shown imagination, it will allow you to use them in the production of other unique compositions that can lift the spirits of close relatives and friends.
The process of creating such a strawberry is quite simple, although it requires some knowledge.
Sweet berries
We can say that this master class is designed to use quite accessible materials. The list below can be adjusted taking into account the availability of similar materials.
- Corrugated paper. It is advisable to choose red, white, yellow and green colors;
- Special wire, it can be purchased at a flower shop;
- Double sided tape;
- Threads;
- Scissors;
- Wire cutters;
- White marker or pencil;
- Candies. It is recommended to choose candies of different sizes to make the composition look more realistic. Truffle-shaped and small round shapes work best.
Step by step analysis
Creation of berries. First we need red paper. It is necessary to cut a strip approximately 2.5 cm wide and divide it, depending on the size of the candies, into several parts.
Sweets can be different in size and volume; this point must be taken into account.
You need to cut the strip into pieces in such a way that after the candy is wrapped in it, you get a small tail. It is necessary for later attaching the candy to the wire.
The resulting pieces of paper must be carefully folded in half and lightly pressed with your fingers to accurately determine the center of the workpiece. Holding the ends, the workpiece should be slightly twisted at the bend. We twist the required number of pieces of paper in the same way and set them aside for now.
Now you need to prepare the strawberry “stem” for work. For this, it is best to use wire. It is malleable and easy to shape into the desired shape. If you remember what a strawberry bush looks like in reality, you can understand that ripe berries hang on the bush. Therefore, to give the composition maximum similarity, it is better to use wire.
We divide a piece of wire into several parts. Using wire cutters, we create a small loop at one end that will help secure the candy without piercing it. Now the end of the wire with the loop needs to be wrapped with double-sided tape.
Let's attach the candy. But first you need to bend the upper end of the wrapper. And using the lower end, we attach the candy to the wire with a thread. There is no need to cut the thread yet.
After making sure that the candy is well secured to the wire, you can begin to wrap it in the prepared corrugated paper. To secure the paper, wrap the ends several times with thread, which should not be cut off yet.
Next you need to make green leaves. Cut out a piece of green paper measuring 3 by 4 centimeters. The quantity depends on the number of berries that will be in the composition. We make small cuts on the narrow side of a piece of paper and slightly twist the ends with our fingers. It should look like in the photo.
We wrap the resulting leaves around the red berry and tie the thread. Now it can be cut off. The stem can be decorated with a strip of green paper.
The last “touch” remains. You need to put small dots on the red part of the berry with a white marker or pencil.
We make the remaining strawberries in the same way.
We make flowers. For the flowers you need yellow paper. From it we cut out rectangles measuring 3 by 4 centimeters. To create one flower you will need two such blanks. One of the corners needs to be rounded. And for the second one you need to make cuts along the wide edge approximately to the middle to get a “fringe”.
Now you need white paper. We cut out a blank measuring 2 by 4 centimeters at the rate of five pieces per flower. Using rounded scissors, we give the workpiece a rounded shape on three sides.
Finally, you can start assembling the flower from individual parts. We fix the candies on a wire and wrap it with a piece of yellow paper with a rounded corner, and wrap it with thread several times from the bottom. Next, we use a yellow blank with a “fringe” and secure it with thread again.
The white leaves need to be lightly crushed with your fingers to give them a more natural look. We fasten one by one around the yellow center of the flower and again wrap it with thread and cut it. The stem can be decorated with a strip of green paper.
Similarly, you need to prepare the required number of flowers. All that remains is to collect all the parts of the composition together and place it in a suitable vase.
Video on the topic of the article
For inspiration, you can check out the following videos:
Similar articles:
knittochka.ru
Sweet berries
We can say that this master class is designed to use quite accessible materials. The list below can be adjusted taking into account the availability of similar materials.
- Corrugated paper. It is advisable to choose red, white, yellow and green colors;
- Special wire, it can be purchased at a flower shop;
- Double sided tape;
- Threads;
- Scissors;
- Wire cutters;
- White marker or pencil;
- Candies. It is recommended to choose candies of different sizes to make the composition look more realistic. Truffle-shaped and small round shapes work best.
Step by step analysis
Creation of berries. First we need red paper. It is necessary to cut a strip approximately 2.5 cm wide and divide it, depending on the size of the candies, into several parts.
Sweets can be different in size and volume; this point must be taken into account.
You need to cut the strip into pieces in such a way that after the candy is wrapped in it, you get a small tail. It is necessary for later attaching the candy to the wire.
The resulting pieces of paper must be carefully folded in half and lightly pressed with your fingers to accurately determine the center of the workpiece. Holding the ends, the workpiece should be slightly twisted at the bend. We twist the required number of pieces of paper in the same way and set them aside for now.
Related article: Elegant crochet tunics with diagram and description
Now you need to prepare the strawberry “stem” for work. For this, it is best to use wire. It is malleable and easy to shape into the desired shape. If you remember what a strawberry bush looks like in reality, you can understand that ripe berries hang on the bush. Therefore, to give the composition maximum similarity, it is better to use wire.
We divide a piece of wire into several parts. Using wire cutters, we create a small loop at one end that will help secure the candy without piercing it. Now the end of the wire with the loop needs to be wrapped with double-sided tape.
Let's attach the candy. But first you need to bend the upper end of the wrapper. And using the lower end, we attach the candy to the wire with a thread. There is no need to cut the thread yet.
After making sure that the candy is well secured to the wire, you can begin to wrap it in the prepared corrugated paper. To secure the paper, wrap the ends several times with thread, which should not be cut off yet.
Next you need to make green leaves. Cut out a piece of green paper measuring 3 by 4 centimeters. The quantity depends on the number of berries that will be in the composition. We make small cuts on the narrow side of a piece of paper and slightly twist the ends with our fingers. It should look like in the photo.
We wrap the resulting leaves around the red berry and tie the thread. Now it can be cut off. The stem can be decorated with a strip of green paper.
The last “touch” remains. You need to put small dots on the red part of the berry with a white marker or pencil.
We make the remaining strawberries in the same way.
We make flowers. For the flowers you need yellow paper. From it we cut out rectangles measuring 3 by 4 centimeters. To create one flower you will need two such blanks. One of the corners needs to be rounded. And for the second one you need to make cuts along the wide edge approximately to the middle to get a “fringe”.
Related article: Macrame bracelets for beginners: do-it-yourself weaving patterns with beads
Now you need white paper. We cut out a blank measuring 2 by 4 centimeters at the rate of five pieces per flower. Using rounded scissors, we give the workpiece a rounded shape on three sides.
Finally, you can start assembling the flower from individual parts. We fix the candies on a wire and wrap it with a piece of yellow paper with a rounded corner, and wrap it with thread several times from the bottom. Next, we use a yellow blank with a “fringe” and secure it with thread again.
The white leaves need to be lightly crushed with your fingers to give them a more natural look. We fasten one by one around the yellow center of the flower and again wrap it with thread and cut it. The stem can be decorated with a strip of green paper.
Similarly, you need to prepare the required number of flowers. All that remains is to collect all the parts of the composition together and place it in a suitable vase.
MASTER CLASS “BERRIES AND FLOWERS OF STRAWBERRY”
Hello my dear neighbors! Today, as promised, I am posting a master class on creating candy strawberries and strawberry flowers. For work we will need the following materials: 1. Corrugated paper in red, white, yellow (not pictured) and green.2. Floral wire (I have No. 1).3. Double-sided tape.4. Tape tape (in the absence of tape tape, you can use strips of green corrugated paper).5. Threads.6. Scissors.7. Wire cutters (in my case, side cutters).8. Candies (it is better to use candies of different sizes so that our “berries” look more realistic in the composition).
So, let's get to work. From a roll of red corrugated paper, cut a strip 2-2.5 centimeters wide.
Then we cut this strip into 5 equal parts. But here I will make a small reservation. The fact is that candies have different sizes. This needs to be taken into account. If you have a large candy (“Autumn Waltz”, “Inspiration”, “Truffle”, etc.), then the strip needs to be cut into four parts so that we have a tail to which we will later attach the wire.
After we have cut the strip into pieces, we take the workpiece and fold it in half, thereby marking the middle of the workpiece.
Next, we twist our workpiece once exactly in the middle.
This is what should happen.
Once we have made the required number of blanks for the berries, we proceed to the wire. I'll explain why I take the wire. When assembling a bouquet, our task is to create the most realistic look of the composition. You all know that in life a strawberry does not stick out with the berry up, but hangs down. Using wire, we can bend the leg in any position. So, we divide the wire into three parts.
Then we make loops using wire cutters. We make loops so as not to pierce the candy.
Next, we wrap the wire with double-sided tape.
We begin to attach the candy. At the same time, do not forget that we need to bend the upper tail of the candy wrapper, twisting it 2-3 times at the top at the base. We do not tear off the thread.
After our candy is securely fastened, we dress it in a “strawberry outfit” and secure it with thread. Our berry is almost ready, but we are not tearing off the thread yet, because... we need to put a sepal on the berry.
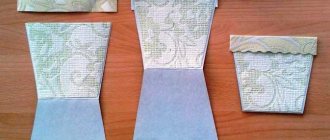
For sepals, we will need blanks of green corrugated paper 4 centimeters high and 3 centimeters wide. We make them exactly as many as we have berries.
Next, we cut out a “fence” from the blank.
And now we attach the sepal to the berry. We cut off the thread.
Taping the leg.
All that remains is to put the dots and that’s it, our berry is ready.
Let's move on to creating strawberry flowers.
To do this, we take yellow corrugated paper and cut blanks 3 centimeters high and 4 centimeters wide. I'm skipping this process. Next, to create one flower, we take two blanks and do the following. We cut off the upper left corner of the first piece, as in the photo on the left. We cut the second blank with “noodles”, not cutting to the bottom edge of approximately 1.5 centimeters. Photo on the right.
Then we move on to white corrugated paper from which we cut out blanks 4 centimeters high and 2 centimeters wide. From the resulting blanks we cut out the petals of the future flower. We need 5 petals for one flower.
Once we have everything prepared, we begin assembling our flower. We attach the candy to the wire and start with yellow blanks.
We wrap the candy without cutting the thread.
Then, we wrap our candy with a blank, cut into “noodles”. We do not cut the thread.
It should look like in the photo.
Now let's move on to the petals. We attach them one by one.
The result should look like this.
We tape the stem. And our flower is ready.
We make the required number of blanks and then proceed to assembling the composition.
stranamasterov.ru
Master class on candy bouquets: Berries and strawberry flowers
Author: Tatiana (Endy)
Author's blog
For work we will need the following materials:
- Corrugated paper in red, white, yellow (not pictured) and green.
- Floral wire (I have #1).
- Double sided tape.
- Tape tape (in the absence of tape tape, you can use strips of green corrugated paper).
- Threads.
- Scissors.
- Wire cutters (in my case, side cutters).
- Candies (it is better to use candies of different sizes so that our “berries” look more realistic in the composition).
So, let's get to work. From a roll of red corrugated paper, cut a strip 2-2.5 centimeters wide.
Then we cut this strip into 5 equal parts. But here I will make a small reservation. The fact is that candies have different sizes. This needs to be taken into account. If you have a large candy (“Autumn Waltz”, “Inspiration”, “Truffle”, etc.), then the strip needs to be cut into four parts so that we have a tail to which we will later attach the wire.
After we have cut the strip into pieces, we take the workpiece and fold it in half, thereby marking the middle of the workpiece.
Next, we twist our workpiece once exactly in the middle.
This is what should happen.
Once we have made the required number of blanks for the berries, we proceed to the wire. I'll explain why I take the wire. When assembling a bouquet, our task is to create the most realistic look of the composition. You all know that in life a strawberry does not stick out with the berry up, but hangs down. Using wire, we can bend the leg in any position. So, we divide the wire into three parts.
Then we make loops using wire cutters. We make loops so as not to pierce the candy.
Next, we wrap the wire with double-sided tape.
We begin to attach the candy. At the same time, do not forget that we need to bend the upper tail of the candy wrapper, twisting it 2-3 times at the top at the base. We do not tear off the thread.
After our candy is securely fastened, we dress it in a “strawberry outfit” and secure it with thread. Our berry is almost ready, but we are not tearing off the thread yet, because... we need to put a sepal on the berry.
For sepals, we will need blanks of green corrugated paper 4 centimeters high and 3 centimeters wide. We make them exactly as many as we have berries.
Next, we cut out a “fence” from the blank.
And now we attach the sepal to the berry. We cut off the thread.
Taping the leg.
All that remains is to put the dots and that’s it, our berry is ready.
Let's move on to creating strawberry flowers.
To do this, we take yellow corrugated paper and cut blanks 3 centimeters high and 4 centimeters wide. I'm skipping this process. Next, to create one flower, we take two blanks and do the following. We cut off the upper left corner of the first piece, as in the photo on the left. We cut the second blank with “noodles”, not cutting to the bottom edge of approximately 1.5 centimeters. Photo on the right.
Then we move on to white corrugated paper from which we cut out blanks 4 centimeters high and 2 centimeters wide. From the resulting blanks we cut out the petals of the future flower. We need 5 petals for one flower.
Once we have everything prepared, we begin assembling our flower. We attach the candy to the wire and start with yellow blanks.
We wrap the candy without cutting the thread.
Then, we wrap our candy with a blank, cut into “noodles”. We do not cut the thread.
It should look like in the photo.
Now let's move on to the petals. We attach them one by one.
The result should look like this.
We tape the stem. And our flower is ready.
We make the required number of blanks and then proceed to assembling the composition.
Result:
Candy strawberries. Master class with step-by-step photos
Do you want your gift to make someone feel emotional? Give him an exclusive sweet present - strawberries made from candies with your own hands.
Previously, we already got acquainted with a simple technique for making gifts from candy. Now we offer a slightly more complex technique, since the thing is supposed to be not flat, but three-dimensional. But this process is quite simple to perform. In addition, we again offer a master class using affordable materials that can be found in almost every home any day.
How to make a gift from Strawberry candies
This work will only take an hour or two, provided that the main preparation - the base of the strawberries - has already been made by you. Materials you will need:
- polyurethane foam;
- balloon;
- sweets in suitable wrappers;
- double-sided tape or glue;
- decorative ribbons and leaves;
- scissors;
- pin, thread.
Blank for needlework from polyurethane foam
Separately, we would like to dwell on the manufacture of the base - a mold made of polyurethane foam. The fact is that this simple method is also widely used in topiary. We advise you to take note of it. You need regular balloons and construction foam. Blow the foam into the ball and tie it lightly with thread to allow air access. Let it harden. This will take about 24 hours. Don't forget about foam's ability to expand. The volume with which you fill the ball should be slightly less than what you expect to extract in the end. This method allows you to obtain a perfectly round or oval-shaped workpiece. When the foam dries, the ball itself can be easily removed by hand. If it sticks, remove it with a knife, just like peeling an orange.
If there are no balloons in the house, it doesn’t matter either. Choose a regular cardboard box of the desired shape. Square, rectangle - whatever will most closely resemble the item you need. Later, you can cut off all the excess from the formed block of foam with a knife, like Michelangelo.
DIY candy strawberries
Now let's move on to our candy strawberries, a master class on which is the main mission of this article.
- We make a blank for the base. Since we didn't need a perfectly round shape, we used a small tea box with foam blown into it. After drying, cut off the top. It was suitable for work because it was shaped like a berry. The excess was cut off, and a notch was made on top with a knife for future roots and leaves.
- We form the “nose” of the strawberry. We tie the tails of three candies together with a thread. Turn them inside out so that they are inside.
- Using tape or glue, attach the “spout” at the bottom of the base.
- We glue the tape to the back of the candies, first tucking the tails of the wrappers.
- We cover the foam blank with candies, moving from bottom to top.
- We form green leaves from decorative tape.
- Using a pin, pin the ribbon.
- We attach decorative leaves and a root on top of the tape.
If desired, you can prepare a whole basket of forest berries. Simple, fast and very sincere.
domrukodelia.com
Let's summarize
- To make a strawberry bouquet you need fresh and strong berries, as well as sharp bamboo sticks and wrapping paper.
- To make the bouquet look more lively, it is advisable to supplement it with other sweet products - candies, marshmallows.
- If you need to transport strawberries far and you are afraid that the berries will wilt, you can dip each one in melted chocolate - this will make the bouquet taste more refined, and it will look more expensive.
- If you want the gift to look “strawberry” but keep well, use gelatin or neutral glaze.
And in this video you can see the creation of a strawberry bouquet step by step. The “partner product” is candy, as well as several sprigs of fresh mint.
When using materials from thebestvideo.ru, a link to the source is required.
Berry candies
Sweet berry candies are deservedly popular. This delicacy delights with its exquisite taste and does not contain harmful additives - it will benefit both adults and children.
Helpful information
Berry candies
Berry candies should be stored in a cool, dry and dark place. It is better to prepare them in small portions - due to the lack of chemical additives, the delicacy cannot be stored for a long time (it is unstable to heat, light and moisture). The exception is frozen candies - you can stock up on them for future use. Dried fruit candies can be stored for about a week. It is better to eat a delicacy made from fresh berries right away (such sweets can be kept in the refrigerator for 1-2 days).
Berry lollipops
Lollipops made from berry juice are much healthier than store-bought candies. To prepare the delicacy you will need only two ingredients: juice and sugar (for 1 part liquid – 2 parts sugar). Mix the berry juice with sugar and boil until the desired thickness (a drop of syrup placed in cold water should “set” and turn into a plastic ball). Pour it into greased molds and cool.
Protein candies made from fresh berries
Large lingonberries, raspberries or black currants are suitable for making these sweets. Beat the egg white by adding 1 tbsp. powdered sugar. Using a spoon, dip the berries into the egg white and carefully transfer to a plate with powdered sugar. After rolling the berries in it, place the candies on a plate, leaving some distance between them. Store the treat in the refrigerator.
Candies with raisins and dried apricots
Combine steamed raisins and dried apricots in equal parts. Add 1 part dried nuts. Process everything using a blender or meat grinder. Add honey to taste. Form into balls. For dusting, use cocoa, powdered sugar, coconut flakes, sesame seeds, ground nuts (optional). Refrigerate the candies.
The other recipe is slightly different. Take 100 g of raisins and dried apricots, add hot water, steam, and then drain in a colander. Pass the mixture through a meat grinder twice, adding 200 g of coconut flakes. Roll the formed balls in coconut flakes (about 50 g will be needed) and place in the refrigerator.
Paste
Rub the berry pulp remaining after making the juice through a sieve, mix with sugar (to taste) or leave unsweetened. Place it on a baking sheet, covering the surface with a sheet of parchment. Dry the layer in the oven with the door open (heating about 100 degrees). Cut it into equal pieces and roll in powdered sugar.
Redcurrant and raspberry candies
Sort and wash the berries (500 g each of raspberries and currants). Warm them over low heat, adding just a little liquid. After 15 minutes, remove from heat, cool slightly and rub through a sieve. Adding about 700 g of sugar and 1-2 tsp. lemon juice, boil the mixture until thick (a drop on the saucer should not spread). Pour it into the mold in a thin layer, cool, and place in the refrigerator overnight. Cut the layer into pieces, roll in sugar. Instead of raspberries and red currants, you can use other berries - black currants, strawberries, blueberries, gooseberries.
Frozen banana candies
1 tbsp. Melt the chocolate broken into small pieces in a water bath, adding 2 tbsp. cream. Cut the banana. Dip each piece in chocolate and roll in a mixture of ground nuts and cookie crumbs. Freeze for about three hours.
Strawberry fudge
Wash fresh strawberries (400 g), crush them, and place them on a multi-layer piece of gauze. Lift the edges and squeeze out the juice, setting aside the pulp. Add sugar to the juice (200 g required) and stir. Make sure the grains are completely dissolved. Beat 8 whites into a fluffy foam, adding 50 g of powdered sugar. Preheat the oven to 120 degrees.
Gradually pour the juice into the protein mass and beat, adding 1 tbsp. flour (the process will take 10-15 minutes). Transfer the mixture to a greased baking sheet and bake for 15 minutes (a golden brown crust should appear). Cool the mixture directly on the baking sheet. Cut into portions, roll in powdered sugar. Store in the refrigerator. Instead of strawberries, you can use any berries (preference for unsweetened fruits - these can be cranberries, currants, etc.).
Sugar candies made from viburnum berries
Pour sugar mixed with starch (200 g/10 g) onto a dish. Roll clean viburnum berries in the sugar mixture, leave for 5 minutes, repeat the procedure and transfer to a dish.
Gelatin berry candies
Dissolve instant gelatin (200 ml/12 tsp) in natural juice. After 10 minutes, heat the mixture in a water bath, sweeten to taste. Pour the liquid into molds, cool, and place in the refrigerator.
Cherry covered in chocolate
To prepare delicious chocolate candies you will need 100 g of chocolate, 20 g of butter, preserved cherries (according to the number of candies).
Melt the chocolate broken into pieces in a water bath, add butter, stir. Prepare silicone molds, pour a little chocolate on the bottom, coat the edges with a brush and place in the freezer. After some time, repeat the procedure. Place a cherry in each cell and fill with the remaining chocolate. Place in the refrigerator.
To prepare preserved cherries you will need 500 ml of cognac, 450 g of cherries and 225 g of sugar. Place seedless berries in a jar, sprinkle with sugar, and leave for 3 days. Then add cognac and leave for a month in a dark place (shake the mixture daily). Place the berries in a sieve and pour the tincture into a bottle.
Hawthorn sugar candies
Grind 1 kg of washed hawthorn berries with sugar (400 g is enough). Add 100 g of starch to the mixture and mix. Form the resulting mass into candies, roll in powdered sugar, place on a plate and let dry.
Berry candies with condensed milk
Pour a can of condensed milk into a wide-bottomed plate and place in the microwave for 3 minutes (stir halfway through the cycle). Then add 20 g of butter and half a bar of white chocolate (grate). Stir the mixture and microwave for another minute and a half.
The finished mass should be thick. Run a spoon over its surface. If the depression levels out slowly, you can stop heating. Otherwise, perform another 1-2 cycles of 1 minute each. Form cakes from the cooled mass (grease your hands with oil). Place clean dry berries inside and form candies (you can use strawberries, seedless grapes, gooseberries, joshta, etc.). Roll them in any powder and put them in the refrigerator.
You just can’t help but like homemade berry candies - they are tasty and healthy. You can always pamper your household with this delicacy, because it can also be prepared from frozen fruits.
© Mir-yagod.ru When copying site materials, keep an active link to the source.
mir-yagod.ru
Photo master class do-it-yourself raspberries from candies
How to make raspberries from candies with your own hands? We bring to your attention a photo master class.
For work we will need materials: 1) Penoplex (foam plastic, construction foam, oasis) 2) Round-shaped candies (Ferrero Rocher, Martian...) 3) Red mica 4) Red organza 5) Floral wire 6) Toothpicks 7) Scissors 8) Transparent and double-sided tape 9 ) Artificial leaves (you can also make them yourself from floral paper) 10) Thermal gun
Let's start making the base of the berry. To do this, cut out rectangles of the same size from penoplex and glue them together with double-sided tape.
Now we cut off the corners with a knife and give the figure the shape of an egg. The berry base is ready.
We take the wire, make a loop at one end so that the candy holds better and, most importantly, its shell is not broken, and we fasten the wire to the candy.
Wrap the candy in a red paper square. Secure with transparent tape. We trim the ends of the mica with scissors.
Fill the base with candies. We decorate the spaces between the candies as follows. We cut out a small square from organza and make pound cakes out of it.
After the base is filled with candies and pound cakes, glue the green leaves and stem to the back of the base. Our raspberries are ready!
Source
Suite design studio Buket7.ru
buket7.ru
Original candy strawberry
To make a composition of strawberry-shaped candies, you need to take: small round-shaped candies in foil (by weight or in a whole box), penoplex or polystyrene foam for the base, red wrapping paper, red organza or mesh, wire, stationery scissors, a set of toothpicks, double-sided and simple tape, a knife, artificial leaves or corrugated paper to create them.
Let's take polystyrene foam or polystyrene foam and glue them together, making a stack. In other words, it is necessary to make a block, from which it can then be made into any shape. Layers of material can be fastened using double-sided tape.
Then, using a knife, we cut off the corners of the resulting lump, and then trim it so that we get an oval or cone shape, just the one that looks like a strawberry. The size of this base and your imagination determine how many candies you use to prepare a sweet gift.
We begin to form decorations from candies. You need to take a piece of copper wire (no more than 7 cm in length) and bend one end of it into a loop. Then find the place on the candy in the foil where the foil is folded into a bunch. It is this bundle that needs to be put on a wire loop and secured tightly (press the foil so that it tightly “squeezes” the wire).
Next, we need to cut out a square of wrapping paper in size - 7 by 7 cm. In its center, place a candy on a wire and wrap it in paper. The output should look like a lollipop, so the ends of the paper need to be twisted in a spiral around the wire. In order for these ends to stick, you need to cover them with simple tape. The ends of the wrapping paper that stick out from under the tape can be cut off with scissors.
We do the same with the rest of the wrapped candies. The wire they are attached to will attach the candy to the base. Therefore, we take a foam base and put the resulting candies on sticks into it. It is necessary to remember that the parts are well seated on the base and do not fall out.
If necessary, they can be moved to another place or further secured by wrapping the base of the candy with tape and gluing its other tip to the base. After we fill the entire base with candies, there will be gaps between these parts. They can be filled with organza. To do this, fold the organza square, slightly moving its edges, and twist it onto the tip of a toothpick and secure it with tape. Then, where there are gaps between the candies, insert toothpicks with organza into the base.
Now we will glue artificial leaves with stems to the back side of the resulting berry. If you don’t have ready-made leaves, you can make them using green corrugated paper.
The cutting can be done as follows: cut a piece of wire and wrap it with a strip of corrugated paper, which is pre-moistened in glue. After this, the strip must be twisted so that it lies on the wire in a spiral. The leaves can be fixed by gluing them to the base.
The candy strawberry is ready!
boobooka.com
DIY candy strawberries: master class with photos
It happens that everything has become boring and nothing pleases the eye, then master classes come to the rescue, the main thing is that they are understandable and fast. After all, time is our resource, which is always scarce. But you must try strawberries made from candies with your own hands. After all, it’s no secret that children love with their eyes, and such additional manipulation with all their favorite goodies will delight the little one. These are the strawberries we can get:
To work we need:
- Candies (round and small).
- Colored corrugated paper.
- Styrofoam.
- Wire.
- Organza.
- Scissors.
- Stapler.
- The tape is regular and double-sided.
- Glue.
- Posilisk (paper is often used when decorating gifts).
- A piece of corrugated cardboard.
After we have collected everything you need, you can start working, all the materials are quite inexpensive and candy is the main indicator of how much you will spend. But remember that you will get much more!
Scheme of work:
- Depending on the size of the strawberry you want to make, this is how many candies you will need. This master class is designed for 80 candies.
- We take the posilisk and wrap each candy in its original packaging, wrap it in such a way that we only have a tail, which we wrap with tape.
- We take polystyrene foam and cut out the shape we need, in this case, strawberries.
- We cover our ellipsoidal shape with double-sided tape, preferably fabric-based, and begin to attach our sweets to the base.
- We glue the candies in a checkerboard pattern and do not reach the very end.
- Our strawberries are almost harvested, but they have visible gaps; we will fill them with organza. We form something like pounds and fix it with a stapler.
- Take a toothpick and insert organza strips between the candies.
- All that remains is to make the “hat” and the strawberry tail to complete the look. To do this, cut out 1 circle from green corrugated paper larger than the cardboard stencil and 5 petals.
- We make a hole in a cardboard mug with wire and fix it, and glue corrugated paper on top.
- Glue the petals to the cardboard using double-sided tape.
For a more pleasant appearance of our strawberries, we can also make flowers, and here’s how they are made:
- 2 strips of yellow and orange corrugated paper and white paper petals (5 pieces).
- We use yellow and orange stripes as fringes and twist them. First yellow, then orange. We secure the “handle” with an elastic band.
- We stretch the petals a little and wrap them around our roll of orange and yellow paper. We fix the base.
- Having made the required number of flowers, we attach them to the wire, which was previously wrapped in green paper.
- Attach flowers to the top.
This is one of the few variations of strawberries, it looks cute, does not take much time to make, and will please the eye for a long time until the candy expires. A worthy replacement for a bouquet.
Another cute bouquet of strawberries made from candies can be made with all the same ingredients, but it is better to replace the candies with ones of different sizes in order to add realism.
We collect strawberries from candies with our own hands as a gift
To work we need:
- Candies (round and small).
- Colored corrugated paper.
- Styrofoam.
- Wire.
- Organza.
- Scissors.
- Stapler.
- The tape is regular and double-sided.
- Glue.
- Posilisk (paper is often used when decorating gifts).
- A piece of corrugated cardboard.
After we have collected everything you need, you can start working, all the materials are quite inexpensive and candy is the main indicator of how much you will spend. But remember that you will get much more!
Scheme of work:
- Depending on the size of the strawberry you want to make, this is how many candies you will need. This master class is designed for 80 candies.
- We take the posilisk and wrap each candy in its original packaging, wrap it in such a way that we only have a tail, which we wrap with tape.
- We take polystyrene foam and cut out the shape we need, in this case, strawberries.
- We cover our ellipsoidal shape with double-sided tape, preferably fabric-based, and begin to attach our sweets to the base.
- We glue the candies in a checkerboard pattern and do not reach the very end.
- Our strawberries are almost harvested, but they have visible gaps; we will fill them with organza. We form something like pounds and fix it with a stapler.
- Take a toothpick and insert organza strips between the candies.
- All that remains is to make the “hat” and the strawberry tail to complete the look. To do this, cut out 1 circle from green corrugated paper larger than the cardboard stencil and 5 petals.
- We make a hole in a cardboard mug with wire and fix it, and glue corrugated paper on top.
- Glue the petals to the cardboard using double-sided tape.
For a more pleasant appearance of our strawberries, we can also make flowers, and here’s how they are made:
- 2 strips of yellow and orange corrugated paper and white paper petals (5 pieces).
- We use yellow and orange stripes as fringes and twist them. First yellow, then orange. We secure the “handle” with an elastic band.
- We stretch the petals a little and wrap them around our roll of orange and yellow paper. We fix the base.
- Having made the required number of flowers, we attach them to the wire, which was previously wrapped in green paper.
- Attach flowers to the top.
This is one of the few variations of strawberries, it looks cute, does not take much time to make, and will please the eye for a long time until the candy expires. A worthy replacement for a bouquet.
Another cute bouquet of strawberries made from candies can be made with all the same ingredients, but it is better to replace the candies with ones of different sizes in order to add realism.
Progress:
- Take corrugated paper and cut a strip from 2 to 2.5 cm.
- It needs to be cut into five identical parts, but if the candy is large, then it’s better to cut into 4.
- Take the strips and fold each one in half.
- We twist along the bend.
- We divide the wire into three parts.
- Using wire cutters, you need to make a loop at the end.
- We wrap our wire with double-sided tape.
- We take the candy and hide our loop with a candy wrapper, then we rewind this place with thread so that we get a candy on a stick.
- We take red corrugated paper and wrap our candies in the blank, but still leave the thread.
- You need to take 3*4 green corrugated paper, the quantity should correspond to the amount of candies.
- We make a “fence” from this paper.
- Now we attach it to our candy and cut the thread.
- We put dots on a white berry.
- To create a strawberry flower, the same principle is used, only a different color scheme, namely: yellow center, yellow fence, white petals.
- Our strawberry is ready!
Here you will get not one big strawberry, as in the first option, but a bouquet, where the number of sweets is chosen exclusively by you; there are no “standards” for this version of strawberries. So the recipe for candy berries will come in handy more than once, especially on the eve of the holidays.