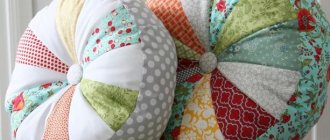
Soft pillows in the shape of different letters are a currently popular trend that can decorate a child’s or adult’s bedroom, or become an original gift for any holiday. But the more important purpose that they can serve is to introduce the child to the alphabet. You can start as early as 2-3 years old. At this age, imaginative thinking predominates, as a result of which those objects that can be touched are remembered.
It’s not difficult to create such soft pillows, the main thing is to take care of the alphabet of the pattern. This is the so-called template for future elements, which will need to be translated directly into the material of the future product. It’s not difficult to sew the entire soft alphabet, and even more so to make patterns for the alphabet from felt with your own hands. You just have to stock up on time and materials.
Volumetric letters
Materials and tools
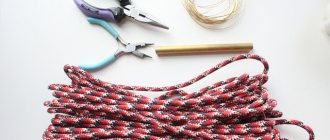
To create a soft alphabet, you need to purchase the following items from art and craft stores:
- Filling - you can use padding polyester, holofiber or padding polyester. The latter option is preferable, as it is lightweight and does not lose its shape. To develop tactile perception, many advise taking cereal, but first it will need to be calcined in the oven to prevent the appearance of beetles.
- Textile glue or glue gun. These 2 types of glue are non-toxic and odorless. If the letters are not created for a child, you can also use glue moment crystal.
Glue gun
- Scissors, Velcro, magnets, needle.
- Disappearing fabric marker for transferring patterns onto fabric and making notes. As a last resort, you can use a gel pen.
- Thin but non-transparent fabric.
- Threads - to sew toys, you can use regular sewing threads or floss. The second option has a plus - a rich range of colors, which allows you to choose a color to match the fabric, then the seams will not be noticeable.
Note! As an additional decoration for the toy, you can use beads for the eyes, beads, bows, and bells.
Beads for eyes
Name pendant
We offer you to make such an interesting pendant with your child’s name, it can be placed on a stroller or on a crib, we offer you a step-by-step master class in which each step of the work will be depicted in a photo, so even a novice needlewoman can cope with this task.
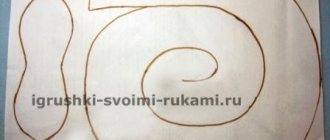
- First you need to make a pattern, you can draw the stencils yourself, or you can use the templates suggested in the photo below, you can simply print them out.
- Now we’ll make a pattern of parts to decorate the pendant itself.
- Cut out all the elements.
- Now we begin to transfer the stencils to the fabric. To do this, take felt of the color you want to make your future letters. We outline each letter with a marker (special for patterns, it disappears after a while, sold in any store for needlewomen). We draw two details in their mirror image.
Read this: DIY puffs: embroider beautiful folds on fabric
- Carefully cut out each letter.
- We sew each letter by hand, do not forget to leave a small hole to fill the letter with filler.
- Now fill the letter through the hole. You can choose holofiber or synthetic fluff as a filler.
Distribute the filling evenly into each corner of the letter; you can help with a stick or match if the product is very small.
- We make each letter in this way. Once finished, we begin to work on decorative elements.
- On white felt we outline two parts of the balloon itself. Fold these parts in half.
- Now we cut the stencil along the marked lines and trace the resulting part on green felt. We will need such an element in one copy.
- Again, we cut the stencil along the lines and draw this detail on yellow felt, also in one copy. Then we cut out the basket of our ball, two pieces. All the main elements of the balloon are ready.
- Now let's make an owl.
- We transfer the body of the owl onto beige felt, and we will make the paws and beak from yellow felt.
Read this: DIY nest for newborns: making useful things yourself
- We trace and cut out all the details.
- Now cut out the belly and eyes from the template. Cut out the wings.
- Cut out the owl's belly using a stencil from felt, and then from well-ironed fabric. In this case, apply the stencil to the wrong side.
- We trace the wings on the wrong side of the fabric.
- Sew the fabric elements very carefully to the felt parts.
- We cut out the eyes from white felt and sew them on.
- Using black floss threads, embroider the eyelashes, make the eyes closed, and carefully stitch each eyelash.
- Now sew the eyes to the body of our owl.
- We sew on the tummy too.
- And finally, we sew on the wings.
- We sew together both parts of the owl itself, leaving a hole for stuffing.
- We fill the body of our owl with holofiber, distributing it evenly around the entire perimeter; in hard-to-reach areas, you can compact it with a wooden stick.
- We sew up the hole, sew on the legs and beak, it is better to glue them with glue.
- Now we sew the balloon, using the same principle as the owl.
- Our decorative elements for the name chain are ready.
- All that remains is to attach the letters and decor to the thread and you can decorate the baby’s room.
You can also make this version of a personalized pendant:
You can sew the alphabet out of felt and teach your baby letters. To do this, you simply need to cut out the letters from felt using the templates presented below; they can be made with filler, or without, just trim the edges so that they do not diverge.
Read this: How to design embroidery correctly and quickly: simple tips
It will look something like this:
You can sew Velcro to these letters and make a frame from the other side of the Velcro, you will get a kind of board on which you can put words, and if there are a lot of such letters, even whole sentences. Children will really like this idea, because it is much more interesting to learn the alphabet through games than just cramming words.
Fabric selection
Many woven and non-woven materials are suitable for creating soft parts:
- Fleece
- Cotton.
- Linen.
- Felt.
- Silk.
- Fleece.
- Flannel.
All the needlewomen who have tried to make soft letter pillows say that the best fabric in this matter is felt. This is a dense non-woven material consisting of compressed wool. Felt is valued for its advantages:
- Strong, non-fraying edge.
- Wide variety of colors.
- Plasticity, the ability to maintain shape.
- Ease of use - bends in different directions, easily tears and cuts.
- Possibility of double-sided use.
- Wide variety of colors.
You might be interested in Creating an organizer for threads and sewing tools
Felt
Optimal alphabet size
You need to decide in advance what size the alphabet and animals will be. This determines how much felt you need to purchase. Teachers working with children believe that the optimal size for a child’s hand is letters of 6.5-10 cm.
But it is worth remembering that the side seams will take about 2 mm; after printing, the letter will gain volume and will look smaller. Therefore, in order to sew a voluminous Russian alphabet, the pattern must be large - 12-13 cm.
If the alphabet is created as a decorative component, any size can be taken.
Stitch for sewing felt letters
Women who do not master the art of sewing at the highest level can easily make soft letters. You only need to know 4 basic stitching methods:
- Loop stitch - a series of identical loop stitches located along the edges of the product.
Buttonhole stitch technique
- A backstitch is a continuous row of stitches made from right to left.
- Edge seam - stitches placed along the edges of the product. They are performed by constantly moving the needle from the wrong side to the front side by throwing the thread.
- French knots are voluminous point knots made by tightening turns. Used for sewing on decorative elements.
Felt letter patterns with animals
To make it interesting for your child to learn the alphabet, you can sew adorable animals in addition to felt letters. An alphabet made from felt is perfect for this; patterns with animals can always be found on the Internet, or you can come up with them and make them yourself. ,
Animals with felt letters
To do this, you will need the following materials, which can be purchased at a craft store:
- Velcro.
- Fabric of a different color for pockets.
- Filling: padding polyester, foam rubber, cardboard.
- Main fabric.
Note! For each pocket cell there should be one letter and an animal.
Before starting work, you need to prepare animal patterns. There is no need to invent anything here. Experienced needlewomen have long come up with animals for the 29 letters of the alphabets, which can be easily made at home:
- "A" - stork.
- "B" - hippopotamus.
- "B" - wolf.
- "G" - goose.
Goose pattern
- "D" - dolphin.
- "E" is for raccoon.
- "Yo" - hedgehog.
- "G" - giraffe.
- "Z" - hare.
- “I” - ea-ia.
- "Y" - Yorkshire Terrier.
- "K" - cat.
- "L" - fox.
- "M" is for mouse.
- "N" is for rhinoceros.
- "O" is a sheep.
- "P" is for panda.
- "R" - fish.
- "C" is for elephant.
- "T" is for tiger.
- "U" - snail.
- "F" - eagle owl.
- "X" is a hamster.
- "C" - chicken.
- "T" - turtle.
- "Sh" - chimpanzee.
- "Sh" - pike.
- "Y" - mouse with cheese.
- "E" - emu.
- "I" am a lizard.
You might be interested in this: The procedure for taking measurements from a child: tables of typical figures
Important! To sew an animal alphabet, patterns of the above animals can be easily found on the Internet and printed. Can also be used as coloring templates for children.
Felt letters
Good afternoon, dear needlewomen!
We have already discussed felt material more than once in our master classes, and decided that it is a very comfortable fabric for creating wonderful crafts and educational toys, since it is pleasant to work with: the material does not crumble, its edges do not need to be processed.
You can also make letters from felt - learning the alphabet will be a pleasant activity for your child. Your baby will learn letters as well as colors.
- You can put the letters on a magnet and attach them to the refrigerator, or make a panel with Velcro, or maybe even an alphabet game with your own hands.
- A felt alphabet is a very useful thing and is indispensable in learning letters.
- In our article you will find letter patterns, a master class on sewing letters and the alphabet from felt with your own hands.
DIY felt letters
To sew letters from felt with your own hands, we need to prepare the materials:
- felt in different sizes
- threads to match the felt (or contrasting, if desired)
- needle
- regular and curly scissors
- paper
- pencil
- filler (sintepon, holofiber)
- letter patterns
Even a novice needlewoman who has never encountered sewing can sew letters from felt, just follow our instructions.
How to cut letters from felt
Adviсe
- When cutting out letter patterns, use scissors to round off sharp corners to make cutting and sewing easier.
- You can transfer the pattern to felt using a pencil, soap, or a disappearing marker.
- You can lay out patterns on felt in any direction; it has no longitudinal or transverse threads
- Felt does not have a back side - trace the pattern on either side of the felt
- The edge of the felt does not require special processing; there is no need to turn the letters inside out
- Leave a few millimeters for the seam
Popular articles Lotus
When cutting out felt, the main thing is to maintain smooth movements, not to fuss, and not to make snags.
If the movements of the scissors are smooth, there will be no gaps left.
To cut out the inside of the letter, make a cut with scissors and then cut along the outline.
Stitch for sewing felt letters
The seam in the letters has not only a connecting, but also a decorative function. For sewing you will need regular threads or floss; you can use threads that match the felt or in a contrasting color.
You can use any stitch to sew felt letters, the simplest is a loop stitch. This way you will connect the parts and decorate the work.
How to care for felt letters
Before letting your child play with felt letters, first wash them in warm water with baby soap, rinse with water and dry. Patterns will still be useful to you, since it is possible that some of the letters will be lost or you will form words from letters - for this you will need additional letters.
Felt alphabet with animals
You can diversify the usual felt alphabet by sewing charming animals to the letters, it will be more interesting to study the letters. For example, in the letter “A” - sew a Stork, to the letter “N” - a Rhinoceros.
- You can also make an alphabet wall hanging for organization.
- For this you will need additional materials:
- — Velcro;
- — Main fabric for panels;
- — Filler, for example, padding polyester, holofiber, foam rubber, cardboard, it will keep the shape of the panel.
- — Fabric of a different color for “pockets”
We cut out large rectangles (2 pieces) from the fabric, sew pockets onto the front part, cut them out of multi-colored fabric and sew them onto the base. Next, both sides of the panel need to be sewn, not forgetting to put the filler in the middle.
Then you need to come up with an animal for each letter, prepare patterns, some of them you will find below, also in our previous article.
Or print out regular children's coloring books and use them as patterns.
For each pocket cell there is one letter and an animal. You can play with the animals and learn letters at the same time.
It’s not difficult to do, but the work is small and therefore quite painstaking. But the result is worth it!
For sewing, use thin 1 mm felt.
Volumetric letters
The process of creating three-dimensional letters is simple, but takes a lot of time. First you need to make alphabet patterns from felt and print them out. They can be taken from the Internet or created in Word by choosing any font you like. It is necessary to cut out 2 identical parts of each letter. If the corners of the templates are sharp, they are rounded.
Volumetric letters
If the pattern is transferred to felt, you should take into account the nuances and recommendations:
- Patterns are laid out on felt in any direction; it has no longitudinal or transverse threads.
- The material does not have a reverse side - you can trace the template on either side of the felt.
- The edge of the product does not require special processing; there is no need to turn the letters inside out.
- Leave a few millimeters for the seam.
Important! To cut out the inside of the letter, make a cut with scissors.
Next, after making parts of the letters, move on to the main part:
- Sew identical parts together, starting from the internal holes. The knot of thread is hidden inside.
- The letter is filled in during the stitching process. The denser the figure is, the smoother and more voluminous it will be.
- After finishing stitching, make a knot. The thread is hidden inside the letters and cut off.
Filling the letters
Animals for the letters are made according to the following master class:
- Print out the stencil.
- The template details are pinned to the fabric.
- Cut out 2 fragments of each pattern and sew them together. They fill it in the process, just like a letter.
- When all the parts of the animal are ready, they are glued or stitched into a single whole according to the diagram.
- They attach Velcro to the animal and the letter. Connect them together.
If the entire alphabet and animals are ready, you can start making the canvas. Take dense fabric (preferably the one from which all the parts were made) about 100 cm wide and 50 cm long for letters measuring 10 cm. Make pockets for the entire alphabet. They should be 2 times larger than the letters. Sew or glue the pockets to the fabric. Each one contains an animal and a letter. The second option is to attach the parts with Velcro.
ABC on canvas
Step-by-step description with photos
As you can see, there is a lot of work ahead. So, let's get started quickly, because, without a doubt, you want to see as quickly as possible what new emotions a bright homemade alphabet made from felt will evoke in your baby!
Step 1: Make the Pages
Cut the sheets of felt into equal squares, for example, 10x10 cm or 15x15 cm. Since our book is intended for children, it is optimal for each page to be a different shade.
Next you need to decorate all the pages.
Step 2: Decorate the Pages
We offer two options for decorating alphabet pages. One is for young ladies, the second is for small men.
To design the ABCs for Girls pages, use the drawings provided below.
Option for boys
Below are the drawings of “ABCs for boys”. Use them to design pages.
Today there are many options for electronic alphabet with beautiful letter designs. If you don’t like our templates, or you want the Russian alphabet, you can use any coloring letters as a pattern for the felt alphabet.
Step 3: Design the Pages
After your pages with letters are completely ready, they need to be beautifully designed into a book. To do this, you can sew all the letters of the alphabet together using a sewing machine or a hand overcast stitch. To do this, fold, for example, sheets with the letters “A” and “B” together “back to back” and sew them to each other around the perimeter. In this case, when sewing, try to select threads of the desired shade.
Popular Articles How to quickly turn water into ice cubes
Alternatively, attach a square piece of black felt of the same size to the wrong side of each page and sew them together with black thread.
Since our book has a lot of pages, the best option would be to sew all the pages back to back. In this case, it will not be as thick as in the option with sheathing with black felt.
Step 4: Trim the Edges
After all your pages are sewn, you need to trim their edges. To do this, use scissors to carefully and evenly cut all the sheets around the perimeter.
If you can sew and cut perfectly precisely, you can skip this step. It didn’t work out that way for us, and we cut off all the uneven sides.
Step 5: Make holes (method #1)
Draw symbols for the holes on a piece of paper. Using these guidelines, use a hole punch to make holes in the pages.
Step 6: Insert the rings (method #1)
Once all your holes are made, use the pliers to insert jump rings into them. We used rings with a diameter of 4 cm.
Step 7: Make holes (method #2)
To assemble a book using the second method, make holes on all pages except the first and last (for the cover).
In addition, take two additional pieces of felt. The length of these pieces should be equal to the length of your pages, and the width should be the total thickness of all folded pages + 1 cm for the gap. These pieces are needed to form the “spine” of your book.
Step 8: Assemble the book (method #2)
Cut two pieces of satin ribbon, each 2 meters long.
Conditionally divide two additional pieces of felt into 3 parts. Using fabric glue, glue both pieces of tape onto one of the extra felt pieces, placing them between the second and third pieces. Glue another piece of felt on top of the first piece. Wait for the glue to dry.
Trim the top of the felt on the spine piece so that it is slightly smaller than the bottom. This will help with stitching in the next step.
To attach the spine to the front and back covers, sew the first and last pages to the middle using a hand stitch. Once you're done sewing, add a little glue between the 2 pieces of spine so that our felt alphabet can withstand the strong hands of children.
Next, insert the tape on both sides into the holes and pass it through all the pages. To finish, simply pull the ribbons towards you and tie them into beautiful bows.
https://youtube.com/watch?v=igqkrt0t6xY
4732 Nika August 20, 2016
1
Flat felt elements
If you don’t want to bother with a voluminous alphabet, you can make flat letters. There are 2 ways. The first option is the easiest to work with. The template is pinned to the felt, outlined and cut out.
This will be interesting to you. Sewing on your own and patterns of interesting shorts
Note! You can make several identical products. They will come in handy when it comes to adding syllables and words, and letters can be repeated in them.
The second option for manufacturing flat parts looks more interesting. Dense material is used for the base, soft fabric is used for the upper part. When preparing patterns, you need to make one blank of the font of the desired size, and the second font is the same, but 2 sizes smaller.
Flat letters
The main letters will be multi-colored, and those that are smaller will be in one color. Next, using a silicone gun, you need to glue the smaller letters onto the larger ones. You need to leave an equal distance along the edges.
On a note! In elements such as “A”, “O”, the inner parts of the upper and lower letters are compared.
3 simple method of making the alphabet is considered the most original. Using patterns, you can quickly make a whole set with duplicates. The finished figures cut out of fabric are glued onto a sheet of dense material with silicone glue and cut out, leaving 2-3 mm at the edges. Contrasting colors will look good in this design.
Using the felt alphabet
An alphabet made from felt with animals is just what you need for educational activities with your child.
Felt alphabet for a child
Bright letters will attract attention and will be remembered quickly and for a long time. And fun games with felt alphabet, which can be played at home in the classroom, will help you consolidate your knowledge:
- “Soft landing” - lay out the alphabet on the floor, circle a toy plane over it: “The plane was flying, flying - what letter did it land on?” The child must answer as quickly as possible.
- “Who lives in the house?” — invite the girl or boy to put a suitable toy animal in the signed pocket.
The work of creating a felt alphabet is painstaking and long work. But every minute invested in the development of a child will become the basis for the formation of a happy and successful person.