Products for working with leather bags
Unlike fabric, tough leather is not as easy to tame. Therefore, the tools and other means for working with it are as follows:
- Awl – for piercing holes for thread;
- Shoe hammer - for leveling seams on the reverse side;
- Sharp scissors are better than medium ones;
- Silver pen – for marking (easily erased);
- Rubber glue (you can ask around at a tailor or shoe repair shop);
- Nylon threads.
Pattern for a leather bag
Many people are making the heroine of this theme for the first time, so you shouldn’t take into account hundreds of tips on how to sew a stylish leather bag with your own hands.
The best solution would be to find an old bag, which will serve as the basis for the pattern:
- First, the “dead meat” is ripped open;
- Then all parts are smoothed by ironing and placed on pattern paper;
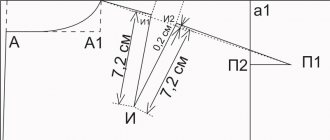
- The next step is marking (and the dimensions should be 0.8 cm larger for bending).
The side edges of the base should give volume to the latter, for which it is necessary to add another 1.5-2 cm margin to the base size. For a lock with a lining, an additional 3 cm will be needed.
Making a leather bag pattern with your own hands: a detailed and simple master class
Leather is a very attractive and pleasant material to work with. In addition, products made from leather are incredibly strong and durable. We bring to your attention a master class on creating a leather bag for a girl or woman.
Prepare all the materials necessary for work:
- A piece of leather measuring 60 by 90 centimeters (you can use material from an old leather jacket);
- Durable needles for working with leather fabric;
- Special thread for sewing leather - dratva;
- Ruler;
- Centimeter corsage ribbon;
- Sharp awl;
- Scissors;
- Glue;
- Tailor's measuring tape;
- Cork panel;
- Clothespins;
- Hammer;
- Small pieces of chipboard.
Before starting sewing work, make a pattern for your future handbag. Decide on the size you need, the number of fasteners and pockets.
There should be a rectangle or square at the bottom of your pattern. Its width, shape and depth are based on the final shape you want. However, it is recommended to make the bottom of the bag at least five centimeters wide.
Both side panels of your bag will be the same size and shape. The width of the side panel will be equal to the length of the bag plus half the width of the bottom. Adjust the height of the side panel as you wish. Before proceeding, carefully check the side panel pattern to see if the resulting proportions will look beautiful and harmonious. If necessary, adjust the pattern.
Next, create the handle patterns for your bag. Focus on the desired size and length of the handles.
Don't forget to leave seam allowances. To do this, add one and a half centimeters to all sides of the bottom and side panels of the bag.
Now start preparing the leather material. Place the skin so that the inner side is on top. Transfer the pattern of your bag onto leather material using a chalk or pencil. Cut using a sharp knife.
Before stitching the leather, make small holes in it using an awl. Then, using a special leather needle, begin stitching the pieces of your bag together. As you can see, such a model of a ladies' accessory can be created even without using a sewing machine.
Place the leather material on a soft surface, such as a cork panel. Place a paper pattern with marked holes on top. Secure with clothespins. To make it easier for the awl to pierce holes in the leather, help by lightly tapping the hammer.
Finish the side panels of the bag using grosgrain ribbon. Place the leather panels right sides together and sew a grosgrain ribbon into the holes. Then coat the resulting seams with glue and punch them with a hammer for better fixation and bonding.
Now sew the bottom of the bag with the side parts, also sewing on the grosgrain ribbon. Sew around the entire perimeter of the bag. Then glue it with glue and press it with a hammer.
Now sew the handles of your future leather bag with threads. Then secure it to the fabric of the bag with needles and sew. For more reliable fixation, glue with glue.
Cut out pieces from chipboard to strengthen the bottom of the bag. Their dimensions will correspond to the dimensions of the bottom. Place inside the bag and decorate with a piece of leather fabric. That's it, your leather bag is ready.
What is a leather bag made of?
Thematic products come in different forms, but this does not negate the need to use the following elements:
- Base – things are stored here;
- Straps – attached to the edges of the bag for carrying on the shoulder;
- Handle – located in the middle;
- Lining – is a thick fabric that is located inside the bag to keep things in their original form;
- Fittings – responsible for fastening individual elements and operating the bag as a whole.
The fitting elements are zippers, buttons, rings for handles, buttons, buckles, as in the photo of a bag made from leather with your own hands. Since metal is in harmony with the skin, the corresponding fittings also have a decorative purpose.
Note!
DIY scrapbooking for beginners: what it is and how to do it. What you need to create a beautiful album or notebook (photo + video)
How to make a craft with your own hands: what you can do with your own hands at home
DIY foam crafts: snowman, Christmas tree, sculptures, original figures with instructions (photo + video)
Model selection
Today there are dozens of models of leather bags. It is worth choosing a model depending on the purpose of the bag.
Those who love shopping should choose a shopping bag. It has a large capacity, and its versatility allows you to use the bag every day.
A hand-sewn belt bag is perfect for travelers or athletes. It is designed for the most valuable things (passport, money, keys). The main advantage is that you don’t need to carry it in your hands.
Leather bag – how to achieve the desired shape?
The skin can be very unruly in terms of maintaining its shape. This is especially true for thin sheepskin and pigskin.
To achieve the desired result, you need to use adhesive gasket materials:
- Nonwoven
- Dublinrin
- Thermal insulating building material.
Wire, cable, and lace are useful for sealing seams. Giving a specific shape to any element of a leather bag is called duplication.
Leather bag - how to make straps and handles?
Whole strip pieces of leather are used to make handles and straps. The optimal width is 3 cm. The length is selected depending on personal requirements.
Note!
Papier mache from egg trays, boxes, cassettes: the best ideas on what can be made from egg packaging
DIY vase: step-by-step photo instructions, master class for a beautiful and unusual craft
- Paintings from buttons, panels, appliques and compositions with your own hands: how to make flowers, a butterfly, a fish or a tree craft from buttons
The leather for the handles is also duplicated. But here you can limit yourself to adhesion of the sling to the skin or laying the tape between two layers. In this case, the handles will have to be glued so that they do not swell and release bubbles after precipitation.
Consumption of leather or fabric for a bag
If there are no problems with jeans or any other fabric and literally a meter of cut with a width of 150 cm is enough, then with leather things are a little different: here you need to control and measure every centimeter. When cutting, it is necessary to lay out the parts in advance, since you may have to avoid some areas where the fabric is wrinkled or has any defects. On average, sewing a bag will require 1 square meter of leather, but this can be said for sure when the pattern is ready.
You might be interested in this: The procedure for sewing a bedspread with your own hands
Bag made from pieces of leather
If you have no or little experience, you should first practice sewing a handbag from old leather, which can be taken from a raincoat or jacket. As a last resort, the product can be sewn from another dense material. This will provide some basis for manufacturing using quality materials.
Pattern of a simple product
How to connect bag elements
When all the fragments are duplicated, they must be connected to each other using paper clips and pins. This will allow you to evaluate the appearance of the future product. If the model excites delight, it’s time to connect the parts with nylon thread.
The question is, how to sew a bag from genuine leather with your own hands if the sewing machine does not take thick leather? This is where the awl comes in handy. But we must remember that the pitch between the holes must be the same.After creating holes for the seams, the product is assembled, and the stitches are glued and leveled with a hammer on the reverse side. However, it is necessary to arrange a lining inside the base in advance.
Two options for soft shaped bag patterns
To prevent your experience of sewing a bag from becoming negative, always choose soft-shaped bag models. Moreover, such bags are always in fashion, as they are practical and versatile. This diagram shows two types of soft bag patterns. For more details, see How to sew a bag with your own hands.
It is not necessary to create a pattern for a bag from paper, but it won’t hurt to make a pattern of the main parts. The fact is that it is almost impossible to determine the size and shape of a bag using a paper pattern. In the sewn state, the bag acquires volume and, therefore, changes its calculated dimensions and shape. Therefore, make paper patterns of the main parts of the bag, pin or glue them and make sure that the shape and size of the bag suits you. If not, feel free to adjust the pattern and try it on again.
Leather bag lining
The lining for the interior of the bag deserves special mention. It can be one bag or a sectoral liner for several compartments.
The last option requires duplication, i.e. embedding additional elements between fabric sheets. In any case, textiles can be presented:
Note!
Flowers made of wool (85 photos) - how to felt a flower from felt or a wool brooch. Step-by-step instructions for beginners
What can be made from wool (95 photos): felting for beginners, master class, felting techniques
How to weave a “Dragon Scales” bracelet from rubber bands on a machine: photo examples, weaving patterns
- Software;
- Velor;
- Cooler;
- Baptiste, etc.
Strange as it may seem, the artificial origin of the fabric is welcome. This way the lining wears out less often, and making a leather bag itself is cheaper.
Decorating a leather bag
If we sew a bag from scraps of leather with our own hands, then it is better to use themed sections for making belts, shoulder straps, handles and external decor.
The latter can be represented:- Floral ornaments;
- Straight-line inserts for the entire surface of the base (so that the bag looks like a mosaic).
A leather bag also welcomes fringe, metal fittings, and suede patches. The choice of specific decoration depends on the style. Therefore, do not be shy to show enthusiasm.
Sewing a bag yourself
Now it's time to start sewing. By this time, it was already necessary to understand what model you wanted to make and from what material, select fittings and all the suitable tools. Further steps involve making straps for the handles, the handles themselves and stitching the final product.
Bag package
First step: handle straps
The first thing you need to do is handle straps. Before the main process, they can be glued and stitched with decorative stitching on top. If everything is done by hand, then most likely the material will have to be pierced with an awl, because needles cannot take such fabric. The straps themselves are attached to the first element on both sides. Don’t forget to insert a ring into the straps, as the handle will be attached to it.
Leather product with an original pattern
Step two: Assembling the product
The second stage involves connecting the main parts to each other. In places where you do not plan to sew a zipper, you should bend the ends. After this, the snake is attached to the prepared place. First, it can be glued with glue. After this, you can tap with a hammer and stitch the zipper with a machine.
You might be interested in this. We create a pattern and sew a beautiful and simple bandana.
Decoration in the form of a fringe will effectively distinguish the accessory from hundreds of others.
Important! Leather is a fairly rough material, so making a bag with your own hands “from” to “to” you will need an awl. You need to work with it like this: pierce the product where you plan to thread the threads.
After sewing in the zipper, you need to sew the top and sides to the bottom of the product. It's easier than it seems. The process itself is carried out from the inside and requires the use of threads of the same shade as for the top of the bag.
The attribute of a business man is a beautiful leather bag
Step three: handles
Now the handbag is almost ready. Now you need to attach the handles. The handles must be strong, since the entire product and everything that lies in it rests on them. Therefore, they can and should be strengthened with skin. To make the handles appear more voluminous, you can insert strips or twisted pieces of leather left after sewing into them. After filling, everything is stitched with an external fastening stitch, and then with a decorative one.
You can also sew a lining for the bag. It is made following the example of a bag and glued inside so that the main material is higher than the lining.
Simple Shopper handbag for shopping and shopping
Photo of a DIY leather bag
Please repost
0