Description of the brooch
The main material used to create the accessory is felt, which is unique in itself. This fabric is nothing more than felted animal fluff, and it is felted using a special technology. Felt has many varieties, and therefore furniture upholstery, toys, felt boots, hats and jewelry are made from it.
The popularity of the felt brooch is explained by its originality. This accessory has a unique texture and a cute, slightly toy-like appearance. In addition, it goes well with knitted and knitted wardrobe items.
Decoration can take the following forms:
- flowers;
- fruits and foliage of plants;
- animals;
- abstract compositions.
Very often, when creating a felt brooch, beads, seed beads, glass beads, embroidery and even a zipper are used. These elements give each product individuality, brightness and emphasize its beauty.
Materials and tools
There are many techniques for making beaded brooches with your own hands. You can also use different patterns for making jewelry. For any technique you will need the following tools:
- beads of different sizes and colors;
- beads;
- cabochon or large flat bead;
- fishing line or monofilament;
- embroidery needle.
You can use various weaving patterns to create brooches. Having chosen a suitable option, you need to take a large central element and begin braiding it. A small bead will not work; it will not be visible at all. This must be done as tightly and carefully as possible. The reliability of the entire product depends on this action. A good way to braid is a cross pattern. To do this, you first need to make a collar according to the size of the central element, and then weave other rows on its basis.
When the central element is securely braided, you can continue making decorative rows. The work uses beads of various sizes and shapes or natural stones. There are no limits to imagination in this matter.
Accessories in the form of flowers
A knitted jacket, sweater or coat can be complemented by such a wonderful decoration as a hand-made felt brooch. Master classes on creating such an accessory are simple and straightforward. They explain step by step the entire process of making a brooch. The most popular decorations are in the form of chrysanthemums and poppies.
Lush chrysanthemum
There is nothing more charming and spectacular than a felt chrysanthemum. This lush flower will decorate any warm item.
To make it, the following materials and tools are required:
- felt fabric for the flower;
- green felt for foliage;
- threads of the same color as the fabric;
- green floss;
- needle;
- scissors;
- ruler;
- pencil or chalk;
- pin.
When everything you need is prepared, you can begin to create a chrysanthemum. The procedure is as follows:
- The fabric for the bud is folded in half lengthwise.
- Using a ruler and chalk or pencil, make notes on the folded piece of material every centimeter.
- The fabric is cut according to the marks so that 1 cm remains to the edge of the fabric.
- When the entire part is cut, it is carefully twisted in a spiral into a roll, holding it by the base. This is how the flower bud itself is formed.
- The base of the part is sewn from below, thereby securing the flower.
- Two outlines of sheets are drawn on the green material. They can be made the same or different in both shape and size.
- The blanks are cut out and veins are embroidered on them using green threads.
- The finished leaves are sewn to the base of the flower. They can be placed side by side or on opposite sides of the bud.
- A pin is sewn to the base of the flower.
- The product is ready.
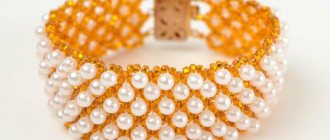
Beaded brooch
One of the brightest multi-colored materials for all kinds of crafts is beads. You can weave jewelry and souvenirs of incredible beauty from it. Usually, this requires some experience and training. But don’t be upset - DIY beaded brooch models for beginners are quite simple, and they can be made even by those who have never held beads in their hands before.
To make a sparkling brooch you will need:
- a piece of felt, matching the color with the beads;
- interlining or other cushioning material;
- beads;
- sewing supplies;
- fabric or artificial leather;
- glue;
- safety pin.
After all the tools and materials have been prepared, the step-by-step production of an exclusive item should begin:
- You need to draw and cut out the base of the future brooch. Transfer the image to non-woven fabric and glue it to a piece of felt.
- Finish the edges of the workpiece with beads, threading a thread through two or three beads at the same time.
- To add volume, you can glue additional layers of felt and embroider with beads in the same way.
- Closer to the center you can use larger beads and glass colored stones.
- After the embroidery is ready, you can cut out the resulting product.
- To decorate the reverse side, you need to cut out a reduced silhouette of the brooch from cardboard and glue it on the back side.
- At the last stage, a pin and artificial leather are glued to the reverse side.
Hand-made brooches made of beads and stones perfectly harmonize with any clothing, giving your image individuality and unique charm.
Felt and zipper decorations
The first to use the classic clasp as a decorative element when creating accessories was a needlewoman from Canada, Odile Gova. The unique accessories she creates from the most ordinary materials are so surprising in their originality and beauty that the Canadian craftswoman has gained many followers, including in Russia.
Universal master class
Brooches made of felt and zippers are a very fashionable novelty in the world of accessories. What makes them especially popular is their unusual appearance and the opportunity for the needlewoman to show her imagination, because the product can be any abstract composition.
To create jewelry you need the following devices and materials:
- felt of various shades;
- metal zipper;
- pin or brooch clasp;
- needle;
- threads matching the color of the felt fabric;
- scissors;
- thick paper;
- pencil or chalk;
- quick drying glue.
Since a brooch can have any shape, the master class on making it is universal. It consists of the following stages:
- A sketch of the decoration they want to receive is drawn on paper.
- In accordance with the drawing, select shades of felt and thread.
- The basis of the product is the material whose color predominates.
- The sketch is transferred to it, carefully but carefully drawing out all the details with a pencil.
- The fabric edges are cut off from the fastener.
- The resulting workpiece is secured along the entire contour of the base with an overcast seam.
- And also, if desired, you can zip the edges of other parts of the product.
- When all the parts of the future brooch are ready, they are glued to the base, according to the sketch.
- A clasp or pin is attached to the reverse side of the jewelry.
- The accessory is ready.
Brooch with ribbons
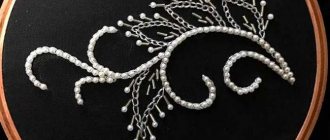
Another option for making an accessory is to decorate it with ribbons. Such ribbons have ready-made folds, which look unusual and attractive in products. The brooch is made on the basis of felt. A contour of the desired shape is applied to it. A ribbon is sewn to the base. It is necessary to ensure that it does not extend beyond the contour of the future product. The edge is also embroidered.
Then other decorative elements are glued to the base. These can be braided Swarovski crystals or cabochons. Then the product is embroidered with beads to complete the intended composition. The reverse side of the product is processed in the usual way for embroidered products. To complete the work, all that remains is to attach the fastener to the finished product.
Brooches for children
Felt accessories are not just for adults. Figurines in the form of favorite fairy tale and cartoon characters, as well as cute animals, will be a wonderful decoration for children's clothing.
Original icons
Bright and funny icons depicting various animals or cartoon characters will appeal to both boys and girls. In addition, you can involve a child in creating such a brooch, which will not only entertain him, but also help the development of fine motor skills.
To make badges you need very little:
- felt fabric of different shades;
- pin or brooch clasp;
- paper;
- scissors;
- pencil or chalk;
- glue.
Before starting work, you need to make a sketch of the future product. You can draw it, print it from the Internet, or translate it from children's books.
Then the actual production of the badge begins:
- Using chalk or a pencil, paper patterns are transferred to felt fabric in the desired shades.
- All details are cut out.
- Small parts are glued to the main element, quickly removing all excess glue.
- The finished badge is placed under a press for several hours.
- A pin is attached to the reverse side of the brooch.
- The new children's decoration is ready.
Creating these felt badges is very simple and fun. And the child will certainly be pleased to wear a brooch made with his own hands together with his mother.
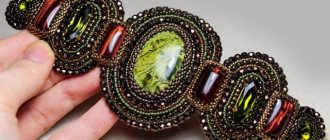
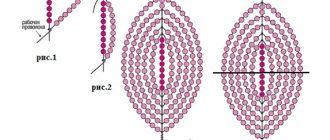
Master class on weaving
In this master class we will consider a brooch using Swarovski crystals. For work you will need: crystal, beads, monofilament, needle. It is necessary to choose a crystal size that is slightly larger than you would like to see. In the finished product, the edges of the crystal will not be visible, since they will have to be sheathed. After selecting all the materials, you can start working. Sequencing:
- It is necessary to make a ring to suit the size of the selected crystal. To do this you need to use a mosaic weaving pattern. When the ring is ready, you need to tighten it tightly around the crystal.
- Continue braiding the central element until it is completely closed on the wrong side.
- Based on the middle row of the braid, it is necessary to make the decorative part of the brooch. Using the same mosaic weaving, you can make brooch petals or other elements. You can use beads of various sizes and colors in your work.
- A clasp must be attached to the back of the brooch. It can be glued or sewn with monofilament using a beading needle.
Learn how to make various beautiful felt brooches with your own hands
Felt brooch in the shape of a flower.
A few words about the material. Felt is sold in A4 sheets, often in sewing kits, and comes in a variety of thicknesses. To work with flat brooches, it is recommended to choose thicker material, because working with it is easier. However, if for some reason you have a sheet with insufficient thickness, you can always increase it by using two layers instead of one.
The assortment also includes natural and synthetic felt. The first one is better to choose when making voluminous parts, as it is better stuffed and looks more voluminous. The second one is great for appliqués and flat products.
A huge advantage of the material is its wide color palette, evidence of which is shown in the photo:
To make it you will need:
- pieces of felt with colors typical of a T-shirt - red and green;
- threads of similar colors;
- needle;
- black beads or seed beads;
- fastening for eyebrows or pins;
- glue;
- paper, pencil;
- scissors.
Patterns for brooches:
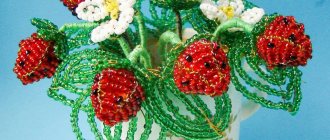
The master class itself on making a brooch in the shape of a poppy:
- First of all, draw the part templates on paper and cut them out.
- The poppy petal pattern is applied to the red felt and carefully cut in four times.
- Two leaves are prepared from green felt.
- It is necessary to make a recess with petals the size of a centimeter.
- Next, the petals overlap each other and collide in the center.
- The product must be allowed to dry a little.
- The center of the future brooch is declared with beads to imitate an inflorescence
- The green leaves are glued together with a slight overlap.
- The flower is combined with the leaves using glue.
- If the brooch is planned to be removable, a clasp is attached to it. Otherwise, the product is sewn to the selected item of clothing.
Decorating felt with lightning.
An excellent option for decorating any sweater or outerwear would be a large snail-shaped brooch made of felt and zippers. A nice addition is that you can use something that has long been lying around in the bins
After all, the main element used in a zipper is the teeth, so it doesn’t matter at all what color the material of the fastener itself is or what the edges look like – you have to get rid of everything
You will need:
- felt in two colors – purple (won) and crimson (decor);
- fastener in the form of a zipper with bronze-colored teeth 30 centimeters long;
- purple threads (to match the color of the base) and contrasting orange (for decoration);
- a small yellow bead and green beads;
- brooch base or pin;
- needle, scissors.
Don’t worry if you don’t find elements of the specified colors, because you can always replace them to suit your taste and style. Also, if the lightning bolt at your disposal is not the size required, you can adjust the size of the brooch by increasing or decreasing it.
Popular articles New Year's Advent calendar for children (with tasks)
To make a brooch, it is necessary to divide the zipper, since only one part of it will be required. To do this, cut the clasp at the base and choose the nicer half. If there is a lock on it, remove it. All excess fabric must be cut off to create a zipper thread.
We cut out the base from felt in the shape of the future brooch and outline a pattern according to which we will subsequently sew a zipper. For this, it is good to use special chalk, soap and even ordinary felt-tip pens - after all, the decor used is voluminous enough to cover all the contours. If you are not sure that you can immediately mark the lines correctly, it is recommended that you first attach the prepared zipper to determine the required length of the outline.
When the preparatory steps are completed, proceed to the main thing - sewing on the zipper. To do this, apply a chain of zippers, starting from the center, and place neat stitches between each tooth. To give the product volume, try changing the direction of the teeth. For example, in the center of a brooch, sew a chain perpendicular to the surface, continue laying it, tilting it slightly, and finish the edge by placing the zipper on its side. Don't be afraid to experiment, because this chain looks great even on small and steep curls.
Now let's start decorating. To do this, put the brooch aside and take felt of a different color. It is necessary to cut out several thin parts of short length from it. They need to decorate the shell of our snail. You can sew on with contrasting threads, this will add a separate effect.
Snails need eyes. Take a needle and thread, form a knot at the tip and bring the needle out from the wrong side onto the face in the place where the eye is planned. Thread the thread through the bead, then through the beads, back into the bead and onto the wrong side. Fasten the thread carefully.
Now attach the clasp and the brooch is at your disposal.