MK: pirate hat and hook
Any children's pirate party requires the presence of beautiful fancy dress costumes. Can a real pirate do without a cocked hat with a skull and crossbones? Definitely not! We invite you to make paper pirate hats yourself on the eve of the holiday or together with your children during the celebration. Here you will find 2 photo-MKs on making hats, 2 files with templates for downloading and 1 photo-MK on making a pirate hook.
To download such templates for a pirate hat , click: pirate-hat
To download a PDF with patterns for three different pirate hats , click: 3-pirate-hats
Photo-MK: paper pirate hat 1 option
The hat is made of black thick paper. A “lace” made of white tissue paper is glued along the upper rounded edge on the reverse side. The skull and bones are cut out of felt. An elastic band was attached to the underside of the hat with a stapler, with which the hat is held on the head. This red and white brooch is made of two round pieces of felt and feathers.
Photo-MK: pirate cocked hat made of paper, option 2
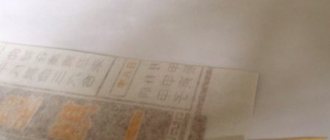
Pirate hat made from newspaper
Perhaps, instead of an origami cap, it would be better to offer small children a much more tempting pirate hat that calls for bright adventures. The model is extremely easy to make, and all you need is a sheet of newspaper and a little tape.
Step-by-step instruction:
- Fold the spread of any printed publication (it’s better to take a magazine, it’s made from thicker paper) in half along the short side.
- Lower the left corner down. It should go beyond the middle of the workpiece. If a child under 4 years old folds the model on his own, he may need help at this stage.
- We also bend the second corner towards the center, slightly overlapping the left side. We fix both parts of the hat with tape.
- Fold the bottom edge of the first layer twice.
Repeat step 4 on the reverse side.
All that remains is to open the hat and dress up the little pirate in it. To make the headdress “last” longer, it is recommended to tape it at the joints.
How to make a pirate hat out of paper - several options
Boys love to portray heroic characters, among whom pirates occupy a prominent place. The costume of your favorite character can be worn for any holiday, matinee in kindergarten or school. Often parents rent a suit from a tailor, throwing away large sums of money in one day. If you put in a minimum of effort, you can make a great outfit that will be unique on your own in a short period of time.
In this article we will look at how to make a pirate hat out of paper, because this is the main attribute of the costume. You can buy a vest and black pants in a store, but you will have to create a headdress yourself. There are several options for making it, let’s look further at how to make each of them step by step. The photographs presented in the article will help you complete the work faster and compare the results with samples.
The simplest option
You can make a pirate hat with your own hands from paper by cutting it out along the drawn contours. First, you need to measure the circumference of the child’s head and make a hoop out of thick paper on which the front of the hat will be attached. Before connecting the ends of the tape, try it on the boy’s head so as not to redo the work later.
Separately, cut out the shape of a headdress from black or red thick paper, as in the photo above. In the center there is a small rounded elevation, which on both sides descends to a thin strip. A white circle is glued in the middle of the hat, on which the pirates’ emblem is drawn - “Jolly Roger”.
You already understand how to make a pirate hat out of paper. All that remains is to attach the front of the hat to the paper hoop. This can be done with a stapler, using paper clips, or glued with a glue gun; PVA glue will also work.
Origami pirate hat
You can clearly see how to make a pirate hat out of paper with your own hands for boys in the photo below in the article. A triangular hat is made from a sheet of paper by folding it according to this pattern, which is decorated and placed on the child’s head. Let's look at how to make such a headdress step by step.
In order to choose the right size of paper for folding, first make a hat from a newspaper by folding origami from a whole sheet. If the size is suitable for the boy, then take thick paper in A-3 or A-2 format. They act according to the ordinal numbers on the diagram. First, fold the sheet in half, then bend the corners, connecting them in the center of the workpiece. The bottom excess rectangles of paper rise up on one side and the other. Then, putting your hand inside, unfold the future hat, making a square. All that remains is to turn the bottom corners up, bending the square diagonally. After trying on, start decorating.
DIY pirate hat
Pirate parties are becoming increasingly popular among both children and adults. And if to make a carnival pirate costume you can, if desired, select clothes from your wardrobe, only “embellishing” them a little, then with a hat everything is a little more complicated.
You can, of course, just buy it, but it often happens that an invitation to a holiday takes us by surprise and there is no time left to find this rather rare accessory.
And then a saving idea comes to mind - to make a pirate hat quickly and easily with your own hands, and why not? After all, there are absolutely elementary ways to create such a headdress, as they say, in a hurry, and the result will most likely be approved by your children.
note
There are more complex creations, but if you have at least basic sewing skills, then you will also be able to do them.
Let's consider all the main options, starting with the easiest.
How to assemble a pirate hat from a newspaper with your own hands in a master class
Old newspapers can be found in any home. Therefore, this method is suitable for anyone who wants to make a pirate hat very quickly and easily.
Take any newspaper and unfold it on a flat surface.
A standard sheet of newspaper will make a fairly large hat, so if we are going to make a headdress for a child, we will need to cut off the newspaper sheet a little on both sides.
It is best to first make several hats using the technology given below, and then, trying them on, choose the most suitable size.
We take the short sides and connect them, thereby folding the sheet in half. Smooth all folds thoroughly with your fingers.
We bend the corners of the sheet located on the fold side to the imaginary center line. To get a neat hat, you need to make sure that all sides are even. If the bent corners begin to unbend, you can fix them with tape.
Fold the bottom edges of the hat up.
And at the last stage, we wrap the small triangular corners inside from the sides of the hat. If they do not hold well, secure them with tape.
The pirate hat is almost ready. Now we need to bring it to perfection. You can paint the outside black and then paint the pirate emblem on the front with white paint. Or you can simply print out the skull and crossbones and stick it in the right place.
Important
As you can see, there was nothing complicated in manufacturing. If we want to get a more solid product, then we can make it from paper, or even better from a sheet of Whatman paper.
To do this, a sheet of whatman paper is initially folded according to the scheme described above, but we don’t stop there and continue to do it as shown in the photo below.
The result is a much more durable headdress, which after painting and painting will look like this.
Don't forget to glue or sew a black elastic band to the finished product to keep it firmly on your head.
How to make a pirate hat from thick cardboard or fabric?
To make a cardboard hat you will need:
- Thick black cardboard (you can paint cardboard of any color black)
- Scissors
- Glue
- Pirate hat template
- Sheets of white paper
- Pencils
You can either come up with a pirate hat template yourself, or look at this photo.
We transfer the outlines of the template onto the cardboard. You will need to make two pieces of the pirate hat.
We cut out the two halves of the pirate hat and make sure that they turn out completely identical by placing them next to each other.
On a separate sheet of white paper, draw or print pirate symbols. We cut them out and glue them to one part of the future hat.
Hat decoration
You already know how to make a pirate hat out of paper, now let’s look at decorating it. Most often, when designing such an attribute, black is used. The finished origami hat can either be covered with black colored paper or painted with gouache with a brush. The pirate emblem is attached with appliqué or painted with white paint after the background has dried.
A hat with a fold at the bottom looks interesting. To do this, when working on origami, complete the folds in diagram No. 7. To prevent the sheet from unfolding, the edges of the paper sticking out to the sides are smeared with PVA glue. The ends of the rectangular parts from the bottom of the hat are connected in the same way. The semicircular cutout of paper in the center of the strip, highlighted with a white border, looks original.
Double hat
Next, we will consider the option of how to make a pirate hat out of paper with your own hands for boys from two halves. The drawing below shows how to draw them. First, make a stencil, then trace it on thick black paper and cut out two identical parts. The “Jolly Roger” emblem is attached to the one that will be the front one.
The narrow edges of the patterns are connected to each other with paper clips or glue. It is more convenient to place a rim made of a strip of paper 5-6 cm wide in the middle. This way the hat will stay better on the boy’s head and will not slide over his eyes while moving.
In the center of the picture there is a pattern for an eye patch. If desired, you can cut it out and attach it to a rope. To prevent the paper from rubbing against the child, it is better to make such an accessory from a sheet of felt. It is soft and pleasant to the skin.
Ready product
After a written explanation of how to make a pirate hat out of paper, compare your craft with the finished hat. As you can see, you can slightly modify the shape by making the narrow edges taller. The top of the hat has a few centimeters of flat surface.
Draw the pirate emblem on a white sheet of paper, and then outline it with a black marker so that it looks three-dimensional. If you don’t have artistic abilities, it doesn’t matter, you can print such a popular drawing on a printer by taking an image of a skull and crossbones on the Internet.
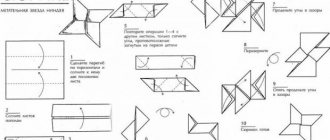
Red Army cap
The cap made of rough khaki cloth is inextricably linked with the images of the defenders of the Great Patriotic War. A simple soldier's headdress is often folded using the origami technique for February 23 and May 9. The military cap of the Red Army differs from Western models. It is one-piece, without hems, with a sewn-in upper part. This model folds easily and is convenient to carry in a pocket or in the belt of a gymnast. The Red Army cap is not a Soviet-era invention; it was borrowed from the equipment of the Tsarist army during the First World War. The name is easy to explain. Military pilots were the first to wear a compact cap, replacing a bulky aviator's helmet with it on the ground.
Usually a military cap made of paper is made according to this scheme:
If the model does not serve for decorative purposes, but as a purely functional replacement for textile baseball caps and Panama hats, you should focus on the size of a newspaper sheet “folded.”
Step-by-step instruction:
- Fold the sheet in half from left to right. And then from top to bottom.
- We leave it in this position.
- Fold the top corners towards the center.
- Fold the bottom edge. First to the base of the triangular part.
- Then again to the same height.
- Turn the workpiece over.
- Fold the sides towards the center.
- Lower the top triangle.
- We bend the bottom corners.
- We make two folds, as in steps 4 and 5.
- We place the trapezoidal valve inside the figure. You can fix it with glue.
For themed cards, it is advisable to decorate a paper origami military cap with a red star.
And this is a slightly different, but also popular scheme:
Non-standard, rare model. Reminds me of a pioneer cap from the already distant Soviet past.
Decoration options
The time-lapse image below clearly shows how to make a pirate hat with your own hands from paper. Decorating with white fringe attached to the top of the central part of the craft looks interesting and original.
It is made from white corrugated paper. In addition to the pirate badge, you can attach a decoration of multi-colored feathers to the front.
From the article it is clear that making a pirate hat for your child for a holiday is not at all difficult, it takes a minimum of materials, and you will spend little time on the work. Involve your child in the work, he will be pleased to do something himself. Creative success!
Paper tricorne
If you don't have time to sew a hat, you can also make one from paper. To do this you will need very little time, less than sixty minutes. If you have children, we suggest involving children in this process. Thanks to this, you will have an interesting and fun time.
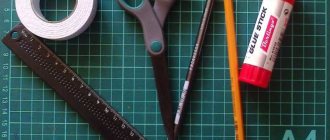
Take a sheet of black A3 paper (or two A4 sheets), scissors, glue and an elastic band for tying, a couple of A3 sheets.
We make a square from a black sheet, cutting off the excess part. A circle is made from it, cutting the corners with scissors. Take one sheet of white paper and fold it into four. Before reaching the edge, we cut the part into thin strips. And also, using scissors, we curl the fringe and glue it to the circle.
Related article: Brocade fabric: description, production and application (photo)
We make three points on the circle, the same distance between them. As a result, we bend the entire circle so that we get a triangle. Press the corners and push out the middle of the triangle. As a result, we got a cocked hat, which we will decorate later. Cut out feathers from a second sheet of white paper.
Take the scissors and curl the edges again. You can also use a pencil. Glue ready-made white paper feathers to one side of the hat. Then we cut out the main pirate emblem - a skull and twisted bones, and glue them onto the cocked hat. Then a couple of holes are made on the hat in order to attach the hat elastic. This is such a cute hat for a sea pirate.
How to make a cocked hat out of paper
A cocked hat is a headdress with a wide brim that is curved toward the top center in such a way that three corners are formed . Because of this specificity, the hat itself received its name.
What you need for work
Paper
The main material is a sheet of paper or newspaper . Each of its sides should be equal to the circumference of the head.
You can use medium density paper.
Important!
The paper should be a single sheet, and not made up of glued parts. The seams from the glue will be noticeable, and this will spoil the appearance of the product.
Paint or gouache
The cocked hat was the headdress of eighteenth-century sailors or artillerymen. They make it for a themed event (masquerade ball, children's party). Therefore, we need to keep our crafts in tradition. To do this, you will need to paint paper or newspaper black on both sides, let it dry and only then start working.
Operating procedure
- We spread our material on the table. It turns out to be a square.
- Fold it in half diagonally. That is, we bring the lower left corner to the upper right corner and iron the fold. We have a triangle.
- Now on our triangle we take the left corner and bend it so that the area of the part is 2/3 of the length of the left side of the triangle.
How to make a paper pirate cocked hat
The algorithm for making a pirate cocked hat will be slightly different from the classic version.
Materials and tools
In addition to black paper, we will need additional materials.
- Scissors.
- Elastic band for hat to keep it in place.
- Glue.
- Two sheets of regular A4 white stationery paper.
Operating procedure
Prepare a flat surface and get started.
- Take a sheet of black paper and bend the upper right corner 45 degrees . We have a triangle and a certain amount of paper remaining.
- Using scissors, trim off the excess paper and unfold the triangle. Therefore, we have a square.
- Our task is to get a circle. To do this, we place our part and turn the corners so that we get the circle we need.
- Let's move on to making the fringe. To do this, fold a sheet of white paper in half along its entire length. We cut the free ends into small strips with scissors, without cutting to the fold line. Open the sheet and cut it into two halves along the fold line. We “curl” the strips with a pencil or scissors and glue the fringe along the entire radius of the circle. Curled side up.
- We visually place three marks along the edges of the circle and connect them at the top. Ready!
Decoration
Decorating a pirate “cocked hat” will take a little longer than making it itself.
You will need to do:
- feathers;
- pirate emblem.
Feathers
Feathers can be taken from birds, but we will make them from white paper. Fold the entire length of the sheet in half and use scissors to cut the ends into strips diagonally. We unfold it and get a paper pen. We glue it to the side of the cocked hat.
Emblem
The pirate emblem is a skull and two bones connected in the center to form a cross.
it out ready-made, or you can draw a stencil yourself on white paper . And then cut it out and glue it in the center.
We cut out two small paper squares, apply glue to them and glue them to both ends of the elastic. Let it dry, then glue an elastic band on both sides of the cocked hat that will secure our hat.
Ready! Quick, easy, DIY and very beautiful, however, there is a way to make a cocked hat even faster.
How to quickly make a mock-up of a cocked hat
- First option . We cut out a template of the finished cocked hat on cardboard paper and decorate it. On the back side from the edge we glue a stick, with which we will hold the model of our headdress above our heads.
- Second option. We attach the same model as in the first case with an elastic band and put it on the head. An excellent solution for a child’s matinee or performance. And the time savings are significant.
Now that you know how to make this hat model, you will not have any difficulties and your solutions will definitely come.
The highlight of the costume and image
The process of making a children's pirate cocked hat, which we sew from fabric, can be followed using the example of a step-by-step master class.
In order to sew a headdress, you need to prepare materials such as: black fabric (preferably thick), scissors and threads, as well as braid, beads, and any nice little things. If your fabric is not too thick, then use cardboard to seal some parts.
Let's move on to the creation process. The first step we need to make patterns for the headdress. To do this, you need to measure the circumference of your child's head. The result obtained will be the circumference of the hat and the length of the crown. This result will also be the inner circumference of the hat brim. The length of the brim itself is about fifteen cm. If you want your hat to look like a real one, then you will have to think through every bend of the fabric. In total, you will need to cut out four halves for the brim, as well as four parts for the crown and circle. Then we need to sew all the details, and in the end we will have: a couple of circles for the brim, a couple of stripes of the crown and a circle.
Article on the topic: The most beautiful openwork crocheted angels
The next step is to machine stitch the two-sided pieces. With the lines facing outwards, fold the margins and stitch. The crown is stitched, and the seams should be on the inside. We sew the brim of the headdress along the outer contour and turn the piece right side out. We machine stitch along the parts of the crown and connect it with the circle at the bottom. After this, everything is stitched and ironed. Next we sew the brim and crown together. It is best to make four marks - front and back and on the sides. This is necessary so that the hat comes out very beautiful and even. Also, the four marks are considered guidelines, thanks to which you will be able to stitch these parts. If desired, you can sew on decorative elements: gold or silver, red or white braid.
Let's move on to the last step of creating the cocked hat. In the end, you need to achieve a rogue look for the hat. In order for you to achieve this effect, you need to decorate the front of the hat with various pirate symbols: crossed bones or a skull. This could be a picture that you can buy in a specialty store, or an image that needs to be printed and embroidered. At the very end, we hem the edges of the pirate hat, you should get a cocked hat, as in the photo below.
DIY paper pirate hat: master class with video
Several centuries ago, a pirate hat was one of the distinctive features of formidable sea robbers. Well, now for most winter holidays it is necessary to make carnival costumes. In today's article we propose to create one of the attributes of a pirate costume - a do-it-yourself pirate hat from paper for boys. They are the ones who most like fairy tales, legends and horror stories about pirates.
Attribute of all pirates
One of the main attributes of a pirate costume is a black cocked hat. You can sew it, but in today’s tutorial we suggest you quickly and easily make a pirate hat out of paper.
In order to make a cocked hat, you will need to prepare a thick sheet of black A3 paper, two sheets of white A4 office paper, glue and scissors, as well as an elastic band for the hat. If you do not have large format paper, then we suggest gluing together two black A4 sheets. It is also worth taking a black pen and an awl.
The first step is to take a black sheet and make a square from a rectangle. To do this, take the edge of the short side of the sheet and attach it to the long side. As a result, the second corner will be bent in half at an angle of 45 degrees.
Then, with a pencil or pen, you need to put a dot at the place where the edge of the first corner was. Draw a line and bend the sheet along the line. Make sure the edges are the same.
Making a pirate cocked hat
What carnival costume can be made quickly and cheaply for a boy for the New Year? Our masters thought and thought about this issue and decided: they won’t do any of the “be”, so popular among modern boys. And they will invite the boys to dress up in the costumes of dashing and fearless pirates. Parents will probably find vests, toy sabers and pistols. We will show you how to make a real pirate cocked hat from ordinary paper.
We will make the headdress using the format design technique. The essence of the technology is that the master will not need to use additional tools in his work, such as a ruler, templates, patterns, reamers, etc.
All parts will be made exclusively from different sheet formats. To make it clearer, let’s explain: for example, from a sheet of A4, folding it in half, we get a sheet of A5, folding it in half again - A6, etc.
This, it is worth noting, is a less complicated way of working than the same paper-plastic method.
For work we will need:
- a sheet of black paper 160 g/m2, A3 format (you can glue 2 A4 sheets together),
- 2 sheets of white paper (for printer) A4 size,
- scissors,
- glue,
- hat elastic.
Additional tools: awl, black gel pen.
Step one
First, we need to make a square from a black A3 sheet. To do this, take the corner of the short side of the sheet and apply it to the long side of the sheet so that the second corner of the short side is bent in half, that is, it becomes sharp - 45 degrees (photo No. 1) .
We mark the place where the first corner ended up. Using this mark, bend the sheet so that the edges of the sheet coincide on the right and left (photo No. 2) . Unfold and cut along the fold. We have a square.
Step two
Next we make a circle from the square. To do this, we round the corners (photo No. 3) .
Step three
Now we need to add fringe along the edge of our future cocked hat.
Take a sheet of white A4 paper and fold it in half 2 times (photo No. 4) . We cut the sheet lengthwise into thin strips, without touching the edges, about 1.5 cm (photo No. 5) .
We unfold this sheet and cut it along the folds. We should have 4 strips of fringe.
Important
We curl the fringe using scissors or twisting it onto a pencil (photo No. 6) .
We glue the whole part of the fringe strip onto the circle so that the edges of the fringe look up (photo No. 7) .
Step four
Along the edge of the circle (by eye) we mark 3 points at the same distance from each other (photo No. 8) . A small error is allowed: the side that turns out to be shorter will become the back of the cocked hat.
We make 3 folds from point to point. They should form a triangle. We push the middle of the triangle from the bottom up and, lowering the sides of the triangle, press the corners. The result is a cocked hat (photo No. 9) , but that’s not all.
Step five
You need to decorate your headdress. Take a sheet of white A4 paper and fold it in half twice. Then we cut it out as shown in photo No. 10 .
You should get two feathers. We curl their edges using scissors or a pencil and glue the corners of the feathers together.
Cut out a skull from a piece of white paper. To do this, fold the leaf in half. Draw half of the skull on it from the fold and cut it out. We also make bones (photo No. 11) . Then we glue the bones together crosswise.
Glue a piece of red paper to the skull (photo No. 12) . Draw the tails of the scarf and cut them out. We cut out the rest of the red leaf along the contour of the skull - we get a scarf.
We glue the skull to the bones and finish drawing the eye sockets, nose, mouth, cracks, etc. with a helium pen (photo No. 13) .
On one side of the cocked hat we glue feathers, and on the other - a skull and crossbones (photo No. 14) .
Using an awl, we make one hole from the side of the feather, the second from the side of the skull. We cut the hat elastic to the required length, thread it through the holes and tie it in a knot.
Now our pirate cocked hat is ready!
Material and photos prepared specifically for “I made it myself” (ChildArt.ru)
Source: https://www.samsmasteril.ru/anons/06-12-2012-delaem-piratskuyu-treugolku
From other materials
The second step in today’s work is to consider a very simple and easy-to-understand way for beginners to create a pirate hat from cardboard. To do this, take thick cardboard, glue and scissors.
The first step you need to do is make a blank pirate hat from newspaper, and make a headband from cardboard. We decorate the figures and connect both blanks with a stapler.
In the following photos you can see how to make a pirate hat from cardboard.