The pattern of men's family underpants is not as simple as it might seem, especially underpants for overweight men, starting from size 56. Incorrect calculations will lead to the fact that the panties will be uncomfortable, the threads in the seams will break, despite the fact that the panties seem to be loose.
DIY women's knitted shorts. Subscribe to my channel and you will learn how to sew various clothes.
The pattern for men's briefs is practically the upper part of men's trousers, so to make an accurate pattern you will have to do a little calculation and possibly adjust something during the fitting. But then, based on these calculations, you will be able to make a good pattern and use it constantly not only for patterning panties, but also for cutting light summer shorts with an elastic band. It is most convenient to create a pattern on graph paper.
Men's family pants should be comfortable, hygienic, practical, and therefore the fabrics for sewing men's pants should be soft, light and thin, but at the same time be durable and have a stable color. It is best to use chintz, satin or lightweight calico, 90 and 150 cm wide, for sewing panties.
Flower nursery Green Gate
Do you like indoor or garden flowers? At the Green Gate nursery you can buy rooted cuttings and divisions of various domestic and perennial garden flowers. We have a constantly updated collection of anthuriums and hibiscus. Flowers and plants are sent by mail.
Technology for sewing a baseball cap, from pattern to clasp. Subscribe to my channel and you will learn a lot of useful sewing tips from a professional.
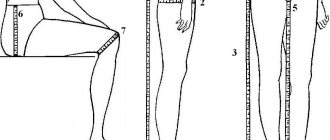
What measurements are needed for men's briefs?
We offer a pattern for men's family briefs, made with short shorts without inserts. To construct a drawing of a pattern for men's underpants, the following measurements were used: St = 41 cm, Sat = 50 cm, Oh trouble. = 55 cm. For example, measurements taken: 176-96-82. St is half waist circumference. Sb - semi-circumference of the hips (at the widest point of the buttocks). Dinner. - thigh circumference at the highest point. To prevent the finished product from being too tight, allowances for a loose fit are used when creating patterns. Increases for men's underpants: Pb tall. = 2 - 5cm, Pb bad. = 5 - 6cm. For this size, we will choose an increase of 2 cm at the waist and 6 cm at the hips.
If you don't know how to take men's measurements correctly, see How to take measurements.
Preparing for sewing
If the tailoring is done by a professional, then there will be no problems. But for a beginner in needlework, it is better to prepare well in advance, because such a gift, made with your own hands, will be adequately appreciated by the recipient. The main step that will simplify the work is preparing the pattern.
Pattern of men's underpants
Model selection
To please the person for whom the underwear is being sewn, you need to take high-quality fabric and choose a suitable pattern. In addition, before starting sewing, you should decide on the shape of the finished product. Family panties are divided into the following types:
- boxers;
- family people;
- gussets;
- swimming trunks
Boxers
Additional information! You can sew any model yourself. To do this, just choose the right pattern for men's family briefs.
Material and tools
To start constructing a drawing for cutting underwear, you need to prepare the necessary tools and fabric in advance. To get started, you need to prepare the following:
- high quality fabric, the quantity of which is determined from the size of the pattern;
- thread of the same shade as the fabric;
- sewing machine;
- graph paper for pattern;
- tailor's scissors and a simple pencil;
- meter tape and elastic band;
- pin, sewing needle and awl;
- iron.
The fabric for sewing must be chosen carefully, because the comfort of wearing underwear will depend on it. For such purposes, it is better to choose knitwear with the addition of polyester. If sewing is done from 100% knitted fabric, then the finished product will stretch heavily, breathe poorly and fade quickly.
Attention should also be paid to the pattern and color of the material. You can make plain underwear or, conversely, a cheerful multi-colored model.
After preparing everything you need, you can begin making panties using a pre-made pattern.
Preparing tools
If the selected fabric is not soft enough to the touch, you should consider inserting a gusset made of a softer, more comfortable material.
You might be interested in this: Creating a pattern and sewing a beautiful evening dress
Gusset insert
Constructing a pattern for men's underpants
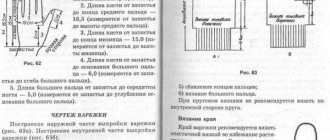
The pattern begins by drawing a vertical line on a sheet of graph paper with the apex at point A. 1. From point A down, set the seat height: AH = 0.5 C6 + 1 = 0.5 X 50 + 1 = 26 cm and determine the length of the panties ( without allowances) according to the formula: AN2 = AN + 7 (increase) = 26 + 7 = 33cm. Both of these values are recommended for the second half (back), so you can immediately build the pattern and the second ladles. But we will give calculations sequentially, first for the front of the panties, then for the back.
Constructing a pattern
To sew underwear, you need to stock up on material measuring 100x80 cm. A pattern for men's underpants can easily be found on the Internet or in a magazine on the relevant topic, but this may cause problems with size mismatches. Therefore, in order to understand how to sew family panties, it is better to make a pattern with your own hands.
Men's briefs are made according to the front and back patterns. As an example, you can consider the option of sewing linen in size 52 (manufacturing items in both sizes 46 and 60 will be carried out similarly). With this option, the length of the product will be 54-56 cm, the hip circumference (abbreviated OB) will be 94 cm, the length from knee to waist (DTK) will be 60 cm.
Start cutting
Start cutting according to the following instructions:
- Take graph paper. A rectangle is drawn on it indicating the angles ABCD. Its width will be equal to OB/4 plus 3 cm for allowance. The length is determined based on the length of the product.
- A step length line is drawn. To do this, the distance DTK/2 plus 2 cm for allowance is set aside from point A. It is recommended to mark the end of the segment with point P.
- A step width line is drawn. To do this, a segment is laid from point P to the side of the rectangle BV. After crossing it, the line continues for another 58 mm, then point P1 is placed.
Front half
The front part is cut in the following sequence:
- 3 cm is measured from point B and a new point E is placed.
- From point P, a segment upward is constructed, which ends at point E.
- The GB side is extended to the right of B by 2 cm. And down from it a centimeter segment is drawn connecting G and E.
- The segment corresponding to the step seam is drawn with a dotted line from point 6 to 1. After this, it is divided in half, and 1 cm is set aside from its center to the right and all 3 points are connected.
Front end
Back half
The next step is to make a pattern for the back half. This is done step by step:
- From point B, a segment is laid 2 cm to the right and 4 cm up. Its end is marked with the letter T, which is then connected to point A.
- To get ¼ of the width of the product, one centimeter is measured from point 6 to the right and at this point the mark P7 is placed.
- The dotted line marks the planting level. This segment connects to points P7 and T, but then extends to the right by 2 cm. This dotted line is divided into 4 equal parts. From the penultimate of the points located on the line, 2 cm is laid to the right, and from the first - 1 cm. After which, all the resulting points are connected.
- From point G, a line is laid 4 cm to the right, after which it is connected to segment P. Then points G and 4 are connected, thus forming the bottom of the product.
You may be interested in this Instructions for Soviet sewing machines Chaika 132, 134 and 143
Rear end
If necessary, the possibility of inserting a gusset should be planned on the front of the product.
The front half of the panty pattern
2. From points A, H, H2, set aside the measurement Sb (half hip circumference) with an increase of 1 cm, for a total of 26 cm. Designate new points A1, H1, H3.
3. From point H1, set aside 1/6 of the half-circumference of your hips to the right (50/6 = 8.3 cm). Do not take into account tenths of calculations (and further too), let it be 8.5 cm.
4. Now you need to find point B1. To do this, divide the hip circumference measurement by 6 and subtract 1.8 cm. The total will be approximately 6.5 cm.
5. Connect this segment with a straight line, setting aside 1 cm from points B1 and B.
6. Next, set aside 1 cm from point A1 and connect this new point to point A, as shown in the diagram.
7. Set aside 1/2 of the half-waist measurements on this line plus an increase of 3 cm, and place a point T, where AT = (41: 2) + 3 = 23.5 cm.
8. Now all that remains is to set aside a 4.5 cm long segment dividing the angle A1H1B in half and draw the line of the front seam with a smooth concave curve.
Back half of the panty pattern
9. Horizontal segments AA1, HH1, H5H4 are equal to 1/2 of the half-hip measurement plus 6 cm, that is (50: 2) + 6 = 31 cm.
10. From point H to the left, set aside a segment of 2 cm and place a point (2).
11. From point H5, continue a straight line to the left by 1/4 of the hip circumference measurement minus 1 cm and place point B2. Н5Б2 = (50: 4) - 1 = 11.5 cm.
12. From point H5, continue down a vertical line 3 cm and place point H6. From point H6, move 1/4 of the thigh circumference minus 1.5 cm to the left horizontally and place point B3. Н6Б3 = (55: 4) - 1.5 = 12 cm.
13. Draw a straight line through points B2 and B3, extending it upward beyond point B2 by 1 cm. You also need to set aside a segment from point B3, but you can determine its value only by measuring the same section of the front half of the panties. Or simply place the front piece pattern on this line and make a mark.
14. Now all that remains is to adjust the waist line and draw a smooth line for the back seam. From point A1, move 1/2 of the waist semicircle plus 5 cm to the left horizontally and place point T1. A1T1 = (41: 2) + 5 = 25.5 cm. Next, from point T1, set aside 2 cm vertically and place point T2. Connect points T2 and A1 with a straight line.
How to cut men's family briefs
To make it more convenient for you to cut the fabric, transfer the drawings of the front and back halves of the pattern for men's underwear to another sheet of cardboard or oilcloth along with the allowances. Allowances in the drawing are indicated in centimeters. It will be convenient for you to use the resulting panty patterns with allowances when laying out the fabric. At the same time, with such a pattern you will not forget to make seam allowances.
The patterns may have to be adjusted in the future, so it is better to sew test panties, make sure that the pattern is accurate, and then transfer it to cardboard or oilcloth. Such patterns are convenient to use when cutting and laying out fabric.
The front and back of the panties can be cut entirely. To do this, simply align the side seams of these halves together, then instead of four parts you only have two.
Instructions
If natural fabric is chosen for needlework, then there is a high probability that with frequent washing its edges will crumble. To prevent this from happening, they are treated with a special linen seam or overlock. You should not get carried away with finishing stitching, as unnecessary punctures impair the quality of the underwear.
You might be interested in Interesting dress patterns A silhouette: how to sew it yourself
cotton and linen fabric for underwear
The sections of material along the bottom of the legs are folded one centimeter and processed with a hem seam. An elastic band will be inserted along the upper cut, so here the hem is made by two centimeters.
First stage of sewing
The entire process of sewing a product is carried out step by step:
- Initially, step seams are made and two halves of panties are obtained, which are placed right sides together.
- The front and back seams are sewn on the attached parts, after which the product is turned inside out.
- The lower part of the linen is folded 1 cm, hemmed and ironed. After this, it is folded again and stitched using a sewing machine next to the edge of the fold.
- The cut along the top of the product is made taking into account the fact that an elastic band will also be inserted there. To do this, you also need to make a hole in the fabric.
- The final stage of sewing is inserting the elastic. To make it easier, you can use a pin during the broaching process. The ends of the elastic are sewn together with thread by hand.
Finished product
It is worth remembering that the patterns made will be useful in the future for sewing the next sets of linen. After all, most urologists recommend keeping 7-10 pairs of panties in constant use. In the summer, during extreme heat, it is recommended to change your underwear several times a day. During cold weather, it is enough to change your panties once a day, but you should wear models made of warm fabrics.
Layout of panty pattern details on fabric
When laying out the patterns of the front and back halves of the panties on the fabric, it is necessary to observe the direction of the grain thread on the patterns and fabric. The directions of the grain thread for different fabric widths are indicated by arrows.
Note the fold line of the fabric for each width of fabric. With a fabric width of 85-90 cm, fold the fabric in half along the grain (lengthwise). In this case, for pant size 176-96-82 you need 1.04 meters of fabric.
With a fabric width of 140 cm, fold the fabric along the weft thread (across the fabric). In this case, the fabric consumption for men's briefs size 176-96-82 will be 0.52 m.
If you need to sew men's briefs in a large size, for example, size 56 or more, then the pattern of men's briefs must be made with an insert for the back half. The layout of the panties will have to be slightly changed and an additional wedge added to it.
Preparing for work
Sewing men's underpants is not a difficult task. The most time-consuming part of the work will be creating the pattern. Beginning needlewomen are recommended to master the technique using the example of a simple pattern of panties without a side seam and gusset. The absence of side stitching allows not only to reduce fabric consumption, but also to eliminate some operations with cutting, thereby reducing work time.
You can sew men's briefs from any natural fabric, for example, chintz or fine knitwear. You will also need threads to match the color of the material, an elastic band and tailor's tools.
Beginner seamstresses are recommended to create a pattern on paper and then transfer it to fabric. Experienced needlewomen can design a pattern directly on a piece of material.
To work, you will need some measurements that should be taken from the “model”:
- Half waist measurement. Symbol - ST. In the proposed example, this measurement is 40 cm.
- Half hip circumference. Designation - SB. In the above diagram, half the hip circumference is 50 cm.
- The length of the product (DI) can be selected individually or use the standard one - 34 cm.
An increase of 3 cm should be made along the hip line. Designation - PB. It is also important to determine the degree of fit of the product to the body. That is, from 2 to 8 cm should be added to the SB.
If it is not possible to take measurements, for example, when preparing a surprise, you can determine the measurements using the existing panties. You can cut comfortable and original boxers by taking measurements from shorts and reducing them to the desired size.
How to sew men's underpants
If you have at least a little experience in sewing bed linen, then sewing panties will not be a problem for you. Why bed linen? Because the connecting seams need to be “packed” with a linen seam. This is necessary because underwear has to be washed constantly and the cut edges of cotton fabric treated in a different way will fray.
Instead of a linen seam, you can stitch the seams and process them with an overlocker, but not with a zigzag stitch. There is no need to add a finishing stitch; unnecessary needle punctures will only destroy the fibers of the cotton fabric.
The lower sections of the panties are sewn with a hem seam (0.7 - 1.0), and the upper section (for the elastic) with a wide hem, 2 cm wide.
In this video you will learn the sequence of sewing women's or children's shorts from knitted fabric.