Modern designers offer many handmade items that will delight you. Few people know that many of them can be made with their own hands, with little effort and using simple materials.
One of these gizmos is a butterfly pot holder. This is a simple pot holder that you can do yourself.
It is cut in the shape of a butterfly, making it look especially beautiful and fill the room with spring and summer mood.
All pattern pieces are created in full size. To create a pattern, it is better to use graph paper or a marking grid. Initially, the pattern itself is constructed, which includes all the parts that are used when sewing potholders.
This master class allows you to sew a butterfly-shaped potholder with your own hands, using simple materials and available tools. It is better to choose fabric either in contrasting colors or in harmonious tones. Since padding polyester will be sewn inside the potholder, the outer fabric can be of absolutely any texture and density.
In order to cut the fabric into the required parts, it is necessary to create patterns. To do this, the intended pattern is drawn on a sheet of paper or graph paper. This will be the main body of the butterfly and the wing. The resulting patterns are cut out, and all the details will be cut out from them. The size of the patterns will depend on how large the potholder needs to be made.
After the patterns are ready, they are applied to the fabric and outlined with chalk or soap. Then they cut along the intended boundaries and get ready-made parts for tack work.
To work you will need:
- Patterns of parts.
- Chalk or soap.
- Fabric in two colors.
- Sintepon.
- Bias tape.
- Braid.
- Buttons.
- Threads.
- Any decorations.
Butterfly potholder pattern in several options
An oven mitt is an integral and necessary accessory in the kitchen, protecting household members from burns. This element can be not only functional, but also beautiful, as it is located in the most visible place. The design and shape of the potholder can be completely different.
You can make it simply square, or you can use your imagination and create a masterpiece that you will want to use in your household again and again.
A good option would be a butterfly-shaped potholder, which we will try to make by following the step-by-step instructions in the master class with butterfly potholder patterns.
The most common types of this attribute are:
- square potholders or in the form of mittens;
- curly (hares, Christmas trees, stars, etc.);
- Silicone potholders are at the peak of popularity;
- There are large potholders with pockets for convenience when removing pots or baked goods;
- Many housewives prefer to purchase or make their own potholders in the same color scheme.
All mittens can be divided into single (high thermal conductivity), double (average thermal conductivity) and mittens (the best option, since thermal conductivity is low). You can sew a pot holder yourself to suit your taste, you just need to show your imagination and creative skills.
Let's get to work
First you need to make a pattern for subsequent embroidery. To do it, you need to know the length and width of the palm, the length of the thumb and index fingers. It is important that the hand is completely enclosed in the tack and also protects the wrist. These parameters will help you determine the exact dimensions of the potholder so that it is convenient to use.
Read this: DIY felt monkey: we create an oriental miracle ourselves
The pattern looks like this:
With its help, you can sew a kitchen attribute in the shape of a life-size butterfly, which will serve you for a long time. The end product should look like this:
Patterns are made on special paper, and then cut out and transferred to fabric.
Don't forget about seam allowances. If you decide to edge the edges, then 1 cm will be enough for the seams, and if you hem them, you will need about 2 cm.
The tack consists of 3 layers: 2 outer parts and insulation. Felt, padding polyester or batting are most suitable as insulation. They have low thermal conductivity, which means the risk of getting burned is minimal. So, to make a butterfly-shaped potholder you will need:
- calico (or any other non-synthetic) of three different colors;
- multi-colored shreds for decoration;
- 4 buttons (2 pairs of the same);
- floss threads;
- bias binding and bindweed;
- cardboard and padding polyester.
Read this: DIY tablecloths for home decoration
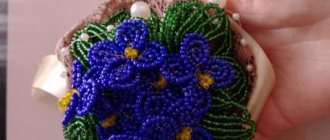
- First, we cut out the details of the future tack from calico. The whole butterfly will be made of blue fabric (cut out 2 parts), and its wings will be green:
- We make the lower parts from striped fabric.
How to sew oven mitts for the kitchen with your own hands for beginners:
An oven mitt is a must have item in the kitchen. It protects your hands from burns when using hot utensils. Of course, today you can purchase these kitchen accessories at a regular hardware store. But it is much more pleasant to use potholders made by yourself, especially since for sewing potholders you will only need the skills acquired in labor lessons at school.
everything you need for work
To start sewing potholders, you first need to assess your strengths and, based on your skills, choose or come up with a model for the future product. If your skills end with sewing on buttons, then it is better to sew a potholder more simply, using simple options for shapes and decor. But if you are already an experienced seamstress, then it will not be difficult for you to make a product in the patchwork style or come up with unusual decorations for it.
Once you have made your choice, start looking for the right fabric. The advantage of sewing potholders is that they are made from unnecessary things. Old coats, shirts, dresses, skirts - everything will be used. But there is one caveat: potholders must be sewn from natural fabrics, since synthetic ones are easily flammable and melt at high temperatures.
An excellent option would be:
- linen;
- chintz
- cotton;
- denim.
A potholder made without filler will not be of any use, so prepare material for the inner layer.
As a “filling” you can use:
- felt;
- fleece;
- padding polyester;
- denim fabric.
To make the finished product look beautiful, prepare edging tape and decoration items.
how to make a pattern
On the Internet today you can find the most bizarre types and forms of potholders, but the following are considered classic:
- square;
- circle;
- mitten.
Making a pattern for potholders is not difficult, because unlike clothing, there is no need to create complex designs. For patterns, you can download ready-made ones from the Internet or trace an old potholder. A square or circle can generally be drawn using ordinary stationery.
No matter how simple the shape of the future potholder, to create it we recommend making a paper pattern and using it to transfer the design onto the fabric. This will prevent uneven parts during the sewing process. The material itself should be washed, dried and ironed before cutting out.
To sew a potholder, you need to make two parts from the filler and two parts from the main fabric. In total you will get four pieces of the future kitchen accessory.
When making a pattern, make sure that all the details are the same, otherwise the finished potholder will have a sloppy appearance. Don't forget to leave an allowance of 0.7-1 cm along the edges of the pieces for seams.
how to assemble the product
Now that you have already transferred the patterns onto the fabric, now it’s time to put all the details together. Depending on where the stitching will take place - inside or outside - the parts should be placed differently.
If the product will be sewn from the inside, then first place the upper parts facing each other, then put insulation on both sides.
If the product will be sewn from the outside, then first of all, fold the insulation parts together, and then place the main fabric parts on them with the front side facing out.
After all the components are combined as required, secure them with a running stitch and then sew them on a machine. If you are sewing a potholder from the inside, do not sew everything completely, but leave a place where you will turn the product outward.
At the very end of the work, sew (if desired) trim along the edges, make a loop and decorate.
Potholder "Butterfly"
BUTTERFLY MITTEER
Comfort in the home is one of the most important tasks of a woman. And the kitchen, in my opinion, is the most comfortable and warm room in the house. Coziness, in turn, consists of little things: a tablecloth, a towel, a jar for spices, oven mitts. Today we will talk about potholders with your own hands, which you can easily make if you follow the instructions.
- For this we need:
- 1. Cotton fabric of different colors;
- 2. Sintepon;
- 3. Satin ribbon 0.2 cm;
- 4. Satin ribbon 3 cm;
5. Buttons 4 pcs.;
6. White lace;
7. Cardboard for patterns;
8. Thread, needle, scissors, sewing machine.
It’s easiest to sew potholders with patterns, because you just need to follow the instructions exactly, and so let’s start creating a fun butterfly potholder for hot dishes.
First we need to make a template for the pattern from cardboard. First we draw on plain paper in the form of a sketch according to the dimensions indicated in the photo. After you have drawn the final version of the butterfly, transfer it to cardboard and cut it out. Now we have a template according to which we can later sew such potholders with our own hands for ourselves and as a gift.
Before cutting out we must prepare the fabric. It is best to take cotton fabric, which will not shrink when washed.
If you know that it will shrink, you need to wash and dry it before cutting, and only then cut it. Your fabric should be uniform in color and shades.
In my case, it is all light green-pink and goes well with each other. We take fabrics of six different colors, patterns and ornaments.
The butterfly potholder according to the template consists of ten parts: the butterfly itself - 2 pcs., the left wing - 2 pcs., the right wing - 2 pcs., the decoration for the wings - 4 pcs. But we don’t forget about the padding polyester layer for the butterfly. In total, we cut out 11 elements from fabric.
We fold all the parts of the potholder in the required order: face down the butterfly, a layer of padding polyester, face up the second butterfly, the left wing, consisting of two parts with the wrong sides facing each other, the right wing is laid out in the same way as the left one, and the final step is to apply the “petals” " and "circles" on the wings of a butterfly. You need to cut out the antennae so that the butterfly potholder looks like a real one, from 0.2 cm long 19.5 cm tape. From 3 cm tape we make a blank equal to the length of the wings for their edging.
We must iron all our parts of the potholder with our own hands with a well-heated iron.
This way, all the unevenness of the fabric will disappear, wrinkles, if any, will be smoothed out, the fabric will “stick” to each other and will be easier to sew, and most importantly, the three parts of the main butterfly will be connected to each other, and the padding polyester will become smaller in volume and easier in subsequent work. After ironing the main butterfly, excess padding polyester may appear outside the potholder; they need to be trimmed with scissors so that everything is smooth and beautiful.
Using a sewing machine, we sew the left and right wings, consisting of two parts each, and the parts are folded inside out. But the seam only goes along the outer edge of the wing, leaving the edge where the ribbon edging will be loose and unstitched.
To sew on the antennae of the potholder with our own hands, we must separate the three parts of the main butterfly, turn out the two components, without padding, with the right sides inward, place the antennae so that only the tips are visible, and everything else is on the side of the front sides of the butterfly. And then sew small stitches along the contour of the head.
After which we turn the product right side out and carefully place the padding polyester inside, which is why our butterfly potholder becomes voluminous, especially the head. The padding polyester may not fit well, in this case you can use something flat and not sharp to evenly distribute the filler inside the butterfly's head. Then it is best to iron the product again.
We must already secure our main part of the tack. To do this, we sew a tack around the perimeter.
In order for the padding polyester in our potholder to remain in place after washing, and for it to be more embossed, it is necessary to quilt it. In my case, this will be easy to do, since the back of the potholder is polka dot, I will quilt through two rows of polka dots diagonally in one direction and the other.
You can take a ruler and draw a quilting design at forty-five degrees with parallel lines.
Now our butterfly potholder requires decoration. We take two petals and, bending 0.5 cm with light stitches, without fastening the thread, sweep each of the petals. After this, we take two circles and collect them around the perimeter on a thread. Afterwards you need to iron all four parts.
On each of the parts it is necessary to sew a button with a large needle and thick threads for relief of the stitches. And alternately sew ruffles in a circle onto two circles.
Then you should sew one circle and one petal to the right and left wings. The circle is sewn with small invisible stitches onto the upper part of the wing, without touching the lower part.
The petal is also sewn behind the upper part of the wing, but with a thick needle and thick white threads using large stitches. When the decoration of the wings is ready for the potholder with your own hands, you need to decorate the edge.
First, we sew one edge using a sewing machine, and sew the other with small stitches with a needle.
You can finally decorate the potholder with ready-made bias tape, but it is thin, since we have thick synthetic padding in the layer, so it is better to cut the tape out of the existing fabric. To do this, a straight line 4.5 cm wide is cut out, 0.5 cm is ironed on each side, and then it is sewn on the front side with a sewing machine, and on the other side it is sewn on with a needle and small stitches.
- This is how potholders with patterns are easy to make, and most importantly, you can choose the color scheme exactly for your kitchen and how you like it.
- If you liked the master class on how to make potholders with your own hands, then share it with your friends and acquaintances on social networks.
Patterns of oven mitts for the kitchen with pockets for hands
Oven mitts in the kitchen are a necessary accessory, agree. And if they are also made with your own hands, sewn with love. This is also a wonderful gift - a set of oven mitts + kitchen mitt.
We offer you patterns for potholders with pockets for hands , which you can print on A4 sheet on a regular printer, and also attach a photo of the results.
How to proceed?
1. Right-click on the pattern and select “Save image as...”2. Save the pattern to your PC3. Find your pattern and click “Print”
4. Select a printer and print “Full page”, print on A4 sheet
Kitchen pot holder “Heart” - pattern
Detailed description and Video on our website: Kitchen mitt “Heart” pattern and MK
Kitchen oven mitt “Owl” - pattern
First, we cut out the parts according to the pattern; we make unsigned parts in one copy. Whether or not to make seam allowances is also at your discretion, I sewed both ways. The owl came out a little bigger, also cute.
Next, we assemble the applique: we sew on the eyes and beak. Next, the main part is duplicated with filler and quilted, the wings are optional. You can make pockets for your hands at the wings, or you can just sew them on.
You can modernize the potholder according to your taste, for example, in the photo there is a gray owl with a different nose and eyes, it is larger in size and the pockets are used for cutlery. Great idea for serving food for kids. Do you agree?
Kitchen pot holder “Bird” - pattern
We cut out the parts according to the pattern, all 2 pieces. Cut out parts A and B with a fold or cut; if cut, then this cut that looks inside the tack will need to be edged.
We cut out part C and duplicate it with filling (batting or padding polyester, you can even use an old towel), quilt three layers. We sew parts A and B and turn them inside out.
You can run a finishing seam along the edges of the potholder or simply iron it, and don’t forget to make a comb for the chicken and a tail loop.
Kitchen pot holder “Butterfly” - pattern
Pattern for a butterfly pot holder in full size, sheet A4:
A very beautiful pot holder - a DIY butterfly? Why not? Nothing complicated! Download the pattern, print it, cut it out of paper and cut out the details.
ATTENTION! Pattern on two sheets.
We cut out most of the parts in 2 copies + filler, you can quilt 3 parts. We also cut out the wings. Please note that the right and left wings must be cut symmetrically, i.e. Lay 2 pattern pieces face down, and 2 pattern pieces turn them over.
Next you need to place and stitch the applique parts, then sew two parts of the wing, do the same with the second wing. We sew on decorative buttons and make decorative stitches by hand or on a machine.
Align the wings with the larger piece of the pot holder and stitch along the outline. Make edging and antennae loops. Ready.
All you have to do is wash it and enjoy using it in the kitchen or give it as a gift.
Source: https://www.besaport.ru/svoimi-rukami/675-vykrojki-prikhvatok-dlya-kukhni
Butterfly potholder pattern
An oven mitt plays an important role in the kitchen. With the help of such an accessory, you can easily rearrange a hot pot, frying pan or plate without fear of getting burned. You can sew such a potholder even if you don’t have the skills.
The potholder can be made in the form of different animals and insects. As an option - a butterfly holder. And to make it easier to sew a potholder in the shape of a butterfly, just make a pattern for the potholder in the shape of a beautiful butterfly.
The finished attribute will become a bright decoration of the kitchen and will bring novelty.
If you plan to decorate the potholder with braid or beads, it is important to remember its direct purpose: decorative elements should not be superfluous when using the potholder. Such elements are attached so firmly that they cannot in any way get into any dish.
How to sew a butterfly potholder from scraps of fabric with your own hands using a pattern
To make such a potholder you will need the following material:
- Fabric of different colors (cotton)
- Satin ribbons (width 0.2 cm and 3 cm)
- Sintepon
- Buttons (4 pcs.)
- Cardboard
- Lace (white)
- Needle, thread. Sewing machine, scissors
Let's get started:
1) Using the specified dimensions, make a template on cardboard and cut it out. To make a butterfly, the following parts are applied to the cardboard in two copies: the body of the butterfly, the left wing, the right wing and 4 pieces. elements for decoration. And also the body of the butterfly needs to be cut out of padding polyester - this is a layer.
2) We cut out the mustache from a ribbon 0.2 cm wide. The length of the mustache is 19.5 cm. From a ribbon 3 cm long we make an edging along the length of the wings.
We sew the wings on a sewing machine; they consist of 2 parts. The seam should go to the outer edge. We do not sew the edge for the edging.
3) Sew on the antennae (place them between layers of fabric)
4) Next, we put padding polyester inside, so the butterfly will become voluminous. Now the product needs to be ironed.
5) We secure the main part of the potholder by stitching around the perimeter in a circle
6) Then you need to quilt the product so that the padding polyester lies evenly; to do this, use a ruler at an angle of 45 degrees to draw parallel lines.
7) Decorate the butterfly. Sweep away the petals. We collect the circles on a thread around the perimeter. We sew buttons onto these parts. And the mugs also have ruffles. We sew these elements to the wings.
 From the fabric we cut out a binding 4.5 cm wide and sew it on. The potholder is ready.
In order for the mitten to serve for a long time and perform its intended functions, it is important to choose the right filler and fabric. Mostly natural fabric, such as linen, cotton, chintz, is most suitable for sewing.
To prevent the potholder from falling apart after a few days of use, the fabric must be thick enough. You can also sew a potholder from old fabric, such as denim. In addition to padding polyester as a filler, drape batting, felt, and felt are used.
Terry cloth can also be a good filler; it is folded in half. The inner layer should be about 3 mm thick.
Necessary materials:
- Fabric: plain and colored; fabric of not bright color for lining, interlayer interlining fabric, non-woven fabric
- Threads
- Wavy tape (approximately 20 cm)
- Scissors
- Buttons
Progress:
1) First we draw the pattern on paper, then it is transferred to cardboard.
2) The pattern must be drawn in accordance with the required dimensions, in full size.
- 3) After this, transfer the pattern to the main and interfacing fabric, leaving 1 cm allowances for the seams.
- 4) We connect the main fabric with the interlining fabric with pins and stitch it on a machine
- 5) Glue decorative elements on top of the parts, which can be made from another fabric
- 6) Sew buttons onto the wings.
7) We connect the upper and lower parts and grind them on a sewing machine. Sew on the braid. We cover the cuts with binding.
Features of the work:
- The fabric scraps are cut in the direction of the grain thread
- The fractional direction can be determined by the interweaving of the threads, even if there is no edge, as well as when stretching the patch. The lobar direction is the one in which the tissue stretches slightly or not at all.
- The scraps are cut so that there is a margin of 1 cm on all sides for the seams, and if the fabric frays, then 1.5 cm.
- If the shreds are different in thickness, then before sewing them together, the thin shreds are placed on a cotton lining; it needs to be basted or an adhesive interlining is glued on the wrong side. In this way, it is possible to equalize the thickness and avoid deformation of the tack. The potholder is ready.
Video material on the topic of the article
- Several more options for sewing potholders will be shown in master classes with detailed instructions.
Source: https://sdelala-sama.ru/shityo/3931-vykroyka-prihvatki-babochka.html
How to sew a potholder with your own hands from scraps master class
Patchwork, or patchwork style, has been used by our ancestors from time immemorial. This type of needlework is notable for the fact that to create it you can use leftover fabric from sewing other things or unnecessary things, but at the same time the pattern turns out to be unusual and beautiful.
Making potholders in patchwork style is a simple, but very labor-intensive process that requires attention and precision. We will show you a master class on how to make a simple potholder from scraps.
To work you will need:
- two pieces of main fabric and two pieces for the inner layer measuring 24 x 24 cm;
- strips measuring 2.5 x 24 cm;
- edging tape.
1. Take a square of the main fabric, place a square of filler on top of it and begin sewing strips to the squares.
2. Take two strips, fold them face to face and stitch them to the base on one side. Then turn them outward, iron them and attach another strip, also stitch them to the future tack, turn them over and iron them.
Continue doing this until the entire surface is filled with stripes.
3. Attach the tape to the wrong side of the potholder and secure it around the entire perimeter. At the same time, at each corner, bend the binding at an angle of 45 degrees.
4. Sew the binding to the potholder, but not all the way, leaving a “tail” for the loop.
5. Turn the binding right side out and secure with pins or stitches.
6. Make a small loop from the remaining binding and hide the “tail” inside.
7. Sew the binding to the pot holder.