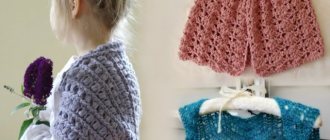
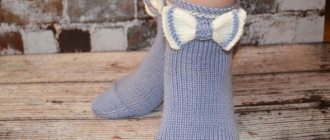
Knitted cat hat
Let's start with a description of a simple cat hat model with knitting needles. The size shown is for a teenage girl or young girl. But, after carefully reading the knitting pattern, you yourself can count the loops to any size.
You will need: - Chalet yarn from Seam (55% baby alpaca, 10% wool, 20% nylon, 15% lamé 95 g/50 met) - 100 g; - circular knitting needles No. 3.5, No. 3
Description of knitting a cat hat
- Dial 88 p. on sp. No. 3, close it in a ring. Knit four rows of hollow elastic: 1p: * K1, we throw the loop over without knitting, the thread is in front of the loop) *; 2p.: * persons. remove (thread behind the loop), purl 1. *
- From 5th r. knit with an elastic band 1 x 1 (knit 1, purl 1) - 7 rows.
- Switch to knitting needles No. 3.5 and knit the installation row: knit 27, purl 1. (path between stitch stitch and pattern), next 15 stitches. - for the side pattern. Here you need to make additions: knit two from each purl stitch. You will end up with 22 stitches on the side.
- Knit 37 r. according to the basic pattern, repeating rows 7 to 12.
- After 37 r. it is necessary to make decreases and the knitting pattern of the cat hat changes. In the second pattern, it is necessary not to cross along the edges of the pattern, but to decrease it, knitting 2 loops each so that they look at the center of the pattern. Repeat 4 times. until there are 2 sts left on the sides.
- Sew the top seam of the cat's hat.
Crochet product
It is better to start work from the center of the crown. The structural element of knitting will be a double crochet. A master class on a crochet cat hat is offered:
- Three air loops close in a circle.
- At the beginning of a new row, like all subsequent ones, a chain of three air chains is formed. After this, the base of the circle is knitted with 11 double crochets. Each row ends with a closing half-column.
- In the new row, the number of structural elements doubles: from 1 loop you need to knit two so that their total number reaches 24.
With each new turn, the number of columns should increase by 12. The subsequent increase is made through one loop. In the next row, an additional double crochet is knitted in every third loop, etc.- When the circle reaches a five-centimeter diameter, increases are made in every second row. To ensure that the texture of the hat matches the future ears, the work is then performed in rotating rows.
- When the number of columns is sufficient for the desired cap size, increasing their number should be stopped. The main part of the product is made with a flat canvas to the desired height. After this, the thread can be broken or knitting can be continued, forming a triangular base for attaching the tie. The second such triangle is knitted on the opposite side. These parts need to be positioned by moving them slightly back.
- For a decorative ear, a chain of five air ones is made. Knitting is done in turning rows. In the 1st row, 3 double crochets are knitted in the fourth loop from the hook and one more in the last one. Not forgetting about 3 lifting loops, knit a new row, adding one loop at the edges and 2 in the center (knit three from one), getting 9 loops. You will need to knit 3 more rows, increasing only along the edges.
- One ear requires 2 such parts. They are placed on top of each other and tied on the sides with 2-3 rows of half-columns, knitting a shell on the top.
The resulting ears are sewn on the sides of the crown. The remaining elements are embroidered or made in the form of overlays.
Meow meow meow!
Over the past three years, cat hats have not lost their popularity.
And no wonder, funny cat ears on the hat attract attention, making the owner stand out from the crowd. The next model is quite popular on the Internet. But when reviewing this style, it’s impossible not to talk about it. So, how to knit a hat with cat ears? You will need: - yarn 180-200m/100g; - knitting needles No. 3.5
Scheme of work
- A description of knitting a cat hat on knitting needles is presented in the diagram. Only odd rows are indicated, even rows are knitted according to the pattern.
- Cast on 96 stitches. and knit 4 p. with an elastic band 2 x 2 in a circle, then proceed to the pattern according to the diagram that shows half of the cap.
- Sew the top seam. Try it on and mark the line where the ears fit to your head. Make an invisible seam in this place.
Original beanie
Decorative ears can be attached to hats of different styles. The popular tight beanie is no exception. This neat hat is very easy to make. The main part can be knitted in any pattern, equipped with a single or double lapel, lengthened at the crown or increased in volume.
The location of the ears must be determined independently in the process of trying on a ready-made hat.
It is important to ensure that they do not come too close at the top, but also do not spread out to the sides, otherwise the end result will not live up to expectations and the decorative elements will have to be re-tied.
Below is a step-by-step description of the process of creating a seamless hat. The loops for the ears are cast on from the finished product, but they can be knitted separately and then sewn on.
Main part
The example considers a hat with a height of 21 cm for a head volume of 52 cm. The product is made on circular knitting needles No. 3 from cashmere with an acrylic additive at a knitting density of 1.8 sts/cm. Work order
- 93 loops are cast on, after which the last one is threaded through the first one. In this case, you need to make sure that the typesetting row does not twist. There are 92 points left in the work.
- For knitting, stockinette stitch is used. The hat will not have a rim or flap, so to prevent the fabric from folding over the edge, it will need to be folded. To do this, after 2 cm of the pattern, purl 1 circle to form a natural fold. If you want to get a scalloped edge, you can walk a row, alternating 2 purls together with 1 yarn over. Then you need to return to the original knitting.
- To decorate the crown of the hat, decreases are made. They begin when the height of the canvas is about 17 cm from the hem. The loops are divided into 4 parts - 23 pieces each. in each. For convenience, sectors are marked with markers. You can also switch to four spokes. At the beginning of each of these groups, you need to knit the first loop, and consider the next two as one loop, knitting them together using a regular knit stitch. The last two loops in the sector are also knitted as one, but already crossed with the front one. Otherwise the pattern remains unchanged.
- Such decreases are made through the row until only 12 loops remain on the knitting needles. They need to be connected in threes: the first one is removed, and the other 2 are knitted together, then the resulting loop is pulled through the removed one. Received 4 pcs. dropped onto the working thread and tightened.
- The edge of the hat is turned up and hemmed on the wrong side.
The main part of the work is done.
Ear tying
Now you need to lay out the hat and mark the line for the ears. It will pass through the center of any of the wedges, being at the same distance from the adjacent tracks formed by decreasing the loops. Their dimensions and placement height are determined visually. For this sample, the beginning of the decorative element falls on the 9th row from the center, and its length is 20 loops. They are collected along a vertical row from the front walls of the knitted loops of the hat. After this, you need to turn the work and cast on another 20 pieces, but from the back walls of the same loops of knitted fabric.
And who can say that this is not a cat? Just sad!
Another funny model. In essence, it is knitted according to the same pattern, but the yarn is quite soft and the ears droop. What a sad cat! A style for any age from girls to older women. Very warm, double, with acrylic lining. Let's look at a knitting pattern for a women's cat-style hat on knitting needles.
You will need:
— grass yarn Gjestal Orkide (50gr/100met); - acrylic yarn (50g/133mt) - knitting needles No. 4
Read description here
Types of hats - cats
Most often, the ears on a hat are formed during the process of assembling its fabric, but there are patterns for headdresses in which they are knitted separately and sewn to the finished product. The yarn for the hat can be any:
- acrylic;
- mohair;
- wool;
- grass.
Cat hats made from grass or other fancy yarns look very natural and their texture resembles real animal fur. Most often, such models are knitted with slightly hanging ears. The style of the headdress will add originality and mystery to a woman’s image. Knitted cat hats are popular among the fair sex of all ages. They are worn by young girls and women. Such models look especially touching on little girls.
Hat ears on top of head
A completely simple, and at the same time, funny knitted hat reminiscent of a cat. Knitted from acrylic yarn, but you can choose threads of your choice - more natural, wool or mohair.
Sizes S and M You will need: - Red Heart Eco Ways yarn (70% acrylic, 30% polyester 270 met/113 g); - knitting needles No. 4,5 and No. 5. Density: 24 p. = 10 cm
To make a cat hat, you need to knit a simple rectangle
Patterns: Twisted loop: knit 2 stitches. knit right away, but do not remove from the left stitch, knit the first stitch again, then remove. Pattern “Twisted loop”: (multiples of 4 + 2) 1st (RS): 2p., * twisted st., 2p. * - repeat from * 2p: k2, * p2, k2. *
How to knit?
- Cast on with knitting needles No. 4.5 - 106/112 sts and knit with an elastic band 2 x 2 to a height of 12 cm.
- Change the tool to No. 5 and go to the main drawing. Knit 30.5/32 cm high, bind off the loops.
- Fold the hat and sew the back seam first and then the top seam in a “T” shape.
Rectangular cap
This model is the simplest. Even those who have never knitted hats before will easily cope with the task. If you use some simple knitting, you can finish such a cat hat with knitting needles in one evening. The winter version is knitted from wool or combined yarn, and for the demi-season model you can use threads with the addition of cotton. To determine the number of knitting needles or hook, simply fold the selected threads in half and twist them slightly - this is exactly the thickness of the knitting tool.
The number of stitches in the cast-on row is calculated taking into account the volume of the head and the knitting density; you also need to determine the height of the future product. Having clarified these points, you can get down to business. Step-by-step description of a knitted cat hat for a girl:
- Cast on 98 stitches with double thread on needles No. 3.
- In a rotating manner, begin to perform the front stitch. To do this, alternate a row of knit stitches with a row of purl stitches.
- When the knitted rectangle reaches a height of 18 cm, all the loops need to be closed by knitting them two at a time and returning the resulting loop to the left knitting needle.
- Now the fabric needs to be sewn along the side edges, forming the back seam. Next, the cap is turned so that the stitching is in the center, then the top seam is made.
- To highlight the ears, you need to sew the corners of the baby hat diagonally. Before this, you can put a little padding polyester there. If desired, the resemblance to a cat is enhanced by introducing additional details: eyes, nose, mustache, tongue are embroidered and long strings are tied, designing them in the form of cat paws.
You can make your ears appear more elevated. Then, having reached the desired height, only the middle 36 loops are closed, leaving 31 loops on the sides. They continue to be knitted separately, making cuts. On the right side, decrease 1 pc. at the beginning of each purl row, and on the left the first two loops are knitted together only in the front rows. When there are 25 loops left on each side, they are all closed. The back seam is made from the inside out, and the corners are stitched along the face, forming ears.
Knitted hat Pussy
Many women love collars. Why not knit cat ears and sew them onto a regular funnel hat. In this case, you knit a regular collar that you like, and separately the ears. Here's a cat hat for you. When choosing a pattern, try to stick to simple options so that the accent of the headdress is on the cat’s ears. For example, a dark gray women's hat is knitted with a tube in garter stitch (in circular rows, 1 row alternates with the knit stitch, the second with the purl stitch. When knitting “here, here” - all stitches are knit). There is no need to provide loop calculations. In this case, you can do it yourself based on what yarn you have on hand. Yes, and accuracy in this case is not very important.
- You need to knit 20 cm in a circle with the chosen pattern (in this case, garter stitch).
- Now we knit the hole for the face. To do this, continue knitting the cat hat in straight rows, not in circles, approximately 20-25 cm (depending on how wide the face hole you want).
- We close the loops, fold the top part of the hat in half and sew it on the inside.
- Separately, we knit the cat’s ears and sew them on. Alternatively, you can knit two small triangles and 2 larger ones in a contrasting color. Place them one inside the other and sew them to the cat hat. So they look more like real ears.
Cat face
We also crochet the details of the face, as the diagram shows. The nose is knitted with black threads in the form of a triangle, and then tied with 2 rows of single crochet with air loops in the corners. For the eyes, you also need to take black yarn and knit a circle of four rows, and the fifth with white. At the same time, it must be knitted under the purl jumper of the previous row so that the black edge is even. The nose and eyes are steamed from the inside through the fabric and sewn onto the cap. When wet, the eyes need to be stretched a little so that they take on a beautiful oval shape. For a more lively look, a bead is sewn onto the pupil. The mustache is embroidered with thread folded in half. Their length is approximately 5 cm.
We crochet a cat hat. part 2: winter version
Difficulty: above average
Working time: 2 days
Materials: knitting yarn, children's yarn, hook No. 2, scissors, markers, ruler, needle, monofilament
According to the author. You can knit this beauty for your little one with your own hands! Your little pussy will be irresistible in such a hat, it will not go unnoticed and it will definitely be guaranteed the admiring glances of others!
As promised, the second part of my master class is devoted to knitting the popular “Cat” hat - a winter option for kids. Therefore, I strongly recommend that you carefully study part 1 before you start knitting, because I will not dwell on many points that were outlined in detail in the first part of the master class.
We will need: bulky yarn for knitting (I use Turkish wool blend “Merino Beams” from Yarnart 100m100 g), two skeins, hook No. 4 for main knitting, hook No. 2 for tying, two short knitting needles No. 3.5 for knitting ears with ties, monofilament, needle, scissors, ruler.
I knit a hat with a head circumference of 48.
1st row: I make 3 chain stitches in the amigurumi ring and knit 13 double crochets, ending the row with a blind (connecting) loop in the third chain stitch of this row.
For those who don’t understand, look at the theoretical part of part 1!
We calculate the knitting density based on the samples that we knit according to the patterns.
2nd row: we knit 2 dc into each dc.
3rd row: we continue to make increases according to the pattern.
4th row: increase every two dcs.
5th row. Let's move on to the main knitting.
We knit the 6th row and all subsequent ones without increases.
So I ended up with 11 rows in the cap, the first four with increases and seven rows without increases with the main pattern with lush columns.
I count the number of loops and make calculations for knitting long decorative ears. Each of the ears accounts for 15 parts of the resulting volume (those who do not understand this point should again use part 1 of the master class). I mark these places with pins and IMPORTANT (!) We knit the ears using the front halves of the half-loops of the previous columns 11th row!
In this photo you can see that from the inside there should be a rib from the back half-loops of our columns.
We knit according to the pattern. The desired length is determined individually. To do this, repeat rows 2 and 3 from the diagram the required number of times.
We take the knitting needles, bend the ears towards the top of the head and put on the knitting needles the loops for the eyelets on the ties - for me this is 13 loops (this value can be different for everyone). Why knitting needles? Our yarn is too thick for a hook, so I knit them with knitting needles - it’s neater and more beautiful. But you can also crochet it if you take yarn of a similar color (length 300m/100g and a smaller hook (1.5-1.7).
I knit four rows with knitting needles without decreasing. Purl every last stitch, and in the front row I remove the first one without knitting. Starting from the fifth row, I make decreases in all front rows as follows: Slip off the first loop, the next two loops behind it, together behind the back walls, front loops. At the end of the row, when there are three loops left on the knitting needle, I knit the two penultimate stitches together on the front walls, and the edge stitch on the purl side. We knit all the purl rows according to the pattern, always removing the first loop without knitting.
When there is one loop left on the knitting needle, I put it on the hook and knit 50 chain loops of the tie.
This is how you get a neat eyelet with a tie.
We tie the edges of the cap with RLS crochet number 2. Don't forget to make reductions in the corners.
We make the second row of the RLS binding with decorative yarn. I prefer to use soft plush yarn in a suitable color for knitting for kids. A mixture of cotton and acrylic also looks good in a harness.
This is what our hat and strap looks like.
Let's start with the cat ears.
Let's look at the diagram.
I crochet these ears tightly with size 2 crochet so that they keep their shape nicely on the hat and don’t break.
I leave the ends of the threads at least 10 cm so that it is convenient to use them to sew the ears to the cap of the hat.
I knit the inner part of the ear (colored) from yarn for tying. I fold the parts of the ears and sew them together with monofilament.
Next we outline the places to sew on the ears. I do this with pins. We baste and sew on the ears.
I hide the ends of the threads at each completed stage of the work. The inside of my hats is just as beautiful as the outside.
I insulate my hat.
I sew on the fleece lining by hand.
All that's left is to decorate our pussy! I decorate the ends of the long ears of the hat with tassels or pom-poms. I make brooches using beads and ribbons of different quality, matching the color scheme to the color of the binding.
This is how beautiful and different “Cats” can be if you really try.
I knit the flower for the brooch according to this pattern, slightly altering it “to suit myself.” Specifically, I'm making three layers of petals, with the first being a single crochet stitch.
In order not to miss new publications of my master classes, click the “Add to your circle” button under my photo and you will always be aware of my news.
Thank you all for your attention! I wish you good luck, as well as easy and even loops!
Source