The history of the appearance of airy and flowing sleeves on world catwalks
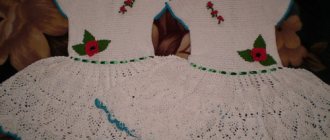
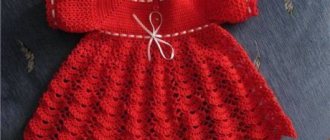
A dress or tunic with batwing sleeves can also be knitted.
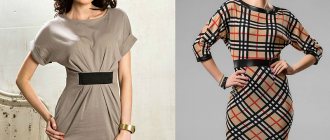
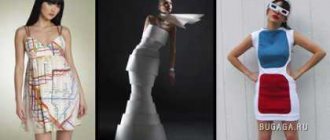
The history of a dress with a batwing cut began in the forties of the last century. In many ways, its emergence was facilitated by the Second World War. A simple cut, easy tailoring, and the ability to use rough fabrics made it popular. Many fashion historians say that this outfit is a transformation of the Japanese kimono dress. Initially, this format of clothing was a tunic with wide sleeves, belted with a belt, which resembled a kimono. The dress with wide, wing-like sleeves earned its finest hour in the eighties.
In the eighties, designers refined the silhouette so that it emphasized the virtues of the fair half and masked what needed to be hidden from prying eyes. Nowadays, the model is used not only to create dresses, but also for tunics, blouses and sweatshirts. Many Hollywood stars selflessly love this style of clothing. In our country, the cut has gained popularity thanks to the prima donna of our stage. Designer clothing models in this style became her calling card for many years.
Who will be decorated with a flying sleeve?
The bat dress suits everyone.
What is good about the bat dress model ? Because clothes of this cut are perfect for thin young ladies and ladies with corpulent figures. A short robe looks daring and sexy, highlighting slender legs, while a floor-length toilet looks elegant. A white mid-length dress is suitable as a cocktail dress. This outfit is suitable for ladies of any build.
It is worth noting that outfits with flowing sleeves love high heels. A low sole will visually reduce your height and make your hips wider. High boots or over the knee boots can add vulgarity. Classic pumps are ideal. If a woman naturally has curvy hips, then an ultra-short outfit will not hide imperfections, but will emphasize them.
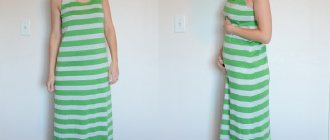
Young ladies with curvaceous figures should choose a mid-length or floor-length option. This season, dresses with wing-like sleeves have not lost their relevance. At the peak of popularity are blouses with loose sleeves that float like wings. Such clothes make you look slim, emphasize thinness and hide excess fat. The sleeves are so loose that they do not restrict movement and focus attention on the chest line. For cocktail dresses, designers added darts on the sleeves to add extra fullness. If it is worth covering your arms, then the sleeve should cover your arm in a cascading cascade; if a woman’s arms are aristocratic and thin, then a model with a slit in the shoulder area will suit her, which will highlight the grace of her arms in a favorable light. Fabric matters.
Nowadays the flying mouse pattern is used in completely different styles. This is a super-elegant evening dress, and a tunic in the hippie, boho style. Those with long legs can highlight their beauty with a tight dress made of viscose, thin knitwear or jersey. Linen tunics, combined with leggings, jeans, and short trendy shorts, are suitable for slender girls. Ladies with corpulent figures should not choose thin fabrics; it is better to choose thick knitwear, which hides everything that others do not need to know about and will show the figure in a favorable light.
Robes with a wide top and freedom of arms are loved by pregnant women. They do not restrict movement, conceal a growing belly and are worn even after pregnancy. Chiffon tunics, knitted and jersey blouses, and midi dresses are perfect for pregnant women. Chiffon dresses are perfect for special occasions, for evening walks arm in arm with your loved one, and for a cocktail party. Its flowing structure will suit women of different shapes and proportions. This dress is quite easy to sew; the burda pattern describes in detail the cutting and sewing process.
For special occasions, a lace dress with wide and airy sleeves is suitable. It is worth choosing luxurious accessories: drop earrings, a bracelet with precious stones and a leather clutch. And, of course, the kings in the world of fabrics - velvet and silk are perfect for this cut.
A flying sleeve is no more complicated than a vest, or we sew the dress ourselves
An undoubted advantage of the cut is the fact that a dress seen in a magazine can be repeated by a seamstress if her arms grow from the right place. For an experienced seamstress, making a pattern with your own hands based on a sketch from a magazine is a feasible task. An experienced seamstress will create a unique bat dress, made from original fabric, and make her own adjustments to the image. If you are familiar with the basics of cutting and sewing, then creating your own designer “flying mouse” dress is quite a feasible task. For a simple dress or tunic, a knitted pattern is suitable. Using a pattern to cut a dress is no more difficult than a child’s shirt, and it looks impressive.
A knitwear pattern for beginners is just a rectangle in which an armhole is made and a sleeve is cut. If the dress has a one-piece sleeve, then the pattern should be lengthened. When cutting, it is worth considering how the neckline will be designed, whether it will be a boat or a collar, or maybe it is assumed that the dress has a deep neckline on the back. It depends on this whether the back and shelf will be the same length or different. If the neckline is boat-shaped, then the back and the shelf will be of equal length; in all other cases, the length will be different.
The model assumes that the hips will be covered. Hip width is measured as accurately as possible. For the pattern, you need to know ¼ of the hip circumference, plus for a comfortable fit you need to add seam allowances, a centimeter is enough. To prevent the sleeve from looking shot, it is necessary to take measurements from the beginning of the neckline to the required length.
The fabric is cut from the wrong side. The pattern is positioned so that the center line coincides with the fold of the fabric. It is worth noting that the main feature of the model is the flying sleeves. If you decide to sew a dress yourself, then you should not take thick knitwear, it simply will not create the desired flying effect; it is also worth considering that too thin flowing fabrics can be quite difficult to work with. As you can see, a silhouette with wide wings, that is, sleeves, is quite easy to sew yourself if you have done at least a little sewing before. The wide sleeve cut is versatile and practical. Women's love for this robe is understandable; the robe is easy to sew, comfortable to wear, and this is the sexiest dress model.
This type of clothing is suitable for both a formal occasion and everyday wear. It all depends on the material and accessories. A mini-dress with a cut like a night mouse in flight, complemented by high heels, excites absolutely all men, it emphasizes beautiful long legs, emphasizes the slender figure of its owner, while the closed top leaves a mystery. Those with curvy figures love this model for hiding figure flaws. A toilet with such a cut makes women much slimmer and does not hinder movement at all. Rarely does a dress model suit absolutely all ages and look so harmonious. Now it is fashionable to wear tunics of this cut with sneakers and other sports shoes. If a woman is not tall, then this combination can make her visually shorter.
When choosing clothes, it is worth remembering to maintain proportions. If the proportions are not chosen correctly, the effect that the woman expects will not occur. She will consider that this cut is not for her and will refuse it forever, although with a different length it will look completely different on her figure. A woman should know what she should emphasize, what advantages of her figure should be shown and how to do it. With the help of clothes you can elongate your silhouette, make your legs visually longer, your figure slimmer, and your chest high and toned. An outfit that fits the hips and gives freedom to the arms accomplishes these goals.
Cutting and sewing
Instructions for cutting and sewing the product:
- Fold the fabric in half, right side down.
- Attach the pattern with pins to the fold of the fabric.
- Trace the outline.
- Add seam allowances.
- Remove the pattern.
- Connect the parts with a hand seam.
- Try it on.
- Correct inaccuracies.
- Sew on a machine.
You might be interested in this. We create a pattern and sew a beautiful and simple bandana.
Turning
For turning you need:
- Cut out the facing from fabric or non-woven fabric.
- Move the line of the neckline of the back and front.
- Stitch the parts for facing.
- Sew edges.
- Attach the facing with pins to the neckline.
- Sew on a sewing machine.
- Iron the part.
All patterns are suitable for both adults and children. The style is distinguished by the ability to combine practicality and uniqueness in one image. When using knitwear, you can sew a coat with this type of sleeve. The magazine "Burda" presents many patterns for knitting and sewing products. If you have experience, you can even sew a children's jacket of this style.
Pattern
For sewing you will need:
- stretch fabric;
- sewing thread corresponding to the fabric;
- pencils;
- tailor's chalk or special marker for marking on fabric;
- sharp scissors;
- paper;
- tape measure and/or ruler.
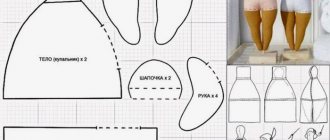
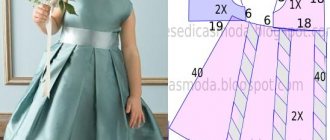
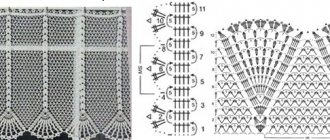
We draw the T-shaped part (of the body), the intersection of the lines of the sleeves and the length along the back. Knowing our personal sizes and measurements, we draw a neckline of the required depth depending on the size and desired length of the sleeve, and increase the lines of the T-shaped part to the desired size. For a beautiful drapery, add 10 cm to the details of the upper part of the dress and 15 cm to the sleeve length. After the “T” part, we omit two segments that correspond to the length of the arm circumference + 1/2 the arm circumference divided by 2. We calculate the bottom line using the sleeve principle, and measure it along the line just below the waist. The picture below shows the cutting of the fabric of all parts of the dress. One of the important nuances you need to know is that the stitching of the upper parts is carried out along the diagonal edge, there is no need to make a seam along the shoulder.
Bat dress pattern
Pattern construction options
When creating a pattern, most often the seamstress chooses one of the following methods. It is important to strictly follow the sequence of actions, since the quality and style of the future product depends on this.
You might be interested in: How to properly sew lace to the bottom of a dress
Bat pattern
How to build a classic sleeve
The classic type is a loose style without any additional darts on the chest. The product can be modeled on a standard back pattern.
Important! The exception to this method is large breasts. In this case, it is recommended to use the below method.
When constructing, the cutout is 2.5 cm deep. When constructing the pattern for the neckline, the formula R = 1/6 * Osh + 1 (Osh - neck circumference) is used.
Classic sleeve option
When creating a pattern, the seamstress must independently model the item according to the style.
Step-by-step instruction:
- Place vertically up 1 cm from the last mark on the shoulder.
- Draw a shoulder line passing through the point from step 1.
- Extend the line.
- Place the shoulder length + sleeve length measurement along the line from step 3.
- Draw the bottom line according to the measurement Wrist circumference * 1/2 + seam allowances.
- Add a raise.
- Draw a rounded bottom line, turning into a side line.
How to model a sleeve for large breasts
In some cases, a girl has a big difference between the DTS and RTA measurements, and it is recommended to adjust the shelf pattern.
Instructions:
- Take measurements: chest height, chest center.
- Determine the top point of the shoulder at the shoulder seam.
- Move 3 cm away from it to the right.
- Draw a vertical line down, the length is equal to “Chest height” - 1 cm.
- Place a measurement equal to ½ of the “Center of the Chest” horizontally to the right of the center of the shelf.
- Draw a dotted line to the bottom seam.
- Cut the diagram along the line, expand the accident according to the measurements.
Afterwards, a chest dart is formed on the shelf. It can be done either on paper or using folds and tucks.
Sleeve pattern for large breasts
How to make a sleeve pattern with a rounded shoulder
This model has a significant angle to the shoulder seam; it is looser near the armhole and looks like a seamless raglan sleeve. When creating a pattern, a basic back pattern is used.
Instructions:
- Determine the extreme point of the shoulder.
- Set aside 1 cm vertically upward from the point.
- Draw a line through the point and extend upward.
- Set aside DP+DR along this segment.
- Measure a 90 degree angle.
- Draw a line for the bottom of the sleeve equal to ½ HP + increase. The size of the increase depends on the model of the item and the type of fabric.
- Determine the bottom point of the back armhole.
- Set aside 4-10 cm vertically from this point, depending on the model.
- Draw the bottom line of the sleeve, which will go into the side line.
You might be interested in this Instructions for creating a beautiful fabric brooch
Sleeve pattern with rounded shoulder
How to make a sleeve without a side seam
The large amount of material in the armhole is the main difference of this style. This model has a seam at the waist.
Instructions:
- Determine the point of connection between the waist and side lines.
- Draw a segment at an angle of 45 degrees.
- Set aside “Shoulder Length” + “Sleeve Length”.
- Determine the extreme shoulder point.
- Draw a curved line.
- At the bottom, the sleeve width is equal to ½ HP + increase.
Additional Information! It is important to remember to allow 1.5 cm seam allowances when cutting the product.
Short sleeve
Girls do not need to hide their hands behind long sweaters. The warm season is a great occasion to sew a product that has short bat sleeves.
Short sleeve pattern
Since this style does not provide for the presence of a dart. The fabric should be dense and elastic.
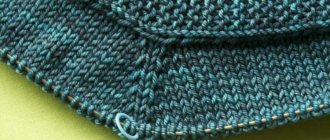
Oversized dress pattern with dolman sleeves
In conclusion, we offer a pattern for those who prefer knitting to sewing. This is a simple pattern with a simple pattern - English rib. Nevertheless, the dress looks very flattering, fashionable, and is suitable for any figure.
How to knit an oversized dress:
You will need melange wool blend yarn (6 skeins of 250 meters each, if size 46-48).
- Cast on 115 stitches, with increases every 7th row. Half English rib (single crochet on one side).
- English elastic band 1*1. We add loops so that we get a wedge, i.e. in the center. From 7 center loops on both sides, in every 7th row plus one loop.
- Increase from stretching between 2 loops. Cross the thread from the broach and make another loop.
It should be noted that the dress is knitted with English elastic on one side, and the other is knitted as the stitches look. The back and front are knitted separately and then sewn together. Finally, loops are made along the edge for the flying sleeve, and 1*1 is knitted to the required length.
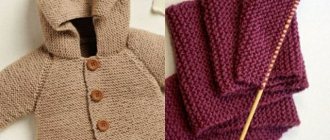
WE SEW A COAT WITH A HOOD AND “BAT” SLEEVE
For those fashionistas who do not yet have a coat that has been fashionable for several seasons in their wardrobe, in this article we will tell you how to sew such a coat with your own hands. Thanks to the Internet, now you can easily find a suitable pattern, but if for some reason this is not possible, then you can easily make such a pattern yourself.
I would like to note that the sketch of this coat can be used as a basis for many other models. For example, using this pattern as a basis, you can easily sew a similar product, but with a wrap.
Well, now let's get straight to work. It should be taken into account that in this model, for a more durable connection of the parts, a double seam is used; it is often used when sewing jeans. To ensure that such a seam does not bring unnecessary trouble, it will be necessary to iron all the folds.
First you need to prepare the fabric for work, which you will need about 3 m (provided that its width is 135 cm) and don’t forget about the braid (you need to take it 1.5 cm wide and 2 m long).
So, after you have laid out the pattern pieces on the fabric, you need to add another 9 cm to its bottom edge, this is necessary in order to make a border. In addition, do not forget about the seam allowances; for them you need to leave approximately 1.25 cm, and for double seams - approximately 2 cm.
After you have cut out all the details of the product, we will move on directly to sewing the product. To begin, take the pocket strip, which should be placed on the inside of the pocket (aligning them evenly), fasten it with pins and make a stitch. The resulting seam must be smoothed out, making sure that the allowance is located in the direction of the valve. After this, the allowances located on the longest part of the bar must be folded over this seam and ironed.
Once this is done, we place the bar in its permanent place and stitch it. And we put a decorative stitch along the top of the pocket. Iron the seams and attach pockets to the front of the coat.
Fold the front and back of the coat, inside out, and sew the shoulder seams. To make these seams strong enough, we reinforce them with braid, which is attached using two lines.
We take all the sleeve parts and connect them to the armholes in the main parts so that their wrong sides are at the top. We trim their edges, put a special ribbon on them and make two machine stitches in a circle.
Then the sleeves themselves are folded inside out, fastened with pins and connected using a double seam.
To prevent the belt from slipping off the waist, it is necessary to make special loops into which it will be inserted. Two such loops should be placed on the side seams approximately 12-13 cm from the armholes. And we attach the third of them from the inside to the back of the product, so that later it will be more convenient to hang it.
Now let's move on to the hood, its parts must be pinned together so that the front side is on the outside and they must also be sewn with a double seam. The resulting hood is attached to the recess on part of the product, trying to align all the edges evenly, pinned and stitched. Excess fabric will need to be cut off.
The bottom edge of the coat needs to be folded 7.5 cm and a stitch is made on the front side.
Take all the details of the cuffs, fold them on top with the wrong side and make stitches along the short edges. Then we put them on the sleeves, with the front side of the sleeve on the inside and the cuff on the outside. We fasten and sew a line in a circle. We bend the remaining allowances in the direction of the cuff and carefully iron them. After that, we bend the edge of the cuffs and sew them on the front side.
Now it's time to connect the hood and front panel. This must be done with the wrong sides inward, after which you need to iron the seam. Then we bend the bar itself and its edge by about 1-1.5 cm, fasten it and make a line along the front side.
Well, the last detail of our coat remains - this is the belt. Bend its shortest edge by about 1.25 cm and iron it slightly. Now you need to fold the belt in half along its long side and stitch it from the inside out. We turn it inside out, smooth it with an iron and put a finishing decorative stitch on the front side. That's all, all that remains is to steam the finished product and it will be ready to wear.
https://sovety-modnicam.ru/palto-s-kapyushonom-i-rukavom-letuchaya-myish.html
Related Posts
Comments and pings to this post are prohibited.
domosedkam.ru