If you have time to sew toys, but have very little experience in this matter, use our step-by-step master class, which tells you how to quickly sew a toy snake with your own hands. This toy will be a great gift for children and adults!! And most importantly, sewing a soft toy snake is easy and simple! By the way, you can also easily and simply knit any toy with crochet or knitting needles.
Whether you are a master or a beginner, it is very easy to create a similar pattern for private use! To keep the head and upper body of the snake vertical, when stuffing, you need to insert a thick bendable wire.
The size of the snake from our master class is 20 cm, it is sewn from fleece and cotton, stuffed with padding polyester, but beginners can use any other available material.
So, how to sew a toy snake at home? Let's look at the step-by-step instructions.
Pattern for sewing a snake with your own hands step by step
We draw the snake pattern ourselves or use ours.
Well, where the body is is immediately clear, but the part next to it is part of the head, you need 4 of these parts.
We cut out the resulting drawing. Next, transfer the pattern to the selected fabric. As you can see from the first photo, turquoise and white fleece was used.
Place one piece of fabric on top of another and cut along the outlined outline.
We carry out standard procedures - sew it, turn it inside out, fill it with padding polyester (or something else, padding polyester would be the best option). Since the body of the snake toy turns out to be quite long, we had to (which we advise you to do) make an additional hole, first stuff through it, then the rest. Another tip about filling - do it quite tightly, then the snake can be modeled in different poses, it will perfectly “hold its head”.
Fabric kite (no sewing)
I spent no more than $40 on materials when creating this kite.
The entire process of creating this wonderful kite took me 8 hours. This is the snake I ended up with:
Step 1: Materials and Tools
My goal was to use the most inexpensive and accessible materials that can be bought in any store. Please note that I didn't have to look for many of the materials, so your kite may cost more.
Materials:
1. Durable nylon. I bought a meter of each color. This amount, according to my calculations, should be enough for 5 kites. 2. Six wooden dowels (0.6 cm in diameter, 92 cm long) 3. Vinyl tube 61 cm long, 0.6 cm in diameter. This tube will hold the dowels together. 4. Fabric glue. You can choose the cheapest one in the store. 5. Superglue. Necessary to firmly adhere the fabric to the vinyl tube. 6. Special fishing line or rope for winding/unwinding and controlling the kite in the air. 7. A pack of safety pins (if desired, can be used to hold pieces of fabric together while gluing it to the wooden base of the snake).
Tools:
1. Scissors 2. Marker with a fine tip for marking on fabric and dowels. 3. Cardboard box for creating a layout (optional). It was easier for me to measure out the triangular kite layout on cardboard so that my kite would end up symmetrical. 4. Tape measure and straight edge (36 inches long) for calculations. 5. Protractor - for measuring angles in a triangular kite. 6. A regular pencil sharpener - we will use it to trim the edges of the dowels. 7. Hacksaw and miter (optional) - to cut off part of the wooden dowel. 8. Large nail – should leave a hole that a wood dowel can go through.
To work, I advise you to spread the fabric on the floor, it will be more convenient to do the calculations.
Step 2: Build the Foundation
What we need:
wooden dowels (3 pieces 91 cm long, 1 piece 6 cm long, 1 piece 7.2 cm long), vinyl tube, nail, scissors, tape measure, marker.
The vinyl tube should be long enough that you can fit the wood dowels into it. The vinyl tube will need to be doweled and cut later (NOT NOW). Therefore, the length of the tube can be calculated based on the sizes of the parts:
• 1 tube 7.6 cm long; • 6 tubes 1 cm long (for connecting crossbars); • 2 tubes 1.3 cm long (to secure the outer tips of the “wings” of the kite so that the fabric does not come off).
1. Measure the length of each key. 3 keys do not have to be cut at all, whereas 2 keys can be obtained by cutting one. I used a miter and a hacksaw to cut the dowels. You can replace these tools with scissors, but then you will have to work hard to cut straight.
2. Use a pencil sharpener to round the edges of the dowels. There is no need to sharpen it, just round it so that the keys can be pushed into the vinyl tube. Look at the photo.
3. Measure one and a half centimeters from the edge of the vinyl tube and make a mark with a marker. Then insert a nail perpendicular to the tube in place of the mark. Look at the photo.
4. Now you need to insert the key into the tube. This will take some time and effort. How to do this - look at the photo.
5. As soon as the first key has been inserted, you can measure a length of 1 cm and cut it off.
6. Repeat for all keys: • to fix the tip, the “nose” of the kite, you will need a key in a tube 7.6 cm long; • two 92 cm long dowels will require 2 vinyl tubes. One 91 cm long dowel will need a vinyl tube in its central part. This is quite difficult to explain - follow the step-by-step actions in the photo.
Step 3: Measure and Cut the Fabric
What do we need
: nylon, marker, scissors, tape measure, straight edge, protractor.
I drew a sketch of my kite on cardboard in advance and cut out the layout. Thus, I got a symmetrical layout, which I just had to attach to the fabric, trace and cut out along the contour.
I had to tinker with trigonometric calculations. To make it easier for you, here is a picture of the measurements I used:
Please note that the 2 edges are 1.5 cm longer. This margin is necessary to glue together the “sleeves” into which we will insert the key.
Step 4: Glue the fabric pieces together
What we need:
dowels, fabric glue, pieces of fabric you just cut out, safety pins (optional).
Note:
you need to glue one of the 19-inch pieces into a sleeve. The other part will be used to glue two pieces of fabric.
For beginners, the longer piece of fabric will be wrapped around the longest dowels. Next I made the sleeve by gluing the nylon around the edge and inserting a dowel as shown in the photo.
Now it's time to glue one piece of fabric to another. Take the piece where there is no sleeve for the dowel, and trim it to 0.5 cm. Glue it as shown in the photo, do not forget to insert the dowel into the sleeve before gluing.
Let the glue dry for several hours.
Step 5: Connecting the base and fabric
What we need:
tape measure, parts of the kite that you have already made - fabric base and wings, superglue, fabric glue, extra dowel to smooth out the roughness from the layer of glue on the fabric.
Prepare the fabric:
You need to measure and make cuts along the edges to insert the doweled vinyl tubes. The cuts should be at a distance of 9 cm and 32 cm from the “spout”. Detailed process in the photo.
Insert keys:
To create the outer strips of the kite, take two dowels in the vinyl tubes prepared earlier.
1. Starting at the “nose”, carefully insert the dowel into the fabric sleeve. 2. Once you reach the first cut, slide a piece of vinyl tubing onto the dowel as shown in the photo below. 3. Continue to push the dowel down the fabric sleeve, being careful not to move the vinyl tube on the outside. 4. Repeat step 2 for the next vinyl tube when you reach the second cut in the sleeve. 5. Thread the dowel to the end of the sleeve, and do the same with the other “wing” of your kite. Assembling the central part: In the 19-inch sleeve, which is obtained in the middle after gluing the two halves of the fabric, you also need to make two cuts to insert a short dowel. 1. The outer strips are now in the sleeves along the edges of the “wings”. 2. The top layer of the sleeve must be cut in the middle in order to insert a dowel, which must be held together by vinyl tubes at both ends.
A few finishing touches:
Now we need superglue. It is very important to use superglue to secure the tips of the kite’s “wings” so that they do not come unglued or fray during acrobatics in the air.
1. Use three-inch vinyl tubing to secure the spout. Now use super glue to glue the fabric to the vinyl tube. 2. One and a half inch vinyl tubes from the base of the kite should be attached to the tips of the outer planks. Use superglue to glue the fabric to the tubes. 3. Apply fabric glue to the back side (the only edge where there is no dowel). To prevent the glue from bubbling, straighten the fabric with a dowel.
Voila! Finally, we have a kite that can perform acrobatic tricks.
Step 6: Attach ropes to control the kite
What you will need:
rope, twine (60 meters), scissors, kite.
In total, there are 6 connecting points (3 on each side), they should be located as in the photo.
I made a loop at one end of the loop, cut the rope into 6 pieces, each 61cm long. Then I attached each rope to the kite at the connection points. To do this, I wrapped the rope around the key and threaded the loose end into a loop, thus tying it around the key.
Measure, without cutting yet, the length for each tied rope: • top rope (21 cm); • bottom rope of the outer bar (16.5 cm); • bottom ropes on the inside (14 cm).
1. Measure each rope and make a mark with a marker. 2. Once all the ropes have been marked to the required length, take 2 ropes from the left side and 1 bottom middle rope and line them up according to the marks. 3. Apply superglue to all three marks to secure the three ropes together. 4. Once the superglue has dried, tie a knot in all three ropes. To secure the knot, I dribbled superglue onto it. 5. Repeat all these steps for the right side of the kite. Excess pieces of rope can be cut off after the glue has dried. Don't forget to check the photo.
Guide ropes.
You will need two ropes to control the kite in the air. One is for the right hand, the second is for the left. Each of these ropes should be about 25-30 m long. The photo explains in detail how to connect these lines to the base of the kite. Make a loop at the end of each rope and follow the instructions in the photo!
Step 7: Test the kite!
What you will need:
a kite, ropes for control, an area where you can “catch” the wind at 15 mph, another vinyl tube, scissors.
The length of the 3 ropes used for control can be changed by wrapping them around the dowels.
The top rope must be adjusted in length, otherwise your kite will simply lie without taking off anywhere, or bounce above the ground. To better control this rope, I wrapped it 6 times around a short horizontal dowel.
Experiment with other ropes until you achieve optimal control of the kite.
To create a handle, use a vinyl tube to control all the ropes evenly to control the kite. I made a loop at the end of the rope and cut the tube in half. I threaded the end of the rope with the loop into the vinyl tube, and then I passed the entire length of the tube through the loop. The result is a comfortable handle that does not cut into your hand.
It's time for our kite to fly!
To fly a kite, stand with the wind at your back and slowly adjust the kite's position with the ropes until it is almost vertical. Pull both ropes a little and the kite will lift off the ground and begin to fly.
To turn in the air, pull the left rope. Accordingly, to turn right, pull the right rope.
Become the author of the site, publish your own articles, descriptions of homemade products and pay for the text. Read more here.
Attach the head to the finished product
It's the head's turn. From the piece that was in the pattern, we cut four blanks. We decided to make a two-color head, so we made two of one color and two of another. Next, we fold the same-color parts and sew them halfway, from cross to cross.
Now we connect the multi-colored parts to each other, sew them together, leaving a hole at the back of the head. We stuff the body through it after turning it inside out, then we sew it together with a hidden seam.
Next we make the nostrils and eyes. For the eyes, you can use large beads, buttons and whatever your imagination tells you. Eyebrows can be embroidered.
We put the head to the body, bait it in four places, maybe more. After this, sew tightly with a hidden seam.
In order to make the toy snake prettier, you can knit a hat, scarf or other decorations. Or you can even knit the toy itself - read about knitted amigurumi toys.
We hope you liked our step-by-step master class for beginners, and now, showing off the finished snake toy, you will proudly say “I made it myself!” See you again!
How to sew a six-meter snake - a boa constrictor from a cartoon. — Toys — Elena Guseva’s website
I recently received an order to remake a 12-meter boa constrictor.
It was necessary to sew 4 six-meter ones from it. And I calmly cut one boa constrictor in half lengthwise and in half crosswise. Sewing 24 meters in a straight line is not difficult. That's what I thought. But the difficulty turned out to be different - you need to stuff them somehow. It was impossible to push holofiber inside. The hand simply did not fit into the new format of these snakes. The old super-kite was sewn from a strip of fabric 30 cm wide. And the new ones turned out to be 15 cm long. The girth of my hand is 20 cm. Okay, I thought, I’ll stuff the filling into the snakes using some kind of stick. And then it turned out that a thin and long stick was completely unsuitable, because it could not compact the filler tightly enough. I didn't want the snakes to be loose and rag-like, I wanted to achieve a dense filling. Okay, I took an ordinary kitchen rolling pin, which I use to roll the dough - the diameter is exactly what I need, only here the length is too small. It turned out that you only need to stitch 30 cm to make it convenient to fill, then turn this section inside out, stuff holofiber inside and then stitch the next similar section. Just to stitch, you need to turn it inside out, and the part on which the fabric is turned should not yet be stuffed. And there you already need at least 5 cm for the lapel, and then you gradually sew and every 5-10 cm you turn it away and pull it up until you reach 30 cm. That’s how I “sawed” these 24 meters at 5-10 cm for several days ???? The fabric is dense, reminiscent of carpeting, quite pleasant to the touch if you run your hand over it once. I did it more than once))) it’s funny to say - calluses formed on my palms from stuffing snakes, my arms and shoulders ached as if from working in the gym))))) Of course, I can recommend sewing in a zipper. There are a lot of zippers along the seams - stuff them through these holes, and then just fasten them and that’s it. This is exactly how the first giant boa constrictor was built. I tried to sew in a zipper for a long time, but in the end I realized that it was impossible to do it properly on such a product.
The diameter is too small - the cross section is only 5-6 cm with a length of 6 m. You need some kind of special machine, but I have a regular one. Despite all my diligence, the zipper did not want to be sewn in beautifully and evenly, and I don’t like to distort it.
After suffering with zippers for a day, I began to sew it up tightly, slowly “sawing” piece by piece ???? And this is what I saw as a result:
- Their tongues are funny - one has silk, the other three have velvet)))
And I tried to make the lips of one of them out of bias tape, but my daughter told me that it wasn’t beautiful, so I made the rest without tape. In place of the eyes inside the head, in order to give the desired bulge in the form of eyebrows and create a cavity for the eyes, I vertically sewed buttons approximately the same size as the eyes.
All this wealth took up half the room and weighed 10 kilograms - in four bags I barely got it to the customer????
I forgot to write that those blue squares that are sewn on the surface are Velcro, its soft part, and the other part of it, where the hooks are, will be sewn on some additional attributes - I don’t know what yet. Previously, a large boa constrictor was decorated with snowflakes on Velcro, well, as you yourself understand, it can be anything - it depends on the scenario of the event where these snakes will be used.
Well, what can I say - a unique experience was obtained! I recommend it to everyone - sew snakes with your own hands! ????
Source: https://stavsneg.ru/p/kak-sshit-shestimetrovuyu-zmeyu-udava-iz-multika
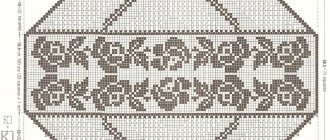
Pattern
How to sew a mouse: step-by-step master class
We start by printing or redrawing the pattern from the screen. We cut out the paper blanks and apply them to the fabric. Trace and cut again, not forgetting to add seam allowances. The number of fabric parts is indicated on the patterns in the photo above. Here's what we get:
- We fold the blanks cut out of fleece in pairs and sew, leaving holes for turning inside out.
- At the bottom of the body we sew an oval base, leaving a hole.
- Turn the workpiece inside out.
- We stuff the part with holofiber.
- Turn out the tail, paws and ears.
- We sew up the holes on the parts.
- We fold the sides of the ears and sew them to make the ears look more voluminous.
- We sew ears, paws and a tail to the body.
- Sew on the nose and eyes using black beads.
Mouse made of fabric in the form of a Christmas tree toy: video mk
All that remains is to tie a red satin ribbon around the little mouse’s neck and the toy is ready! New Year is perhaps one of the best holidays of the year! We start preparing for it no later than the beginning of December - we need to find a new salad recipe, come up with outfits, invite guests and prepare gifts.
Pattern
How to sew a mouse: step-by-step master class
First, print out the pattern or redraw it from the screen onto paper and cut it out. Next, we transfer the pattern to the fabric and cut out all the blanks.
Then we sew the body together with the legs by hand or on a sewing machine, and turn it inside out. We cut out the paws from pink felt.
- We sew the head together with the ears.
- Now we fill the head with holofiber:
We make a tail from thick yarn and attach it in the right place. We tie a knot at the tip. We stuff the body of the mouse tightly with holofiber and sew on the head.
- We cut out a circle nose from pink felt and sew it in a circle with a basting stitch, stuff it with holofiber and tighten it.
- Sew on the nose and embroider the eyes.
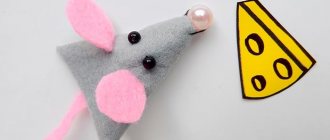
DIY soft toy mouse
Another, this time the last option for sewing a mouse. A simple pattern, a minimum of materials and time spent make it accessible even to beginners in sewing! .
For work we will need the following tools and materials :
- any dense but soft fabric (I sewed from purple fleece);
- pink fleece or flannel for the inner ear;
- filler;
- black beads;
- sewing threads;
- needle;
- red ribbon;
- sharpened scissors;
- pattern (printed or paper + pencil for redrawing).